First off, I just wanted to mention that the last couple of months have been pretty busy on the customer service and support side of things, especially as we were coming down from our busy winter season, which meant that response times were a bit longer than usual. I’m happy to share that we did bring on another support person to our team with a lot of hands on experience being a former customer, which means we now have five full time staff for customer support, plus, some of our engineers and product management team also involved in the customer service and resource development.
We’ve now caught up on tickets and replying back on our typical timely manner.
With the AltMill 4×8, ATC, and a bunch of other stuff going through our pipeline, we anticipate our demand for support to continue to grow, so if you’re interested in joining our customer service team, feel free to share with us here: www.sienci.com/work
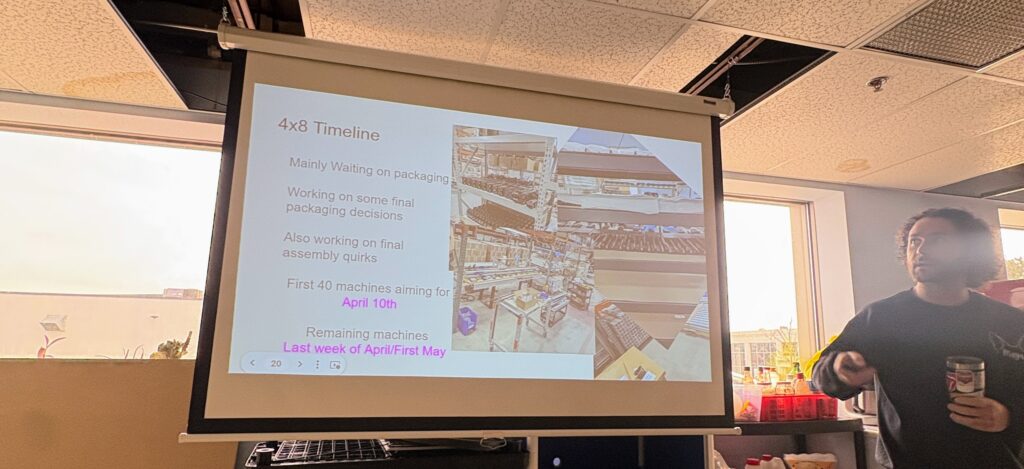
AltMill 4×8
Mike presents the upcoming timeline in the company townhall
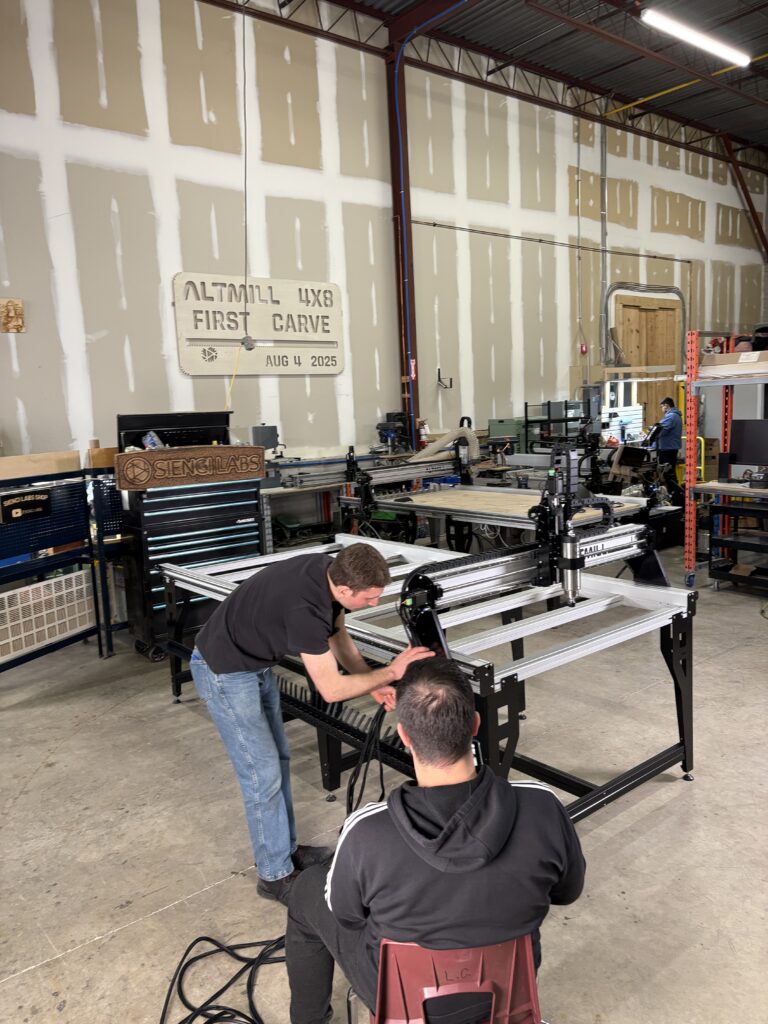
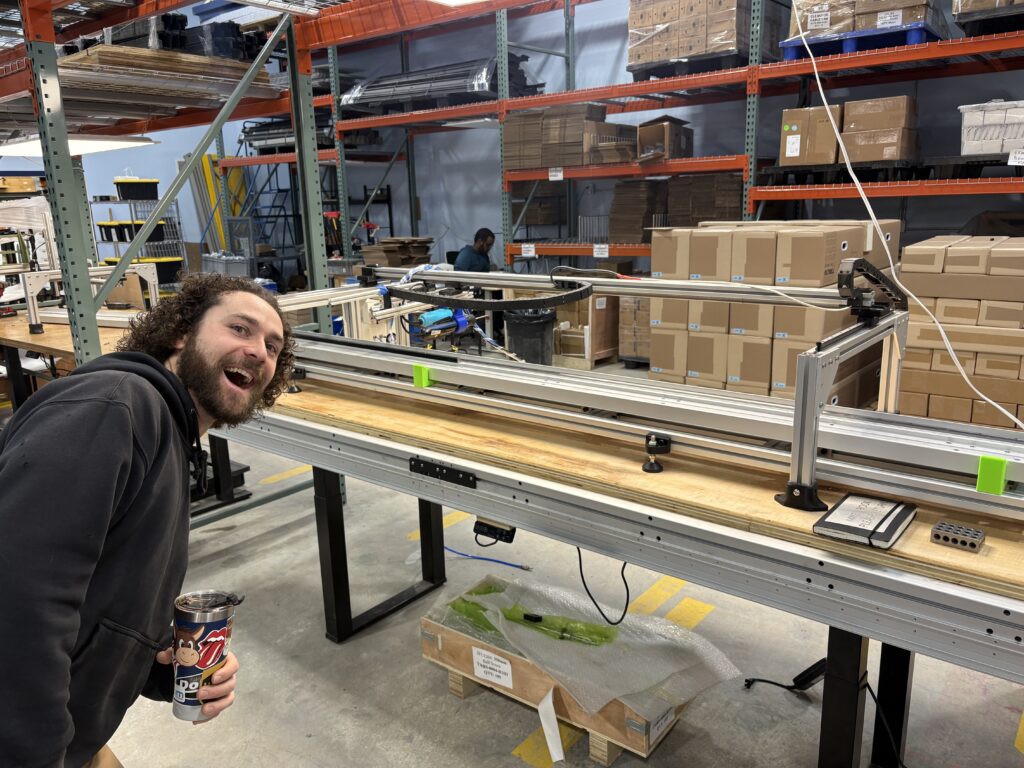
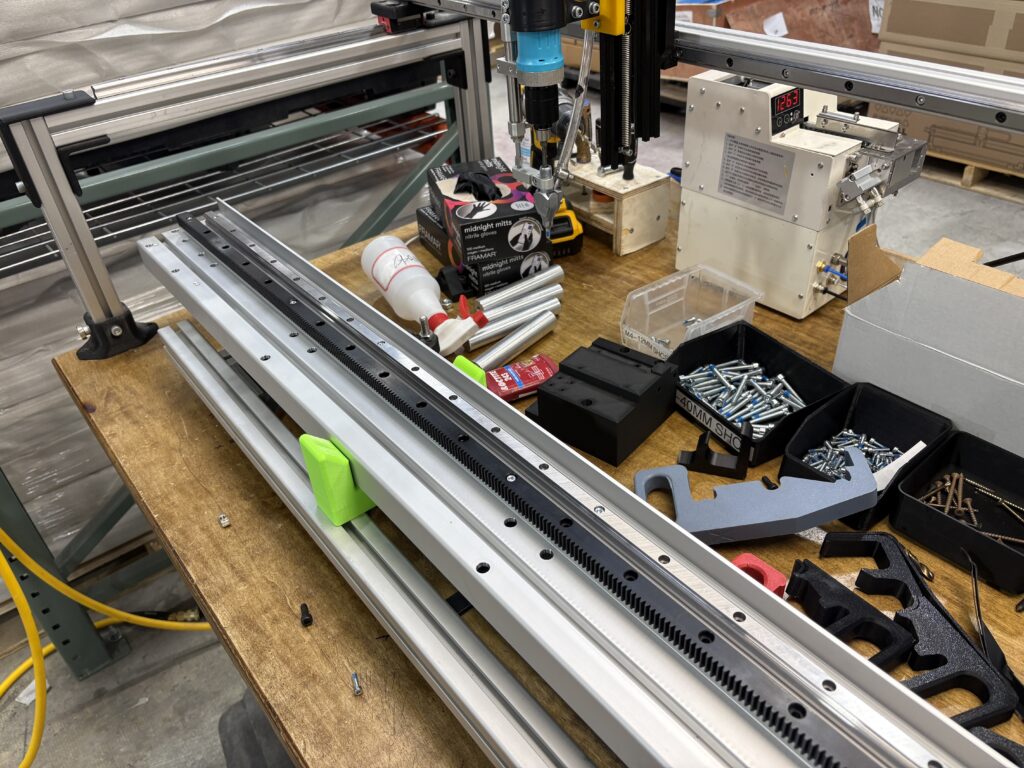
We have been full swing on AltMill 4×8 production, with a bunch of stations now set up for assembly of the new machines. However, we have been delayed a few weeks, and current first machine shipping date is set at April 10th April 17th. Due to some components being off tolerance and needing rework, we are putting extra effort to make sure that the first batch of machines don’t have early stage issues. Some things that are being addressed include:
Pitch error on the racks
Tooth profile tolerances on the pinons
Gearbox backlash
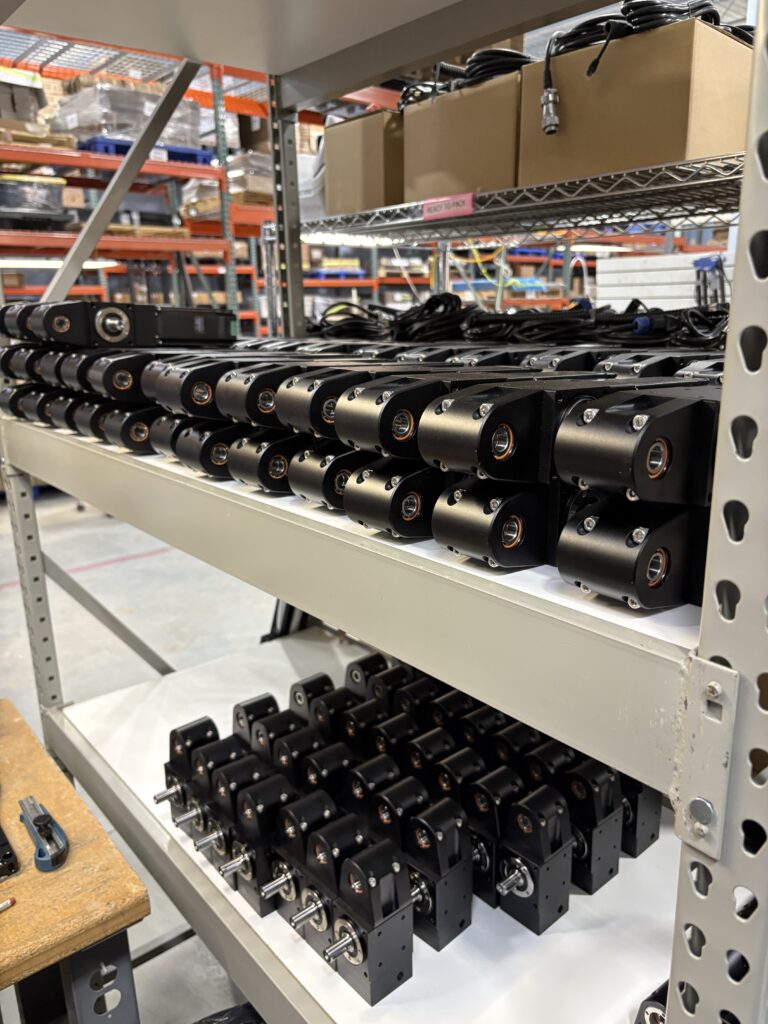
On the bright side, we have ordered enough extra parts so that even with a higher than typical number of QA rejects, we are able to fill a substantial number of the first batch. We are also working on remaking parts to ensure that we can complete the rest of the production batch. We are building and assembling as much as we can as we work through the process in the meantime.
We are also now in production of batch 2, bringing additional considerations and QA processes to reduce potential issues and delays.
In other news, the engineers and marketing team have been working on putting together the full assembly resources and videos over the last few weeks, getting ready to post once the machines start shipping.
Filming and creating content for the assembly processAssembled units for the gearbox and swing arm mechanisms
LongMill MK3
A lot of work/progress so far with the LongMill MK3, with most of the work done around general testing and reliability.
We have now completed a round of rigidity testing to compare between the LongMill MK3, LongMill MK2, and the AltMill. Check out the results on our blog. (TL;DR) = the LongMill MK3 is between 65-80% more rigid than the LongMill MK2, signifying a big jump in performance.
In other news, we continue to work on the development and production of the LongMill MK3. We have now ordered the majority of the components needed, with the exception of controllers and power supplies which are still in development. Based on current timelines, we expect to open up pre-orders mid-May, and start shipping in and around July.
Deflection testing on the LongMill MK3
In other news, we’re clearing out of the last set of LongMill MK2.5s . We have around 50 of the 30×30 and 50 of the 48×30 in stock, so if you are looking to get one of those machines, they’ll probably still be available for the next few weeks before we sell out.
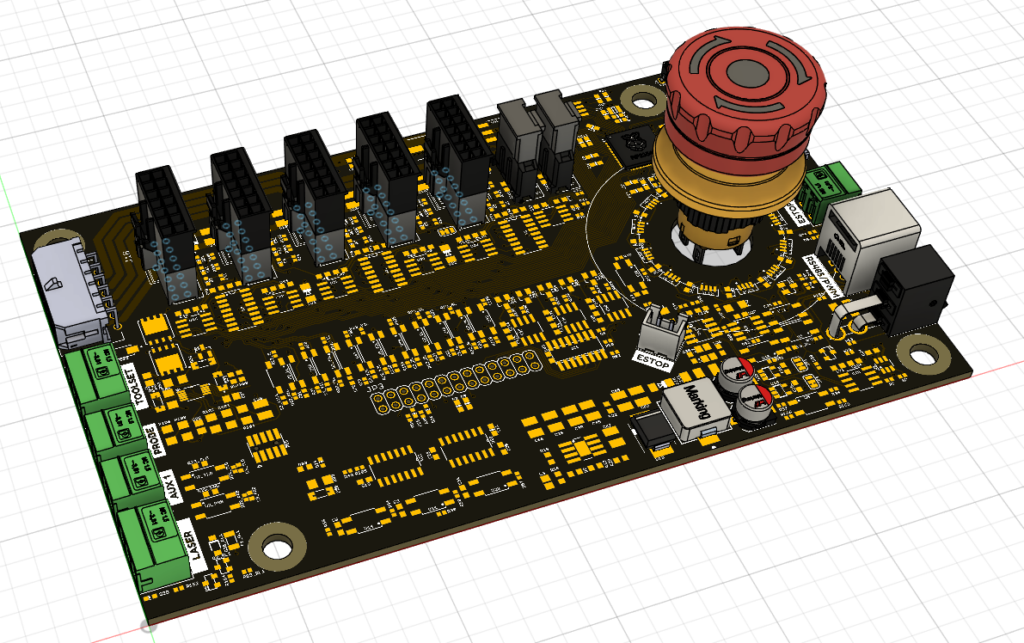
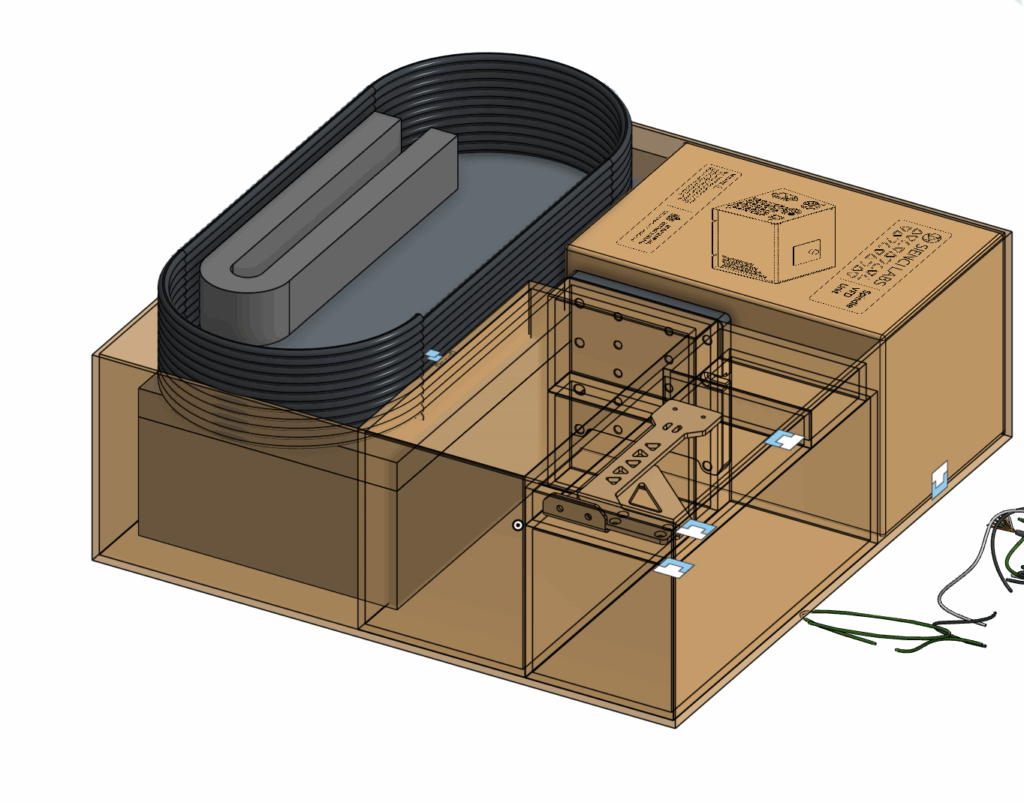
SLB-EXT V2 and SLB-LITE
We have made a few key decisions around the SLB family of controllers. First, naming:
SLB-EXT V2: The new successor to the original SLB-EXT currently used on the AltMill. The SLB-EXT V2 is designed specifically for the AltMill and power handling of 48V.
SLB-LITE: Designed specifically for 24V architecture of the LongMill.
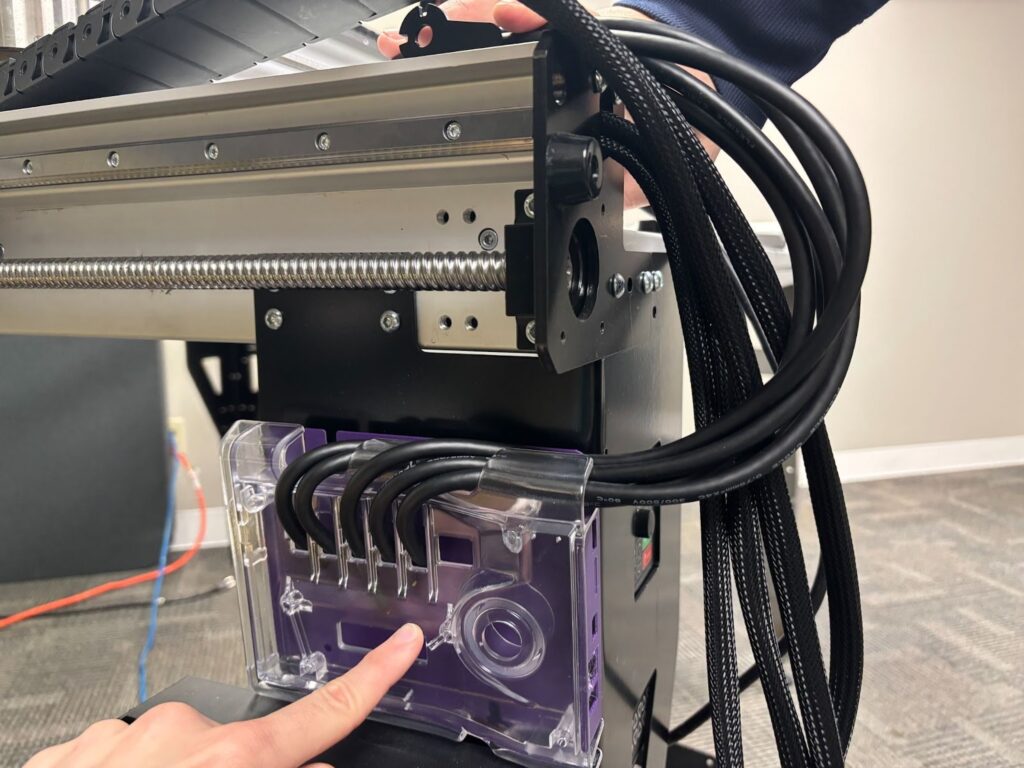
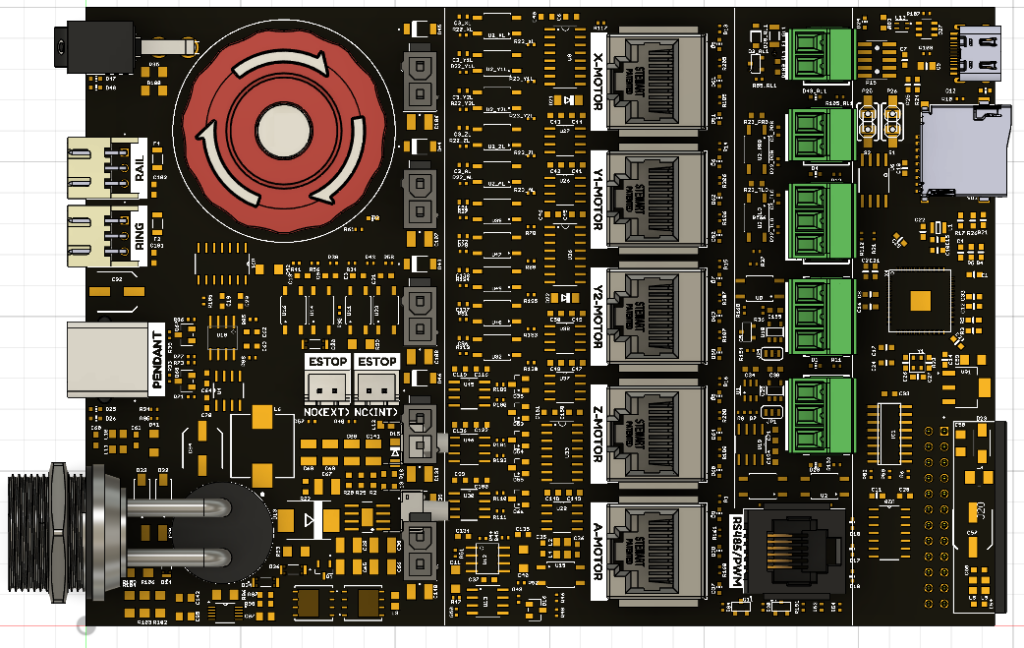
Wire management with the new SLB-EXT case
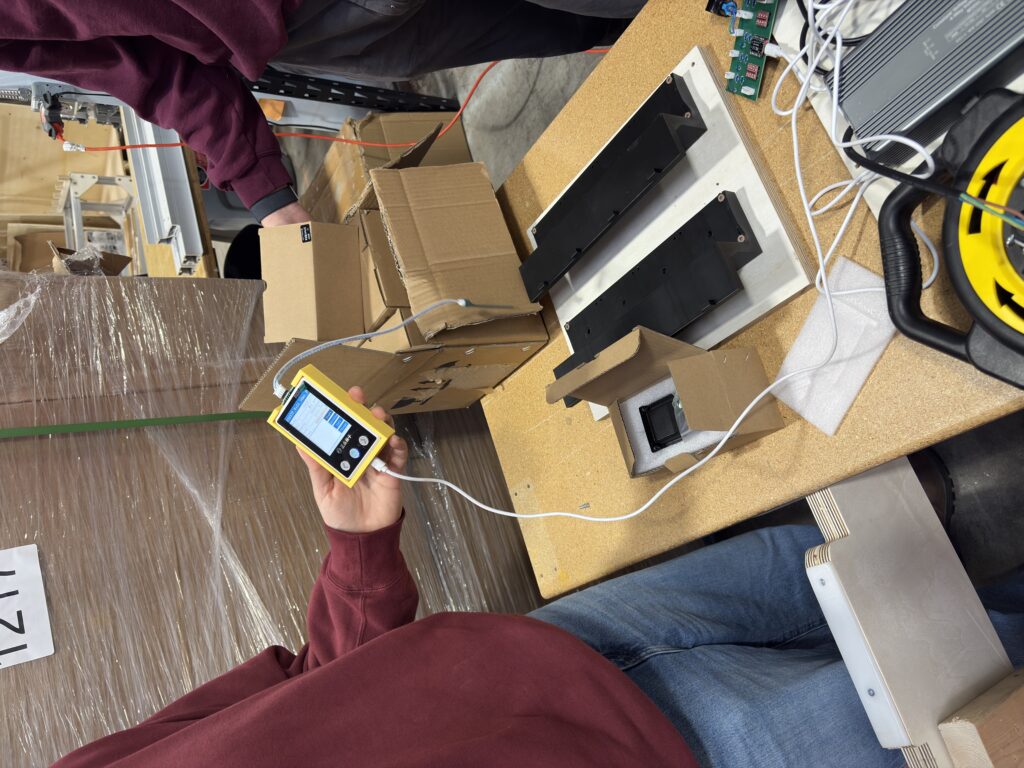
Our first prototype boards have been produced! We will go through initial flashing and testing of the new board over the next few weeks in April, and make revisions as needed before going into production.
First prototype boards
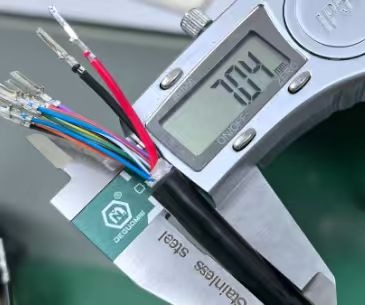
Additionally, new molded cable samples have been made with a nominal width of 7mm, over our current nylon sheath design with a width of 10-12mm. Why did we unify all of the cables into one mold? Because:
Simplifies wire management
Makes wiring of the machine during the assembly process more intuitive
Allows more space in the drag chain for additional cables and accessories
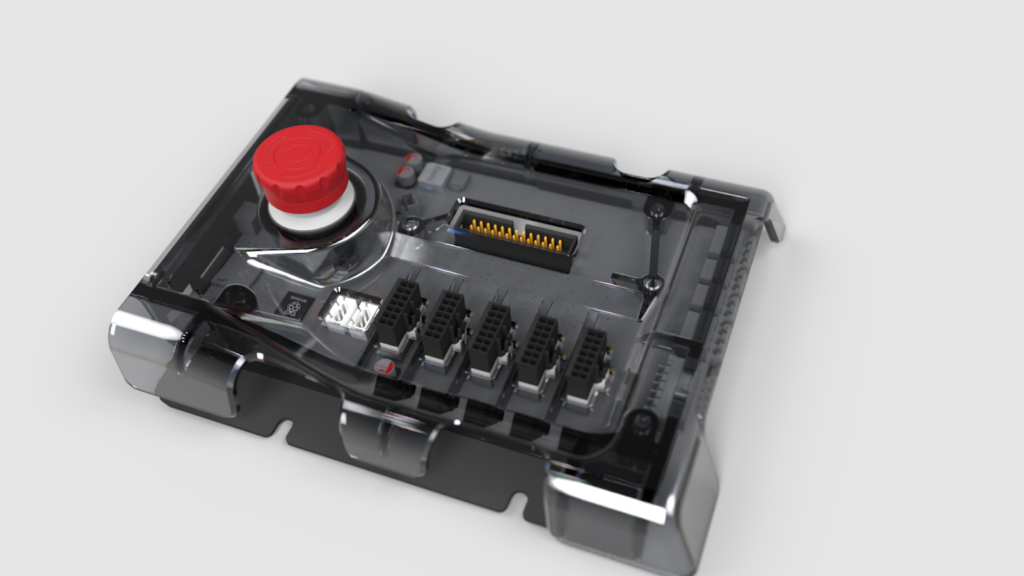
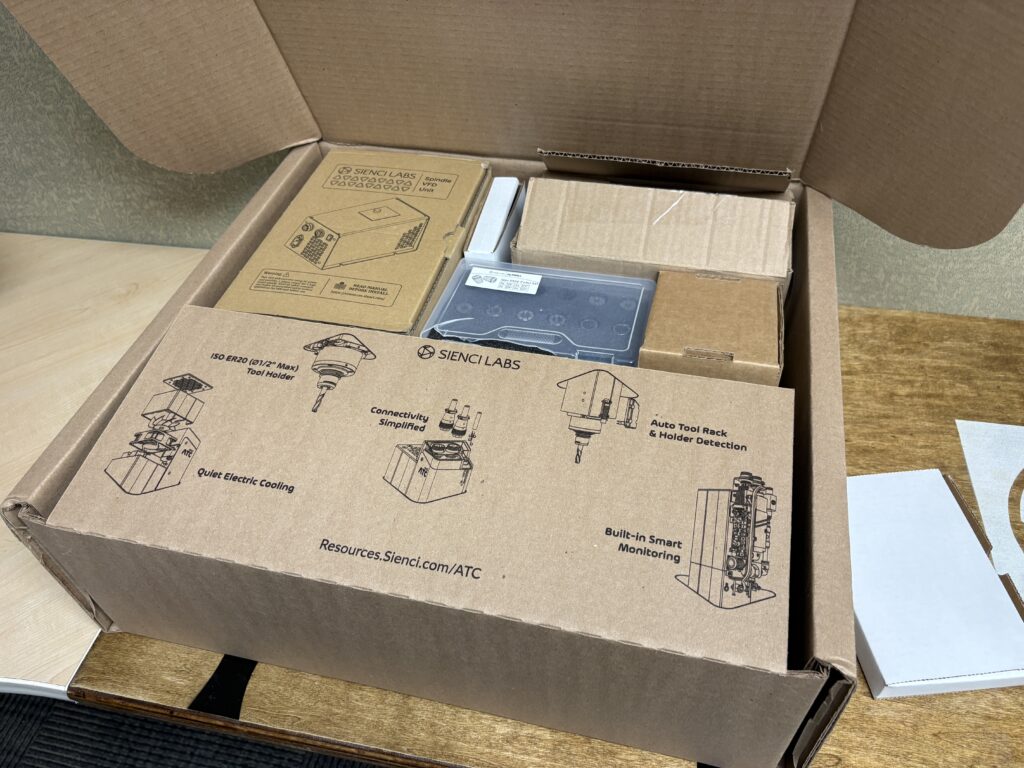
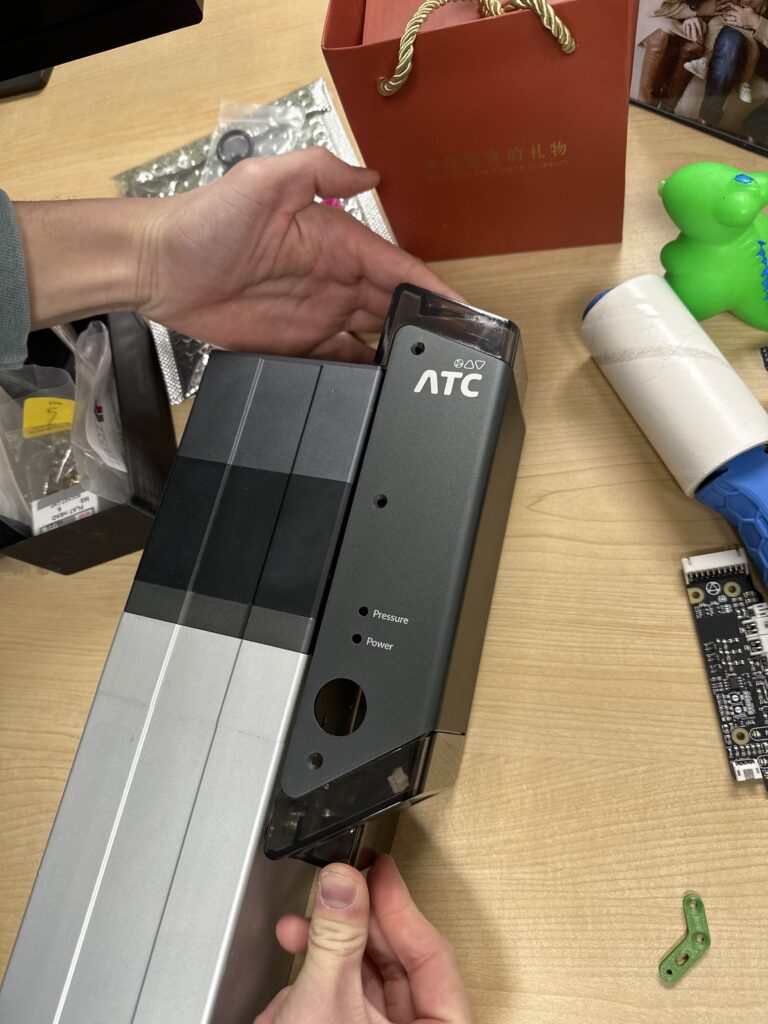
Auto Tool Changer
The ATC production is now in full swing as we get prepared to ship out existing orders. We have set up production stations to start with assembly and we are building our first units now.
Unfortunately we are continuing to work on a few straggling details in preparation for shipping, and we expect that we will begin shipping in the third week of April. Some outstanding tasks include:
Completion of the resources and installation guides
Completion of the new firmware testing
Otherwise the completion of the hardware production and assembly for the first batch of ATCs are scheduled to complete on April 10th April 17th, in tandem with the 4x8s.
I’m also excited to share that we’ve also implemented a new station with the ATC to machine some aluminum parts in house. We’re expecting to slowly integrate more parts over time that we can machine in house to give us an opportunity to stress test our machines and products, as well as give us more production flexibility or adjust designs more quickly as needed.
Nini prepping ATCs for testingEthan checking for Tool Rack defects with a jigNext step is testing before shipment
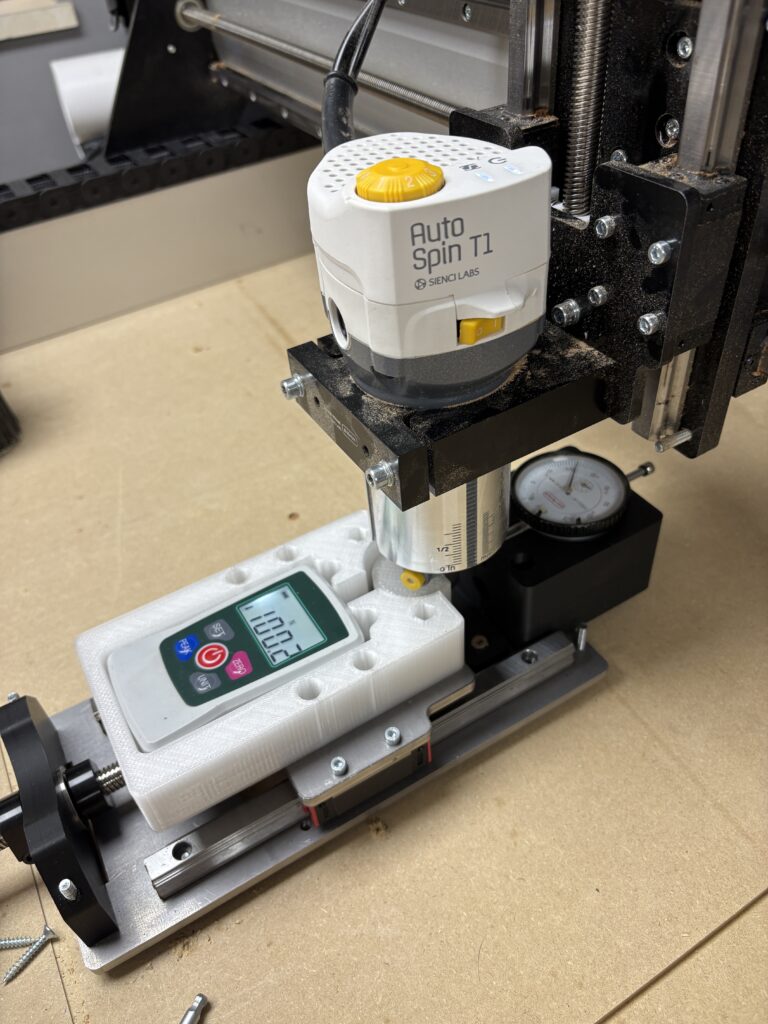
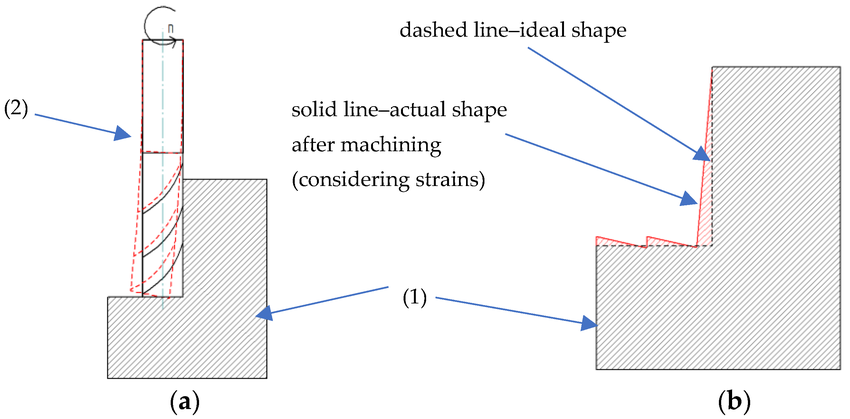
Testing the amount of deflection a machine experiences at different loads, aka the rigidity, is a good way to predict the overall performance of a CNC machine. When it comes to using a CNC machine, two primary objectives are to make the part accurately and quickly. One major contributing factor to the precision of a part has to do with how much the end mill deflects away from the programmed path. The end mill on a more rigid machine will deflect less than on a less rigid machine given the same feeds and speeds, and thus produce a part that is more accurate. Alternatively, a user can run their machine faster while still producing a part of acceptable quality on a more rigid machine.
A diagram showing the effect of tool deflection and how it affects the geometry of a simple part
Perhaps a common example of how this affects a simple part of a CNCed design would be holes. Holes cut on a CNC machine tend to come out undersized, because the material on the walls of the hole push the machine and endmill towards the center.
It should be noted that deflection exists in all machines, it’s just a matter of how much. To improve tolerances, it’s common to do a “roughing” pass, which removes the bulk of the material, and then a “finishing” pass, which removes a small amount of material at the end, minimizing deflection to bring the part to final shape.
The state of the market & why we’re sharing results
As we discussed in one of our prior blog posts, there isn’t, as far as we can tell, a standardized method for testing machine deflection in the hobby CNC space.
We are able to glean general comparisons between our machines and other machines in the market by test results posted by other members of the community. As time has gone on, here are some of my personal opinions on why that is the case:
It’s hard to give context on what the rigidity numbers mean.
For most of the practical testing range, deflection is not visible to the naked eye. A lot of times, people will demonstrate standing on their machine as a demonstration of rigidity, maybe even standing on it while it’s cutting. This doesn’t really show how rigid the machine actually is, because you can’t see how much the machine is deflecting from a distance.
Additionally, just because a machine is bigger and heavier doesn’t necessarily mean that it has less deflection. Some areas of a machine’s design can affect the overall accuracy of the machine, even though it may seem insignificant at first glance. For example, from our comparisons between computer simulations and real life testing, we’re able to see that things like bolt tolerance and mechanical components shifting around under load can actually play a pretty big role in the overall deflection values. All this to say, you could have a super rigid machine, but have a weak or loose part of it, just that one part alone can have a major impact on the overall machine rigidity.
Rigidity is less important that we think it is.
Owning and using a CNC machine isn’t just about how rigid or fast it cuts. The whole experience is important, from the setup, assembly, software control, and overall reliability. For the average hobbyist, if a CNC project takes 45 minutes to cut instead of 30, does it really make a huge difference?
Return on investment in a higher degree of engineering requires high volumes to experience
Lastly, with us expecting to build a very high volume of CNC machines, a small design improvement affects a lot of users. For machines built at lower quantities or DIY machines, it’s cheaper and easier to over-engineer the machine rather than optimize it, since the cost of engineering time is higher than the cost of buying bigger or better components.
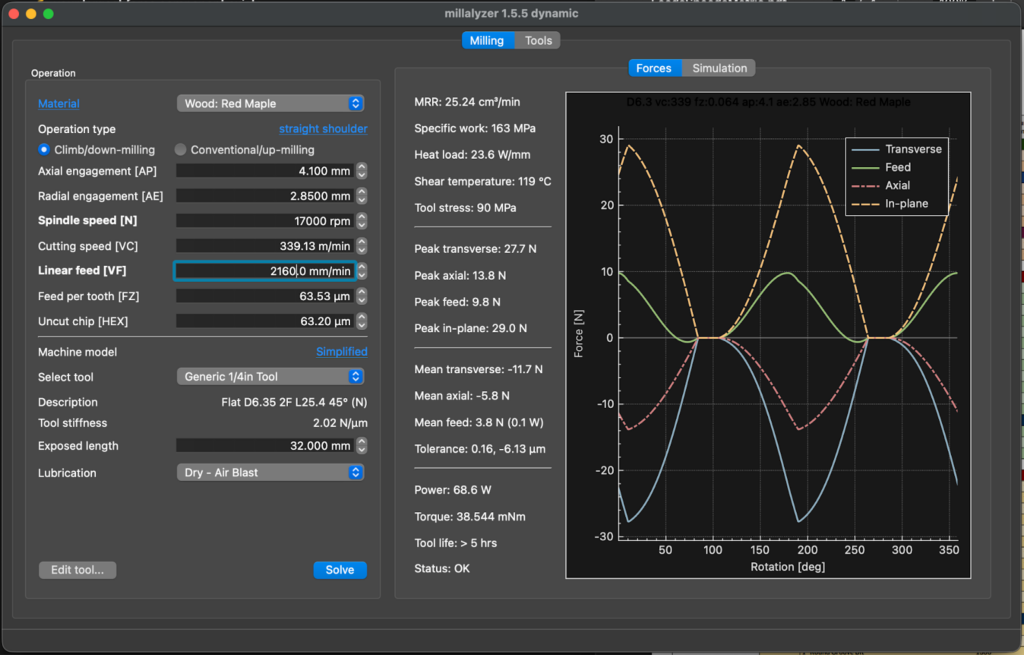
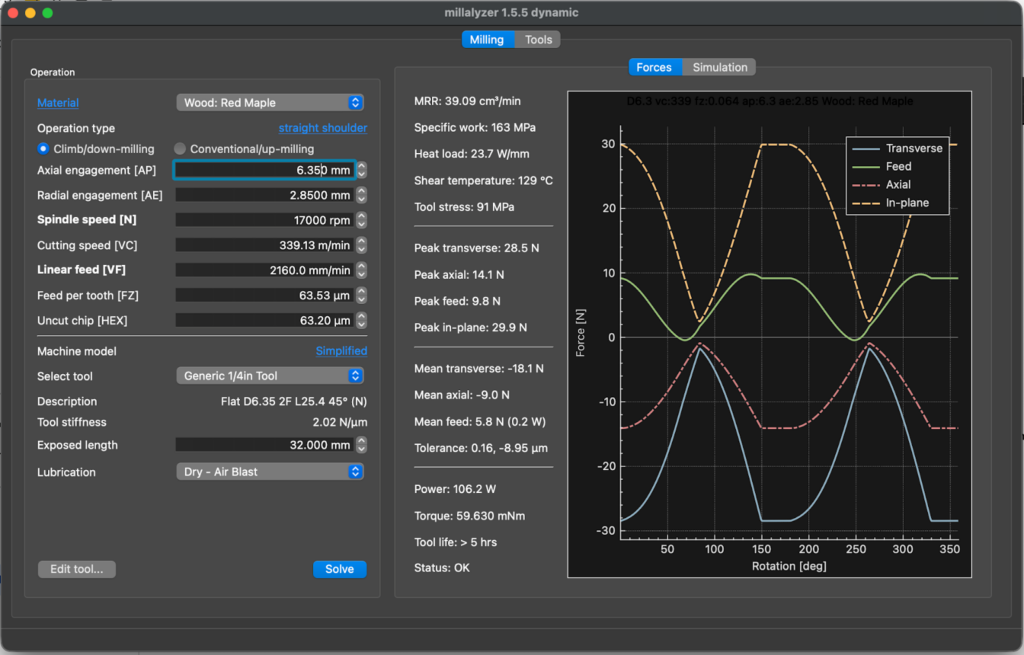
Testing process
We built a simple testing jig using old prototype parts from the LongMill MK3. We have a force gauge on the moving gantry and the dial indicator on the other. When we turn the lead screw to push the force gauge against the router, it moves the dial indicator some amount. The more that the dial indicator moves, the more the machine is deflecting.
Getting straight to the results & comparisons
As we can see from our results below, we have around 65-80% improvements in rigidity between the LongMill MK2 to the LongMill MK3.
Same settings as above but with a 6.35mm step down
Same settings as above but with a 6.35mm step down
Same settings as above but with 6.35mm step down and 6.35mm step over (full slot)
Same settings as above but with 6.35mm step down and 6.35mm step over (full slot)
We will refer to some of these values in our discussion below.
Balancing machine performance and cost
Building a machine to be rigid and powerful is easy, but making a machine rigid and powerful on a budget is hard. To optimize the design of a machine, we take many factors into account.
Acceptable deflection
As my electrical engineering professor used to say, in science, 5 = 5, but in engineering, 5 = 5, plus or minus a tolerance, which is to say, whenever we cut out a part, we should expect some deviance in the size of that part, and we need to decide and understand how much deviance we can accept.
In the scope of woodworking, I believe anything under 0.005” (5 thousandths of an inch) to be “very very accurate”. For context, 0.005” is 6.25x smaller than 1/32”, or about a sheet and a half paper thick.
LongMill MK3 48×30
Force Applied (N)
Force Applied (lbs)
Positive X (thou)
Negative X (thou)
Positive Y (thou)
Negative Y (thou)
25
5.62
4.5
5
8
9
50
11.24
10
10
11
12
75
16.86
16
15
17
18
100
22.48
22
21
24
25
If we look at the range of deflection at different forces, we can determine that we should aim to keep forces to under 25N to be within the 0.005” deflection range.
Motor power
In our testing, we also measured the maximum force that the motor can apply to each axis. On the X axis (one motor), we measured the force to be around 600N, or 135lbs. On the Y axis, 256lbs.
Each motor must resist internal machine forces, such as the friction from the lead screws, bearings, and linear guides, as well as control the inertia of the machine itself. Additionally, the motor must push the end mill through the material at varying forces.
The mean and peak feed forces from Millalyser give us an idea on what those forces are (3.8N-10.4N). Based on these calculations, the motor forces are far higher than the expected loads from cutting.
A few notes:
We have 1.2NM motors on all axis, which will be the same as the ones used on the LongMill MK3 in production.
We used a 48V power supply, instead of a 24V power supply in production
Given how much more powerful the motors are, we believe that running the machines in 24V will not make a difference in overall performance. Because the 24V power supply and SLB-LITE designed specifically for the LongMill MK3 is significantly less expensive than the 48V architecture used on the AltMill, it makes sense to go down this route.
Spindle/router power
Through our AutoSpin T1 project, we did a significant amount of testing and research around spindle and router power, even going as far as building our own dynamometer to test true power output of different routers and spindles. Millalyzer also gives us an idea on the range of power draw needed from the router, ranging from 68.6 watts to 234.8 watts.
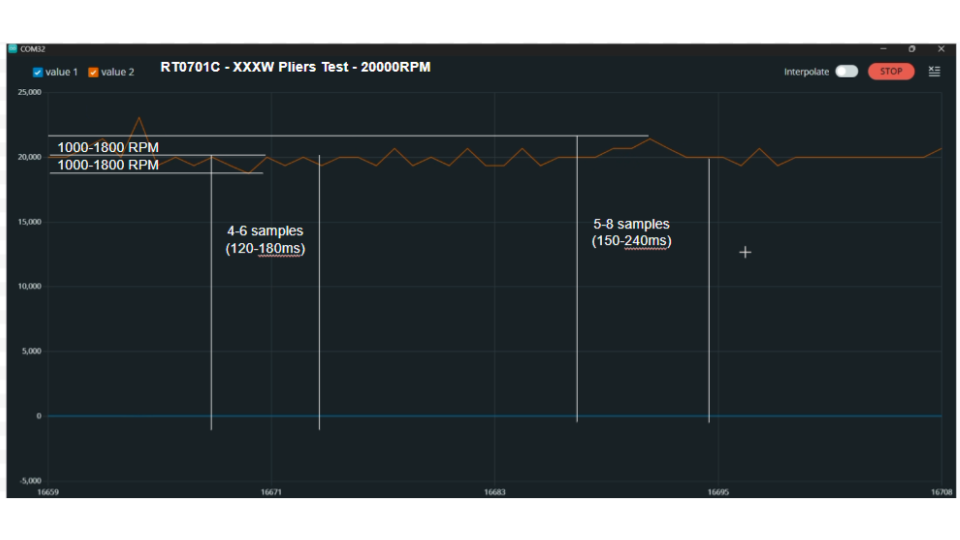
The green line shows that the Makita RT0701 can push around 1600 watts of power until dropping down to around 350 watts of power at 32,000RPM. A typical 1.5KW spindle progressively increases power output as the RPMs get higher.
We can ensure that the spindle or router used with the LongMill MK3 is capable enough by comparing the estimated power draw from Millalyser to our measured output line. In either case, both the Makita RT0701 or 1.5KW spindle is more than capable of producing enough power.
Our LongMill 1.5KW spindle kit costs around $650USD versus AutoSpin T1 is around $150USD, which is a 4x difference. Users can use either option, but we believe that the AutoSpin T1 is adequate for this application with the added benefit of the lower cost.
AltMill vs LongMill MK3 comparison
As it stands, the AltMill is approximately 2-4x more rigid than the LongMill. This is largely due to:
Thicker and heavier structure on the AltMill
Higher mass of the machine on the AltMill
If performance and rigidity is very important to you, the AltMill does provide much more in that way.
There are some practical considerations to make when it comes to actual differences in cutting, such as:
This is something I learned people call the “pucker-factor”, which is that people may not be so inclined to push their machine as hard as they can because of a lack of confidence.
Tools have a limit to how hard they can cut because they can deflect and break as well
Overall, I expect the practical cutting performance of the AltMill to be around 2x of the LongMill MK3.
If you’re cross shopping between the LongMill and AltMill, here are the prices to consider:
LongMill 30×30 ~$1390USD or $1870CAD
LongMill 48×30 ~ $1790USD or $2410CAD
AltMill 2×4 ~ $2790USD or $3890CAD
AltMill 4×4 ~ $3160USD or $4290CAD
…so between LongMill MK3 48×30 vs AltMill 2×4, which I think is the closest comparison based on working area, the price difference is around $1000USD, or comparing the 4×4, $1370USD.
We should also note that the AltMill also requires a spindle, larger tooling, and higher power dust collection to get the maximum performance, which can increase the cost difference when comparing between total setup costs.
Conclusions
With improvements to the machine rigidity and motor power, we expect users to be able to cut much faster and reliably compared to the LongMil MK1 and MK2. A significant amount of work and consideration has been made to improve performance overall while keeping the price the same as the older generation.
While this article only covered testing around rigidity, make sure to stay tuned on discussions of other improvements for the LongMill MK3, including easier assembly, maintenance, and electronics as well!
We hope you enjoyed this report on the LongMill MK3 design and performance!
Hello there, welcome to our March 2026 Production Updates!
AltMill 2×4 and 4×4
Lead times for 2×4 and 4×4 machines are now fairly short, with most machines shipping out within 2 weeks. Lead times for 1.5KW and 2.2KW spindle kits may vary. 2.2KW spindles for the AltMill are expected to ship in approximately 1-2 weeks as well. 1.5KW spindles are backordered, and are expected to be restocked in mid-to-late April. We will provide a more detailed update on the product page once we have more details.
Orders for AltMill 2×4 and 4×4 will ship out separately, which means that users can assemble their machines ahead of time.
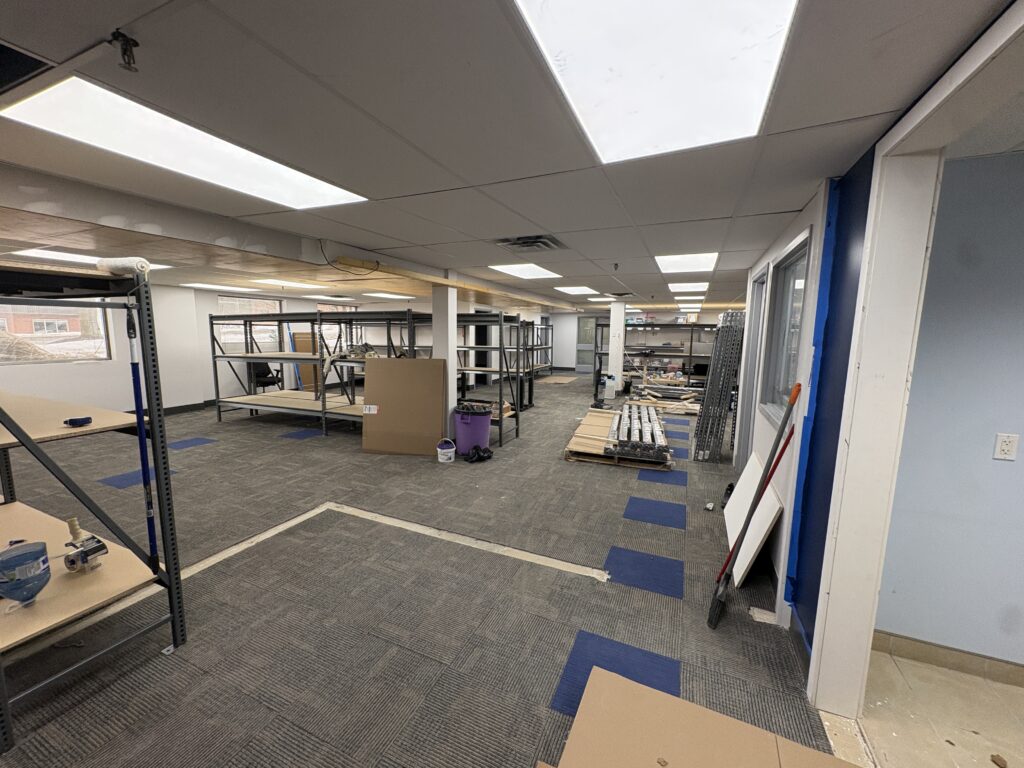
Office Expansion
We just expanded our office again! Mid-last year, our upstairs neighbours moved out so we took over around 6000sqft. There was also a part of the office with a stairway that lead to nowhere. Now, that stairway leads somewhere! We are knocking down that wall to take over a portion of our next door neighbour as well. This move adds another 2000-3000sqft, which will be used for some assembly work, especially for electronics, as it is more isolated to the larger office and we can reduce the amount of dust for those parts.
Painting the new office expansion
LongMill MK3 Development
LongMill MK3 development continues to chug along.
Setting up the first LongMill MK3 with Dave
We set up our first machine with our beta tester, Dave! Since he’s our first beta tester, we learned a few things, including:
Starting the Y gantries at the front of the machine makes it easier to put on the X rail, especially if you have limited access to the back of the machine.
Putting the X rail onto the Y gantry can be a bit finicky. We are potentially going to update the design of the Y gantries to allow the rail to drop in sort of like the AltMill.
Other changes and updates in progress include:
Redesigned Z-motor mount to allow the inductive sensor to sit higher up, allowing for more travel.
We are still looking to onboard and work with two more beta testers, which should happen in the coming weeks.
Prototype LongMill MK3 48×30
We are also slowly starting production on some of the major, long lead time components in the coming weeks.
Additionally, we are coming close to the end of the LongMill MK2.5 batch. Once we have sold out on the remaining machines, we will not have LongMills available for sale until the new batch of MK3 machines start shipping. We are currently checking inventory to confirm how much longer we have, but we estimate approximately 1-2 months of stock remaining currently. LongMill MK2.5 machines are shipping within a week.
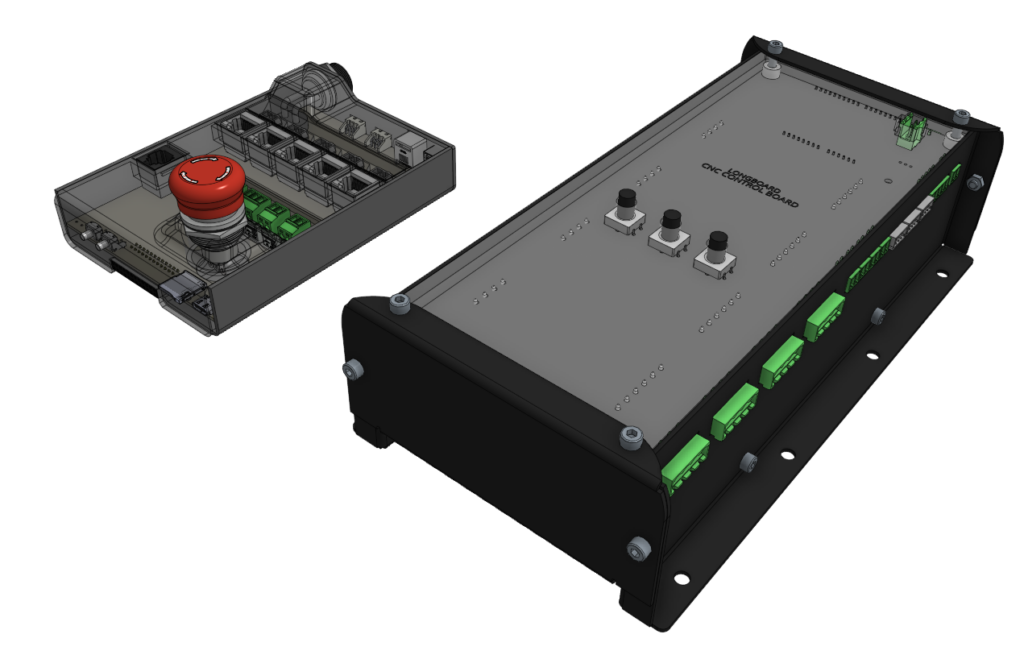
SLB-EXT V2
The development of the new controller continues to be underway. For those not up to date, we are working on a new version of the SLB to be better optimized for cost and manufacturing, while still keeping the same functionality of the original SLB.
Continued development of the SLB-EXT
A ton more work done with the new SLB, including:
Updated layouts for the traces and components
Design and development of the advanced breakoutboard
Design of new plugs and cables to improve wire management
We will start the process of making a batch of prototype boards and conducting testing in the coming weeks.
Rendered mockup
AltMill 4×8
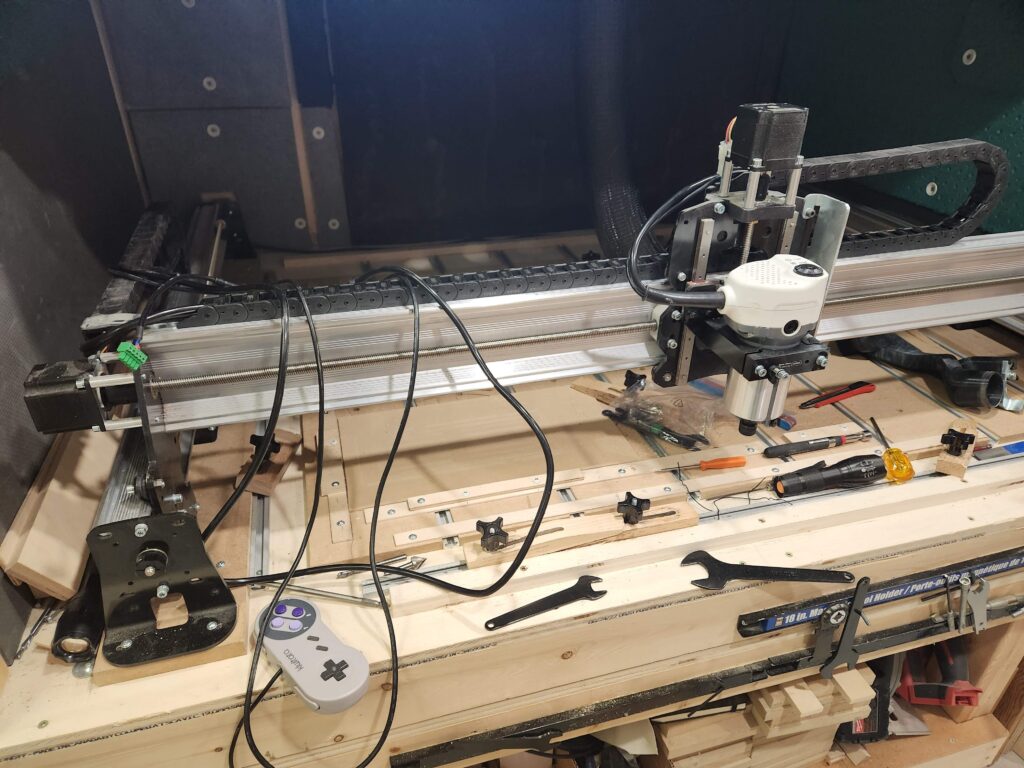
As of Feb 23rd, we have received all of the parts needed to start building 4×8 machines, with the exception of some screws and small straggler parts such as some allen keys, warning labels, etc. Much of the work is currently with testing and QA for incoming components, as well as working on the setup for the rest of the production area to get ready for assembly of major components in the next week or so.
Mike with the 4×8 AltMill Y rail assembly stationCloser look at the AltMill 4×8 rack and pinion assembly station
Automatic Tool Changer
We have now received the majority of the parts needed for ATC production and are currently putting together space for the assembly and testing. We are expecting to start shipping out ATCs at the end of March, which will be a few weeks delayed compared to our original anticipated delivery time. Macros for the ATC, which are programs for controlling the ATC functionality can now be found online here: https://github.com/Sienci-Labs/atci_macros. We are also expecting to have updated versions of gSender plus online resources complete by shipping time, so the small delay is allowing us to get some of those things polished up.
#image_title
Clear Cut Dust Shoe
We’re excited to announce that the Clear Cut Dust Shoe is now available for sale!However due to higher than expected demand, the ~150 units we had stock were sold out within 24 hours, plus more with units that were sold with spindle kits.
We’ve put a pause on selling Clear Cut Dust Shoes individually for now, and we are currently working on ramping up production on that. We have a separate amount of stock for the spindle kits, so that we will ensure they are included on all of the spindle kits we ship on a 1:1 basis. We’ll have another announcement coming out soon to let everyone know the production schedule for the new dust shoes.
Informal Call for New Staff
I want to put some feelers out in the community for someone looking for jobs/roles in finance and HR. Up till now, we’ve/I’ve been managing this side of things since our company is not quite large enough to have someone fill this role full time, but given how things are going, I feel like we need to look in earnest for people to fill some of our company admin roles.
If you feel like you might be a good fit in a finance or HR type position at a startup or small company like Sienci Labs, feel free to send in an application here: https://sienci.com/work/
Oh also, we are looking for an electronics/embedded design engineer as well, so feel free to apply for that as well.
gSender 1.6.0 Edge-4 is now out, bringing a solid round of improvements, fixes, and general polish.
We’re officially in the part of the Edge cycle where the focus shifts away from big new features and toward testing, optimization, and cleanup. A lot of this release is about making things faster, smoother, and more reliable based on feedback from everyone testing Edge so far.
If you’ve been waiting to try Edge, this is a really good time to jump in. As always, reports from early testers are extremely valuable.
Visualizer parsing improvements
This release includes a major rewrite of the file parsing and visualization worker used when loading G-code files.
Performance gains:
~55% faster visualization time for most files
~75% faster visualization for rotary files
~35% less memory usage for typical files
~86% less memory usage for rotary files
What this means in practice:
Bigger files load faster
Less RAM usage while previewing
Much better handling of large jobs
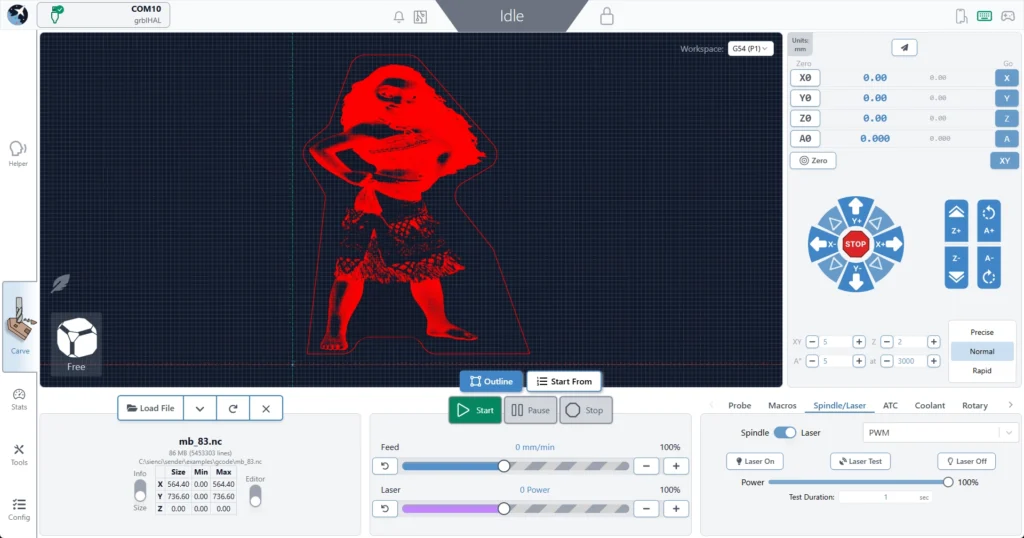
For reference, we successfully loaded an 85 MB / 5.5 million line file, which wasn’t possible in previous versions.
Connection process is generally smoother and more reliable
Better handling of reconnect scenarios
No resets in the connection workflow
Should reduce Alarm 14 and error 1s on connection and clearing alarms
We no longer assume ethernet is always grblHAL, so fluidNC/non-vanilla grbl users connecting over ethernet should properly fallback to grbl if configured as such
Responsiveness
Better support for smaller screens
Wide-but-short resolutions (like ~13xx × 7xx) should no longer cut off UI elements
Fixed some Remote Mode responsiveness regressions
Cleaner spacing in the top bar on smaller displays
Packaging
Fixed slow startup on AppImage builds caused by ASAR compression
Continued build pipeline cleanup
Smaller installs overall
Example: Mac .app size reduced from ~550 MB → <400 MB
ATC – status updates and other
Probed, unprobed, and off-rack/manual states are now separate statuses
You can always see both offset status and manual/off-rack state when applicable
Tool Timeline received a visual refresh for better clarity and information layout
Tool nicknames are now included anywhere a tool number is shown in the UI
Config and Templates moves into Accessory Installation Wizard
Extremely professional placeholder images added to ATC Installation wizard while we wait for marketing
New timeline look
New machine profiles & grblHAL Core support
Updated AltMill 4×8 machine profile
Added support for new/remapped firmware values and keys for grblHAL Core
Config automatically adapts based on firmware version
Affects EEPROM-related areas including:
Restore Defaults
Config Tool
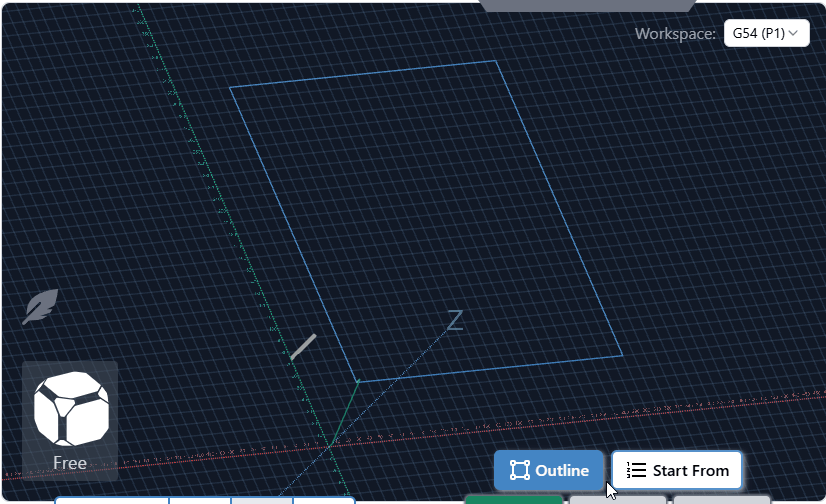
Outline improvements
Outline process improved – should be faster, should work better for all types of files. Travel direction is always consistent.
Added new option – Rapidless Square – which computes a bounding box of only the cutting movements (G1/G2/G3) and ignores G0.
Can now configure outline to use custom feed rates and G1 rather than G0 (Thanks, kieraneglin)
Inner islands no longer considered when generating hulls for details outline – so file outline should be more consistent overall
G0 ignored, just outline cutting motions
Config updates
Various logic changes to config area to improve performance
You should notice the population of entries and search to be more performative
No delay when connecting on the config page
Various improvements & fixes
Selecting the current jog preset now resets values back to configured defaults
Config imports are validated before being applied
Diagnostic PDF now clearly shows when disconnected data isn’t available
Improved Run Check on Load workflow:
Prompts before enabling check mode and running the file
Probe corner can now be changed directly in the Run Probe dialog
Warning shown when using a non-default corner (no more probing the wrong spot)
Improved grblHAL flashing UX
Spindle selection now updates correctly when configurations change
Fixed connection widget interaction issues when dropdown menus are open
Alarm descriptions now pulled directly from grblHAL firmware
Various Dark Mode polish improvements
Fixed diameter parsing for DeskProto rotary files (for real this time). This must be toggled on inside the config section under “Rotary Diameter offset”
grbl Rotary – can now pass A through natively rather than always hijack Y when rotary mode switched off. This is mostly for compatibility with fluidNC/non-standard grbl variations that natively support A axis commands.
Camera cube added to visualizer in surfacing and rotary surfacing tools
No longer show the special animation for spindle/coolant when disconnected and spindle/coolant state is indeterminate
Download
gSender Edge is beta software, so expect the occasional rough edge. You can safely install gSender and gSender Edge side-by-side.
Huge thanks to everyone testing Edge and sending feedback — it directly helps shape the final 1.6.0 release.
We received our shipment of approximately 2000 units on February 2 (it was supposed to be mid- February) and will get routers shipped out to customers shortly after.
AltMill 4×8 Production
We continue to wait and prep for the arrival of AltMill 4×8 components. Based on our schedules, the last remaining parts for the 4×8 are scheduled to arrive between Feb 20th to March 6th. Other parts are expected to arrive sooner, which means that assembly for the first units will start approximately mid-February, allowing us to make progress in advance before all parts arrive.
In other news, resources for the 4×8 assembly continue to be worked on, with filming for the assembly video scheduled for the second or third week of February in preparation for customers to start receiving their machines in March.
LongMill MK3 Development
Thank you all for the overwhelming response of applications for LongMill MK3 beta testing. We’ve now received the rails and started internal testing. We will be sending out beta testing units to selected individuals in the next few weeks.
First functioning prototype build of the LongMill MK3
As it stands, we’re super excited about the LongMill MK3 as we expect to bring a massive leap in performance over the LongMill MK2 and 2.5, while keeping it at a super competitive price point. Some additional work we’re doing to bring down BOM costs include:
An easier to manufacture, significantly improved dust shoe with easy to replace bristles. This means not only is the overall cost of the dust shoe less, but users can extend the life of their dust shoe by replacing just the bristles. We will provide users with extra bristle in each kit.
Integrated cables. With current cables being a combined bundle of motor signals, power, and inductive sensor signals sheathed in one nylon cover, we’re looking at molding a single cable to reduce the overall unit cost of the total cable.
SLB-Lite. With the SLB-EXT being a major cost in the total BOM cost of the LongMill MK3, development (see in the next section of the article) is expected to keep all of the core functionality of the SLB and SLB-EXT, in a smaller, lighter, and more affordable package.
SLB-Lite
In our discussion about the LongMill electronics, we mentioned, especially with the Closed Loop Stepper Kit, that the overall cost of the electronics currently makes up a significant portion of the LongMill MK3 bill of materials. This is primarily because the electronics were specced and designed for the AltMill. However, for the smaller and less power hungry LongMill, the AltMill electronics are functional but overkill for the application.
Peter and Daniel and have continued to work on the newest generation of electronics to act as the successor to the SLB-EXT used in the AltMill. We expect a number of improvements for the new controller, currently code-named “SLB-Lite”, including:
Lower cost, with the board expected to be around half the cost of the SLB-EXT
Improved wire management
Overall smaller footprint, allowing for lower shipping cost and easier integration into LongMills, AltMills, and other CNC machines.
Ability to use power supply voltages from 24V-48V and the ability to provide up to 100 watts per motor.
Ability to connect an additional board for added features and functionality beyond the SLB-Lite, while still being less expensive in combination than the SLB-EXT.
Lastly, by using the same controller on all of our CNC product lines, we expect to see savings through the economies of scale by essentially doubling the number of units produced. Plus we expect to reduce our inventory management costs with fewer unique components, and a more unified experience between the LongMill and AltMill lines.
Additionally, coming to all controllers is new SLB and SLB-EXT firmware, with overall performance and stability improvements, and specific features like faster and better handling of motor alarms and resetting, support for advanced plug-ins used for the Automatic Tool Changer, and unlocking of SD card features allowing for running gcode and files directly from the controller. More details on the new firmware and ability to have access to beta firmware before the wider launch available on our blog.
To coincide with SD card support, the upcoming gSender Edge (our beta version of gSender), will be coming out with the interface to communicate with the SD card. When both systems have been tested to be reliable, full support for the new firmware and all of the new improvements will come to the main version of gSender.
To hear Kevin talk about SD card support in the next gSender Edge release, check out this video here:
gControl Panel Computer Pricing Updates
Due to the recent RAM and memory shortages, pricing for the gControl has been increased. We are keeping an eye on the pricing for components as they change, and are hoping that pricing will come down soon. We will update pricing when RAM and memory prices come back to normal levels.
Certified VFDs are Now Shipping
After a long wait, certified VFDs have finally arrived and have undergone testing. Customers who are waiting on VFDs will receive them shortly.
ATCs Sells Out; New Batch Added
Due to higher than expected demand for the ATC, we have sold out of the first batch. Customers who place orders moving forward will be part of the second batch. The first batch is expected to start shipping in late March, and the second batch is expected to ship in June.
First look at production covers for the ATC.
Curious on how this whole ATC thing works? Check out Johann’s breakdown video here:
gSender 1.6.0-Edge-3 is rolling out with a solid set of improvements and long requested fixes.
We are approaching the feature freeze for 1.6.0, so most remaining work before the March release will focus on stability, polish, and small behaviour adjustments. It’s likely we have one more Edge release that’ll prioritize various bugs and remaining improvements. If you have been waiting to try Edge, this is a good moment to jump in. As always, reports from early testers are extremely valuable.
This update includes several notable enhancements, including major gains in load time and improvements to remote mode.
Faster load and install times
Significant changes to the packing system and build process have produced much faster startup across all tested devices.
A load time of roughly 25 seconds or longer has been reduced to about 4. Similar improvements appear on every device, including gControl.
This has been one of the most common complaints about gSender, so we are pleased with the progress and expect further gains.
Check out the load time comparisons below:
1.5.7 on PC (~25 seconds)
Edge on PC (~5 seconds)
Edge on gControl (~7 seconds)
Installation is also noticeably faster.
Silicon Mac builds, Mac Signing, and new Electron version
We’ve updated the Electron version for packaging to the latest release, which means dropping support for earlier macOS versions. The minimum OS requirements are now as follows:
macOS: Monterey (v12, released 2021) and up
Windows: Windows 10
Linux:
Ubuntu 18.04 and newer
Fedora 32 and newer
Debian 10 and newer
We are building and providing both an Intel (universal) build and now a Silicon (ARM64) version of gSender for macOS. Silicon users should notice a performance improvement.
We are now also signing our macOS builds, so hooray! Coming soon to an app store near you!
Better portrait mode
We continue refining layout behaviour to make better use of space across different display configurations.
Larger, clearer buttons in portrait mode and elsewhere
Improved spacing and alignment
More adjustments planned throughout the Edge cycle
A new guided installation tool walks users through setting up supported CNC accessories.
First supported workflow is ATC setup
Future plans include spindle, laser, and first time CNC setup guides
ATC configuration
The ATC configuration tool has been streamlined.
Combined and reorganized options
Improved flow and clarity
Updated interface for a smoother configuration experience
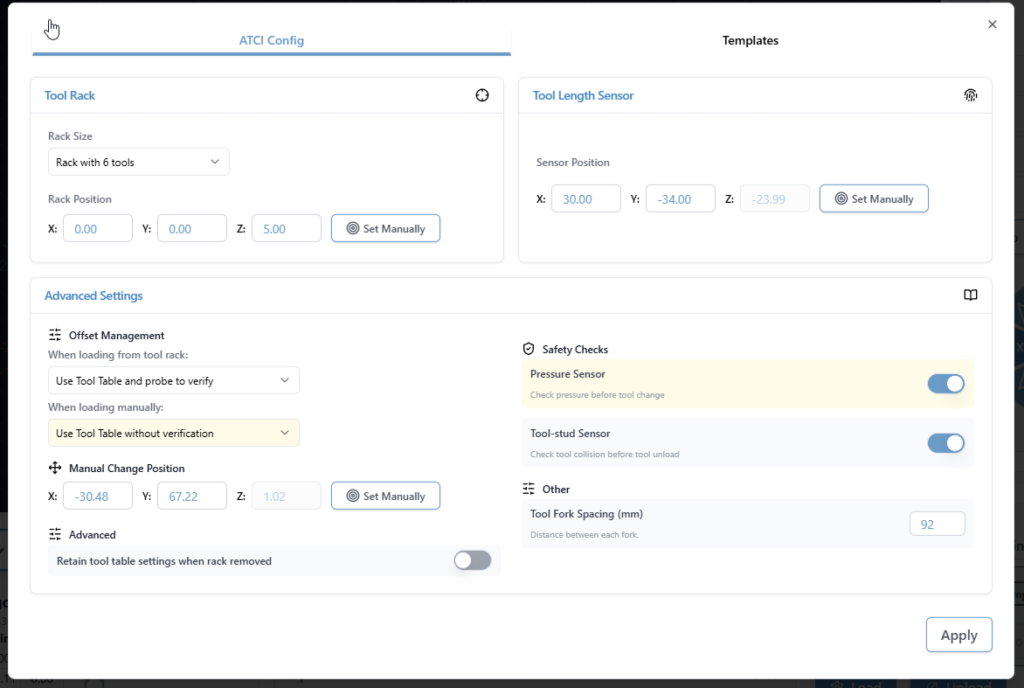
Look at all the options when it comes to ATC configuration
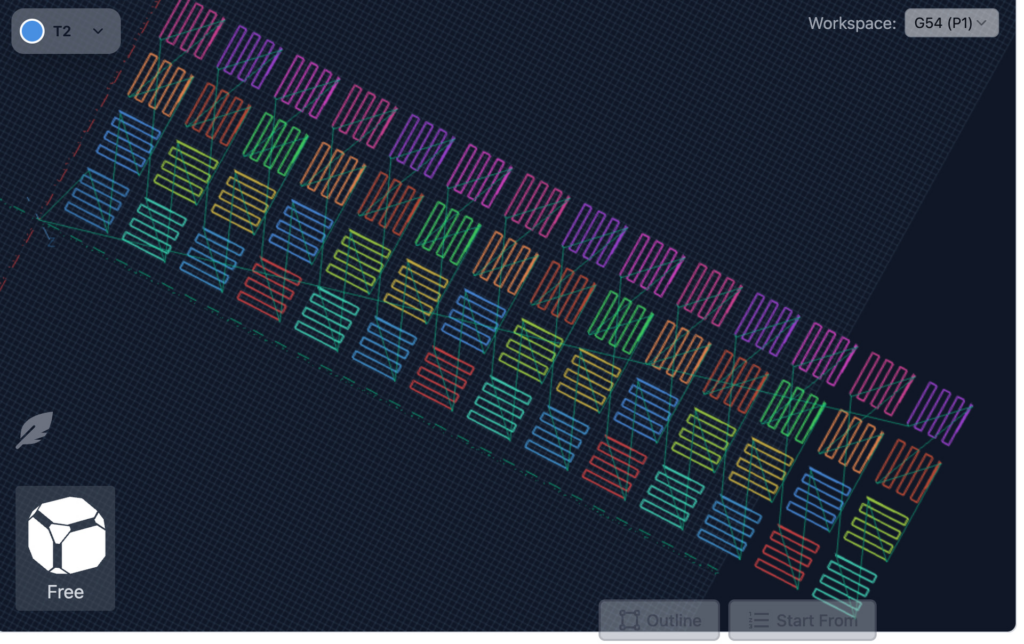
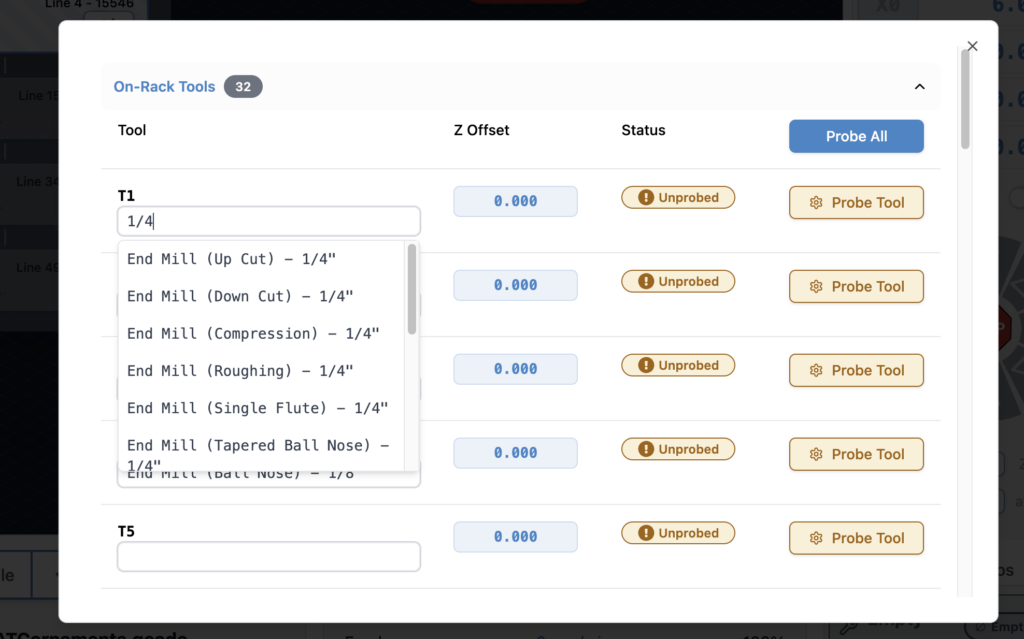
ATC Visualization and Tool Table
Updated colours to a designated set of 12 for better toolpath distinction. It’s now funky fresh
Tool table tool nicknames are now selectable from a database of common bits, which includes search and still the ability to type in a custom note for a specific T command.
New toolpath colours
Tool table – selectable tool database
SD and FTP support
FTP support added, allowing uploads over Ethernet instead of USB only
Simplified workflow with a single refresh/list button
Automatic SD mount attempts when the tool opens
Dark mode and portrait mode updates
Progress bar improvements
Safety checks to disable the tool when connected to grbl or grblHAL devices without Ymodem or FTP support
EEPROM and configuration improvements
Added support for new settings in the upcoming grblCore release
EEPROM tool now handles all reported EEPROM settings, not only those surfaced in Config
Rotary time estimation
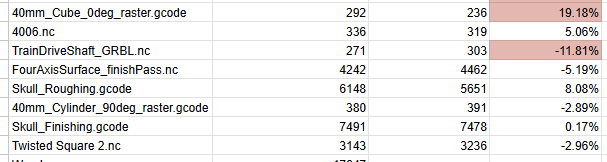
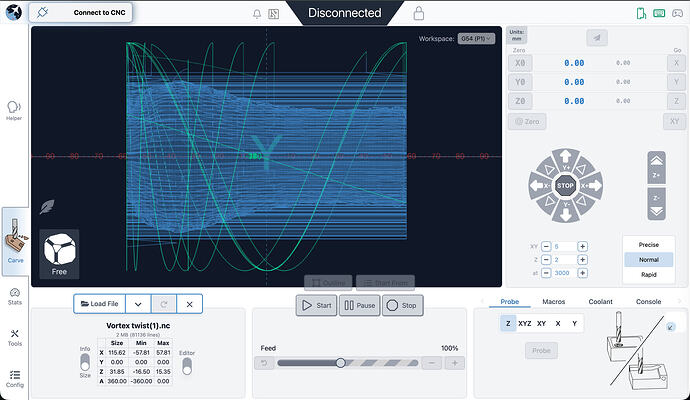
Time estimation for rotary jobs is now more accurate. Travel distance calculations now correctly account for A axis rotation, bringing estimates closer to real world results. Accuracy is approaching within 10 percent, with more refinement planned.
Some of the test file results for new rotary estimation
Visualization for rotary files has also improved. DeskProto typically sets Z to the surface and stores workpiece diameter in comments. gSender now uses that information to produce correct visualizations. Most gcode viewers cannot do this without explicit diameter data, so this is a meaningful improvement.
Better Rotary Visualization
Visualization matches end results
Remote mode
Updated look and feel
Settings now sync between desktop and remote clients, ensuring consistent preferences such as jog speeds, probe type, and units
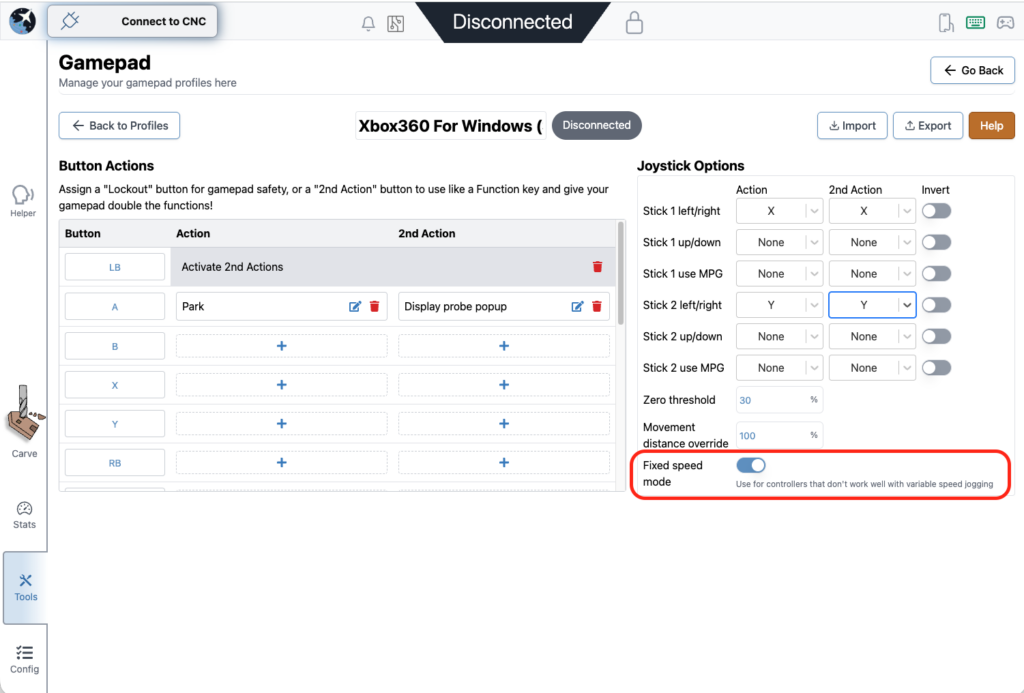
Gamepad Updates
Fixes to certain shortcuts on gamepad firing twice, specifically the park button and probe popup
Added a new feature to disable dynamic speed and use a fixed value for thumbstick jogging
All these changes were done by a community member. Thank you for your contribution Kesmit13!
Fixed speed mode
Various fixes and improvements
ATC functionality updates
Fixed issues where tool offset was being incorrectly zeroed out on board reset
$SpindleESH now sent correctly on spindle select for core firmware
Gamepad jogging improvements, including fixed speed jogging
TLO probe offsets captured mid toolpath to keep UI elements current
Error and Alarm descriptions populated by grblHAL firmware
Helper accessible across all gSender tools, not only the carve page
Optional prompt on program close to prevent accidental exits
AltMill 4X8 machine profile added
Now using grblHAL error and alarm descriptions throughout the application
AltMill ZxY plus Spindle configurations removed
Added probe profile for BitZero 2 probe block (thanks Krudoy)
Download
gSender Edge is beta software, so expect occasional instability. You can install both gSender and gSender Edge side by side.
Thank you to everyone testing Edge and sending feedback. Your reports help shape the final 1.6.0 release.
It’s been a little while since we’ve talked about what’s going on under the hood of the SuperLongBoard (SLB), and today we’ve got some exciting news for those of you who like to live on the bleeding edge.
We are looking for a small group of AltMill and LongMill owners to help us beta test the new “Main” version of the grblHAL firmware.
If you’re interested in helping us test this out, you can fill out the Google Form linked at the bottom of this post. But first, a little history lesson on how we got here, why this change matters, and what you can expect.
A Quick History Lesson: SienciHAL vs. Main
When we first launched the SLB, we made the decision to fork the firmware into our own specific flavour, which we affectionately called “SienciHAL.”
At the time, we needed to make sure the firmware was rock-solid and perfectly tailored to the specific hardware we were building. We needed to guarantee stability for our users right out of the gate, and having our own branch allowed us to lock things down and ensure everything behaved exactly how we wanted it to for launch.
However, maintaining a separate fork means you miss out on all the cool new stuff happening in the wider world of grblHAL development. Over the last year, we’ve been working closely with the original creator of grblHAL (Terje) and the community to bring our specific needs and features into the Main branch of the firmware.
Our goal has always been to contribute to the open-source ecosystem, not just take from it. By working to get our changes merged into the main project, we ensure that the SLB remains compatible with future developments while being able to contribute any potential improvements back to the community.
What’s New in this Firmware?
For the most part, if we’ve done our job right, you won’t notice a huge difference in how your machine cuts. The motion and reliability should feel just as solid as before. However, moving to the Main branch unlocks some nice quality-of-life improvements and future-proofing features – examples being:
Automatic Motor Alarm Reset: One of the small but mighty changes. It makes recovering from motor alarms much smoother without needing to power cycle or mash reset buttons as frantically.
SD Card Support: We are unlocking support for SD card reading, which opens the door for running files directly from the board and other advanced standalone features down the road.
Advanced Plugin Support: This firmware includes support for the plugins we’ve developed for our ATC (Automatic Tool Changer) spindle. We also hope that these features will be helpful for anyone setting up their own automatic tool change system on any machine running grblHAL.
Under-the-hood Tweaks: A lot of small improvements to stability and code efficiency that come from the collective brainpower of the open-source community. This firmware version also exposes the ability to change many other settings and features such as LED brightness and ‘jerk’ motion control.
Who Should Test This? (And Who Shouldn’t)
We are looking for AltMill and LongMill users who are relatively comfortable with flashing firmware and using gSender.
This is beta firmware. While it has been tested to the best of our abilities and equipment, there is naturally a risk of bugs or unexpected behaviour.
It is not recommended to participate in beta testing if you’re in the middle of a critical production run or have a deadline to meet.
DO sign up if you enjoy tinkering, don’t mind providing feedback, and want to help us polish the next generation of our software stack!
For Interested Beta Testers
If you’re interested in beta testing, please fill out the Google Form below. We will be selecting a limited number of users to start with to ensure we can provide adequate support and gather focused feedback. If selected, we’ll email you the firmware file and instructions on how to flash it to your SLB.
For anyone interested in upgrading without beta testing, an officially supported public release of the new grblHAL main firmware will be made available in the coming months, shipping with new machines as well. We will announce this in a subsequent blog post and on social posts.
We’ve also been working to coordinate to have a ‘Webbuilder’ accessible grblHAL machine profile accessible that will allow advanced users to configure their version of this firmware any way they’d like to.
We are incredibly grateful for open-source projects like grblHAL. They are the backbone of what makes affordable, high-performance CNC machining possible for hobbyists and small businesses. We want to do our part to support and contribute to these projects wherever possible, and moving our users to the Main branch is a huge step in that direction.
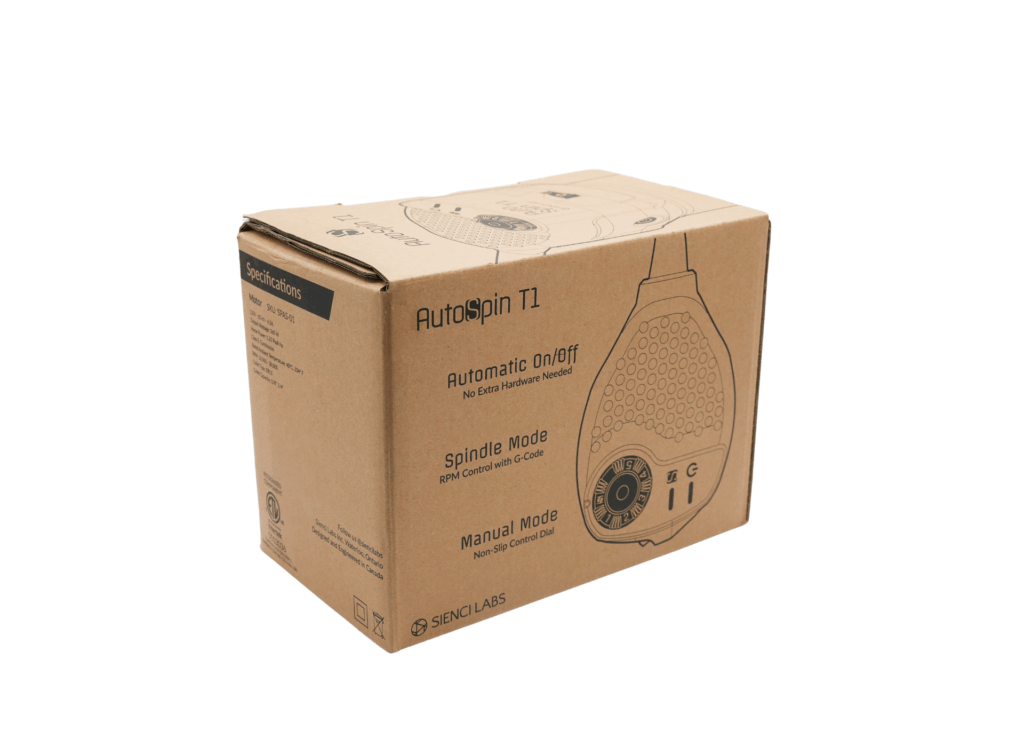
The AutoSpin T1 is an exciting new product designed to mash spindle capabilities with a traditional router. In a way, you can think of this as a replacement for the Makita RT0701 router that has been the staple for so many hobby CNC machines.
It also serves as an intermediate product for users considering a spindle. The AutoSpin T1 offers speed control and on/off functionality through a signal cable similar to a spindle, which allows several benefits including:
Improved safety, as the router can turn off when a cut finishes or is cancelled
On the fly router speed control, allowing users to change the speed without touching the router
Added convenience of being able to automatically turn on when a job starts
While spindle systems have continued to gain in popularity, many entry level CNC machines still continue to use a Makita RT0701 or similar style router. The AutoSpin T1 aims to cater to our most entry level and budget-sensitive group of users.
We initially designed this with the LongMill in mind, but we also recognize this style of router is commonly used in other machines, including Shapeokos, Onefinitys, XCarves and more. With the help of some of our broader community members, we’ve tested the AutoSpin T1 compatibility with many other hobby CNC machines, which means we can bring this technology to many more people.
Development
Although the concept behind the T1 is simple, this project is a culmination of many, many months of research development.
One of the key reasons for us to develop this router started when we experienced a small batch of Makita RT0701 routers having overheated bearing issues. We found that after a few minutes of use, some Makitas would have extremely hot collets, which we suspected was due to friction from the bearing holding the shank. Upon autopsy of the routers, we found that Makita started using bearings from two different manufacturers, one of which was the root of some of the overheating problems.
This actually became such a growing issue that we actually ended up discussing bearing issues with product managers at Makita. We also did a ton of research and testing on different bearings and styles to ensure that when we went to build our own router it would not have the same issues. Given that we bundle a Makita router with most of our LongMills, we knew that we would have a large enough volume of AutoSpin routers to produce as replacements, which provided the motivation to develop our own.
Up to this point, the Makita RT0701 has, and still continues to be an extremely reliable router. We’ve had very few issues overall, even counting the overheating bearing issues. While we initially considered moving away from the universal motor system that the Makita uses, we eventually came back to the same system given how reliable, well used and inexpensive it was compared to other systems.
Speed Control Optimization
One of the most powerful features of the Makita router is its ability to compensate for load changes. With a traditional, uncontrolled motor, as soon as a load is applied, the speed of the motor goes down. In a CNC application, the load on the motor changes constantly, but the speed of the motor must stay the same to ensure that the chipload of the end mill can stay the same. This is especially difficult because the slower the end mill turns, the higher the load on the motor gets, which means that with an uncontrolled motor, a stall can happen pretty quickly under heavier loads.
What we found was that the speed control of the Makita router was actually extremely good, with compensation happening less than 3/10ths of a second.
Given that we were working on building our own custom electronics to allow for the use of PWM speed control, a lot of tuning went into the motor to ensure a fast response.
Lastly, with regards to PWM control, we also found out that we needed to ensure that our electronics supported a wide variety of PWM signals. We found that each controller had a different signal speed, which meant that we needed to ensure the motor controller itself needed to be able to interpret the signal reliably.
CNC Compatibility
Given the popularity of the Makita RT0701, we naturally built the body size of the router at 65mm and most of the shared dimensions. However, differences include:
A longer cable
Detented speed potentiometer
Additionally, we’ve created the wiring for the PWM signal cable to be adaptable with factory provided plugs to allow plug and play functionality with most common hobby CNC machines. Users can also hardwire their PWM signals.
Safety Compliance
To ensure that the product is safe and can be sold in North America, the AutoSpin T1 has been certified under UL1004-1 standards. Additionally, we believe that the AutoSpin is safer than the typical router, as it can be shut off and turned on remotely through the controller, which means that if the machine needs to be stopped in software, the controller can (and should) be configured to turn off the router automatically as well.
Who is this for?
The AutoSpin T1 is directed as a default option for low to middle end hobby CNC machines or a drop in replacement for hobby CNC machines that already use a similar 65mm size router. Here are some of the key features:
ER11 collet system, allowing for use of a standardized and readily available collet system
Higher quality bearings ensuring smoother operation and longevity over budget routers
Signal wire, allowing most hobby CNC controllers to control On/Off and speed between 10,000 to 30,000 RPMs, as well as the ability to be controlled manually
Longer AC cable
Controller Compatibility
The AutoSpin T1 has been tested with:
Masso controller
Buildbotics controller
The LongBoard (found in the MK1 and MK2)
SLB and SLB-EXT
Carbide 3D controller
Thank you to our beta testers for their testing and feedback!
Virtually any controller that has a 5V PWM output for spindle control will work with the AutoSpin T1.
The AutoSpin T1 can also work independently without using the controller for speed control. The AutoSpin T1 can be turned on and off, and have the speed be controlled with the potentiometer dial at the top of the router. To ensure reliable operation in manual mode, the potentiometer dial is detented, which prevents the dial from moving during cutting and high vibration operation.
Spindle vs AutoSpin T1
There are notable similarities and differences between spindles and the AutoSpin T1 that can help you determine what is right for you:
Spindles are generally more expensive than the AutoSpin
Spindles require more complicated wiring and setup
Spindles are generally quieter and efficient, and can output more power
Both can be turned on and off, as well as have their speed controlled by the CNC controller
The AutoSpin T1 is best for users who:
Want to have their setup be as simple and compact as possible
Already use and are happy with the power and versatility of a router
#image_title
Addressing Power Ratings
One of the biggest general considerations users will make between a router and spindle will revolve around power ratings. We believe the way that power ratings are advertised in the industry can be misleading and don’t tell the full picture of how a motor performs in real life.
Wattage: Most spindles and routers will have a power rating in watts. Common wattages are 1.5KW and 2.2KW for some entry level spindles. For the Makita RT0701, you’ll see 1.25HP as the rated power. For all of these ratings, they typically indicate the peak input wattage. This indicates the maximum amount of power the motor can handle for a short period of time. This doesn’t indicate how long it can handle it for or under what conditions.
Like car engines, there is a relationship between power output, torque and speed. In a standard 3 phase spindle, torque generally remains flat in the operating speed of the motor, and only reaches peak output power at its maximum speed. This means that the spindle at a lower RPM does not fully use its capacity.
For the universal motor in the AutoSpin T1, the torque of the motor is highest at its minimum RPM, and diminishes as the speed increases.
In practice, this means that a router can actually perform quite well, especially at lower speeds. As you can see in the graph, the green line shows the line power output of the Makita RT0701 and the blue line shows a typical 1.5KW spindle. And as we’ve noted in our tests, the cutting performance actually lines up with the tests, where it is easier to stall a spindle at low RPM compared to a router.
#image_title
Another thing to note is the rating system used for power tools in general. You can often see tools rated for 1.25HP, 2HP, and even 3HP at times. Based on a typical 120V 15A outlet found in North America, we can reasonably expect 1800 watts, or about 2.4HP. The reason why power tools can be rated so high is because a circuit can handle above 1800 watts momentarily without the circuit tripping. So as we mentioned earlier, these ratings are for peak power, not average or constant power.
Due to this, in the eyes of the certification, the motor is only “rated” for an output of approximately 350 watts at 30,000RPM, even though in practice, this can vary widely.
All this is to say that in practice, when working with typical tooling up to ¼” (which is what we expect most users to be working with the ER11 collet system) users will find the power of the AutoSpin more than adequate.
Makita RT0701 vs AutoSpin T1
There are also some notable similarities and differences between the Makita RT0701 and AutoSpin T1:
The cable on the AutoSpin T1 (14ft / 4.3m) is longer than the Makita RT0701, which makes it more suitable for CNC machine use.
Both use similar components and have very similar form factors.
Both have a 65mm diameter body, making it compatible with any 65mm router mount.
The AutoSpin T1 can be controlled with a PWM signal, found in most hobby CNC controllers. This allows the AutoSpin to be turned on and off by the controller, plus, it can adjust and change speeds on the fly.
In a way, the AutoSpin T1 is an improved version of the Makita RT0701 and serves as a drop in replacement for customers who want to add features to their machine with minimal changes.
Production Schedule
Beta testing was conducted and concluded in mid-2025.
We are now in production for the AutoSpin T1. We expect units to arrive late January and to start shipping out by mid-February.
Pricing
The AutoSpin T1 router is positioned at a competitive price point to the Makita router: $149 USD / $199 CAD (vs $119.99 USD / $165 CAD.)
We’re excited to announce the release of gSender v1.5.7, a version focused on refining performance, fixing long-standing quirks, and adding new functionality to make your CNC workflow smoother than ever.
Check below for a full list of changes. Updates are available via Github or follow the update prompts in-app on gSender startup.
v1.5.7 Changelog
Fixed issue with start job shortcut not firing in some situations.
Park shortcut now persists between sessions.
Unlock button now has same logic as large Alarm unlock button for Alarm 10 and 17 where it will reset and unlock for you.
Corner selection hidden for Z-only probe type.
Squaring tool calculations for custom distances are now correct.
Added support for Teensy boards in recognized devices.
Error line reporting mismatch fixed.
Stopping on start event codes should now correctly clear the planner and reset the board.
Added cut depth validation to Surfacing tool.
Auto-reconnect should work for Ethernet again.
Added import/export functionality for gamepad profiles.
Homing location now shows correctly on stats page.
Fixed issue with terminal history order.
Added new config option to run check on a file when it’s loaded in.
Fixed issue with rapid position shortcuts not memoizing positions.
GRBL spindle max/min again correctly updates the eeprom on change.
Config search behaviour updates to be more consistent with modified flag enabled.
Probe shortcut no longer causes an error 2 due to stale distance modal.
Rapid position shortcut no longer has a stale homing location value.
Hey everyone, happy new year! It’s time for a very exciting 2026!
Potential Resolutions for UPS Issues
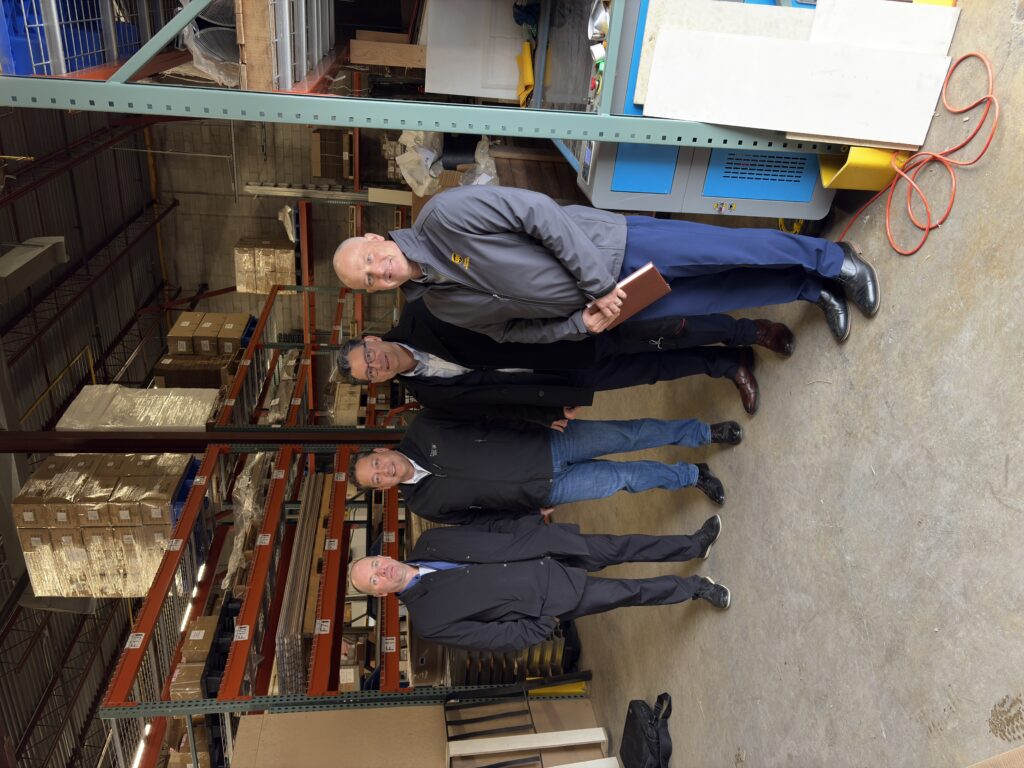
Visitors from UPS
We had some interesting visitors from UPS, including Sean Griffin, president of UPS Canada, Dean Tabakos, Director of Business Development at UPS, and Frank Perez, UPS President – Americas Region & International, Healthcare and Supply Chain Solutions (SCS) Engineering, and our UPS rep, Todd McCracken.
As we mentioned in our previous updates, we’ve been having some issues with UPS shipments, primarily with things getting stuck at the border. This meant that we were getting a lot of shipments being sent back without any reason. We were also being charged a lot of taxes and duties when we weren’t supposed to.
With all this going on, some of the high-level execs from UPS decided to stop by our office to take a look at what was going on and let us know some of the work they were doing to get shipping back on track.
Reducing issues with customs declarations
With the change in regulations requiring all shipments entering the US to have customs clearance (before it was just for shipments above $800), UPS and other shipping and logistics companies were slammed with a significant volume of declarations needing to be made. With a big part of this process being human-driven, many shipments were being held at the border or sent back for customs issues and errors. We were told that with the implementation of new systems and AI, they are now able to automate more than 95% of the processes, meaning that the error rate and speed have gone up dramatically.
Reducing border hold-ups
When a multi-part shipment is created, but all parts of the shipment are not in the same truck, every item in that truck is sent back. Initially, this caused a huge number of shipments to be shipped back. With the change in generating separate manifests, shipments are accounted for on a truck-to-truck level, which eliminates issues created when multi-part shipments don’t travel together.
This is expected to reduce the number of shipments being sent back from the border, but also reduce transit times and lost packages because prior to this change, multi-part shipments needed to be held in a facility until all of the parts of the shipment are ready to cross the border. This specifically impacts us because most of the machines that we ship must be shipped in several packages, which means that if all boxes for that shipment are not together, they will wait in a warehouse until they are. This creates more opportunities for damage as they get transported around the warehouse as they wait, or get lost if they are misplaced.
—–
It’s hard to say how much things are going to change in the short term, but we are obviously optimistic that as we get settled into the new normal of more complicated reporting and customs processes, we will have fewer shipping issues.
Tax Registrations for Nexus
Some customers may have seen us charge sales tax for certain US states. This is because we have reached Nexus in these states (usually $100,000 or $200,000 in annual sales, although rules and calculations vary by state). Taxes will be automatically calculated and charged, and we will remit them directly to the state to comply with US state tax laws.
Arizona
Colorado
Florida
Georgia
Illinois
Indiana
Maryland
Michigan
Minnesota
North Carolina
New Jersey
Ohio
Pennsylvania
South Carolina
Tennessee
Texas
Utah
Virginia
Washington
Wisconsin
Some of these states are new, some of them we have reached Nexus for some time ago and we have been collecting taxes already.
AltMill 4×8
Production for the AltMill 4×8 continues to move forward, with business as usual with:
More short and long term wear testing ongoing
Packaging planning and design
Resource development for the 4×8
Working with and gathering feedback from beta testers
Nathan with packaging planning for the AltMill 4×8
ATC
Jon testing the rack partsATC packaging design
Auto Tool Changer work continues on as we wait for production to complete for parts. Some work done for December and ongoing include:
Continued testing for software and hardware
Packaging design and optimization
Testing of different compressor sizes and configurations
ATC production and development continue to move forward.
Closed-Loop Stepper Motors
First off, our closed-loop stepper motor kits are now available for sale! This kit allows users to install closed-loop stepper motors onto their LongMill.
In other news, we got a batch of closed-loop motors which had the wrong firmware onboard, which gave us a chance to reprogram and look into the tuning parameters for motors. Going through this gives us an opportunity to look at continual optimization of different aspects of our machine systems.
Certified VFDs
As we mentioned in some of our previous updates, we have certified our VFDs for the Canadian market. We initially certified around 100 VFDs in our first batch and are in the process of getting our next large batch of VFDs to ship to customers still waiting on their units. We were able to get around 40 units done early, so we will ship them to customers currently in the queue. We expect the remaining units to arrive in January to complete the rest of the queue.
LongMill MK3 Development
LongMill MK3 is in official development. Here are some design goals:
Reduce part count and variability
Reducing the number of parts reduces the amount of time needed to assemble the machine. Additionally, reducing the number of unique parts also allows the assembly process simpler by copying the same processes across different areas of the machine, plus reduces the amount of supply chain and inventory management we need to do. We expect the LongMill MK3 to have 30% fewer unique parts over the LongMill MK2.
We have a mix of parts that come from the LongMill MK2 and the AltMill, plus a bunch of new, unique parts that are specific to the LongMill MK3.
Improve reliability
The LongMill MK3 will use the latest family of SLB-EXT and closed-loop motors, self-adjusting anti-backlash nuts, and linear guides to provide significant improvement to machine reliability over the LongMill MK2.
Keep affordability
With improvements to our assembly and QA process, changes to the design, and larger economies of scale, the LongMill MK3 will have a target price with beginners and hobbyists in mind.
Lower the barrier to entry
The LongMill MK3 comes in conjunction with many new features and products, including:
The AutoSpin T1, which aims to provide spindle-like features and functionality at a lower price point
Inductive sensors included by default, implementing homing and other positioning checks
Currently our main focuses are in:
Producing and testing our first batch of prototype rails (expected to arrive end of Jan)
Producing and testing our first batch of laser cut steel gantry parts
Designing and developing a new set of electronics (currently code-named the SLB-lite), to bring down the cost of the electronics used in the LongMill to better fit the needs of beginners
Schematics in the works for “SLB-Lite”
AutoSpin T1
As mention in the last month’s blog post, we have now completed production of the AutoSpin T1 and are currently waiting on the arrival of the tools. We are expecting them to arrive mid-February.
10 Year Anniversary Party
Can you believe it’s been 10 years since we started Sienci Labs? We’re planning something to celebrate. Details are still percolating but this is what we have in mind.
Open House (afternoon): Shop tours, demos, and hang out/meet our team
After Party (night): Big, casual party and rave in our back warehouse
Everyone is invited, stay tuned on our social media for more details coming soon.