
Hey everyone, we just wanted to share a quick and simple project to add some extra workholding options for your LongMill. This project also works great for other CNC machines so feel free to adapt them for whatever setup you have. We’ll be providing links to all of the files, gcode, and links to the parts and bits you need to use below.
One thing that we want to experiment with is in providing ready-to-run gcode to the community. Basically what that means is that rather than for us to provide the general design files, such as with a 3D model or vector file, users just need to have the right size material and bit to be able to create something. We believe that this will help lower the barrier for new beginners to do projects as they continue to learn to CNC. This also means users will be able to make stuff without needing to go through a CAM program, which we believe is one of the more challenging parts of the process. We’ll of course still be providing all of the other design files and info so that users can still modify and remake the files to their liking.
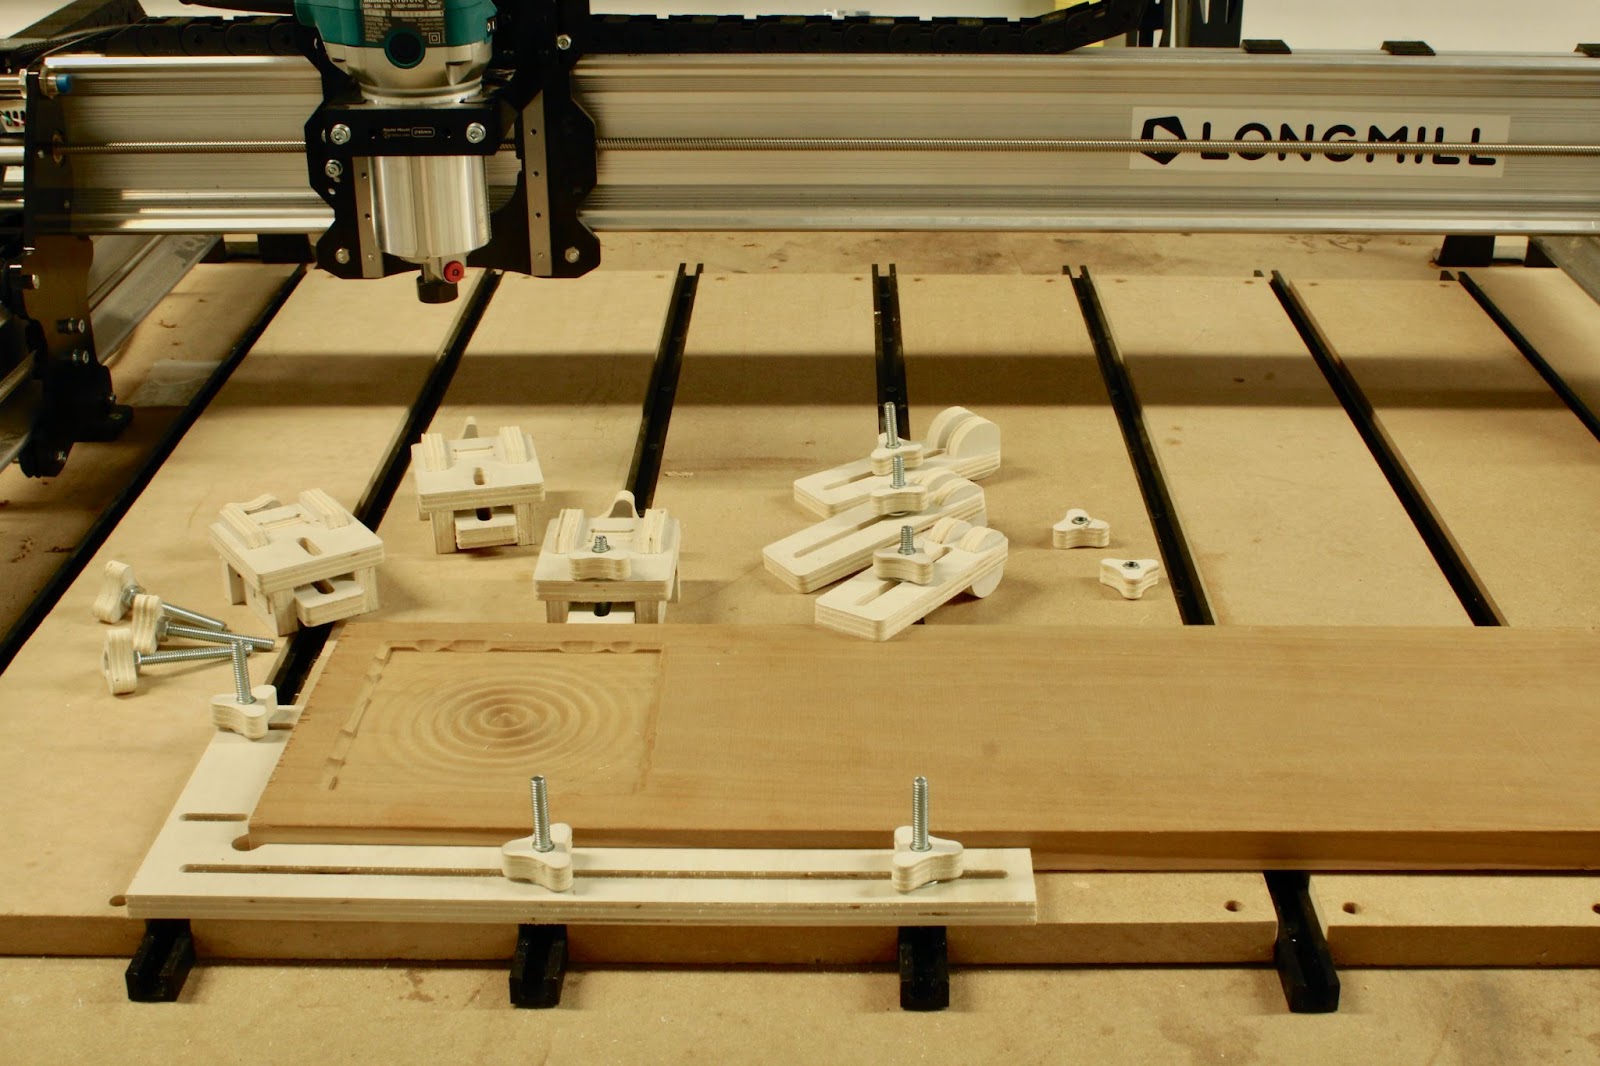
Clamps used for CNC workholding are always at the front lines of where the action happens, and because of this, are prone to getting chewed up or damaged. Having a CNCable design that can be made from scrap wood makes it easy to make extras whenever you need more or want to replace them. The goal for these designs is to be able to allow folks to make their own clamps using cheap and commonly available materials.
For these projects, you’ll need some
- Plywood or other sheet material. We recommend using 3/8″ or 1/2″ material
- 1/4-20 hex bolts of various lengths. I’ve found 1-1/2″ and 2″ bolts are pretty good lengths to start with
- 1/4-20 nuts
- 1/4-20 threaded inserts
- 1/4″ washers
We’ll also assume you have some sort of t-track or threaded inserts installed in your table as well. Depending on the t-track you have, you may need t-bolts that fit as well. If you’re looking for a t-track for the first time, I’d recommend finding some that have a profile that fit ¼” hex bolt heads instead, as compatible hardware will be easier to interchange and source.
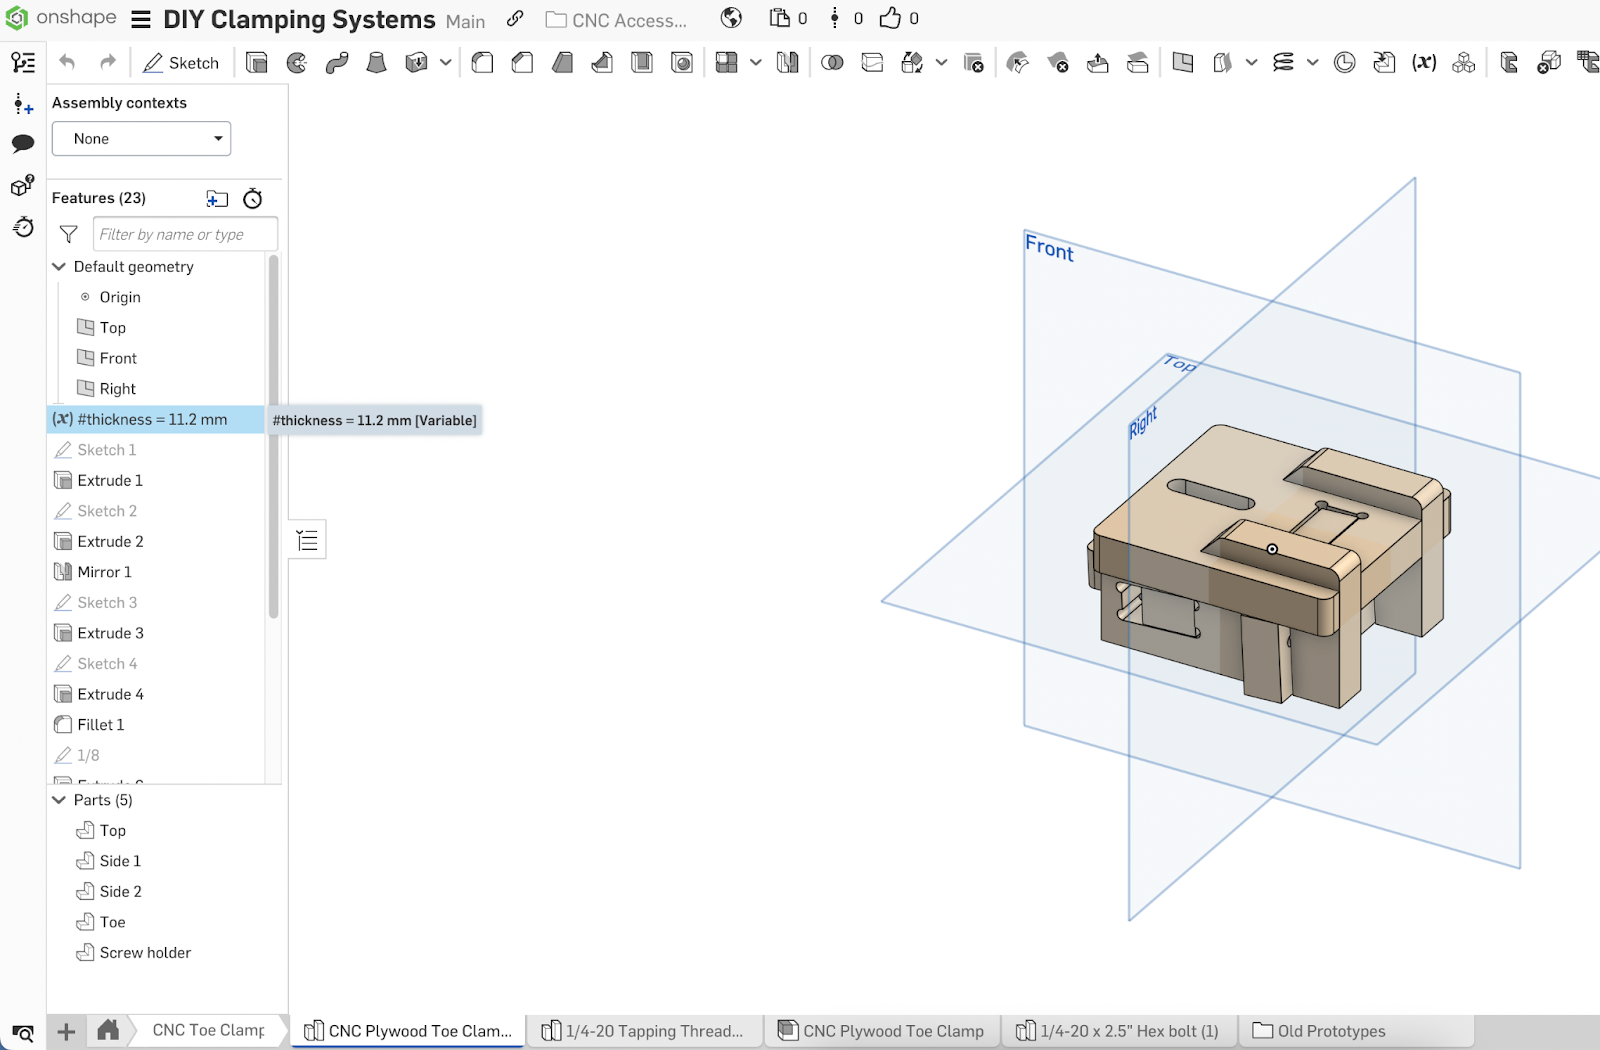
The pre-made files for this project are made for 3/8″ to 1/2″ plywood because they are common sizes, but if you want to use other thicknesses, the Onshape design document is publically available and can be adjusted to the materials you have on hand by changing the “thickness” variable on every Part Studio. The downloadable design and gcode files are pre-made for 3/8″ and 1/2″ material.
Files for download on Google Drive: https://drive.google.com/drive/folders/1-yqwXRzFJ7Vkuc_LlHl02ixcUFjN3CYX?usp=sharing. You’ll find:
- DXF files
- Gcode files
- Image preview of the parts
Onshape offers a free, hobby and education use license that offers the full functionality of their program on the cloud, with the exception that all projects made on the free plan are public and searchable. This means that derivatives of this design will also be available to the public.
To modify designs, you will need to create an account on Onshape and duplicate/copy a new version to make changes. A few other notes:
- When importing your DXF into a CAM program like Carbide Create or Vectric, please note that if they are coming out the wrong size, you may need to change your project units. I’ve found that setting the project units to inches usually works the best. Alternatively, you can scale them to the right size.
- DXFs from Onshape are not usually joined, so you may need to use a “join vector” tool before creating toolpaths.
Most CNC users will likely want to export all of the parts as DXFs. This is a very easy process. Simply right-click the side of the model you wish to export the face of and “Export as DXF/DWG”. Then import the vectors into the CAM software.
https://cad.onshape.com/help/Content/exporting-files.htm
General Cut Settings
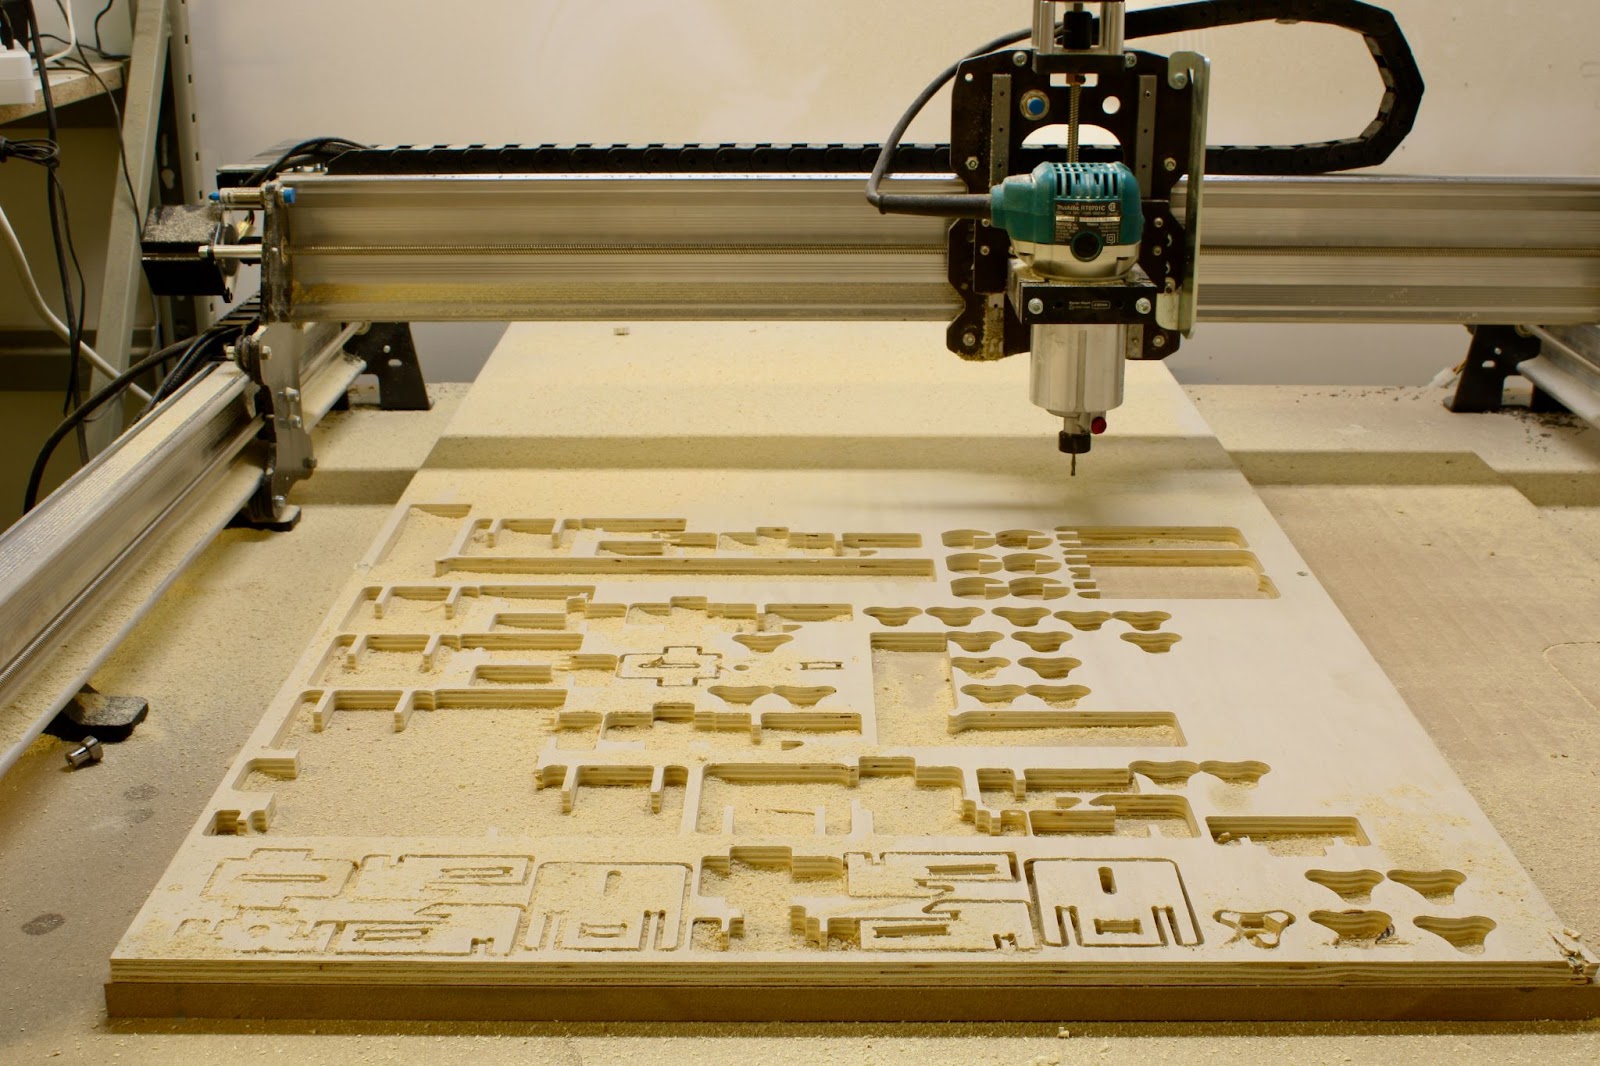
All of these clamps can be milled easily on a CNC machine and assembled by sliding the parts together. While the downloadable designs are made for 3/8″ and 1/2″ material, variations in the thickness of your material may affect how well parts slide together. For the most accurate fitment of parts, I recommend measuring your material’s thickness with calipers, then using that thickness plus 0.1mm on the “#thickness” variable in Onshape. This will automatically adjust areas of the design that rely on thickness, such as the joining slots and holes. That being said, some gentle persuasion with a mallet will usually do the trick as well.
Everything is designed to be cut with a 1/8” bit, and extra reliefs or “dogbones” have been added for everything to slot together nicely. Please note that if you use a different sized bit using our pre-made gcode, your parts will not come out to the correct size.
If you want to make your own gcode files, here are some general recommended settings.
If you want to get the cleanest looking cut, a downcut bit will work well and a compression bit will work even better. For the sake of accessibility, all of the designs have been made to work with ⅛” bits.
As a side note, I just wanted to mention about using corncob bits. Whenever I make slot-together projects, I actually generally use a 1/16” corncob bit because 1) it leaves a fairly clean top and bottom edge 2) has a thicker overall body, which makes it less prone to breaking compared to a fluted 1/16” bit 3) because it leaves most of the dust in the cutting path, most of the time I can get away without needing any tabs or something to keep the piece from flying out 4) since the radius is pretty small, a relief on the inner corner radius isn’t necessary for parts to fit together and 5) because the cuts are thinner, it also makes less dust and waste overall. Since ⅛” straight bits are almost ubiquitous, I’ve just made the designs work with those, but if you can get some 1/16” corncob bits to experiment with, I highly recommend it.
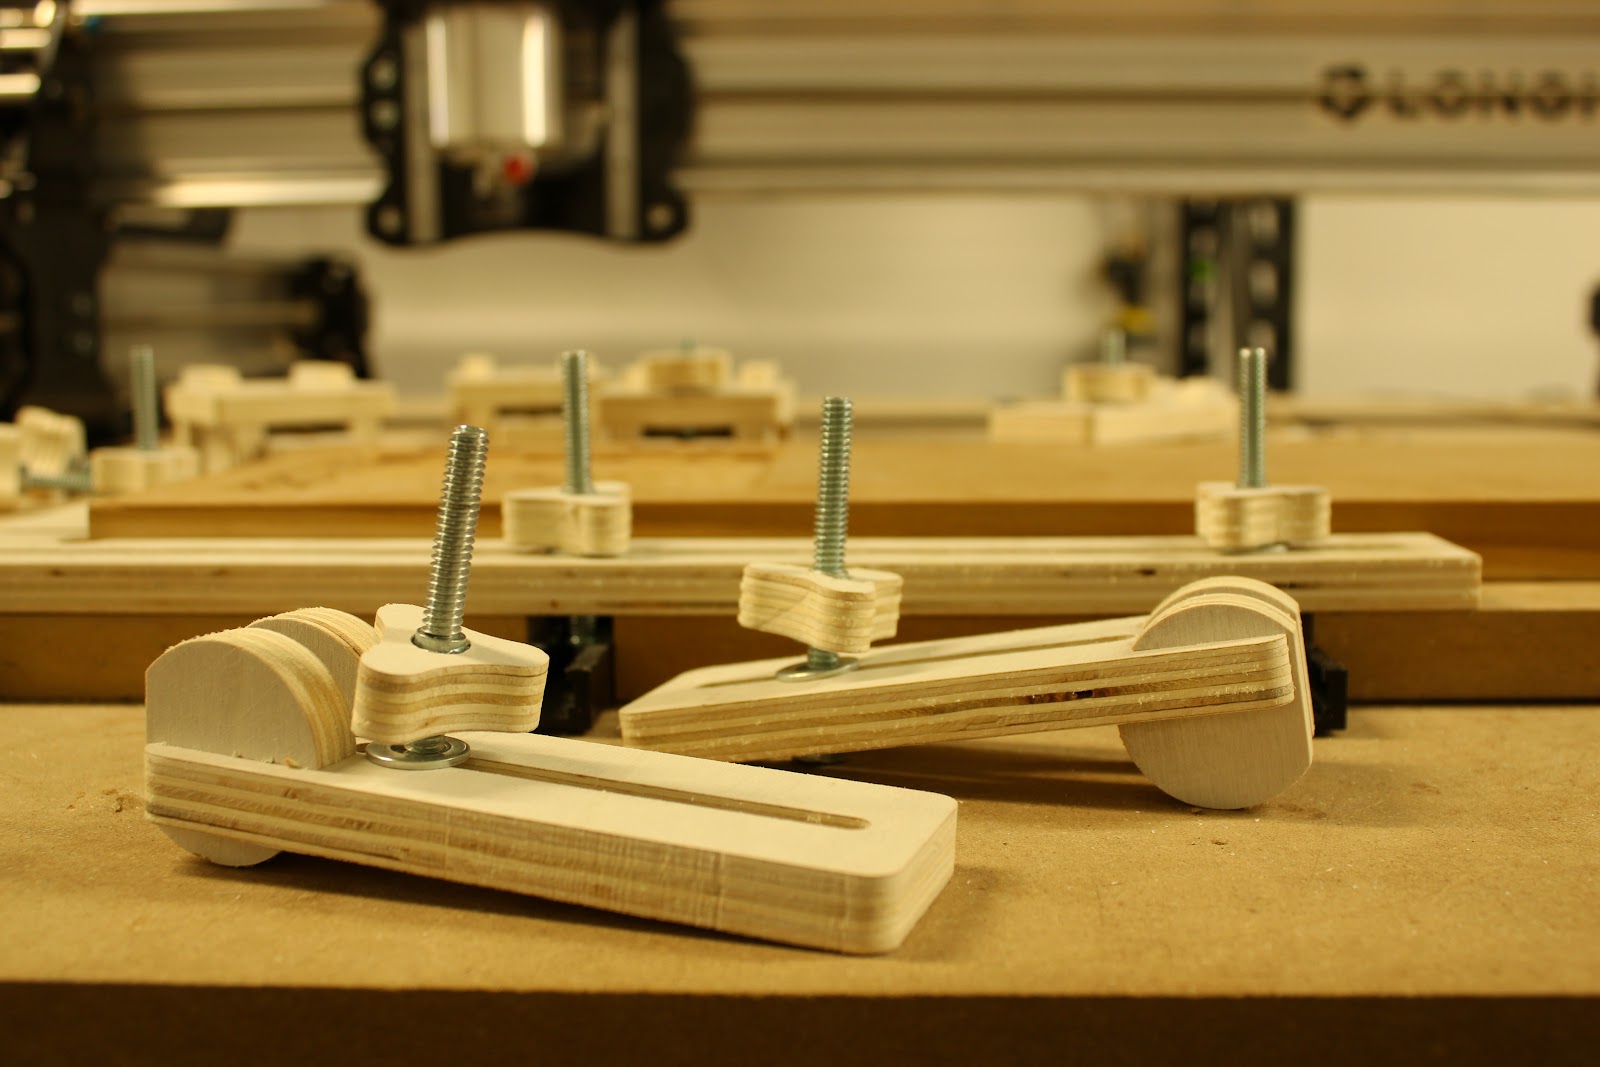
Project 1) Hold Down Clamps
Hold-down clamps are versatile and simple to use. They work by “holding-down” your material by pushing down on the top of the material.
There are a million different ways to make a hold-down clamp, but this design is unique as it uses a rounded support at the back to allow for the right angle to apply downwards pressure against your material. The most optimal angle for securing your material is at a level or slightly angled down position. Based on the thickness of your material, simply flip the clamp upside down to use the side that offers the most optimal angle.
Since these clamps are made of wood, even if you have a bit of an “oops” and run into them while carving, you’ll minimize the damage you’ll do to the machine and since you can make them on your CNC, you’ll basically have an unlimited supply!
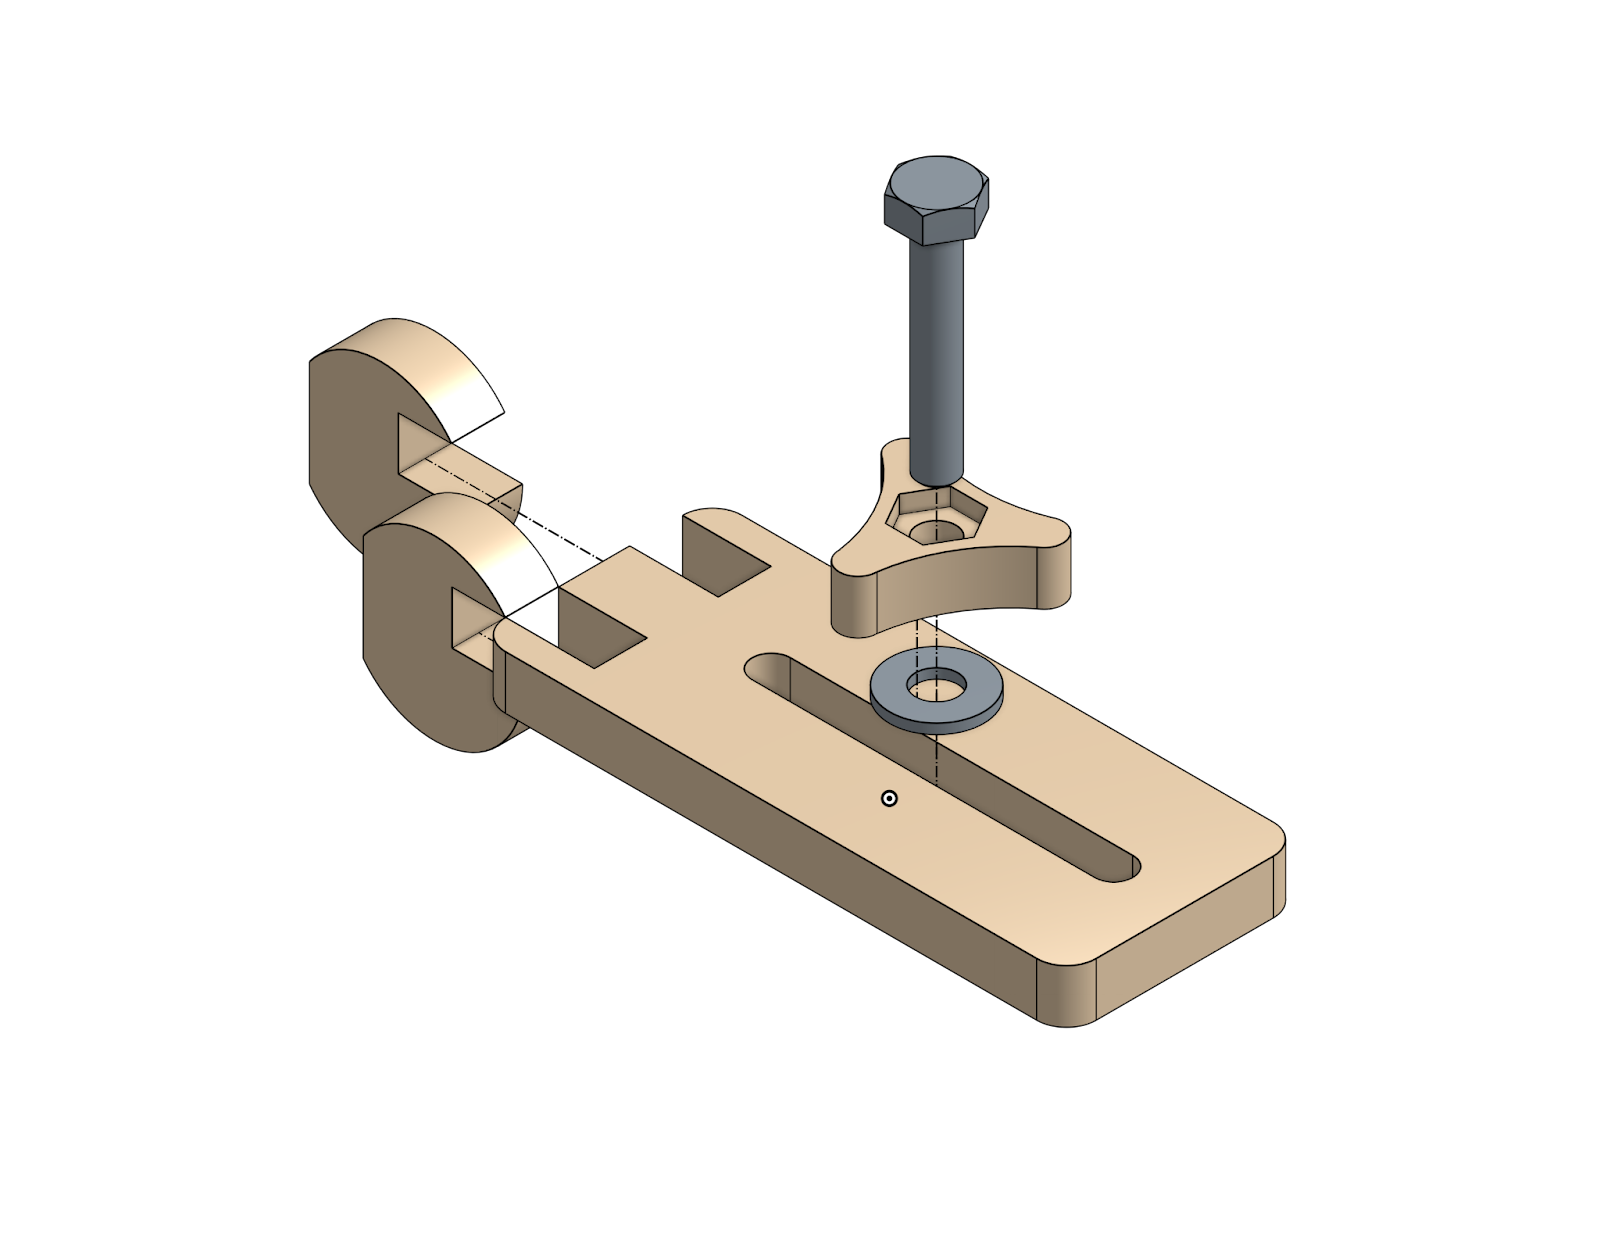
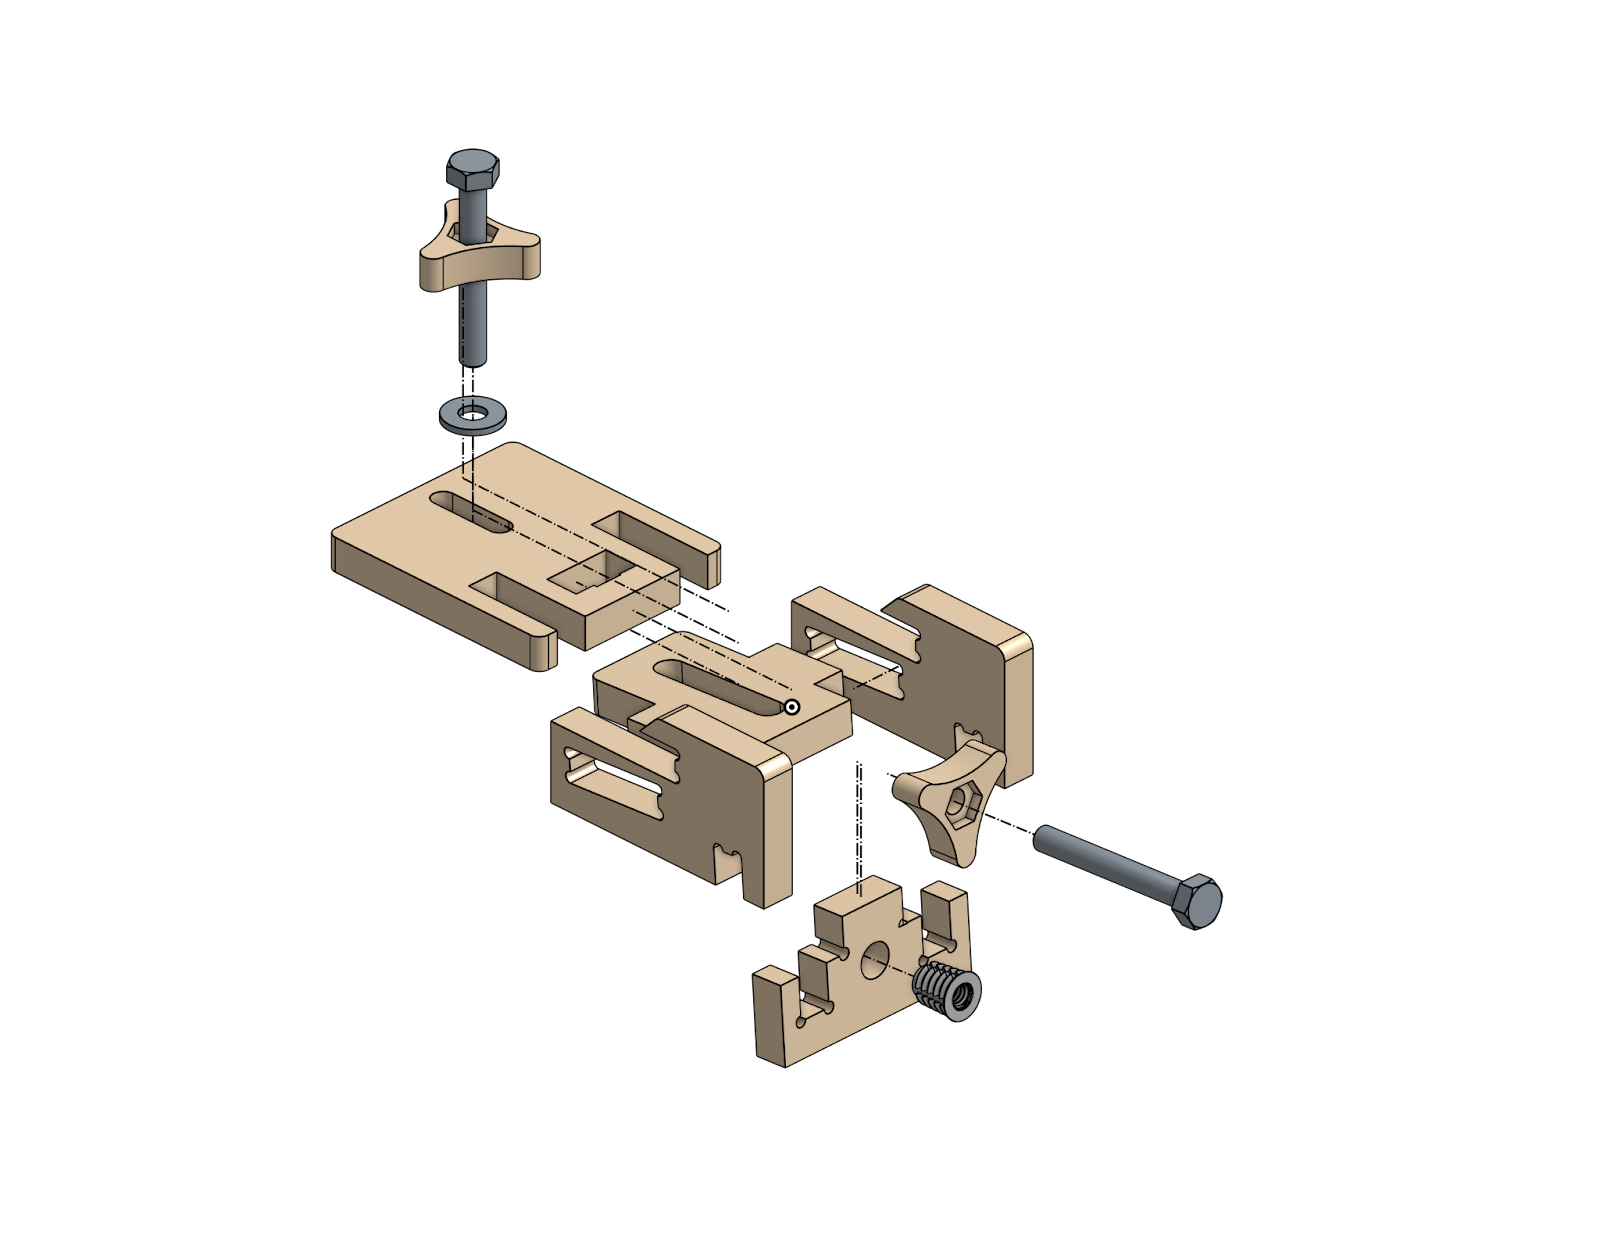
Exploded View
Tips, notes, and suggestions
- Threaded inserts are super handy in adding threaded holes to wood. Simply fit a hex head driver or Allen wrench into the top end of the insert and screw it into the pilot hole. We sell these in the store but they are also easy to find on Amazon or at hardware stores.
- Knobs and the semi-circles are prone to flying out after cutting, so I recommend milling them a little slower on the final pass than you would on the body of the clamp.
- You’ll need different length bolts to accommodate different thicknesses of your project, but I’ve found that 1.5” and 2” bolts are suitable for most applications.
- If you make the toe clamps in the next part of the article, make sure to make extra knobs as you’ll need them there too!
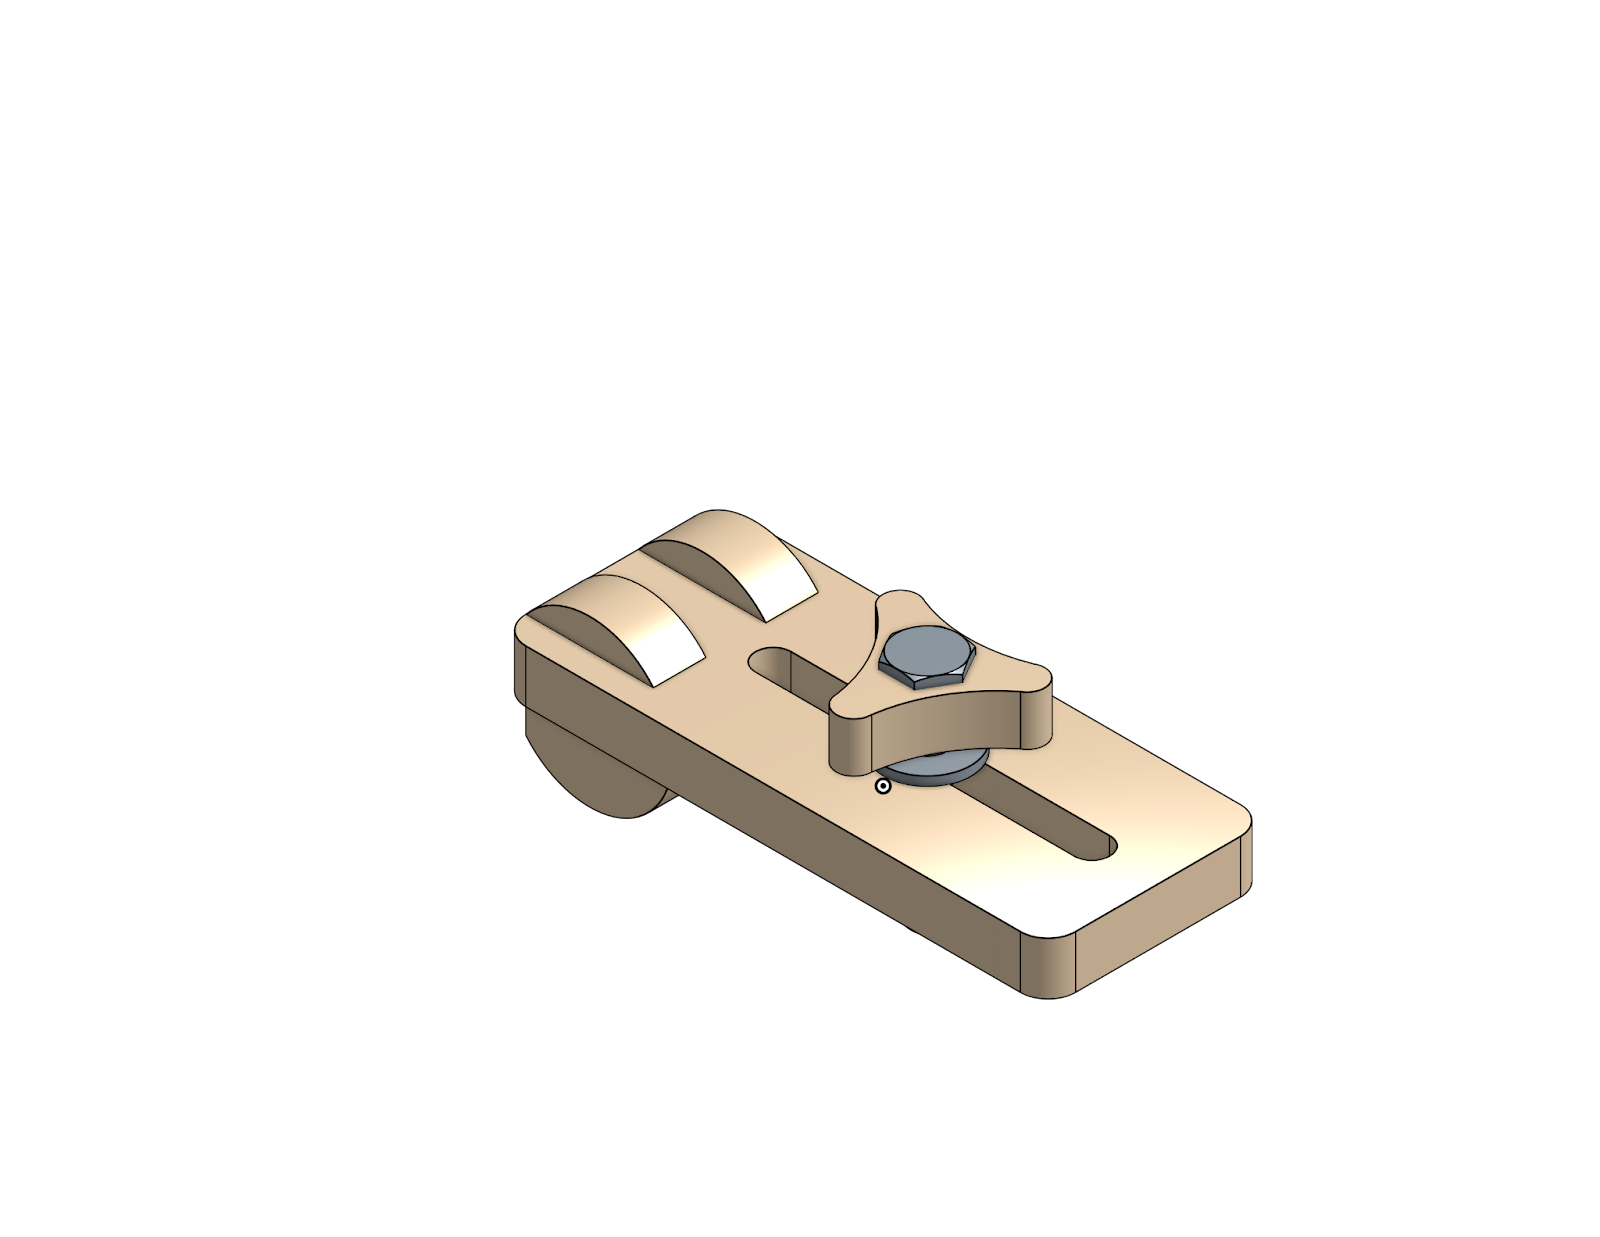
Project 2) Toe Clamp
If you don’t want to have clamps in the way of the top surface of your material, toe clamps are the way to go. By pushing in from the side, they stay away from the top of the material, and by angling the force downwards, we’re able to keep the material from lifting up as well.
This clamp must have some sort of hard stop for the other side of the material to butt up against. I’ve also included some designs for corner stops that can be bolted to a t-track table, but any solid stop for the material will work fine.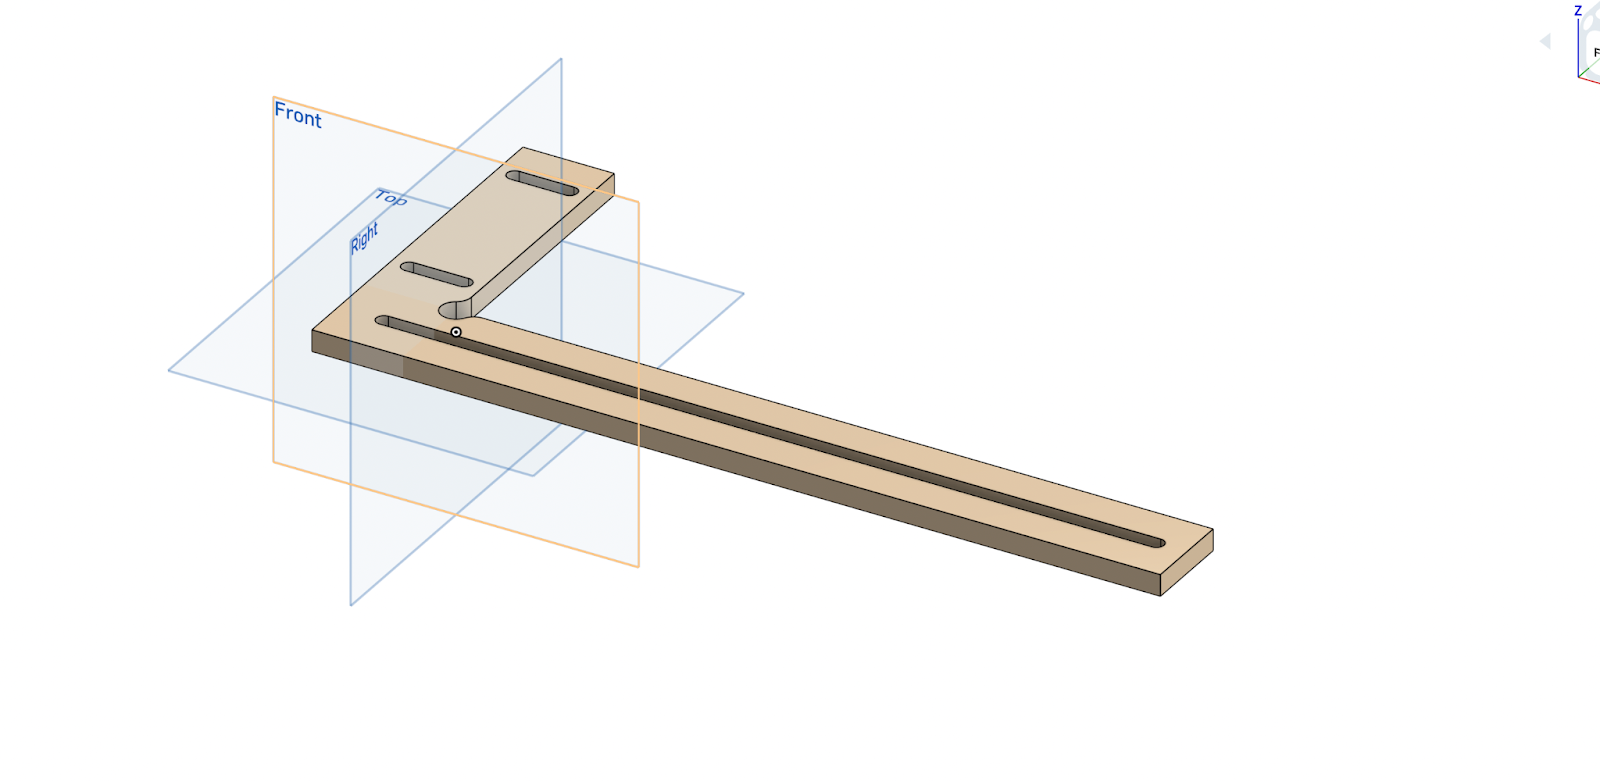
Tips, notes, and suggestions
- If your clamp can’t get close enough to your material, try using some scrap blocks to fill in the gap. This can also help if your clamps are getting in the way of your spindle or router
- Watch out that your clamp doesn’t slide away on the table when you turn the knob. Because of the mechanical leverage you get in the screw, the amount of force you’re putting on the material may be enough to slide away the clamp as well.

Final thoughts
I hope you find these designs useful and offer a starting point in building up your CNC workholding arsenal! Since these designs are freely open for you to use and modify, please feel free to make changes to the original design to make improvements and fit your needs.
We’re planning on continuing to design and share projects for our community, so make sure to subscribe on our social media.