Going Bigger – Announcing the Development of the AltMill and Extended Versions of the LongMill

One of the most frequently asked questions at Sienci Labs is “Can you build a bigger version of the LongMill?”. Well, I just want to assure everyone we have been actively working on the development of 1) an extended version of the LongMill and 2) the Altmill! Although we’ve been working on these projects for a couple of months now, these projects are still quite early in their development and we don’t have a ton of details to share. The purpose of this announcement is to start getting our community involved by learning what sort of machines and features folks are looking for. If you’re interested in being involved in this process, please make sure to fill out the survey.

What is the extended version of the LongMill?

Well, I guess it’s in the name. We’re working on a version of the LongMill that uses the core components of the original machine, but extends the rails and leadscrews to add more working area to the machine. The goal is to have a LongMill 30×48 or LongMill 48×48 machine. We expect to be working in a price point of around $2000-$2500 for a full extended version of the LongMill, with kits available for adapting pre-existing models of the LongMill to the larger size as well around $800 to $1000. Please note that pricing is an estimate at this point and may change.

What is the AltMill?

The AltMill is a new machine that we’ve been working on that focuses more on the more industrial/production end of the spectrum of hobby CNCing. This means linear rails and ball screws, more powerful motors, and other features that are designed for more intense CNCing. We expect to be working in a price point of around $3000-4000 for a 48×48 inch working area.

Timeline

Extended version of the LongMill

We are currently in the early stages of manufacturing prototypes of the rails for the extended version of the LongMill. We will be conducting testing between October and November, to push for a December or early 2022 launch.

AltMill

We are currently building to scale prototypes with wood, with plans to start producing prototypes from aluminum in the coming months. Due to the scale and complexity of the project, we expect to have working versions of the AltMill at the start of 2022 with a launch for the AltMill in mid-2022.

Beta testing

If you wish to be part of our beta testing program, please fill out the survey. You will be able to provide your information at the end of the survey.

General challenges of the project

Building larger machines also prevents new challenges. Here are some things that we’re working on addressing. We also discuss this topic specifically about the LongMill here: https://sienci.com/2020/06/05/things-to-consider-when-making-a-longer-longmill/
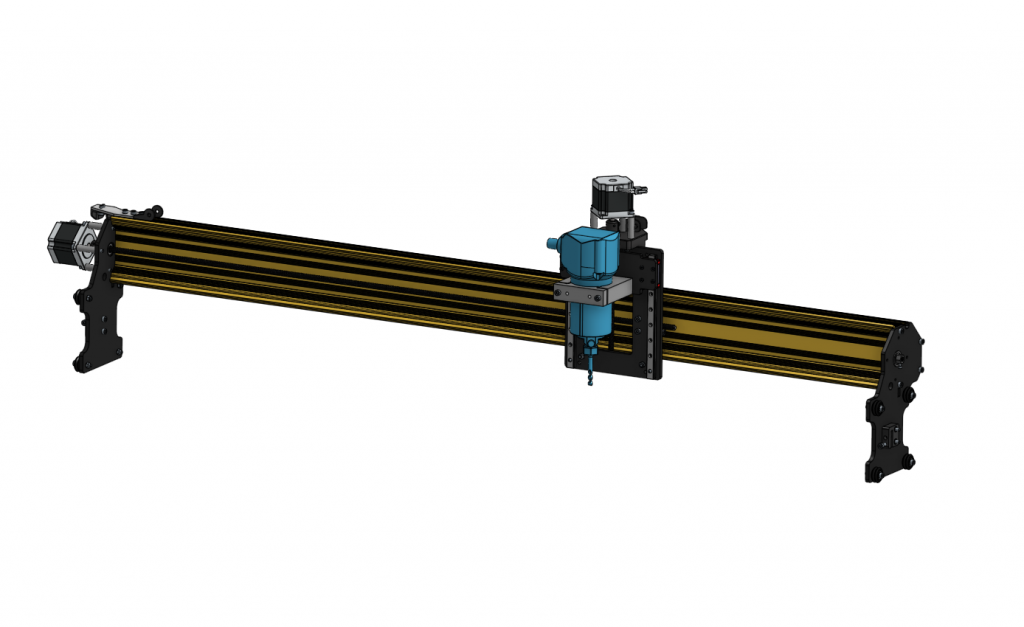
Rigidity

Longer rails have more flex, which means that we need stronger rails to compensate. For the LongMill, we are currently working on a new rail design that improves rail rigidity while keeping overall weight down. This should help keep similar levels of overall rigidity in the machine and allow users to run their machines with the same speeds and feeds as any smaller LongMill.

The AltMill on the other hand will use stronger linear rails and bearings, as well as a solid aluminum structure to ensure a high degree of rigidity.
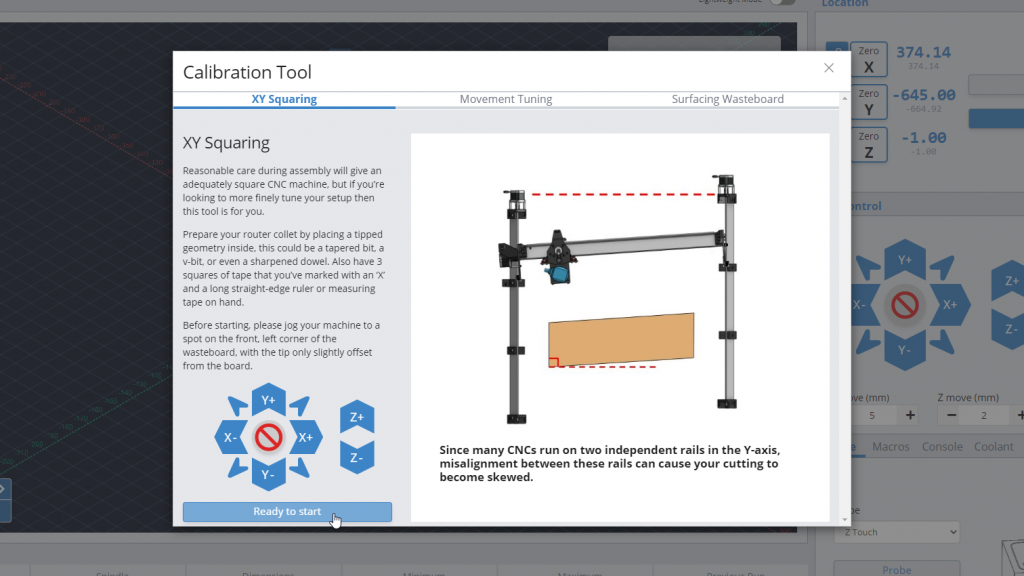
Squaring

Our machines rely on both Y rails to be parallel with each other and perpendicular to the X rail to ensure that the machine doesn’t rack or cut out of square. With the LongMill, we can generally rely on our table mounting procedure to ensure that the machine is square, but the larger and heavier the machines become, the harder it becomes to square the machine properly.

Squaring and calibration tool for the LongMill

To account for this, there are a couple of options:

  • A table which uses precision cut parts to help square the machine
  • A tool or measuring device included in with the machine
  • Making the machine smaller

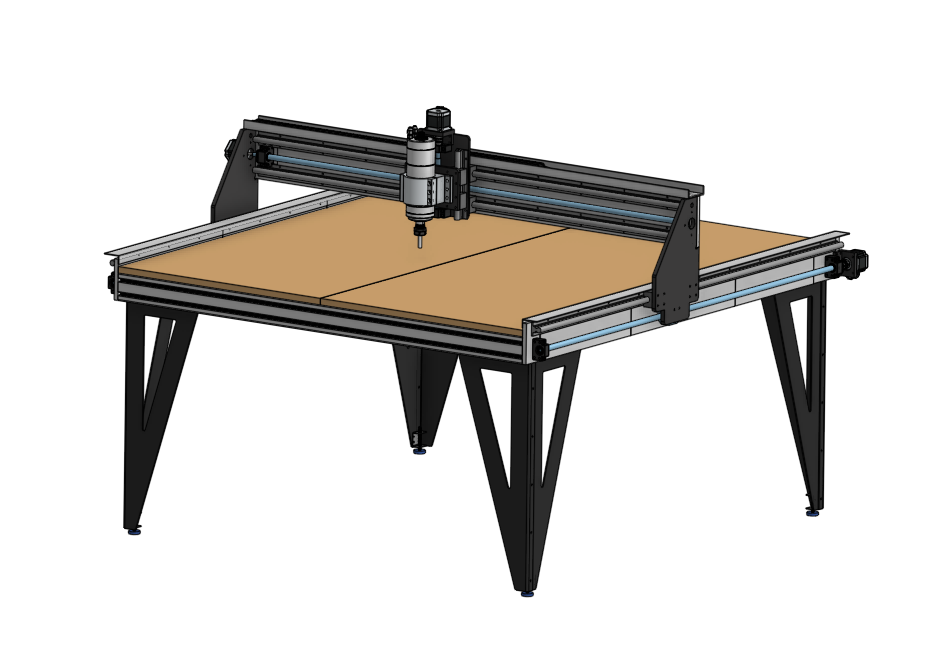
A table, in my opinion, offers the most precise way of keeping the machine square, which is why we are developing additional structures to support the machine that can use similar or same designs between both the larger LongMill or AltMill.

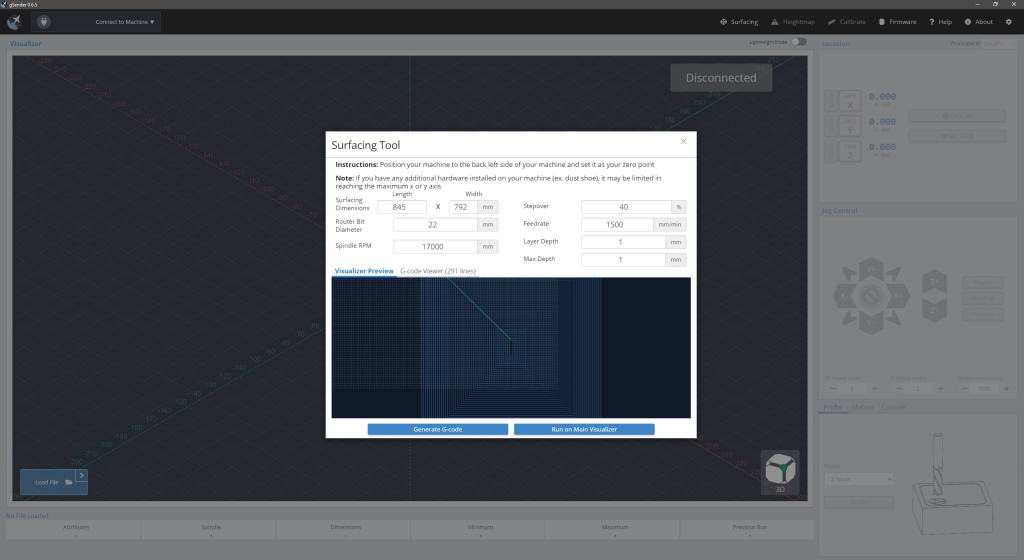
Beyond this, gSender also offers a calibration tool that will play a more integral role in working with larger machines.

Mounting

Although a LongMill 30×30 fits perfectly on a 4×4 ft sheet of MDF, it is generally difficult to find sheets larger than this for mounting larger machines. One option is to cut and join multiple smaller sheets into a 5ft or 6ft square base to mount a machine on or have a pre-built bench or table that the machine mounts to, with space in the middle to put a larger wasteboard.

In terms of a 30×48 LongMill size, customers could purchase a 4×8 ft sheet and cut it down to 4×6 ft size to mount the machine to. However, 48×48 machines and the AltMill would need to use an alternative method.

In this case, having a table would also offer a good solution to this issue.

Power

The larger a machine gets, the more power it needs. This means larger motors and drivers. This is because:

  • The parts that make up the machine that need to move are larger and heavier
  • We want to cut faster so that larger projects don’t take forever

I generally use the rule of thumb that no matter how large or small the machine is, you want the machine to be able to travel between the lowest left corner to the highest right corner in the same amount of time. So this means that the machine needs to travel faster the larger it is.

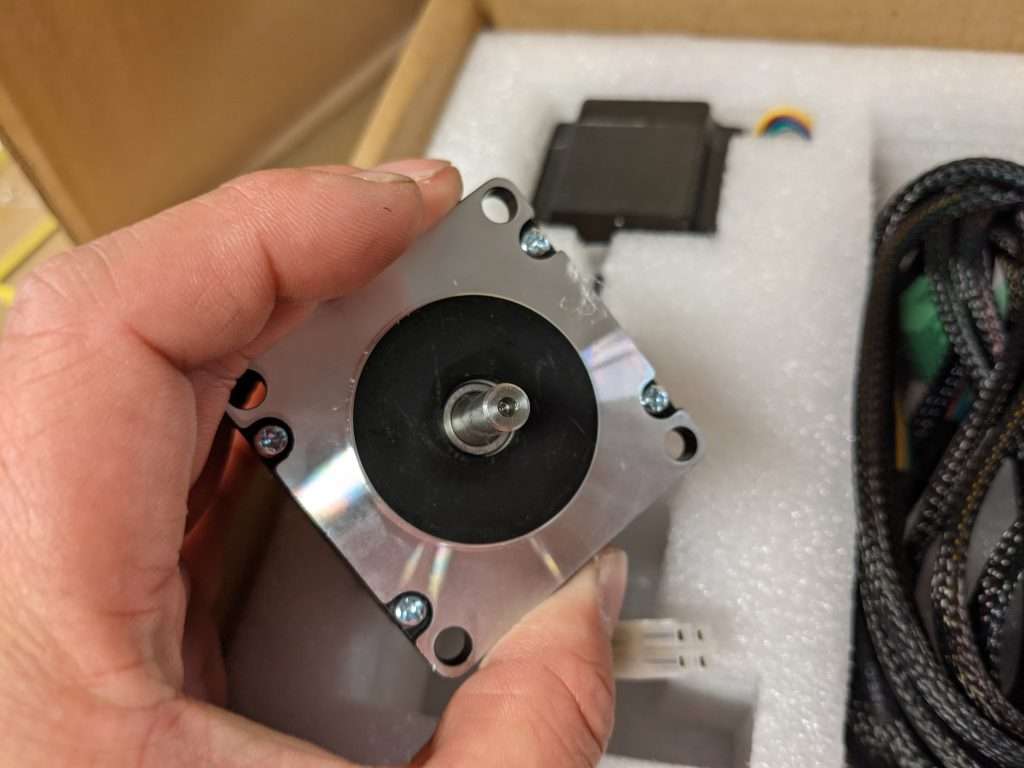
We are currently working on either using larger motors as well as optimizing the power from the stock LongMill NEMA 23 motors.

Spindle and router choices

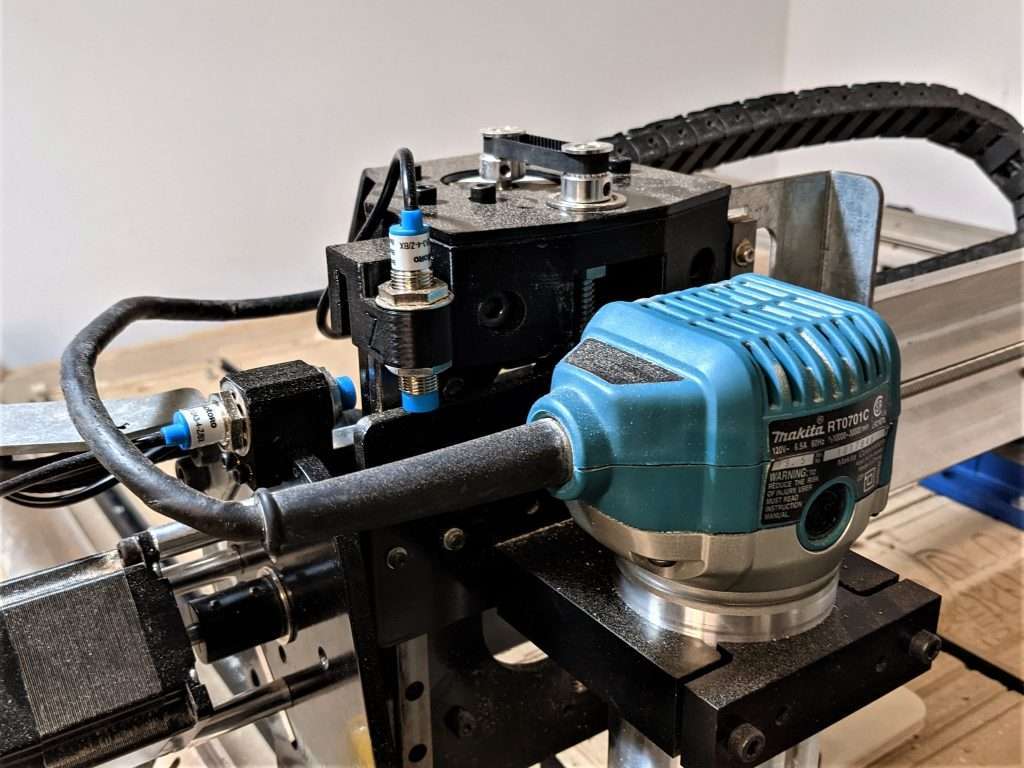
The bigger and more powerful the machine becomes, the router or spindle power becomes a limiting factor. Although I believe that the Makita router we recommend for our LongMills should be able to handle anything for the extended versions of the LongMill, a spindle may be necessary on an AltMill. Here are some hurdles to get over with spindles:

  • They are larger and weigh more, thus needing more hardware to support on a machine
  • Have higher power requirements, which means that users will also need to make sure their workplace can support it
  • Require additional wiring, which adds additional complexity
  • Generally not available in retail, which means that we have to source a spindle manufacturer and ensure we do proper QA and testing

Seeing as spindles could be used interchangeably between the AltMill and LongMill, this opens up the opportunity to offer spindles for both machines as well.
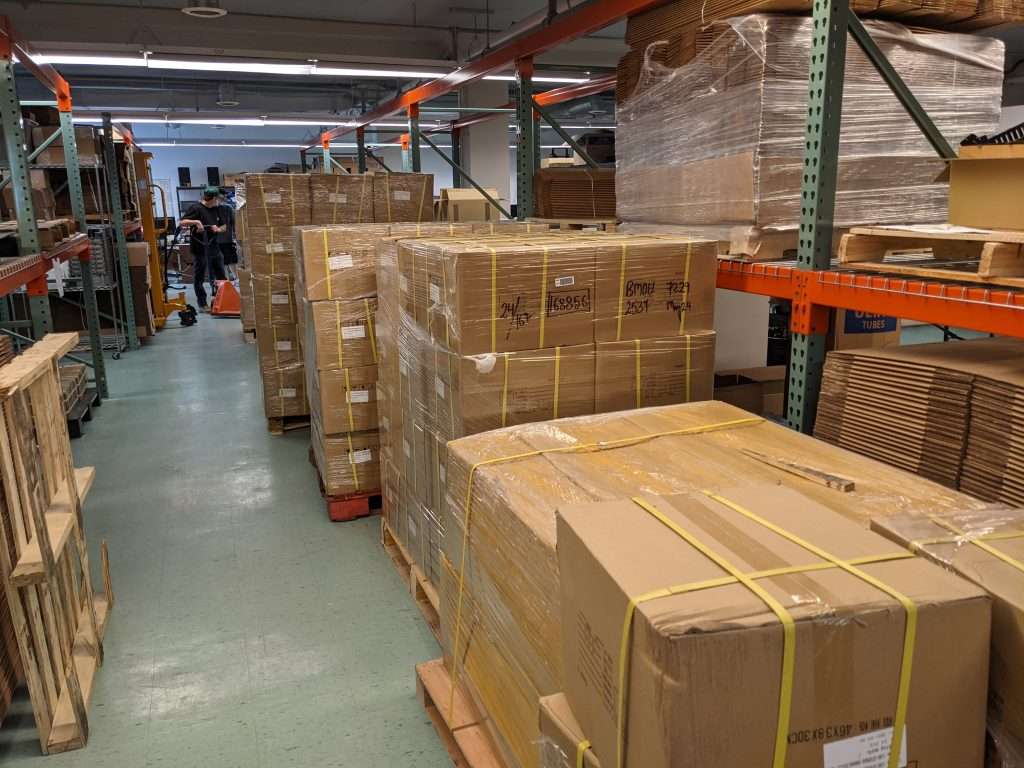
Shipping

Larger machines are larger and heavier, making it harder and more challenging to ship. The current shipping weight of the LongMill 30×30 is around 60lbs. Although fairly manageable, any heavier and larger than this, I feel would be unwieldy for the average user. Not only that, larger, heavier packages are more prone to being damaged during shipping, which is something we definitely want to avoid.

I expect our larger machines to be way bigger and heavier than this, and I estimate that weights will start to exceed 100lbs. This means either shipping the machine in several separate boxes, as well as figuring out the best way to handle the tracking and logistics on this.

Our goal is to continue to make it possible for us to ship by courier (UPS/Canada Post) to ensure that customers don’t need to worry about freighting. This should make our machines more accessible for the general public.

Pricing

Because of all of the factors discussed above, larger machines cost more. As with the current LongMill, our primary goal is to provide the best possible value by lowering manufacturing costs with the most optimal designs. We do make certain decisions, some good and some tradeoffs to achieve competitive prices. Here are some examples:

  • Using standard extrusions for building tables – easy to source and build with
  • Reducing the number of variations of the machine to take advantage of economies of scale (no custom sizes) – reduces the amount of different types of support and resources we need to create as well as reduces machine complexity by not needing to design high customizability, but means customers have less choice in the size of their machine.
  • Assembly required by the customer – better understanding on how the machine works and saves costs on in house assembly labour, but would take longer for customers to get up and running

On the other hand, there are some changes that will add costs that we feel are worthwhile to spend money on:

  • Partial assembly of the AltMill to ensure proper assembly of linear motion components – we are able to create jigs and tooling to make in house assembly and calibration easier than most customers
  • Tables and other mounting options for larger wasteboards and machines – ensure proper squaring and make it easier for the user to set up their machines
  • Larger lead screws and ball screws – Although more expensive, larger screw drives are needed to prevent whip which are more apparent in larger machines

Inductive Limit Switches – Production Update

Hey everyone here’s an update on the development of the inductive limit switches for the LongMill! If you haven’t read the last post, you can read it here: https://sienci.com/2021/07/30/longmill-limit-switches-coming-soon/

I know a lot of people are excited about this kit, and I assure everyone we’re working really hard on this. Over the last couple of weeks, we’ve been working on a couple of different things, including video and written info and content, continual testing, assembly instructions, packaging, and the supply chain for the kit. We are now waiting on our first batch of sensors and a couple of other parts to arrive from our manufacturers, and we will be starting packing and assembling the kits as soon as parts start to trickle in. All of the parts for the kit have been ordered and are expected to arrive in mid-September. We expect to start shipping kits a couple days after we’ve received all of the parts. Kits will be $60CAD or around $48USD each.

Our initial timeline for this project was to have a product released at the end of August. However, we had a minor setback due to some changes in part price and availability from one of the sensor suppliers that we initially ordered and tested samples from, so we have acquired samples from two additional suppliers, one of which we’ve fully tested and have decided to move forward with to use for production.

Some a bit more specifics that we’re working on to provide users include information about using different workspace coordinates, returning to a certain part of your job after a power outage or shutoff, and using jigs, which should add some extra tricks and functionality users can add to their machines.

Making your own

As promised in the last post, here are some instructions on making and assembling your own mounts and sensors if you prefer making your own over buying the kit from us.

Please note that these instructions are still in development, and additional resources and videos will be available for users soon. These instructions should help the general user population if they wish to make their own mounts and sensors.

Choosing sensors

The sensors we recommend using are:

Model: LJ12A3-4-Z/BX

NPN Detection

Detection distance: 2mm-4mm

Normally open

Supply Voltage: 5V* 

Choosing the correct voltage option is very important, as this particular type of sensor is more commonly available in a working voltage of 6-36V, which requires additional wiring to make work with the LongBoard. For using higher voltage sensors, you may need to use either the 12V auxiliary power from the board, 24V from the power supply, or from an external power source. That being said, I highly recommend sourcing the 5V variant of the sensor as this will make installation much more simple.

There are many variations of the LJ12A3-4-Z/BX, as well as other M12 sized barrel sensors that come in different lengths. In my experience, most seem to be more than accurate enough for this application, with a repeatability of 1 thou or better.

Most sensors also come with a set of nuts and washers, which can be used for mounting.

Making the mounts

All mounts can be 3D printed. The models can be found on our public Onshape document for the LongMill. The models can be found under Electronics -> Limit/Homing Switches. Right click on the model to export as an STL or your preferred 3D model file format.

These parts can be printed with most FDM printers. If you’re interested in reading about our 3D printing process, please check out this post. I would recommend using a higher infill for these parts since a more rigid part generally helps mounting.

All of the mounts use a pair of M3 heatset inserts. CNC Kitchen has a couple of videos on using threaded inserts on 3D printing that are awesome which talk about them in general as well as how to install them.

For our application, we found a fairly inexpensive and commonly available insert that works great. A drawing of the insert can be found below.

Here is an exploded view of the inserts.

Assembling the mounts

Here is a view of everything assembled before mounting to the machine.

And here is the exploded view:

Attaching to the machine

The mounts slide onto different areas of the machine as shown in the images below. Use the M3 screws to secure them. You will need to position the sensor to a position that lines up the tip (usually blue or orange) with the gantry you are sensing for. Loosen and adjust the mounts as necessary.

Wiring

Although the sensors for our kit will come with pre-wired JST connectors with a 2.5m wire for running through the drag chain, it’s likely that off-the-shelf options will not. You will likely need to extend the wires to be able to run the wires through the drag chains.

The LongBoard comes with ports to connect limit switches via JST4 connectors or with the detachable screw terminal block. Here is a diagram of wiring the inductive sensor using the screw terminal. Note that the 5V and ground lines are shared between all of the sensors, and each black signal wire is connected to their separate axis.

More info on wiring can be found on our resources for limit switches.

Firmware settings

Once your sensors are installed you may need to update your firmware settings to enable the limit and homing functionality. A full outline of all of the related firmware settings can also be found in our resources.

Conclusion

I hope that this information helps some of our more ambition users who don’t want to wait to get a kit from us set up limit switches on their machine. I also hope that this will give you guys a head start in exploring all of the functionality in adding limit switches to your design. Over the next couple weeks, our team will continue developing the resources for the installation of the switches, so I highly recommend staying in tune on our social media and our blog, and check back on our resources page to check for updated resources!

LongMill limit switches coming soon

Hey everyone. One highly requested add-on for the LongMill has been limit switches. For the uninitiated, limit switches are often used on CNC machines for 1) homing the machine 2) preventing the machine from reaching the limits of its travel. If you’re interested in reading more about what limit switches are and what they can do, I recommend reading the article in the Resources.

Please note that in this post, we are using the term “limit switches” and “homing switches” interchangeably. I do understand that there is a small distinction for both, but for this application, they are basically the same.

At the beginning of LongMill development, limit switches were not a priority as a feature when focusing on beginner hobby CNCers. This primarily came down to a few factors. First was the added complexity of having limit switches, which means additional setup and assembly for the user, as well as adding to the learning curve of learning how to use limit switches. Secondly, with the LongMill set up so that crashing the machine will not damage itself, limit switches are not necessary to protect itself. For customers still adamant about having limit switches, we still provided full hardware support to plugin or wire in switches directly into the controller, which would take care of a small population of more advanced users.

For those who want to read more about community made limit switch solutions, this is a great thread to read: https://forum.sienci.com/t/homing-limit-switches/99/41

We still hold our opinion that beginner users do not need limit switches with their machine to get the full functionality of the machine, and we recommend starting out without them until a better understanding of the machine and its use is achieved. However, as our community has grown and along with that their experience, more and more users are now exploring new ways to bring advanced features to their machines. Not only that, the development of our very own gSender now allows us to integrate software and hardware more closely than ever before. With these things in mind, we’ve spent some time creating our own plug-and-play solution for the LongMill.

Creating a limit switch solution specific to the LongMill came with several challenges.

First was the lack of foresight on providing mounting points for limit switches. This simply came down to the fact that we did not integrate mounting points on the LongMill for adding limit switches. Later versions of the LongMill did come with holes and other features that could mount sensors, however, with so many different versions of the LongMill, it would be difficult to document and provide resources for installing limit switches for every single version of our machine.

Second was the voltage support of the sensors we need to use for the limit switches. We are using a variant of the LJ12A3-4-Z sensor as our limit switches, a very common and widely used sensor. However, almost all variants of this sensor are designed for a 6-36V input voltage. Although it is possible to pull 12V power from the LongBoard, the JST 4 pin connectors already integrated into the board which was designed to be used for a plug and play solution were designed for 5V only. In hindsight, it may have been a better idea to route the 12V power to the JST connectors, but this meant that we would need to purchase 5V compatible sensors, which do exist but are more difficult to source, to be compatible with the LongBoard. Our first supplier for the sensors created the proper wiring and plug set up for the LongBoard, but unfortunately, they were only able to provide 6-36V sensors which meant that we had to start looking for a new supplier.

The new design overcomes these two challenges. First of all, the mounting hardware for the limit switches will allow users to install their sensors to any version of the LongMill, as well as allowing the flexibility to choose which side of their axis they want to mount to. For example, some users may want to home from the bottom left corner of their machine and some may want to home from the upper left corner of their machine. Users only need to move their sensor from the front of the machine and remount it to the back and specify the change in the software to make the change. Second, we have re-sourced and tested a 5V variant of the LJ12A3-4-Z sensor, which will provide proper voltage compatibility with the LongBoard. This supplier will also be providing us with the proper wiring for a plug-and-play installation of the limit switches.

We expect the kit to be ready for sale and shipping around the end of August. Each kit will come with three sensors with a plug and play wiring harness which should have an installation time of around 15-20 minutes. The price for each kit will be around $60CAD or $48USD. Additional resources and software setup support will also be provided with the kit. We’ll also be publicly releasing the designs and specs for the kit for users that want to make their own setups. Please check our blog, email, and social media for further announcements.

Today’s testing of the sensors have shown repeatably of over 1 thou which should offer a very precise way to home the LongMill.

I’m excited to see the limit switch kit in the hands of LongMill users soon and look forward to seeing the rest of the development team and the community come up with ways to utilize homing on the LongMill!

July and August 2021 Production Update

Hi everyone, this is a production update for July and August. I’m happy to announce that we are expecting the lead times for the next 400 machines to be 1 to 2 weeks (update, as of August 10, lead times for LongMills is under 1 week). For the most part, we expect most machines to ship within a few days. Any orders that are still pending shipment at the time of writing should be shipped by Tuesday of next week.

All of the parts that we were waiting on for this part of the batch have now arrived and we should not be seeing any major delays in shipping for roughly the next 8 weeks.

During part of July, we ran into some part shortages, such as with our control boards, Delrin anti-backlash nuts, and drivers. We also had a short period of time where our print farm was also shut down due to a shortage of filament. These shortages were caused primarily due to shipping delays. We’ve finally have gotten all of our parts without much issue, and can continue production.

At this point, we will be able to produce another 400 units without running into supply shortages. There are still a number of components we expect to start running out of once we ship the 400 units, including:

  • Rails
  • Gantries and other steel components
  • Control boards

We have placed orders for these items at the time or writing or are in the process of ordering these parts.

In any case, that’s our update for this month (and August). Happy making!

June Production Updates

Hey everyone, this is our June production update. For previous production updates and other company news, please check our blog.

It’s continued to be a busy month for April, but as we talked a little bit in our previous update for April/May, we have continued to shorten our lead times. We’ve taken the time to train some of our staff on new responsibilities and reorganize and plan production for the coming months. We are near the end of our run of Batch 4 machines and are starting to prepare for shipping Batch 5 in June.

In terms of COVID, Ontario has slowly seen a decrease in cases and more of our staff are becoming vaccinated. We are fortunate to have had no cases so far, and hopefully none until the end of the pandemic.

A new batch of motors, lead screws, and drag chains

Lead Times

Lead times are expected to average around 1-2 weeks for this month, however we are starting to face shortages in parts that will rely on the timely arrival to keep up with production. Some of these parts include:

  • E-stops
  • Touch plates
  • Arduinos
  • Delrin V-wheels

We expect these parts to arrive in 1-2 weeks. However, this may change if we face delays in transit. We will keep lead times updated on the product page to account for these changes.

Supply Chain

There have been some minor bumps along the way in terms of supply chain especially due to current worldwide events, but luckily with early planning and dedication from the manufacturers we work with, the supply chain process for Batch 5 has been relatively smooth.

One area that we’ve seen a large spike in prices have been with drivers and Arduinos. Due to the chip shortage, many of the components that go into the LongBoard controller have gone up in price. Most ICs that go into this production have doubled in price, and new products that we are working on that involve chips may be delayed due to the unavailability of chips. We have acquired parts for the next 500 controllers with approximately another 100 controllers in stock, but we may need to be cautious of continuing shortages for the rest of 2021.

On the topic of spiking prices, steel prices have gone up more than double since the start of the pandemic, affecting the price of gantries and other steel components that go into making the LongMill. On a lesser level, copper, tungsten carbide, and other raw materials have increased overall prices for many components as well such as E-stops and end mills. Cardboard shortages with our packaging manufacturer have also affected costs and lead times a few times over the last few months too.

Luckily due to improving processes and increasing batch sizes, we have been able to find other ways to save costs and so we don’t expect to have major changes in pricing for our products, however, it is a reality that we may need to face at some point that our company will have to account for changing material prices by increasing the prices of our products.

We have also been affected by the shipping fiascos that have been happening around the world as well. Although we weren’t directly involved in the Suez Canal crisis, we have experienced slowdown in some shipments due to this situation. At the time of writing, most of the parts that we need for Batch 5 production are in transit within Canada (by rail) or are in production with local manufacturers. A couple of parts that we are still waiting on that are in transit by sea include:

  • Router mounts
  • Couplers
  • Delrin nuts
  • 3D printer filament

The remaining components for Batch 5 are expected to arrive this month but won’t be complete for shipping until these parts arrive.

Manufacturing

There have been a few changes in manufacturing at Sienci Labs. Here are some of the things that have been going on.

One small change is the material that we have made the ACME nuts from, switching from stainless steel to brass. Brass has shown to be easier to work with in terms of manufacturing and forming threads. In previous manufacturing batches, a portion of nuts were rejected due to rough threading that made it difficult to thread onto the lead screws. The new brass nuts are of much better quality.

As part of the transition from steel shoulder brackets and drag chain mounts, Batch 5 kits will use M8-16mm bolts instead of M8-25mm bolts to mount these parts. There is no functional change, as the longer bolts are a carryover from when longer bolts were needed on the 3D printed parts.

Next, we are switching to e-coating our gantries from powder coating. We believe that e-coating is an excellent alternative to powder coating as it provides a cleaner, more consistent surface which is important for our XZ gantry assemblies. In some of our recent batches of powder-coated steel, we were running into issues where paint contamination and dripping would either produce cosmetic defects or affect the assembly of the parts because of the unevenness of the surface. E-coating does have a thinner surface, which theoretically means that it offers less scratch resistance on parts. However, based on samples that we have been provided of our parts after being e-coated, we have seen significantly better resistance to chipping and surface quality, without much difference in scratch resistance. This change should decrease manufacturing costs while improving overall quality.

In the last batch, we switched to using M3 screws with captive washers to help keep the screws from coming loose. For these screws, we have switched from stainless steel screws to Class 12.9 alloy, which is a much stronger screw that will prevent head stripping. Head stripping has been a minor inconvenience as removing stripped screws takes a while.

We’ve added three new CR30s (3D Print Mills), a belt based 3D printer. These machines will add additional 3D printing capacity with the benefit of being able to continually print repeated parts. We are currently in the stage of testing and tuning these machines, but we expect each printer to do the work of 4 standard 3D printers, increasing our print capacity by approximately 25%.

Design

Batch 5 comes with some very minor design changes to the LongMill.

First to mention is that motor shafts on the X and Y will be fully round. This is due to a very small number of customers reporting their motor shafts breaking off. The engineers at LDO Motors and us have confirmed that the full shafts will prevent this.

We are manufacturing a slightly modified 65mm router mount to eliminate the need to use M5-12mm screws. Because of the drill tap depth of the four mounting screws in the back of the router, shorter M5 screws were needed compared to the rest of the machine assembly. With the new router mounts, M5-25mm screws can be used on all parts of the router mount. We have also relocated the additional tapped holes that are used for mounting to the front of the mount for easier installation of accessories such as the LaserBeam.

New ACME Delrin nuts have been manufactured without the counterbore, which were an unnecessary feature for our application.

Shipping

Shipping to US and Canada have been reliable overall and seems to have returned to pre-COVID speeds.

We had some delays with Canada Post shipments going to the US via US Air Parcel, so as an alternative we would recommend using UPS.

We have had several issues with customs for shipments going to Mexico this past month that are new. If you have an order that needs to go to Mexico, please let us know in case we need to make other arrangements.

What is a G-Code Sender or CNC Machine Interface?

Hey everyone. We get a lot of questions about software for CNC machines, part of which includes using a g-code sender or machine interface. If you’ve ever gotten technical support from us, there’s a good chance you might have talked to Kelly, who took some time to make this video to help answer the common questions and discuss common functionality in the software.

This video covers some of the basic features that are in g-code senders like UGS and our very own gSender.

gSender Surfacing Tool now available

gSender downloads are now public. Find downloads here: https://sienci.com/gsender/

Our development team have been working hard to continue making gSender better. Our latest update improves overall performance and reliability, as well as working on new features. The latest version now comes with a surfacing tool that makes it easy to surface your wasteboard using the built in tool.

This tool lets you import your basic settings such as your tool size and speed to automatically generate the toolpaths to run on your machine. Not only can you use this to surface your machine, but you can also use it to surface other stock by changing the size on the tool.

If you aren’t on the latest version of gSender, your gSender program will have a green arrow to indicate an update is available on the upper left side where the gSender logo is.

Additional gSender Documentation continues to be in development. Feel free to check it out to learn more. Continue to stay tuned as more changes and updates come to gSender!

gSender BETA Public release is here!

Hello all,

This is a really big milestone that I’m really excited to have reached! It’s not easy or inexpensive to be paying nearly 4 peoples salaries for coming up on 5 months just to develop a program that is being made available for free but we just really think that this labour of love is going to be something that benefits not just the LongMill community but the Hobby CNC community at large.

So I guess now is the time for me to answer the two big questions:

  1. Why now?
    Though the changes between our release last week and this week aren’t drastic it’s never really clear cut when something is ready to move onward. Since this was my call, I can say that I didn’t want to make gSender public until I was sure that we had all our bases covered. This included at least a couple of iterations on builds for every OS, less reports of crashing and bugs, fulfillment of the big-ticket item requests like jogging stability and keymapping, and some refinement in the overall design that was more of a gut feeling.
  2. How does this include the hobby CNC community as a whole?
    If you weren’t aware, the LongMill and many other machines such as: X-carve, Shapeoko, Bob’s. MillRight, OpenBuilds, 3018 CNCs, and more all run on the GRBL open-source firmware. This is what gSender has been built to support. This means that though gSender comes ready out-of-the-box to run a LongMill, it can also readily support many other kinds of CNCs and we’ve made it open-source and free across the board so that anyone can come on over, grab it, use it, and benefit from it. So yeah, tell your friends! No mater what CNC they use, if you’ve enjoyed using gSender then they probably will too 🙂

Alright so, of course I’ll do a quick recap of changes since the previous release and where to download, I just want to say a couple last things first:

  • With gSender now public, this will likely be one of the last communications made to this mailing list as all of you signed up for the duration of the closed Beta which is now concluding. Instead, I’ll likely be moving my communications over to a combination of our website blog and the Forum – we’ve got the regular Sienci Mailing list you can feel free to sign up for if you want to continue receiving development notifications
  • If you’ve enjoyed using gSender, I’d love it if you would take the time to respond back a review of how you find it. I don’t yet have a plan on how I’m going to use the reviews but at the least me and my dev team really grin ear-to-ear when we see you guys getting so much out of gSender so that would be some great feedback to hear
  • Lastly, thank you all so much for taking the time to provide your feedback – the feedback that’s brought gSender to what it is today. There will continue to be a page available for submitting gSender feedback here: https://sienci.com/gsender-feedback/ so keep it coming if you have more to say. I’m so grateful for the time and words from all of you

Okay, on to the normal stuff!

New changes:

  • Improvements to job handling
  • Tooltips created for data entry points
  • Splashscreen tweaks
  • Working PI build!?

Downloads:
All downloads are now available on the gSender page on our website, check them out here!
https://sienci.com/gsender/

There’s also now a documentation page underway, check out the beginnings of it here: https://sienci.com/gsender-documentation/

If anyone has any further questions or need assistance downloading the new version I’ll be keeping my ear to my inbox and the gSender forum category over the weekend 

👍

Cheers cheers cheers!
-Chris and the rest of the team at Sienci Labs

Talking about the Makita RT0701. Do I need a larger router for my CNC?

I decided to write this post to talk a bit about routers to use on hobby CNC machines like the LongMill. If you’ve done some research on this topic, you’ve probably seen a lot of machines use the same Makita router. Of course this isn’t a coincidence. We believe that the Makita RT0701 is a great option for a lot of reasons, including:

  • Good speed control from 10,000 to 30,000RPM
  • Simple round body which makes it easy to mount to a machine
  • Affordable price of around $100 to $150
  • Easy to find at most big box hardware stores
  • Ample power and performance

However, for a lot of people, especially woodworkers who use full size routers that have 1/2″ shanks and +2HP motors in their work , the Makita router looks a little bit dinky. If you’re one of those people who have this opinion, here are the reasons why the this router is more powerful than you might think.

Electronic speed control

By far the biggest reason the Makita punches above its weight is because of the electronic speed control built into the router. Simply put, when the Makita’s motor is under load, the electronics will boost power to the motor to compensate. This means that no matter how hard you’re pushing the router, the motor will continue to spin at a constant speed. For CNCing applications, this is an important feature as the speed of your router is closely tied with the speed and quality of your cut.

Although many routers now come with this feature, routers that do not have electronic speed control need to rely on their internal inertia to keep their RPMs stable. Although this works in an hand held application, CNC machines need to have a consistent speed through all of the cuts for the best results.

If you have a router that doesn’t have speed control, you’ll likely notice that your RPMs drop when you hit the material, and you have to adjust the pressure of your cut to keep cutting consistently. With a router like the Makita, the router will instantly compensate for the change in load and not allow the RPMs to drop.

Matching the performance of your router to the performance of the machine

With almost all hobby CNCs, the deflection of the structure of the machine is the limiting factor. To put simply, the machine will deflect far enough to ruin a cut before the router will begin to struggle to keep up, which means that there is no point in putting a larger router that will never see its full potential.

Our real life testing

Over the last couple years, we’ve heavily abused our Makita routers, such as by cutting large amounts of aluminum and wood at a time. We do run tests as well that involve crashing the machines while the Makita is still running to test the effects of changes in the electronics which can completely stall the router. We also have built custom industrial-focused machines that use the same router. Here’s an example of a project where we used a Makita router to cut aluminum.

Some of our tests include cutting through upwards of half an inch of hardwood using our 22mm surfacing bits to stall the router.

I hope this post provides a bit more confidence in the Makita routers and answers some questions on whether a larger router is needed for the LongMill.

April/May Production Updates

Hi everyone, this is our April pt 2. and May production update.

If you’re looking to order a machine or waiting on one to show up, please read this update to find out what’s going on in our shop.

For previous production updates, please check our blog (https://sienci.com/blog/).

If you are looking for an update on where your order is on the waiting list, please check our list (https://forum.sienci.com/t/list-of-shipped-machines/1215)

Lead times for new orders

We’re happy to announce that lead times will be dropping from 3-5 weeks to 2-3 weeks!

*UPDATE – We have now cleared our backorder. New orders will ship within one week!*

This comes due to a flattening out in the number of orders we are getting, as well as the additional staff that we’ve brought on to continue packing and shipping machines. We are aiming to keep our lead times within two weeks, however, we are stating our lead time as 2-3 weeks to provide ourselves an additional 2-week buffer for any unforeseeable delays.

It’s exciting to finally get back down to our 2-3 week lead time, as we have seen a major backlog of orders since around June of last year and it wouldn’t have been possible without the hard work and dedication of the Sienci Labs team. As our production capacity meets the demand for the LongMill, this gives us the opportunity to dedicate more time to developing other parts of the company such as marketing, customer support, and technical development. We also expect to see improvements in the productivity and efficiency of our production, giving us more flexibility in the number of machines we can sell and ship.

At the time of writing, we have around 270 machines in stock. We expect to keep our lead times at around 2 weeks until we run out of this stock.

Batch 5 production

We are currently shipping machines for Batch 4 and are producing parts for Batch 5. Parts for Batch 5 will be arriving between May and June. Once we run out of parts for Batch 4, new customers will need to wait for all of the parts in Batch 5 to arrive for us to start shipping again.

Batch 5 will consist of 1000 LongMills.

Commonly asked questions

If you are interested in ordering a LongMill please read this section.

If I place an order today, how long will it take to ship?

2-4 weeks

Is there any way to skip the line/get my machine faster?

  • No. To keep things fair for all of our customers, we ship all orders based on when they were ordered. There are no exceptions. The only way to get a machine faster is to order one sooner. If we have updates to the lead time, they will be posted here and on the forum: https://forum.sienci.com/t/list-of-shipped-machines/1215If you want to see where you are in the queue for your order, please check the forum.

Does it make a difference in when I get my machine if I pick it up?

  • The only difference it will make will be that you will not have to wait for the shipping/transit time for the machine to ship. Typically, machines take around 1-3 days to ship within Ontario. Otherwise, there is no difference.

When do you charge my card/take payment for my order?

  • Your card will be charged at the time you place your order. This is to ensure your place in line, purchase parts ahead of time, and have the most accurate estimates on production and delivery.

How can I cancel my order?

  • You can cancel your order with no penalty any time before your order ships. Please contact us through our website or email us with your order number and a request to make a cancellation. A refund will be processed through your original method of payment.

Can I add other items to my order before it ships?

If you’ve ordered a LongMill and wish to add other items to your order afterwards before it ships, please choose “Local pickup” (for free shipping) and add your LongMill order number. Some items (such as the T-track sets) cannot be combined for shipping.