Hey guys, Johann here. Ever since we announced the Sienci spindle for the Altmill, there has been a tremendous amount of interest from the community in bringing a Sienci-supported spindle option to the LongMill platform. While it has always been our intention to do so, we were busy finishing up the AltMill and other projects, which prevented us from giving this project the due diligence that it deserves.
If you want to read about our previous thoughts, testing, and opinions about spindles for the LongMill, check out this blog post.
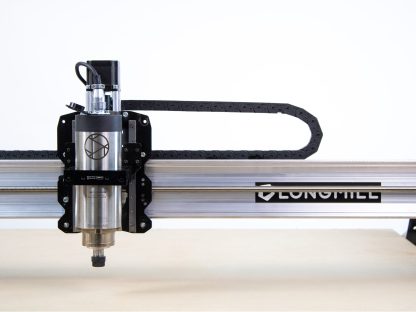
The LongMill Spindle and Dust Shoe Kit is now available in our store. First orders are expected to ship August/September 2024
Below is our analysis and additional info about ordering the kit.
TLDR Version
It’s about half as loud as a router
Easy to connect
Offers precise control over your spindle
New features and functionality when paired with the SuperLongBoard.
Offers gains in performance over 20,000 rpm
Orders are open now and will ship August/September 2024
Key benefits
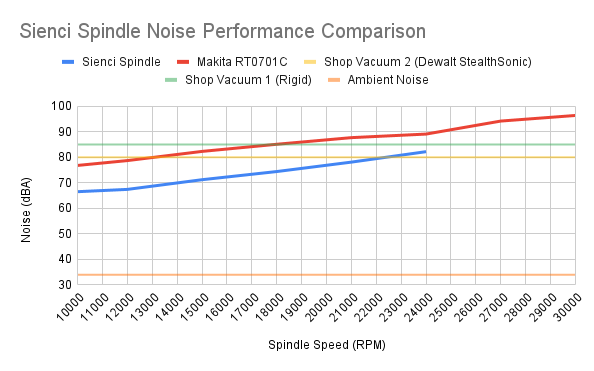
Noise
In a previous survey of the LongMill community, most people placed “lower noise” as their second highest priority feature (only behind auto tool changing).
In our testing, a 1.5kW spindle is consistently 10dBA quieter than the Makita router at every speed, which makes it a drop-in upgrade that is easily half as loud (half the noise every 10dBA). While a water-cooled spindle would be even quieter, we believed that a small amount of extra noise was a reasonable tradeoff to the extra complexity of a water cooling system.
For some context, this air-cooled spindle produces less noise than the quietest of dust collectors/shop vacs in most use cases up to 23,000RPM.
Hear the difference in volume and the quality of sound for yourself
Plug and Play/Easy to Install
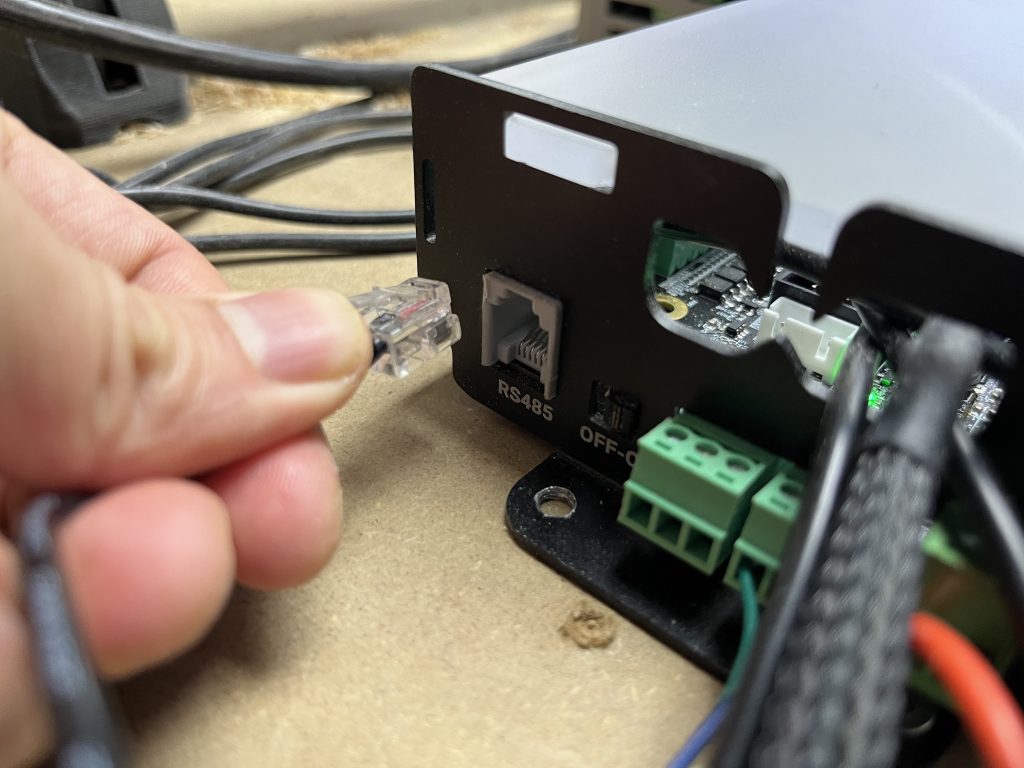
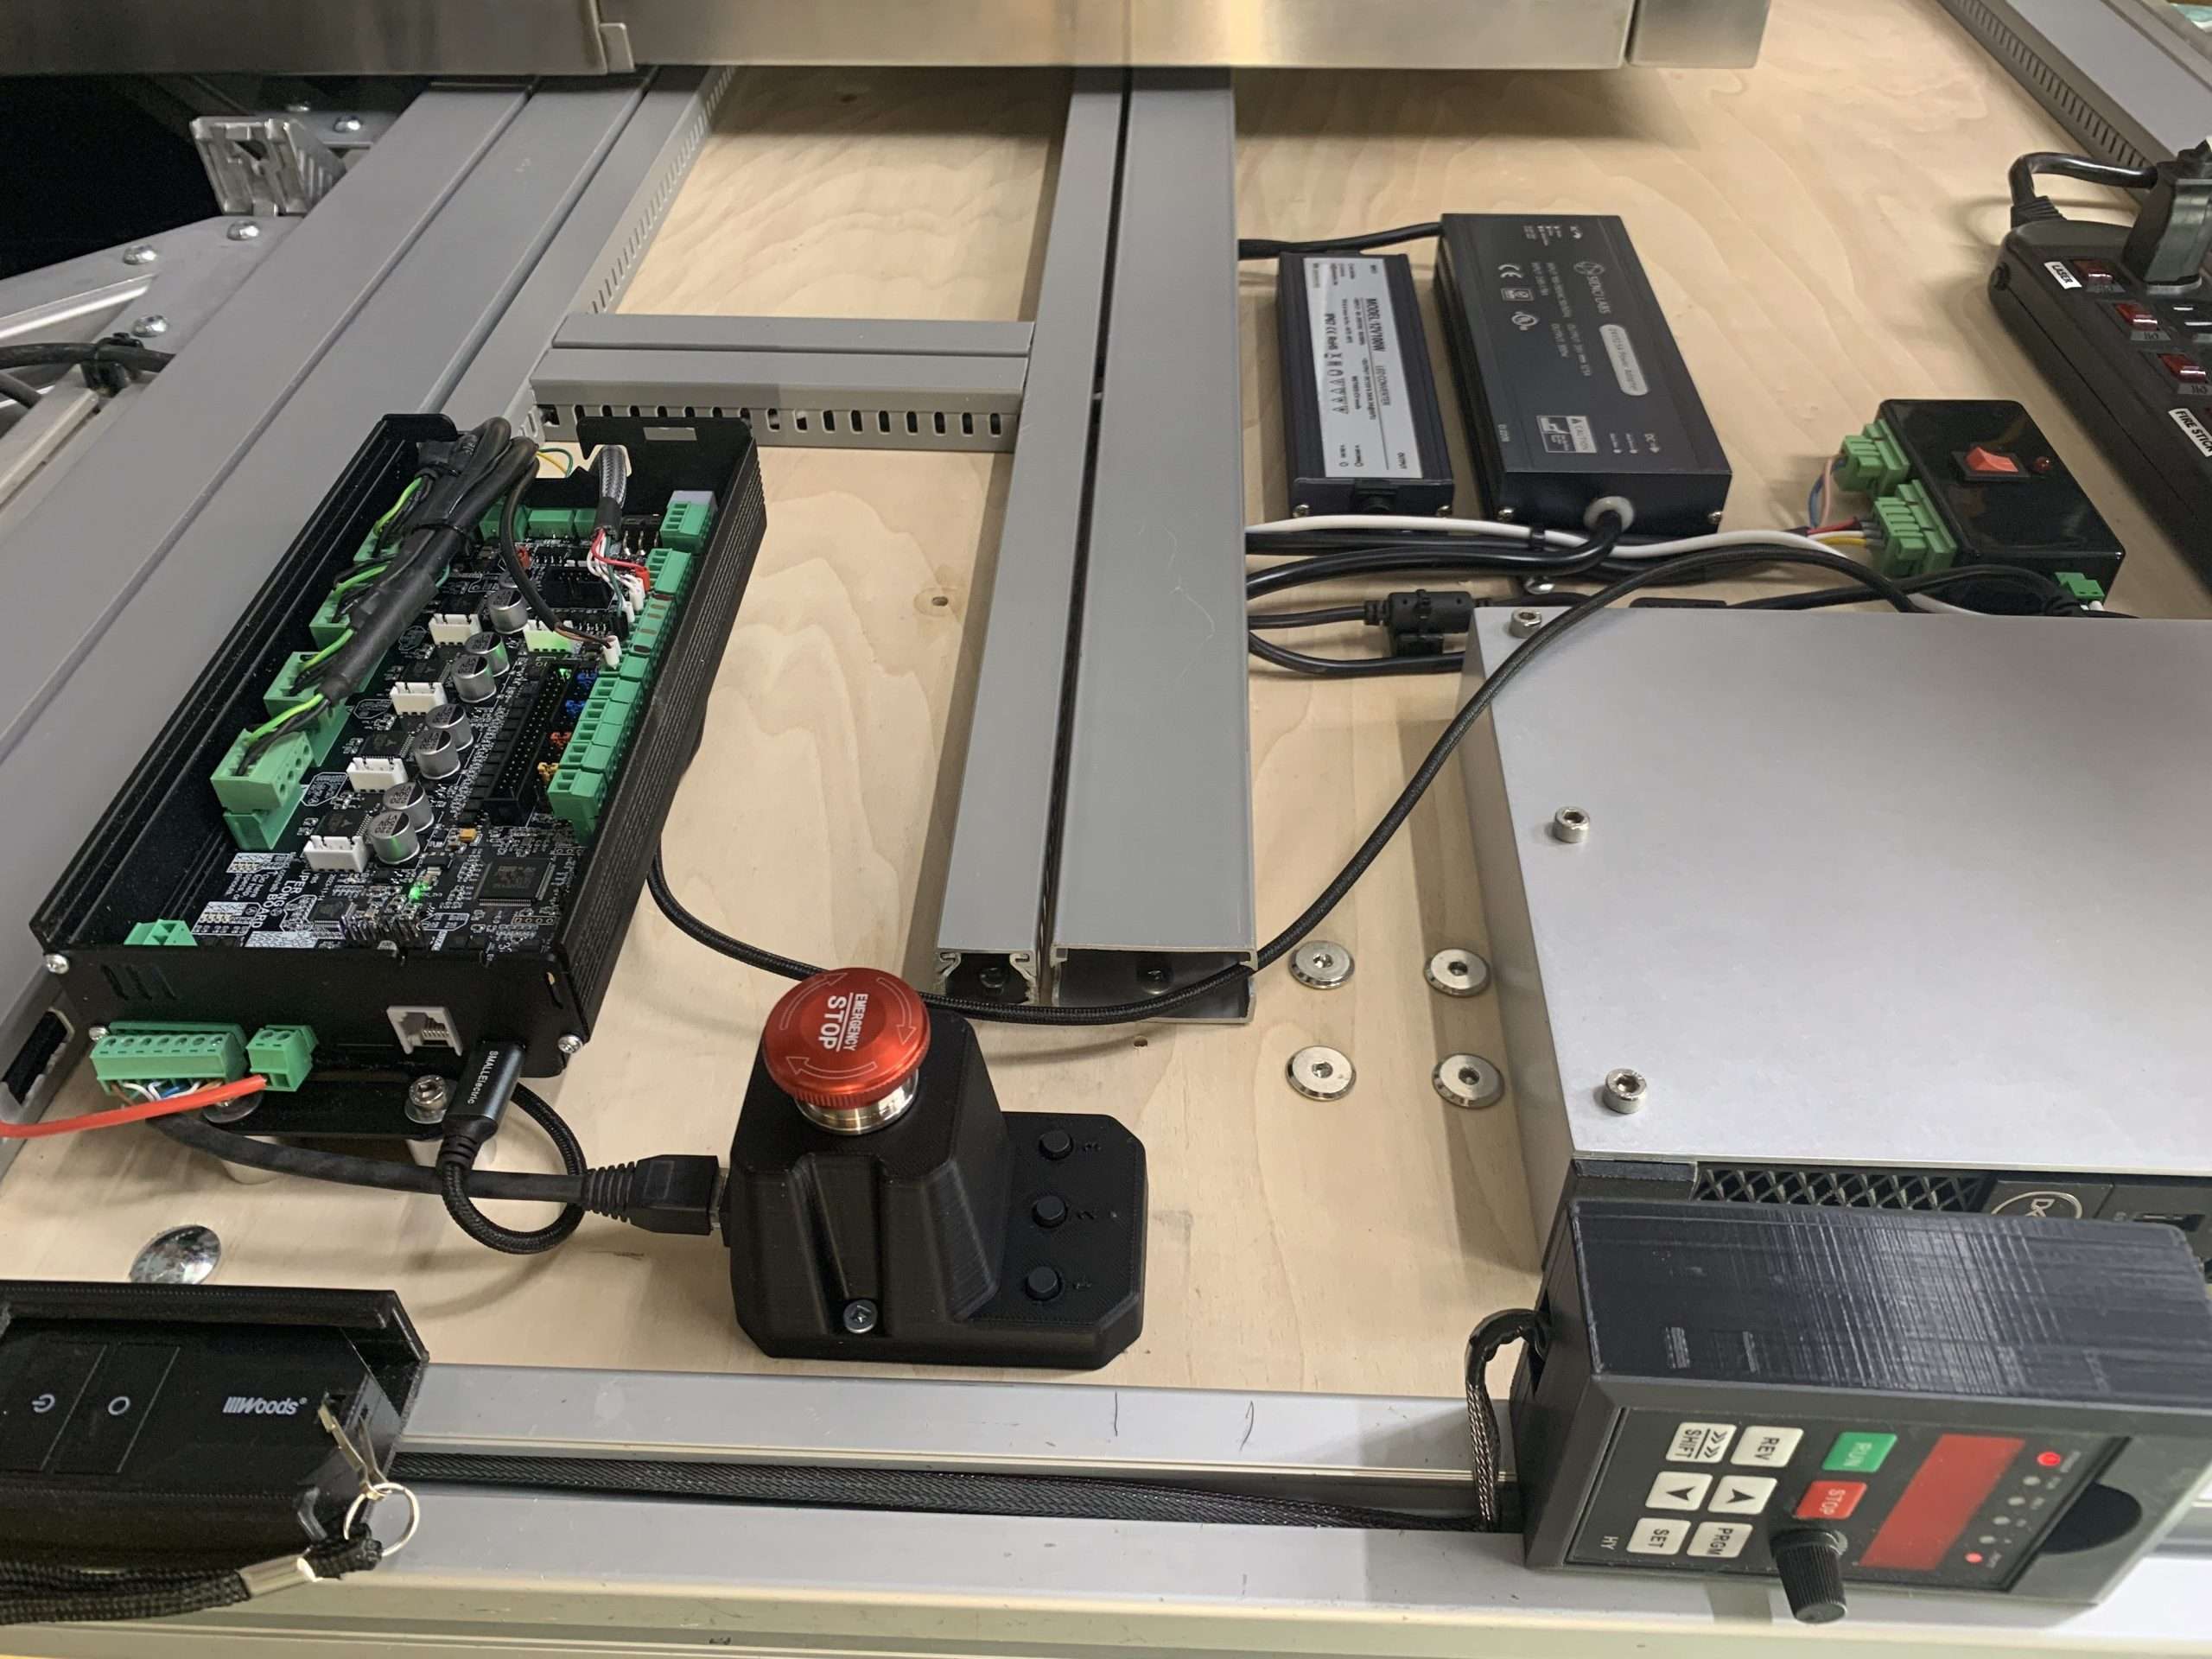
The Sienci spindle comes pre-wired, pre-programmed, and connects to your controller with a single RJ11 Cable (a telephone cable). As with all of our other accessories for the LongMill, come with excellent resources and support. We are currently finalizing the installation guide to upload to our resources site soon.
One wire to rule them all
Advanced Spindle Control
Another benefit of a spindle system is that you can control the start/stop and speed of the spindle directly from your g-code sender or gSender. With this digital interface, you:
Can precisely control the speed of your spindle down to the single RPM
Know when your spindle is at speed
Know if your spindle stalls
Communicate between the VFD and gSender to improve the chances for job recovery in the event of a failure
No guesswork speed controlSpindle error feedback
Caveats, Provisos, Warnings, and Disclaimers
Marginal Cutting Performance Gains
This is an area we spent a lot of time and effort digging into since there are varying performance claims floating around the Internet and we’d like to give you our conclusions with some hard numbers. This of course pertains to our product in general, but likely to any spindle kit on the market. We believe we have conducted the most thorough testing and investigation in the hobby space for spindles.
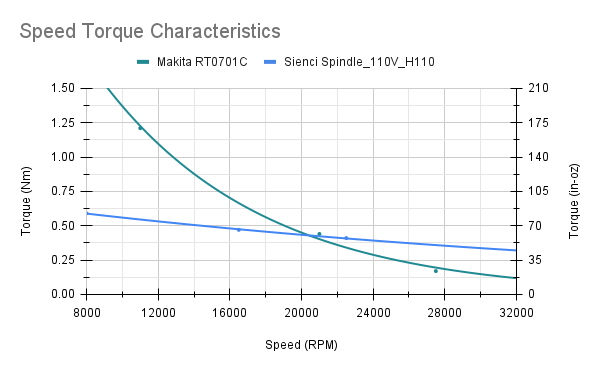
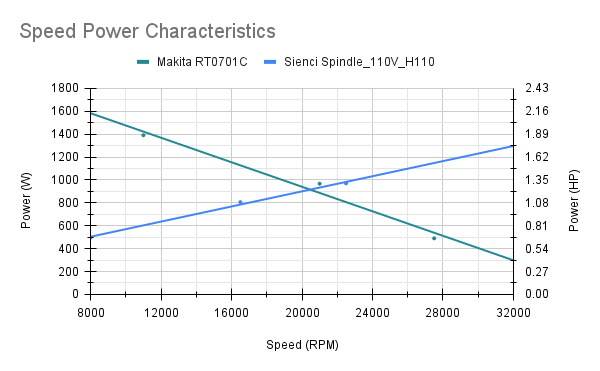
A single run of our cutting test, out of more than a hundredSpeed – Torque characteristics of the Makita vs Sienci spindleSpeed – Power characteristics of the Makita vs Sienci spindle
The key takeaway from our testing is that the spindle is not dramatically more powerful than the router. The spindle has more power and torque at higher speeds, while the opposite is true for speeds below 20000 RPM (despite a higher risk of overheating for the Makita).
For 0.25” (¼ inch) tooling, there is little practical difference in cutting performance when upgrading to a spindle since you are limited to 400-500W cutting with the rigidity of the bit. With surfacing, you can use the full power of the spindle, but it also means that you will need to run both the machine and the spindle fast.
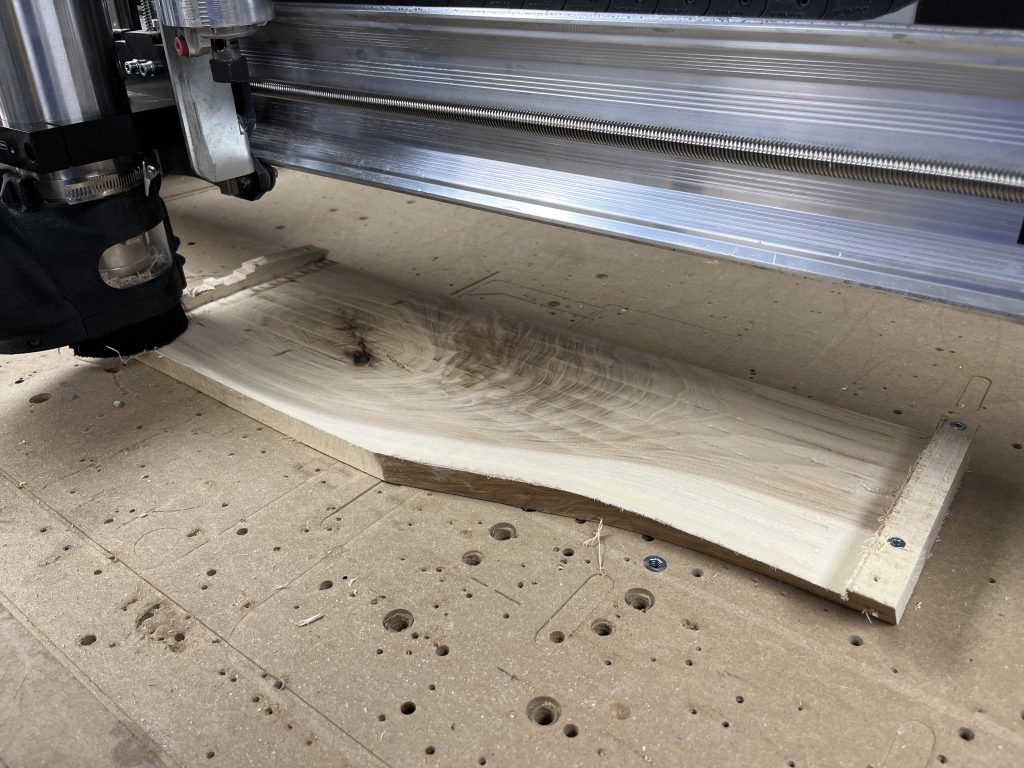
Surfacing Hard Maple End Grain at 1.2mm depth and 5000 mm/min (800W-1000W)
SuperLongBoard as a requirement
To take full advantage of the spindle, including the advanced control features detailed above and the all-important partial holding current feature available only with grblHAL, we highly recommend that you upgrade to the SuperLongBoard.
While it is possible to adapt this spindle kit for use on the LongBoard (and we will release more information on how that can be accomplished), here are 6 key disadvantages that you should be aware of:
We will consider this a DIY configuration and support and resources will be limited
Start-stop control will be unavailable without a reflash of the firmware and additional components
The VFD will have to be re-programmed
Holding current must be applied in full which can overheat the drivers and motors
No stall detection or any other advanced features that are currently in development
High-speed machine movements (>4000mm/min) that suit the spindle are unavailable due to legacy driver stability issues.
Dust shoe hose size
The spindle is designed with dust collectors, not shop vacs in mind and as such fits 4” dust hoses by default. To use shop vacs with the dust shoe, you will need to purchase a commonly available 2.5” to 4” adapter (Example found here on Amazon). We are trying to see if we can offer an adapter at some point, but there are no commitments on this item just yet.
Additionally, the original dust shoe used on the LongMill is not compatible with the 80mm spindle. The kit comes with a larger dust shoe included.
The dust shoe performs well with a shop vac attachment
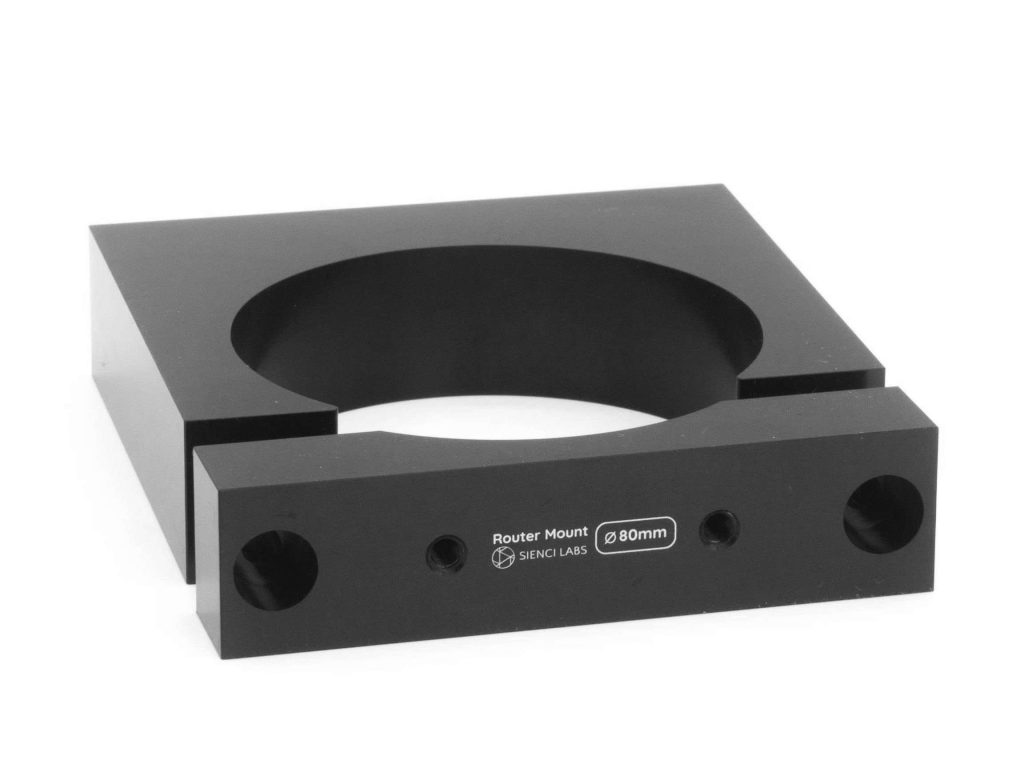
Spindle Mount
This spindle is 80mm in diameter and the mount will be included in the LongMill Spindle and Dust Shoe Kit.
The main difference between the AltMill Spindle and Dust Shoe Kit and the LongMill Spindle and Dust Shoe Kit is the addition of the 80mm mount. You can also purchase the mount separately from our store.
Additional Information and Insights
Cutting Volume and Accessories Compatibility
We’ve checked the spindle + dust shoe against every single LongMill configuration ever released (including the MK2 extension kits), and there is no loss to cutting volume to any configuration (the MK2 front feet can technically can collide with the dust shoe, but the overlap is only 2mm (1/16”) and only occurs when you are cutting below the wasteboard).
The story is a bit different with the Vortex which is a lot more height constrained. The additional length of the spindle collet eats into the cutting (and probing) height requirements of the Vortex, and for every machine configuration we recommend raising the feet of the machine up by 1.5” (2 sheets of 0.75” MDF) to restore the original cutting volume.
Insufficient clearance for the Vortex without raising the machine
Weight of Spindle and Mechanical Effects
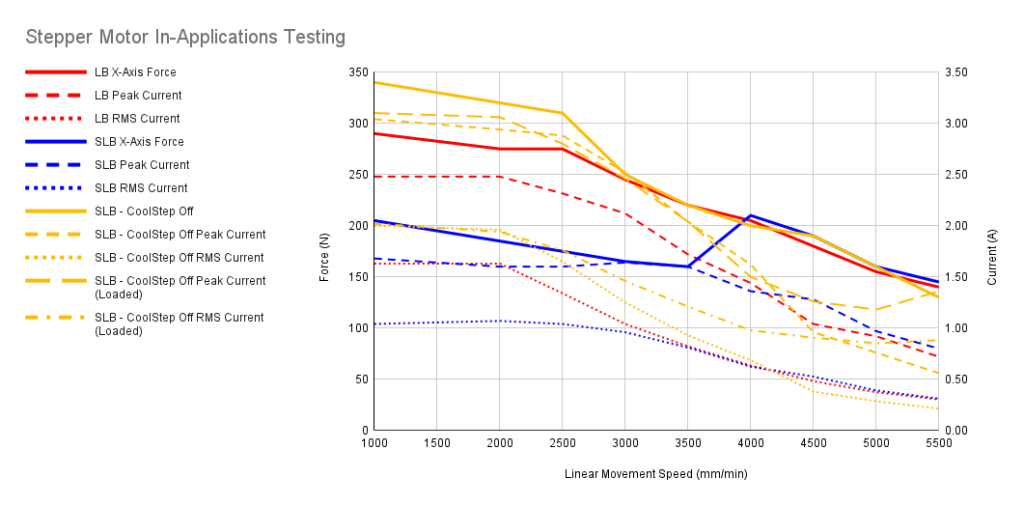
The new spindle is 2.8kg (6lbs) heavier than the Makita RT0701C router’s 1.8kg (4lbs) which may seem a lot, but according to our calculations and testing, this has a negligible effect on the X and Y axis, requiring only an extra 1-2% of available torque from the steppers motors even accelerating to 5500mm/min. The remaining torque should also be sufficient in making the hypothetical 1.5kW cuts which typically require less than 100N in cutting force.
Force generated by the stepper motors at varying speedsForce requirements for a 1.5kW cutJogging the machine at full speed
With regards to the Z-axis, the additional weight can consume up to 27% of total available torque of the motor. Having said that, since boring operations typically involve pushing the bit down into the material, the additional weight is not an issue in such a scenario.
Making a few holes in walnut
Lastly, it’s also worth mentioning that although the steppers can hold and push the spindle with an adequate amount of force, aggressive cutting can still result in significant deflection of the bit and cause your cuts to come out untrue, so after any aggressive cuts, you should always follow up with a skim/spring or finishing pass to make sure that the surface is accurate and smooth.
Conclusion
While the Makita RT0701 is an excellent option and recommended for most LongMill users, the Spindle Kit offers a high-quality, simple, and well-supported option for the community. To learn more and to order, make sure to check out the store page here.
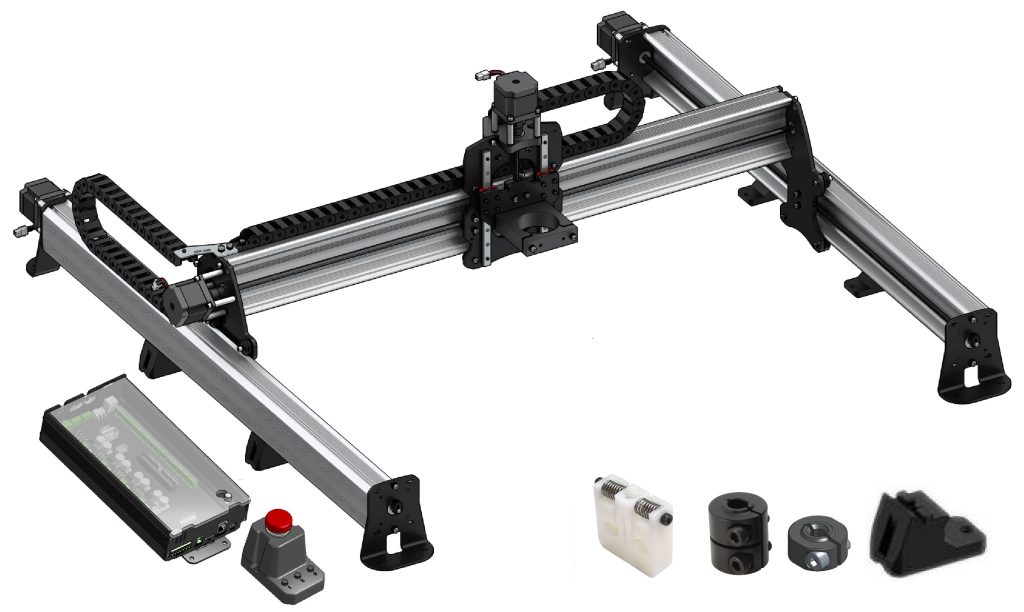
Docs The lead time for this item is 3 days. The LongMill Spindle and Dust Shoe Kit is designed to unleash the capabilities of the LongMill as a plug-and-play replacement for the standard Makita RT0701 router. Each kit comes with: 80mm Dust Shoe 1.5KW 110V Air-Cooled Spindle 110V, 1.5KW, 3-Phase VFD…
For those of you that have followed us as we develop and improve our products, or read Andy’s Production Updates, you probably know the drill by now – it’s time for our LongMill CNC to see some new improvements!
History
The LongMill used to be called just that when we launched it back in October of 2019, but the naming quickly got expanded:
LongMill V2 which began shipping March 2020
LongMill V3 (Aug 2020), then V4 (Jan 2021), then V4b (Aug 2021)
LongMill MK2, which marked a complete redesign of the LongMill CNC to continue our focus on ease of assembly, rigidity for price, and designed with add-ons in mind. This began shipping in March 2022 and retroactively grouped all prior LongMills into the “MK1” naming.
LongMill MK2.5 which we will now be ramping up to begin shipping for June 2024
Why do we make these updates? Since we launched the LongMill, we’ve continued to maintain a solid idea of where we felt it should sit as a CNC and more generally as a tool. If you’re looking for a CNC that can create any reasonably-sized project an individual would be looking to make at home with great support and reliability, it’s the machine for you. It’s akin to a home printer, you could save money and spend less on stamps or small label-makers, and you could also spend a lot more on a large laminate printer or printing press, but the home printer can really hit the sweet spot for most individuals. We’ve never wanted it to trend upwards in price and features until it starts to resemble an industrial piece of machinery (that’s what our new AltMill is meant to do), but we also recognize that we can take action when opportunities arise from:
User feedback
Production at scale as our company grows
New understandings of our users priorities as we see how everyone uses our CNCs
Making steps while ensuring that the changes are worth our time and everyone’s money makes us feel that we’re continuing to update our products with the best that we have to offer to the CNC community. This is exemplified by the transition from quite a few 3D printed parts in the original LongMill to now being all metal and one injection mold in the MK2.5. Another example is the MK2 redesign which made the LongMill 2-3 times stronger than the MK1 design for the exact same cost and nearly halved the assembly time. All of this with very few price adjustments along the way to keep up with changes during COVID, inflation, and continuous improvements we continue to pour time and energy into to build and support such a user-friendly machine and ecosystem. Would you believe our 30×30 model started at $950 and by the MK2 it was still only $1350 USD?
What’s changing?
We’ve got two new heavy-hitters that we’re very excited to announce as a part of the MK2.5 update, alongside some other smaller improvements.
SuperLongBoard
Many of you might already be familiar with this new development that’s been over 1.5 years in the making, but if not we have many priorblog posts that can bring you up to speed. The bottom line is that with the successful launch of the first 500 pre-ordered units and the positive reception, we’ve decided to fast-track the SLB to be standard with the LongMill moving forward (it’s also what we’ll be building off of to power our new AltMill CNC).
Since my last SLB update, we released a great summary video on what you can look forward to that also explains why we think it makes sense to move forward on this new electronics architecture. The main benefits to all users will be:
Faster movement, homing, and probing from new motor drivers that are more robust and anti-resonant
Smarter drivers also reduce motor noise, allow changes on-the-go over firmware, and are expected to be more reliable
Improved cutting reliability against ruined jobs and material due to high-grade EMI measures implemented in the board redesign which also includes Ethernet connectivity
Smarter and more responsive system resulting in faster probing, safer E-stop, and room for even more future expansion
Even more extras for the true enthusiasts like RS485 VFD support, 4th axis cutting, TLS, and more
It’s been very exciting seeing the SLB get into peoples hands over the last two months, especially so after some have already contributed their own guides and videos showing installation, reduced motor noise, and increased speeds. I was getting concerned that the shipping status table posted in the last SLB update would encounter more delays but I’m happy to say that we were able to keep things relatively on track in that first batch. I really appreciate everyone’s understanding and patience as we’ve been preparing to get more SLBs in for MK2.5 and also the lineup of already another hundred or so orders from people looking to upgrade their existing CNC systems. The strong reception we received in the initial pre-orders, combined with the feedback we’ve gotten so far from them in action, is what makes us confident in rolling out the SLB to everyone else for MK2.5. We’ve already had many more updates to our docs from the wider feedback such as:
Troubleshooting when the SLB is too fast for your machine
Post processor selection
Options for new options for motor holding
Clarified RGB LED strip hookup
Clarified 4th axis driver hookup diagram plus extra firmware setup steps
To all those who back-ordered their SLBs, don’t worry you still have your place in line since MK2.5 was always meant to be a part of this same batch of boards. Currently we’re still doing our best to have the boards ready to ship out by end-of-May but it seems that there’s been another delay from one of our manufacturers which might mean that we won’t have boards show up until the start of June.
Spring Loaded Anti-Backlash Nuts
There’s also been a lot of coverage documenting our long process in trying to figure things out with these, but now we’ve gained confidence we can produce them in bulk and are excited to introduce them as a part of MK2.5!
Since we premiered this new part, demand has remained super high and every time we’ve restocked it’s sold out in just a couple days. The reason people have jumped to buy the over 4000 we’ve made so far is that it offers self-adjustment to maintain no backlash on all the LongMills axes. This is normally a very expensive technology to access, and is normally solved on other CNCs by using ball screws (more expensive and require more cleaning maintenance) or belts. To-date we’ve used an OpenBuilds-based design that allows for no backlash on lead screws but requires manual adjustment, but with this new upgrade it means one less step for y’all to have to worry about when it comes to CNC assembly and maintenance; giving you a reliably precise CNC system while still having the benefits of the low maintenance of lead screws.
Other Updates
Some other updates that were already introduced during MK2 shipping were new coupler and clamping nut designs that now use M5 hardware instead of M3. This change has meant that we have mostly eliminated people having issues with stripping hardware (some of our users have gorilla grip) or not being able to tighten them down hard enough on the lead screws.
We’ll also be rolling out injection molded feet which will be replacing our currently 3D printed middle feet. These support the Y-axis rails to create a more rigid system, but these parts have never really caused any issues or showed signs of needing an upgrade, we just haven’t changed the design for a while now so we decided to save the time for our 3D printer farm and opt for higher-quantity manufacturing.
Summary
We’re excited to announce everything that’s on the MK2.5 docket! Due to the changes, MK2.5 will also be coming with an approximately $150CAD/$110USD price increase compared with MK2 to reflect the addition of primarily the SuperLongBoard and the other additions.
We are continuing to work our way through the materials from Batch 8 (MK2) and are waiting on Batch 9 (MK2.5) parts to arrive which we expect to start shipping out later in June. We’re also already underway on putting together new revisions of our assembly manual and other LongMill resources and are looking forward to continue further expanding those resources in the coming year in other areas as well.
Of course, as MK2.5 starts to arrive in users hands we’ll continue to bring any other improvements we can like we’ve done for all prior LongMills, and anyone who’s looking to manually upgrade we already list all the new parts on our store for individual purchase. Also if you ordered a MK2 that hasn’t shipped yet and you’d be interested in upgrading to a MK2.5 instead, please just call or email us to arrange paying the difference and we can happily update your order.
LongMills continue to ship out as usual. We received another batch of controllers after being out for another few days.
Batch 9 production continues and we continue to focus on getting some of the new things such as:
Spring-loaded anti-backlash nut
Injection molded feet
SuperLongboard
This also includes existing changes and improvements that already exist on the LongMills that are currently shipping.
Motor to leadscrew couplers using M5 hardware
New ACME locking nuts
To reflect the changes to the LongMill MK2, we will be calling this update the LongMill MK2.5.
We are expecting Batch 9 to start in June. At this point, we will increase pricing for the LongMill MK2 to the MK2.5 to reflect the addition of primarily the SuperLongBoard and other additions. Pricing for this new version is to increase by $150CAD/$110USD approximately.
LaserBeam and Vortex
LaserBeam and Vortex orders are shipping out as usual within a few days.
Ikenna and Abeku have been working on a magnetic mounting system for the LaserBeam to allow for faster and easier mounting and dismounting of the laser, and folks should expect more information to come out soon near the end of April. They also let me know that while the mount is suitable for the LongMill, they are continuing to work to improve the stability of the mount to work with AltMill and higher speeds.
The magnetic mounting system should work on all mounts either on the right or left side, or just on the front, depending on the version. More info to come soon.
Due a random failure with one of the closed-loop steppers used in testing, we have started testing motors from 4 different companies to nail down the highest quality motor for the AltMill and ensure that we can understand the reasons for the motor to stop working.
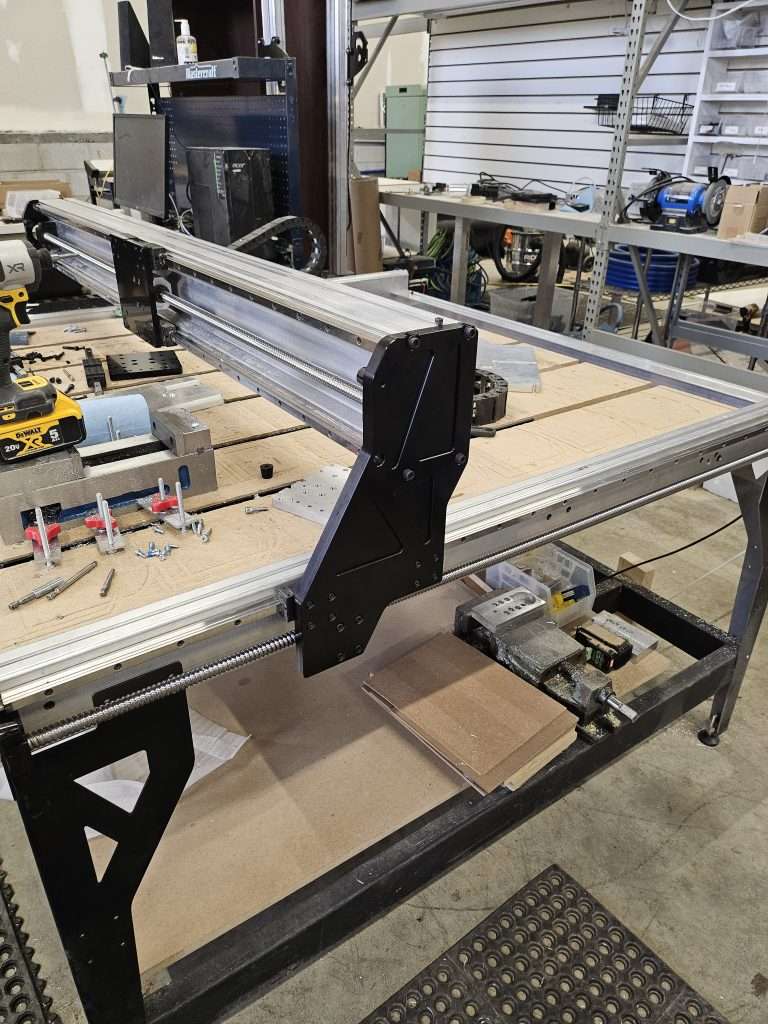
The gantries for the AltMill are done and have gone through an anodization process to make them black. This should improve the aesthetics of the machine and make it look more polished
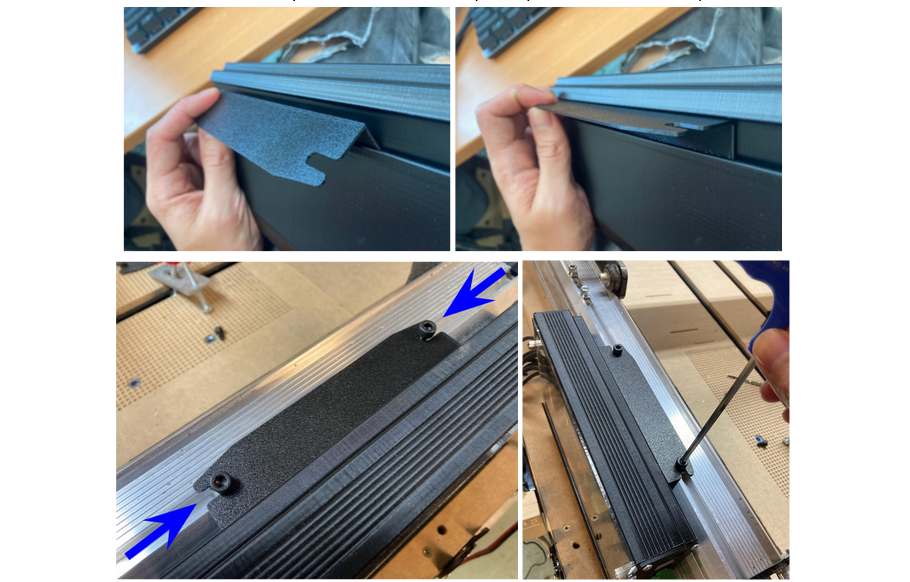
We are testing and manufacturing the dust covers for the linear guides on the Y-axis. Based on our testing results, this may become a standard included part of the AltMill
We are working on testing a 4KW spindle to push the limits of the AltMill
Testing on the relay and power distribution control board are being tested now. This control board allows us to distribute power from the power supply to the motors and kill power in an emergency setting, improving the machine’s safety
Additional parts for the first 50 AltMills are expected to arrive mid-April and we will start assembly as soon as they arrive.
Test fit of new gantries
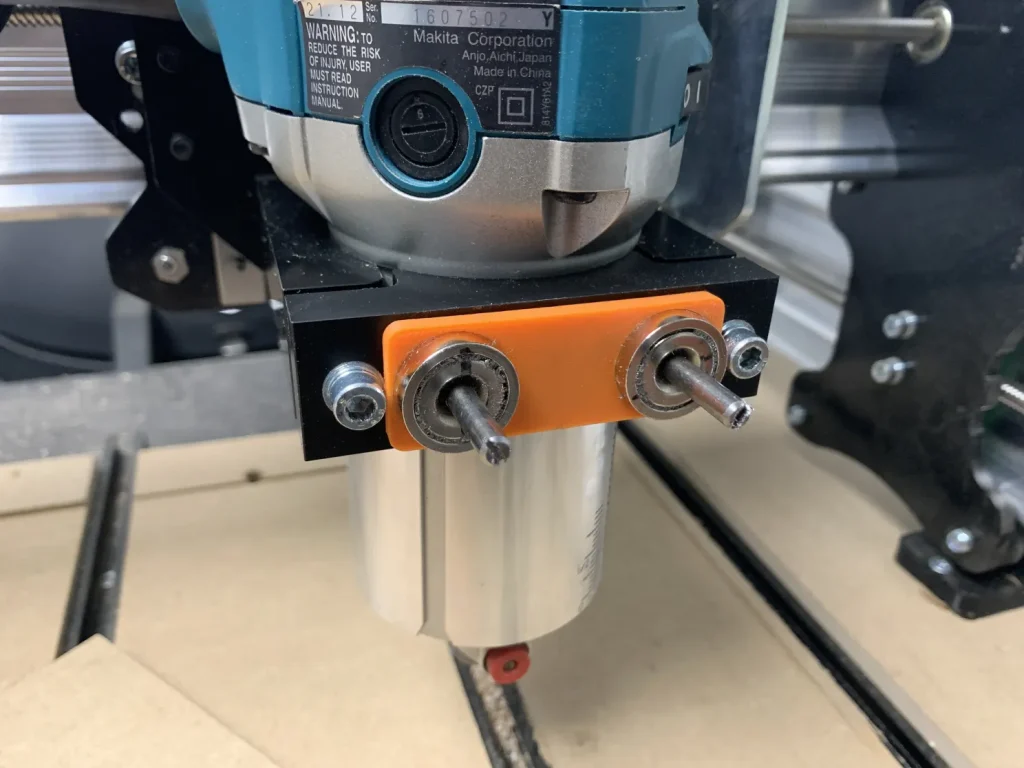
Sienci Router
The Sienci Router project continues to move along. We have now received two controller boards, but have not been satisfied by the level of speed response we’ve gotten. For a bit of context, traditional motors will slow down when under load. In the case for CNC milling, we don’t want our router or spindle speed to go down, as it increases the chipload. If an end mill rotates at a set speed, each rotation takes a certain amount of cut per pass. If the end mill rotates slower, then each cut has to remove a large amount of material, which can overload the bit and cause a crash.
With the first two boards, because the motor slows down too much under load, it would not be optimal for CNC. We believe that there were some communication issues and misunderstandings with the motor manufacturer for this requirement, and so after a lot of back and forth and some group testing on a video call, we were able to sort everything out and are expecting to test the third version soon.
What is exciting is that the manufacturer has been able to get a response time of around 40ms, which is faster than the original Makita RT0701 and its brushless motor counterpart. Although in practice, this probably won’t make too much of a difference since users are not likely to load their motors to the extent we had in testing, this in theory means that the cutting speeds and loads will stay more consistent.
There are still some details to iron out for the motor, however, primarily in the additional tuning of the motor.
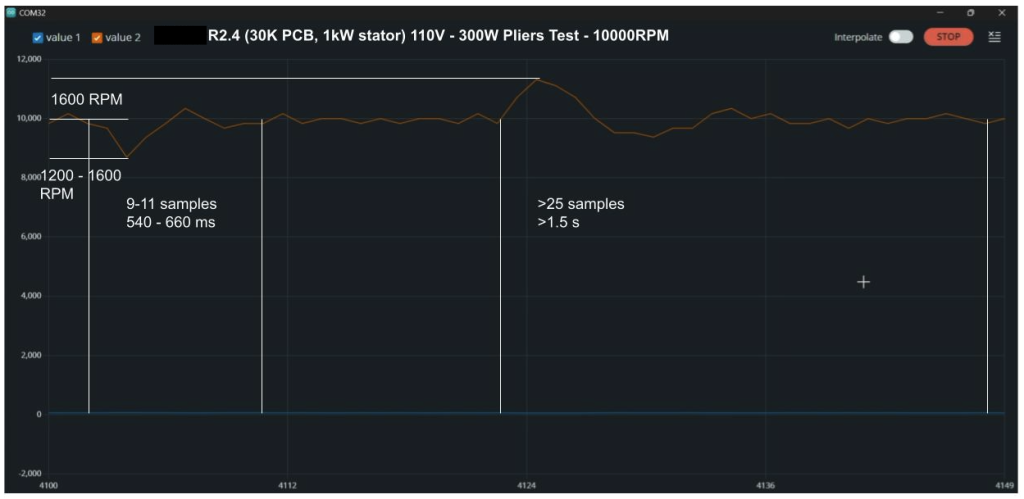
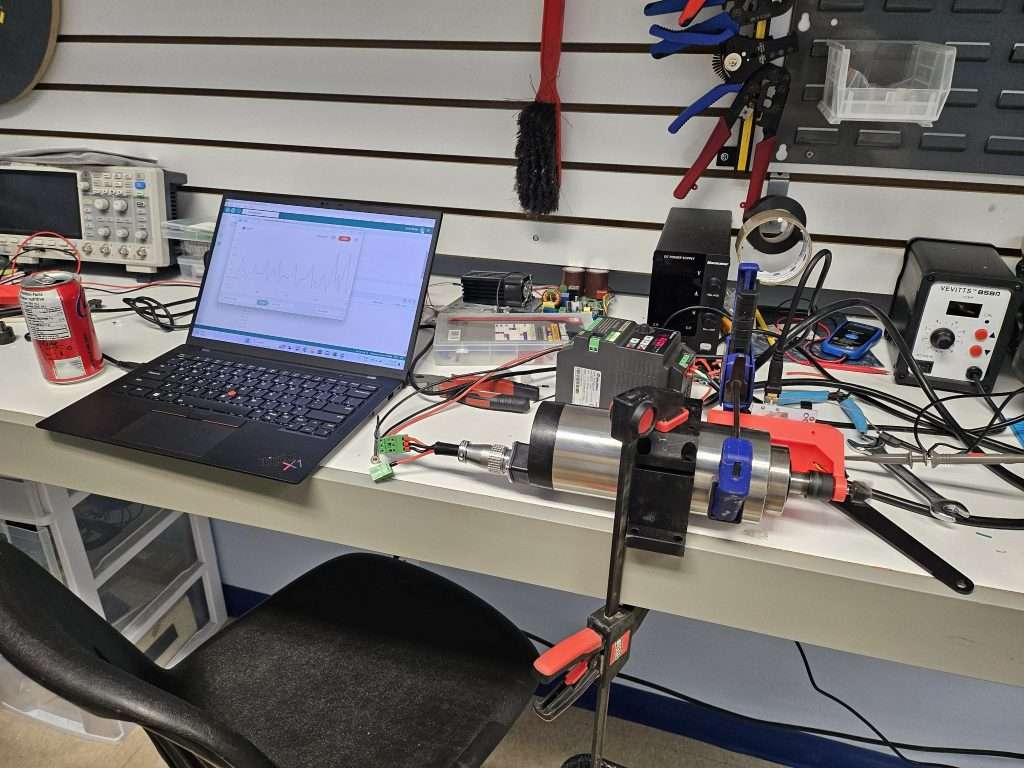
We’ve started doing some testing of loading the motor a certain amount and releasing the load quickly. You can see there is an initial amount of time where the motor slows down at first, and then when the load is released, it speeds up for a moment before returning to its original speed. The main reason we suspect this is happening is because the tuning of the motor was originally done using a motor without the larger shaft holding the collet. Because the final assembly of the router has more inertia, the tuning of the motor is not correct.
To fix this issue, we’ve sent one of our prototypes to the manufacturer to do additional tuning to reduce this variation.
We believe that there may be some limitations in the technology on how quickly the motor can react to changes in load, and so we are exploring other methods such as using an encoder or speed sensor in line with the motor. However, we do believe that with proper tuning, the motor will be able to perform within the scope of this project.
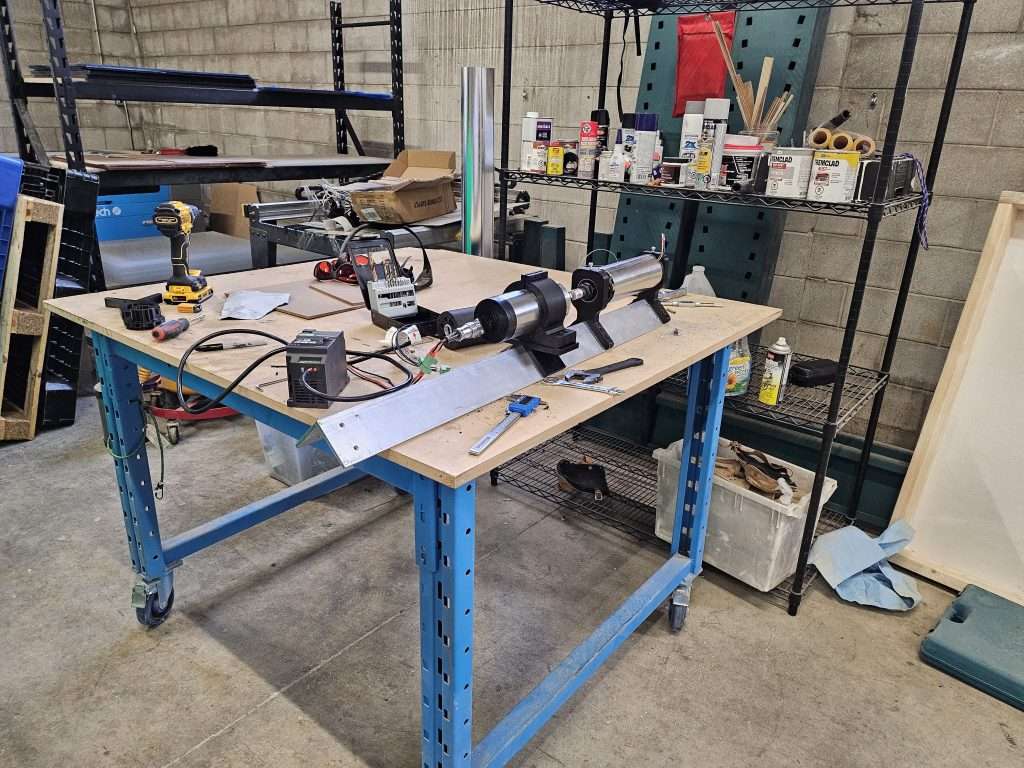
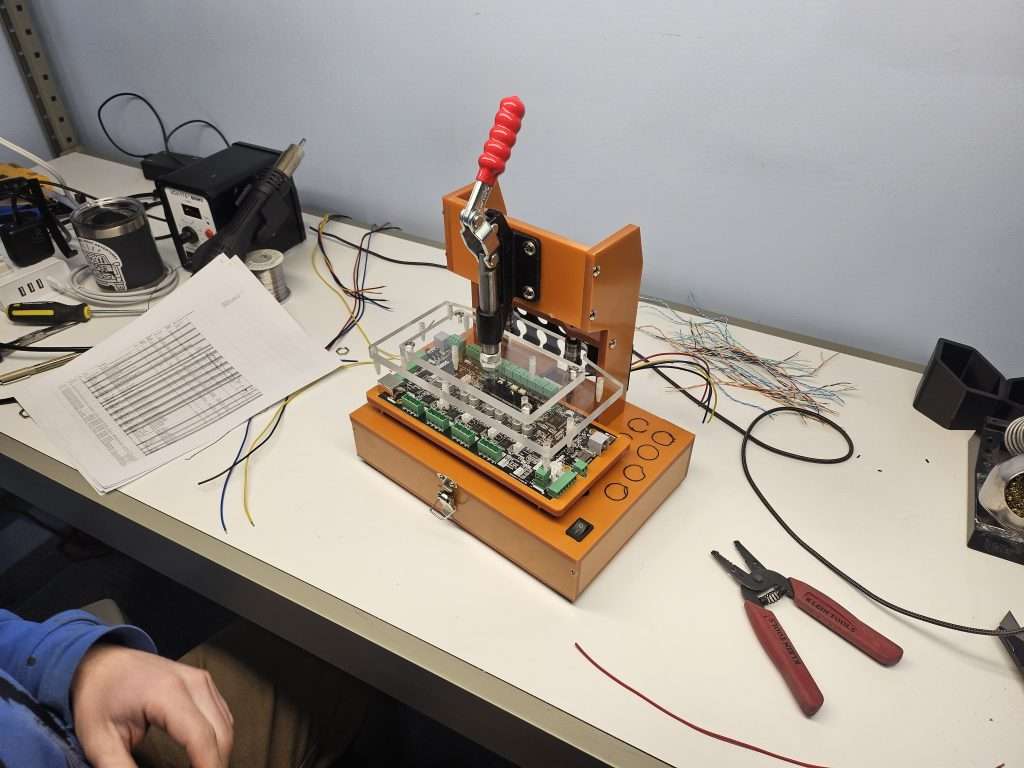
In the meantime, our co-op students are building a bit of a makeshift dyno to test the routers and spindles.
Dyno projectRPM logging
SuperLongBoard
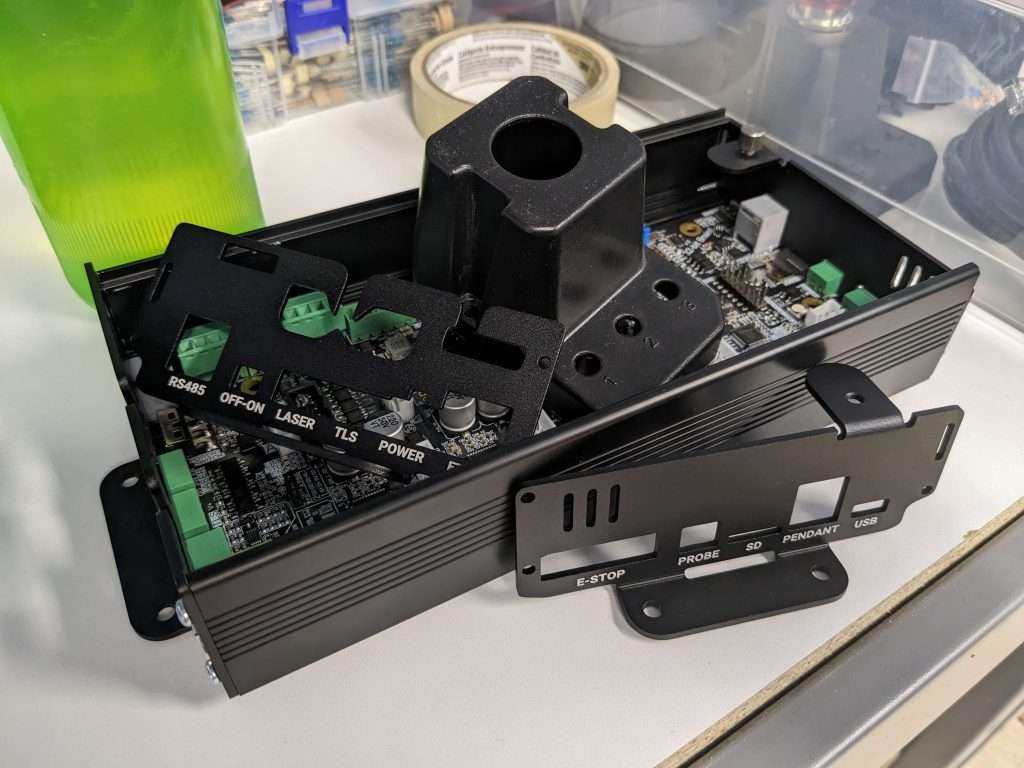
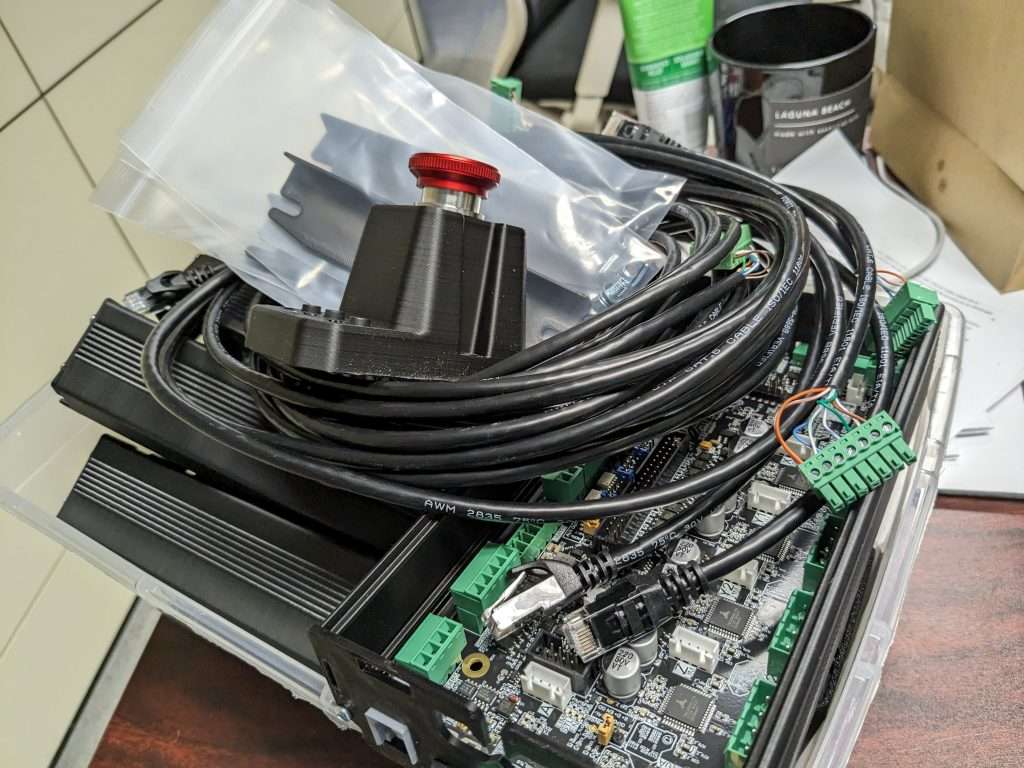
Check out the completed SLB box, which will be the ones reaching the first 475 users soon! We have received our first batch of SLBs and are prepping them for shipping.
Due to some delays on the die for the box and the e-stop PCBs, there may be a few days we are waiting next week, but we are working on shipping the first 100 SLB before the end of the week if possible.
Testing jig for SLB
CO2 Laser
I’m excited to have witnessed the first firing and testing of the CO2 Laser currently in development. Ikenna will be making an update post soon so keep an eye out for that!
Greetings all, Chris here again to emerge from my SuperLongBoard development cave and provide you with my news!
For anyone who still has yet to hear about our new and most ambitious Sienci Labs electronics projects to-date, our arguably aptly named SUPERLongBoard, is the graduated version of our current LongBoard and has been designed to be even more SUPER at all things hobby CNC.
This is a serious upgrade for a serious board, even if we had some fun with the name: culminating in what we hope to be an all-in-one solution and in many cases an upgrade to anything currently in its pricepoint on the market. The result is a 32-bit processing, on-board motor driving, Auxiliary output supporting, 4th axis controlling, laser, TLS, macro button -having board.
With that summary out of the way, you can catch up on past progress by looking at my update last month which also has links to past videos and past updates before it: https://sienci.com/2024/01/25/slb-january-updates/
Now let’s roll along to what new stuff I have to update you on this month 🙂
New Stuff
We’ve now pre-sold nearly 450 boards now…. and wow I’m so excited to see that everyone else is just as excited about this board as I am. To put into context: the current batch of boards we’ll be manufacturing was intended to be 500 but had to be reduced to 470 (I’ll mention the reason shortly) which means that we’ve nearly already sold out the whole batch before starting shipping! Needless to say, Andy and I already began discussions about a month ago on what our next steps are going to be if the reception to the SLB ends up being as good as we hope it will be to ensure we can have more on-hand in the coming months if possible.
Now the reason why we had to reduce to 470 is basically a math error, but in short:
Right on time to the schedule I posted in my last update – a couple weeks ago – we finally ordered the final production run of SLB boards! After the last run of prototype boards arrived we were able to very quickly redistribute them to Beta testers and vet any last changes we felt needed to be made so we could turn around and start prompting for production.
Already knowing that Lunar New Year would interrupt our delivery progress, we’d already ordered every other overseas part that we needed to produce the SLB (except the boards) at the start of January to ensure things would arrive on time by boat.
Knowing that we couldn’t do this for the boards since we needed more time to test them, we instead pre-ordered lots of the parts used for the board circuitry in advance as a way to help speed up production after Lunar New year finished. This included important stuff like the STM32F412 ‘brain’, TMC2660C motor drivers, and some other rarer items. We pre-ordered around 525 of these parts, but shortly after realized that we needed to do one final set of prototype boards and this used up 40 of the 525 parts.
After we add a small buffer for potential board failure, this left us with about 470 left for production SLBs that we can make available and would ship by air to catch up with everything else so they would all arrive around the same time.
Speaking of ordering parts, let’s take a look at what our full part table looks like right now as we start preparing to intake SLB parts and set up packing stations to check and ship them out:
Subsection
Name
Amount
Shipping Status
Board Parts
SLB important PCB components
1
Pre-ordered and now being used for SLB board production
SLB PCB assembly
1
Underway, scheduled to arrive by air on March 18th
USB-C Cable
1
To be ordered shortly after some more testing/validation
E-stop
E-stop Button
1
Ordered, currently on boat and scheduled to arrive March 5th
E-stop PCB
1
Underway, scheduled to arrive by air mid-March
E-stop Cable
1
Completed, will be shipped alongside E-stop PCBs
Injection Moulded Case
1
Completed, currently on boat and scheduled to arrive March 15th
#4 screws
3
In stock
Enclosure Parts
Aluminum Extrusion exterior
1
Completed, currently on boat and scheduled to arrive March 15th
Front Panel
1
Rear Panel
1
Acrylic Cover
1
Arrived, to begin in-house production mid-March
Steel Mounting Bracket
1
Underway, should be made and plated in a couple weeks by our local steel manufacturer
M5-10mm SEMS
3
In stock
M5 T-nut
3
In stock
M4 Thumbscrew
1
Arrived
#4 screw
6
In stock
Packaging
Cardboard Box and inserts
1
Still being designed, should have a 1 week turnaround time by our local manufacturer
We’ve tried to time things out using a combination of boat and air freight for international parts and the shorter timelines of our local producers. Hopefully the information isn’t too much to look at, but the long and short of it is that everything looks like it’ll all show up around the same time!
Some of the great-looking production samples!
In the meantime, we’ve begun working on making space for packing and testing stations, working on designing our quality assurance procedures to test boards before they go out the door, all the while internal testing and Beta testing still continues forward as small tweaks to gSender support and to the Firmware are still being made to get everything working how we like it.
Please still bear in mind though, due to there being things that could still be outside our control, I would still conservatively estimate that SLBs begin shipping out the door last week of March or the first or second week of April. This would cover instances where delivery by boat or air has a slowdown, or we find something with the final batch of boards that need our attention. For example:
We’ve now had problems with a couple RGB LEDs out of the 50 prototypes we’ve made where they light up random colours rather than turning the colour they’re told to be. This makes us think that our manufacturer is giving us slightly water-damaged components, so we spoke to them about baking the LEDs before installation and are also working on a way for them to validate the boards before shipping so they don’t show up broken. This is an example of nothing we’ve done wrong, but could pop up unexpectedly on a board as complex as the SLB.
Will there be more Videos?
Yes of course! To be honest, after the inrush of pre-orders after the SuperLongBoard launch I’ve had more of a sense of duty to test-test-test the board as much as I possibly can as a higher priority than filming the boards capabilities. This is because, though I know there’s lots that the board can do, clearly everyone who’s already pre-ordered is already on ‘board’ with the SLB so I don’t think it would be fair for me to spend my time building more excitement for the board when I can instead focus my time on making it more bulletproof 🙂
And I think the nose-to-the-grindstone work has been paying off! There’s been tons of bug squashing and pushing machines to their limits by us and our trusty team of Beta testers:
We’ve now had over 15 firmware iterations since the start of the project
We’re continuing to work closely with the grblHAL firmware creator to ensure great compatibility between the board and its functionality, we actually sent him a pre-production SLB of his own that he’ll be receiving shortly
Major work thus far has included implementing major features like reliable USB and Ethernet, standby current reduction and individual axis holding, 4th axis control, TLS support, action buttons and ensuring their behaviour is predictable in different situations when using the CNC, controlling the custom outputs, honing in on the new LongMill default settings
Lots of tweaks have been made to gSender to make it know all the things it needs to know to effectively communicate with a faster and more feature-diverse controller. There have been more delays than originally thought due to continuing to find unexpected edge-cases in how the SLB behaves differently from the LongBoard, but we’ll keep trucking along and expect to be done in time
Ikenna has now thoroughly vetted the SLB to work with our LaserBeam laser diode and is very happy with how it’s working, even now using SLB in his LaserBeam livestreams
When it comes to roadblocks we’ve hit, the last month has actually been very good. Beta tester feedback has been a split of 40% gSender compatibility problems, 30% improvements to board documentation, then about 15% tweaks to firmware and the last 15% changes we had to make to the board design before we began production. This is good news because software and firmware are things that we can -and have- continued to work on while things are being manufactured and shipped over. This means that the gSender and Firmware teams still have most of March to finish polishing things up which seems very doable. The last remaining hurdles are to get things like 4th axis cutting and switching between spindle and laser working as smoothly as we can in gSender, and then completing the remaining documentation tweaks based on Beta testers continued feedback, then writing up a guide on how to do a full board swap for existing MK1 and MK2 owners. I’ll also be setting aside some time mid-March to establish final movement speeds and motor noise that can be expected.
With all that said, videos will definitely still be making more of an appearance as we begin to near the delivery date since I want you guys to see what you’re going to be getting before shipment begins 👍 Alongside this will of course be: continued updates to FAQs, starting to release parts of the SLB manual, starting to release a list of recommended hardware to use alongside your SLB for 4th axis, lights, and more. I might even do some Livestreams so you guys can see more of the board in action and have any of your other questions answered! Some of my current video/livestream ideas are:
Speed and noise comparison to the LongBoard
Trying and SLB retrofit onto a Mill One
I’ve been messing around with a RapidChange unit and am hoping to see if I can get it fully set up and working to answer any questions about the SLB supporting an ATC. If you haven’t seen this unit yet I’m very excited about what it might do to shake up the hobby CNC space for more affordable automatic tool changing, and Don who I’ve been speaking with over the last year is a really nice guy who’s direction I really love so far
Conclusions
If you’ve made it this far, here’s your award 🏅. This is to recognize that you once again lasted through another one of my treacherous, Engineering-writing posts, complete with its poor sentence structure and also a lack of pictures on this post especially.
In all seriousness, thanks for everyone’s continued support for this project and the other projects we’ve continuously strived to do with Sienci Labs over the years. It’s never been easy for us but the kind words and reassurance that the work we’re doing matters really helps to keep us going. Thanks for anyone who’s been helping give me and the gSender team the needed feedback to keep making more cool features and fix iterations that sometimes break things and thanks for posting all the cool stuff you do and helping each other out too.
If you have any other ideas for SLB content you’d like to see, please leave them in the comments of wherever you were when you saw the link to this post whether it was on Facebook, our User Forum, or elsewhere and I’ll try to find them and write them down.
Hey all! Chris here again with some more juicy SLB updates
There’s been a lot of great news to come since you last saw me with my major SLB update post at the start of November, and then our very successful SLB launch on December 4th. If you missed them feel free to look back and get caught up:
Firstly, thank you to all of you who have pre-ordered! We sold almost half of our first batch of 500 in the first 3 days, and are now at 357 total pre-sales, we might be sold out before we’ve even shipped the first board! Me and the whole team behind this effort really appreciate the trust and excitement we’ve seen for the SuperLongBoard and will keep working diligently to come out with something that we’re proud with and in a timely manner.
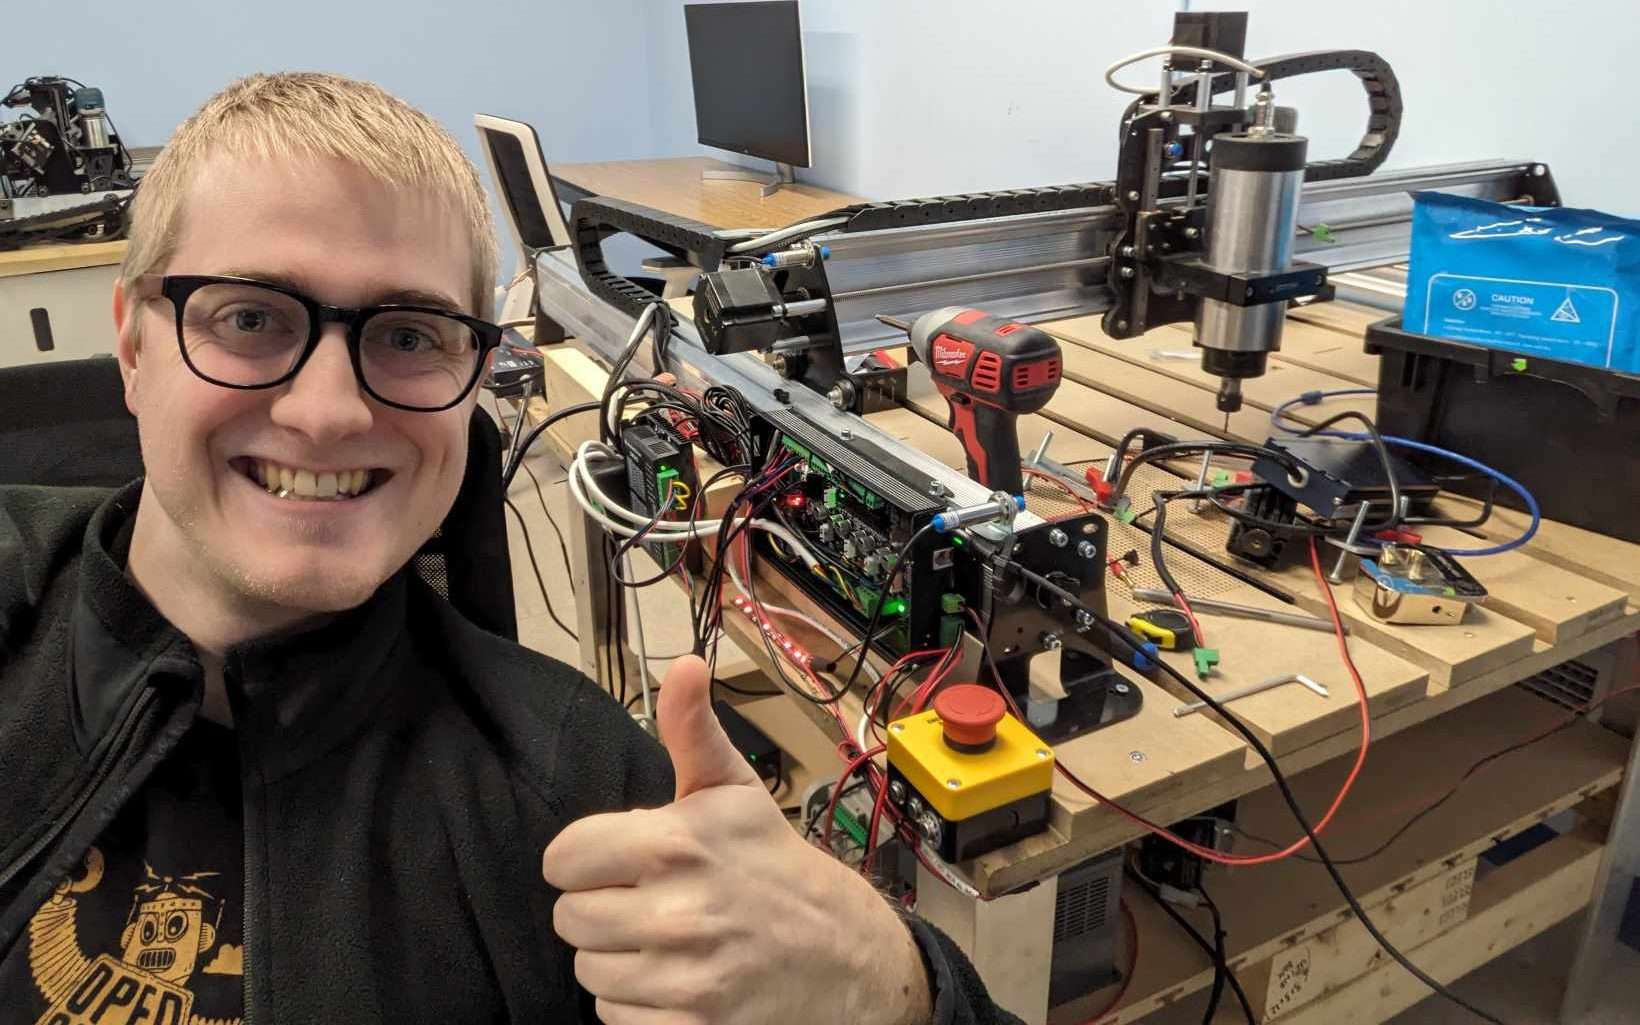
Thumbs up from one of our test setups at the new Sienci HQ!
Just a reminder that we’ll still be sticking to our word and offering anyone who orders an SLB before Jan 31, 2024 a reduced price, this means that if you’d like to show us some early support in this project and save some bucks while you’re at it, you’ve only got less than a week left to join the pre-orders 🙂
Some Meat and Potatoes
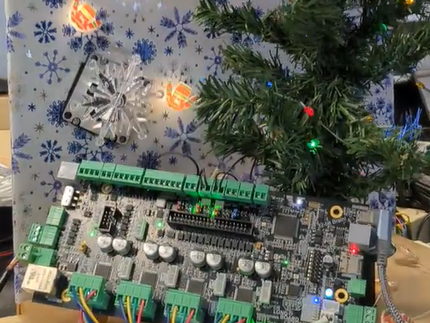
SLB Beta testing and board development rolls on 🚂. Since you last heard from me late December, nothing notable was hinted to since there’s A LOT of complexity to timing a product like this that has been going on behind the scenes. The one fun you might’ve seen was an SLB-powered Christmas Tree display which was a great break for me to enjoy a hands-on project, especially after the many countless hours I’ve spent recently behind a computer on documentation, emails, bug testing: https://www.facebook.com/groups/mill.one/posts/1811830652621591/
Happy SLB-mas!
Getting along to the juicy stuff, the SLB production progress has been continuing to pass more milestones:
SLB Enclosure 3D design finalized
E-stop PCB finally designed after the hurdle of the E-stop connector not being able to be tracked down so we got around it by attaching a connector to the other side
Enclosure samples arrived, tweaks made, production started
Major slowdown in receiving new SLB prototypes because of shipping confusion from UPS since we moved offices
Now at 5 Beta testers who are all talking on an the expanding private SLB Forum (will become public at launch)
E-stop samples and sample 2.5m E-stop cable arrived (longer length allows for more options on where to place the E-stop)
Found we won’t be hitting any major roadblocks when it comes to certification
Manufacturing of E-stop wires and injection molded E-stop enclosure complete
Manual & documentation now reaching reasonable progression in outlining all board features and testers now having hands on with the majority of options the new board makes available
Most-finalized SLB design, basically ready to go!
I hope you’re all as excited as I am about all those major steps that have been taken. We’ve also been iterating very quickly on improvements to the SLB’s firmware and bringing gSender up-to-speed to properly support the new board. These we know we have more time to complete since physical production is the MOST important to move along ASAP, but software and Firmware is still great to put our minds at ease to ensure everything works as expected as soon as possible:
6 new SLB firmware versions since my last big update, now at 5.0.1 which fixes and improves some great stuff
Status light overrides
Improved PWM switching with separate inversion control
TLS inversion should now be fixed
SwitchBank control now happens over software
Laser will be changed back to not be default behaviour for safety reasons, but gSender is being worked on to support easier changing between Spindle and Laser
Controller jogging finally smoothed out, improved time estimation, more progress to resolve HAL Rotary behaviour, among other things
Whole ordeal now almost straightening out where we had massive delays due to software certification regulatory changes, requiring us to reapply and have our costs doubled to $800/yr just to be a trusted distributor
Here’s some more detail you can see on some of those points. Please read to the end if you want to see information about the remaining steps we have ahead of us and where my thoughts currently lay for the delivery timeline ↓
Finalized SLB Enclosure and E-stop
Sooo much iteration we went through to try to make a from-factor we were happy with
To give some context, we started ideating the enclosure the SLB would fit inside before the board even existed! We wanted to make sure it would accomplish a range of things to accomodate all the new plugs, keep wiring clean, look nice but also robust, not break the bank since the value should be coming from the board itself, and much more. A while ago I even started a thread on our forum when I thought I’d finally reached the end of our design vision (https://forum.sienci.com/t/official-call-for-feedback-on-new-board-in-development/8519/)….. aaand it was met with mixed reviews. In light of this we went back to the drawing board and I hope what we came up with will be able to meet everyones needs.
Finalized aluminum SLB enclosure and cable, E-stop to be injection moulded
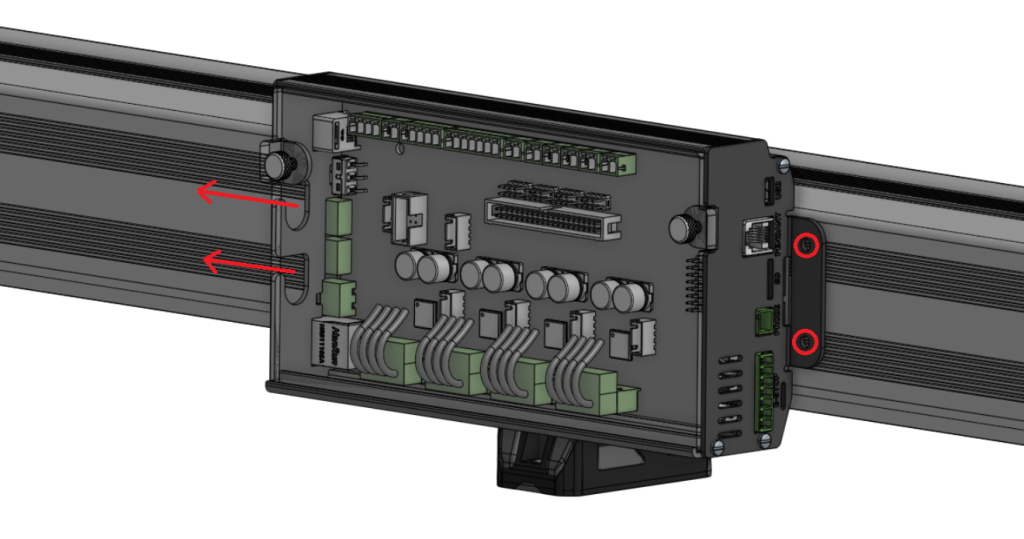
This new design should give the best of both worlds! Universal flat mounting via flanges to accommodate a range of setups or machines inside enclosures, with a subtle bracket that will allow for Y-axis rail mounting for any LongMill MK2 owner if they want to keep all their wiring tidy and together. The front is easy to open and allows some wire management inside the enclosure itself, with most wires going out the rear, and I’m sure you’ll be happy to see how the status lights turned when we do a final reveal. You can also see the detached E-stop with it’s longer cable and 3 customizable Action buttons! These will all come standard with each SLB kit
Beta Testing
We’re in our final push on Beta testing to see if we can find any last issues with the board. This process has been ongoing for several months now with us finding little quirks here and there – but luckily most of these have been easy fixes that weren’t due to the boards themselves and instead the software or firmware. Below you can see a new setup for one of the testers, and if you pay close attention you’ll see some of them posting updates on their testing experiences on our Facebook group or Forum (like https://www.facebook.com/groups/mill.one/posts/1829844527486870/).
I rotated this picture to fit better onto the page, sorry Ian 😐
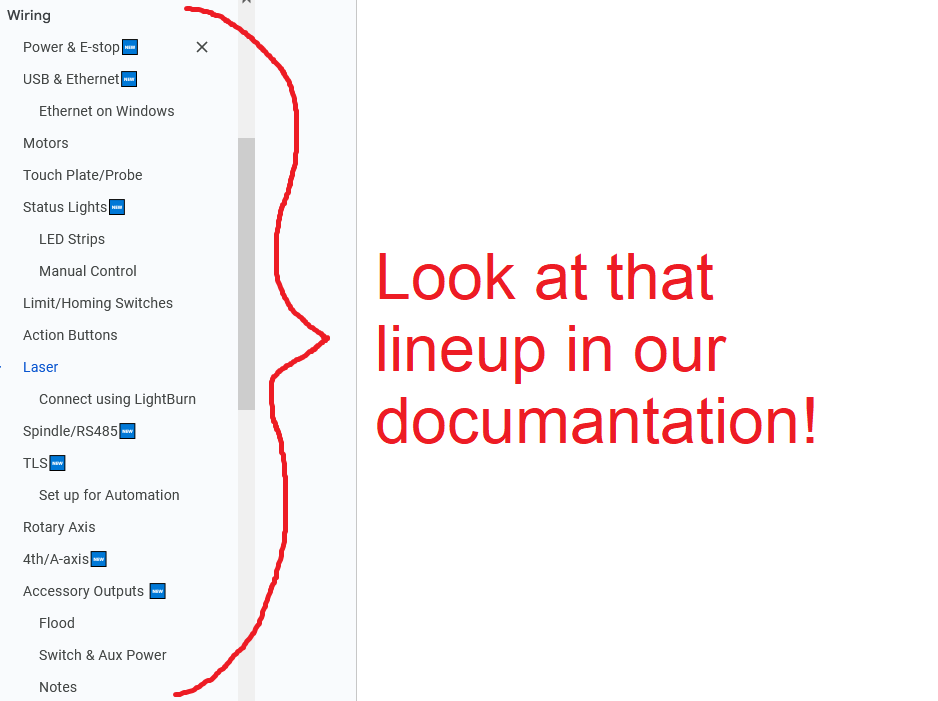
Documentation
A labour of love to keep our level of product support to the standard you’ve come to expect from us, we’ve now passed 50 pages of documentation covering all aspects of mounting, features, configuration and more for the SLBs. Another thing I wanted to let everyone know of is that one of my goals for this year is to transition all of Sienci’s documentation to be publicly contributable so that anyone can submit improvements or entirely new write-ups on how to use our products and just to share CNC resources in general. I’m very excited about this prospect and hope that I can do it in a way that best honours our ever-growing community.
Ongoing work on over 50 pages of documentation on all aspects of the SuperLongBoard
What this all Means
It means we’ve been working hard and seeing results! There’s still many more steps to go though, and with now everything in production except the boards themselves, I have to admit that the March delivery date might push into the end of March or start of April depending on our luck with slowdowns overseas from Lunar New Year. The board design as of tonight is fully complete with any other small tweaks we felt it needed to be ready for production, so the last thing holding us back is any remaining feedback from Beta testers that might tell us that there’s anything else we might’ve missed on the boards – otherwise if we have the confidence then that would be the last big piece of the puzzle completed. We want to try the best we can to not miss anything and have been trying to run Beta testing and in-house tests for over 5 months now to gain the confidence that we hope to see play out once everyone else gets their hands on the SLB.
Most recent round of prototypes being sent out to Testers to collect as much feedback as we can
Any other remaining steps and timeline as we start to see the light at the end of the tunnel:
Ongoing Internal validation on the new batch of boards, between Johann on General checks and Ikenna on LaserBeam compatibility alongside Expatria on their own setups we’re doing one last big effort to ensure boards can begin production and Firmware is as progressed as possible
As of the start of this week and until the end of next week, the -hopefully- last version of the board prototypes arrived in the hands of Beta testers alongside the mostly finalized E-stop, enclosure, and new firmware. We’ll be looking for any remaining feedback to hopefully conclude any remaining findings they can provide before we begin production: using the E-stop and Action buttons, the form-factor and fitment of the enclosure, anything else they’d still like to see improved or fixed with their SLB experience
Continuing to order full 500 quantities of anything we’re sure about like the thumbscrews that just arrived today and will soon be starting to vet USB-C cables
Board PCB production should begin the last week of January or first week of February, and in the meantime we’ll be pre-ordering all the board components to hopefully reduce production time
Design box packaging
Start to prepare jigs and processes for QA
Throughout February and until we begin shipping, continue to make updates to FAQs, short videos to show board capabilities, SLB Manual, gSender HAL support, and SLB Firmware
Me and the SLB and gSender teams have been, and will continue to be, working diligently as the March delivery window continues to approach. This has been an especially big project for us to undertake so we want to do whatever we can to set up the SLB to succeed. As 2024 starts to pick up steam, I’m really excited for the impact that the SuperLongBoard might have on the future of hobby CNCs and hope to be proud of the 1.5 years spent to bring it to life.
Watch out for more videos I’ll put out to show what the board can do and feel free to keep asking questions 👍
gS release schedule
Please let us know what you think of the new 1.4.0 (https://sienci.com/gsender/)! It’s an accumulation of over a years worth of work in a package that we called “Fundamentals”. We wanted to bring new things to the table but also really take the time to go back into what fundamental things we could improve about gSender to make the day-to-day CNC experience more pleasant and reliable. This included new joystick controls, touch plate probing on all corners, much more accurate time estimation, faster file loading, endeavouring into maintenance reminders, and more. We know it may have a couple bugs in it here and there but we’re committed to fix those in the coming weeks and make 1.4.0 the new, best version of gSender for everyone to use!
Our next big push we’ve decided to call “New U”, where we’ll be aiming to take everything we’ve learned about the CNC control experience and put it to work in doing a complete overhaul on gSender’s UI. I know this may be a polarizing topic but we do feel like we can take something that we already felt we’ve done so well on and push it even further. We hope to take plenty opportunities to get everyone’s feedback as we begin this process but we feel hopeful that once we come through on the other side this will certainly be for the better and a better gSender overall.
Thanks yall for your time and hope to see you more soon!
Hi everyone, Chris here. It’s great to be speaking with y’all again, it’s not often I get around to writing blog posts since I tend to be more behind the curtain on the tech development we do here at Sienci. As Andy mentioned in his November Production Update post, there’s a lot to update on so I’ll spread as many juicy details as I can. We’re now at over 400 people interested in buying the new SLB system we’ve been working very hard at so thank you for your support! It’s very clear that our community is very excited about this massive upgrade to the LongMill and for the future of the hobby CNC industry.
There’s also a video I filmed which you can feel free to watch if you prefer to see more of my face 🙂
Recap
Let’s start with a quick refresher about how the SLB came to be Sienci’s biggest project to-date.
As many of you know, Sienci Labs has historically been built up by our mechanical solutions – an expected direction seeing as myself and Andy co-founded the company while studying Mechanical Engineering. Our goal with Sienci was always to take advanced, industry technology and try to find a way to simplify it in ways that made it less expensive and easier to use so that everyone could have access to making complex things at home. We feel like that goal of price-point and ease-of-access is something we’ve been proud and successful at to-date with our big projects like the LongMill turned LongMill MK2 CNC, LaserBeam laser system, Vortex rotary axis, AutoZero touch plate, and our unique MK2 Magnetic Dust Shoe.
What’s been clear to us since the start though is that the CNC experience won’t be able to be improved with mechanics alone. Most hobby CNC communities have quirks with their machines, but once those quirks are understood the majority of confusion comes from everything else you see day-to-day when you use it: designing projects, tool selection, feeds and speeds, machine control, and reliable cutting. This is why we started working hard on non-mechanical solutions that we’re also very proud of like gSender for open-source CNC control, our in-house feeds and speeds charts, our expansive resources for learning and understanding CNC, ever-growing roster of tutorial videos, and now the SLB.
Why the SLB?
The SuperLongBoard is a next-generation CNC control board we’ve been dreaming of making for years now and is getting closer to completion. We believe that at this current stage, integrating smarter, more reliable, and more capable CNC control electronics will make the biggest improvement to the CNC experience. If you look at options on the market there’s been a large divide between the capabilities and reliability of the typical hobby CNC boards in the $40-$200 price range and the far more expensive, semi-industrial options that can reach the several-hundred-dollar range to over $1000. With chips getting more powerful and lower cost, we thought that gap in ability could be reduced while still staying in the lower price range by making a board with those new technologies. We knew this was going to be a big challenge – there are reasons why it’s typically easier to up-sell older technologies than it is to develop new ones – but we felt strongly in our decision. We felt that creating a new, improved, and unique solution could bring new innovation to the market to benefit everyone by reducing barriers to entry, keeping the industry progressing, and making more reliable and capable CNCs at lower price-points.
Working alongside Andrew and his team at Expatria Technologies, and building off of Terje Io’s amazing grblHAL project, all these tools need to work hand-in-hand so we can set our sights on resolving two major areas that we think hobby CNCs could benefit from:
Reliability: this is such a broad topic to solve, but it can be more-or less divided into a couple categories.
Board wiring and protections: designing a board with proper grounding and plenty of voltage protection and isolation takes a lot of time and experience but is needed to shelter the electronics from CNCing – an electrically ‘noisy’ environment from all the moving motors and static electricity buildup from cutting and vacuuming materials
USB protocol: this is implemented in firmware and grblHAL comes with far more checks with data communication mechanisms in place to guarantee delivery over USB and know when to resend lost information
Backup Communications: adding Ethernet on top of grblHAL’s already robust USB implementation isn’t necessary but having an alternate communication method to turn to is always a great option if you’re ever experiencing problems with the primary style – an onboard SD card also gives you that flexibility
Processor speed: a slower processor can’t buffer as much information when dealing with short and complex movements, meaning better chips can reduce the chance of errors popping up
Room for growth & “Wow factor”
Motor drivers: the same stepper motor controlled by different motor drivers can see notably better performance with all else being equal – so why not upgrade to newer-age drivers to get better speed with less motor noise out of the same CNC
Smarter CNC: having the CNC better tell you when something has gone wrong, automatically fix a problem for you, or make one of your existing processes easier creates far less room for error
More control options: there are typically specific limitations on what a CNC can do, so why not expand it’s options to support all commonly used CNC accessories plus leave space for even more customizable outputs. This can include things like independent Macros buttons, independent Spindle and Laser control, Modbus over RS485 for more closed-loop VFD control, tool length sensor support, ring and rail lights, door sensor, CANBUS, CNC pendant options to control the machine more easily, adapting to plasma cutting, and more
Multi-axis control: benefits those who have started to dive into cutting rotary projects to create ornate, fully 3D projects on their CNC and want either a simpler transition between cutting styles or are interested in full 4-axis cutting
Onboard computer: if you’ve ever run into problems with a Windows update, USB port falling asleep, or having hardware too underpowered to run your CNC, these problems can all be solved with a dedicated, purpose-built, and built-in computing solution running something like gSender onboard
We think we can address most of these aspects with the SLB at the time it ships so it can play a part of the next big step in hobby CNC technology. It’s advanced electronics and software will bring not just new features and functionality to the LongMill, but at a price point that we believe will be affordable for hobbyists. With it being a Sienci project, it can also guarantee that the SLB will be backward compatible with ALL LONGMILL CNC MACHINES OF ALL GENERATIONS, which means that users can upgrade their machine’s capabilities by simply replacing the controller. It will also support all our current plug-in add-ons. We also plan, just like with gSender, to make our board well documented and able to be adapted to many other CNC form-factors when we start to work through rolling it out in production.
How it’s coming along
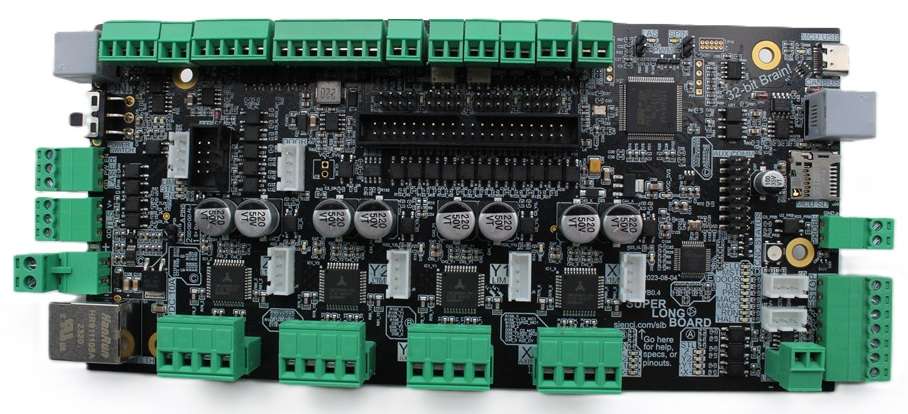
Very well! Since Andy’s last update, our SLB team has been working hard to prioritize checking the functionality of the physical circuitry on the V2 prototype board are we’re now feeling confident that the following circuity is good to go:
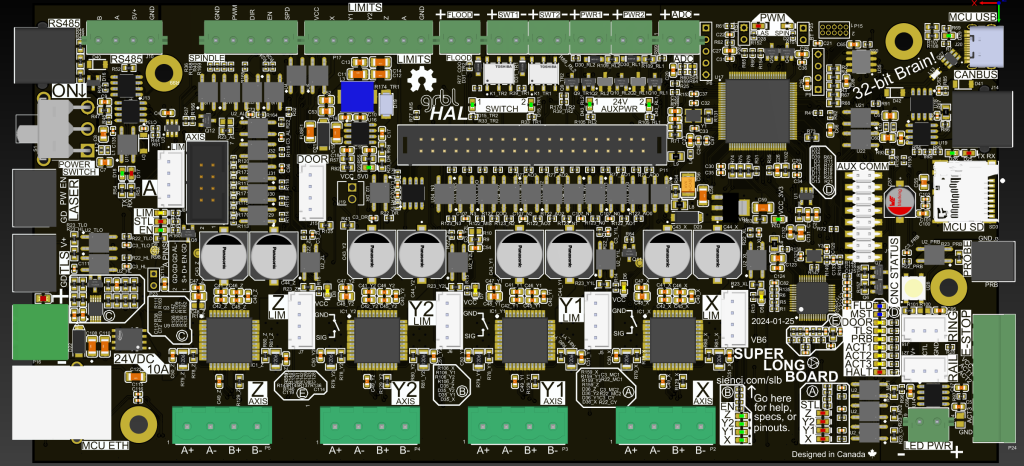
Newest version of the SLB (V2)
24V 12.5A brick power supply input with power switch (no more power over computer USB)
External, detachable E-stop with light, controller feedback, plus 3 customizable buttons
More reliable implementation of serial communication over USB-C (no drivers needed) as well as Ethernet
4 higher-end, independent motor drivers rated for 2.8A RMS (TMC2660C, higher efficiency, less noise and resonance)
RGB Machine status LED
‘Contact’ style touch plate input
4 independent limit switches with two connector styles and 5V or 24V output
Coolant digital output set via M8 and M9 commands (5V 40mA)
Independent rotary axis support with dedicated limit switch
Tool length sensor input for easier tool changes
Modbus over RS485 to control spindles and other accessories with two connector styles, terminal breakout and CAT3 cable with RJ11-6C/RJ25 and supports daisy-chaining
Very dust resilient enclosure with quick assembly
Many status LEDs for troubleshooting
Tons of opto-coupling for optimal protection against incorrect wiring and electrical noise
Less heavy boards with less fragile components should lead to lower failure rate
Extendable RGB LED ring light and rail strip output
4 customizable outputs to external circuits, controllable via M62/64/63/65, M7/M9, M8/M9, and M3/M5 (2 SSR pin shorting and 2 relay/solenoid/motor driving)
SD card to store onboard information and possible g-code file overflow (min 512MB)
Door sensor for input to pause cutting
Special CANBUS for pendant communication
Extra breakout IO to access spare MCU pins and other alternate outputs
ADC input for future sensor input
Communication connections (e.g. Rx and Tx) available for future control via external controller / pendant
These could still change a little on our way to production but I’m very confident that this will give an accurate image of what the SLB will be capable of. The gray items on the list might not be ready at the time of launch but the great news is that we have verified all their circuitry and put them on the board so all that’d be missing is a firmware update we plan to put out after shipping boards to enable those features as well.
The main items absent from the list are twofold:
Firstly, though we aimed for the V2 board to be our second and last prototype, we did find some areas that we wanted to tweak. These were: changing the Spindle 0-10V output back to 5V PWM to support the new spindle we’re working on, changing the Laser PWM and Flood output circuitry to deliver a signal that’s more in-line with the previous LongBoard, tweaking the RGB LED driver buffer, fixing some onboard status LEDs that were floating, and adding some more EMI improvements. Most of these changes are quite small, but we decided that getting a V3 prototype made will help us feel confident in finalizing the design for production. This is a hard decision as it’s likely going to add another 1 month to our board release timeline, but we really wanted to be sure to support one of the key features we wanted the board to have “Independant 5V PWM and EN Spindle and Laser control set via M3, M4, M5, and S g-code commands, plus SpinDir“. The V3 design should be sent out to get made in the next week and should now lock-down the full SLB design. While we wait for it to arrive we’ll be focusing fully on testing and firmware improvements.
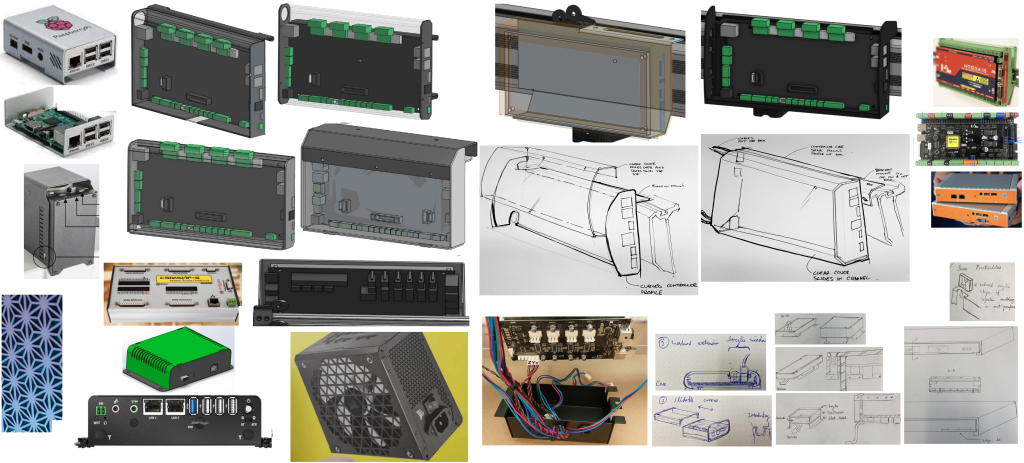
Secondly, for those who might not have been following Andy’s production updates, we’d originally envisioned the SLB as being a system of two different parts working together. The first being the board itself, containing all of the core CNC functionality controlling motors and handling g-code, and second being an optional onboard compute module that would act to replace a computer or laptop and instead be integrated. Users could connect a keyboard, mouse, and monitor to control all functions of the machine directly through the SLB. This was very exciting to us given the considerably low price of the compute module over a computer, around $40-80 dollars plus the cost of the monitor, keyboard, and mouse, as well as the extra speed, user experience, and reliability of an onboard system.
In our extended tests with this idea in mind, we weren’t finding the success we’d hoped in creating a seamless user experience with this solution. Despite trying many Linux kernels, drivers, GPU acceleration, and bringing many more efficiencies to gSender, the Broadcom and Rockwell-based processors used on smaller compute modules were not powerful enough to accommodate the visualization of g-code directly onboard. This also meant they didn’t have extra headroom if in the future we wanted to implement other features such as having a camera monitoring system or other sensor inputs. With many months delay trying to chip away at a resolution we decided to split the development of SLB back into its two parts; prioritize improving the baseline machine performance first so CNCers don’t have to wait any longer for the SLB to make better machines, and strip out all the on-board connectors and switch to a higher-power off-board solution that we’ll implement at a later stage. This will mean anyone could still upgrade at a later date. Higher-power Fanless PCs will cost more, from our initial budget of around $80CAD/60USD for the compute module, to somewhere around $100-$200USD depending on the specs and configuration, but would ensure a smooth and seamless experience as well as provide headroom for future applications.
To summarize, we decided to take the concept of the onboard computer and divide and conquer on it at a later date. It would’ve been really cool to have a fully integrated system but it kept pushing our board delivery back further and we felt it would benefit everyone if we just pushed ahead on the other features that will all still bring great benefit to the CNC experience. This means that users will still need to connect their computers to the board to control their machines when the first batch of SLBs release, but should still see drastic improvement.
To-date, SLB development costs have tallied to more than $300k, making it easily our most expensive project to-date if you don’t count gSender which is I’d guess is around $500k at this point. These costs are pretty standard and have mostly come from paying salaries to do in-depth research on board infrastructure options, decisions on features that CNCers would like, designing robust PCBs, lots of custom firmware development, and testing. The new board uses a large number of components, adding to the challenge and complexity in manufacturing, but this was expected and we’re working through it. We feel confident that we’ve done something useful here and we’re excited to see the interest in the SLB on launch and continue moving development forward.
grblHAL support in gSender
Another big effort we’re having to undertake to support the SLB has been with gSender. Though grblHAL has “grbl” in the name, it might as well be a completely new firmware with all the new work that our development team has had to put in so far to make a seamless CNC control experience and UI. Since grblHAL is such a new firmware on the hobby CNC scene, it’s still growing and not widely adapted, and we want to help change that. There’s so much documentation that has already been made but there’s also a lot more we have to figure out. We’ve been working on an all-new firmware flashing utility for the new board, and had to build in a lot of modularity so gSender can be compatible with old and new boards alike
Look at an example of all these new EEPROM settings!
Iteration on the SLB enclosure I think is coming along well, the design is now pretty much locked in 🙂
Back in April I put out a post on our Forum with the leading design we had at the time to get peoples feedback on what they thought (https://forum.sienci.com/t/official-call-for-feedback-on-new-board-in-development/8519) and the results were positive but still mixed. I wanted to take a new approach to the enclosure design to accommodate all the new plugs without them all being exposed, as well as improve cable management on the LongMill in particular. Though many people were on board, many still expressed concern with my idea behind mounting the board to the Y-axis rail due to their fear of dust, vibration, or accommodating enclosures.
After going through way more iterations internally, this is now our revised design which I feel much more confident will suit everyone’s needs:
#image_title
The main perks of this enclosure is it’s mounting versatility and wire management. With this new setup, anything that you’d expect to have more common access to faces toward the front and all other wires can be routed out the rear. The RGB status LED will be visible through the faceplate put the panel will also be easily removable for troubleshooting or servicing. All the components on the board face upwards so everything is accessible and the board has been tested to run very cool so even in hot environments and with the bit of venting we’ve added in we expect everything to operate as normal.
Rail mounting bracket
The rail mounting is also a separate piece that can be used or not. This gives versatility to mount the SLB on any surface (rail, vertical, or horizontal) with 2 or 4 screws. We’ve already begun production of the parts and should be getting them in Nov-Dec.
E-stop Design
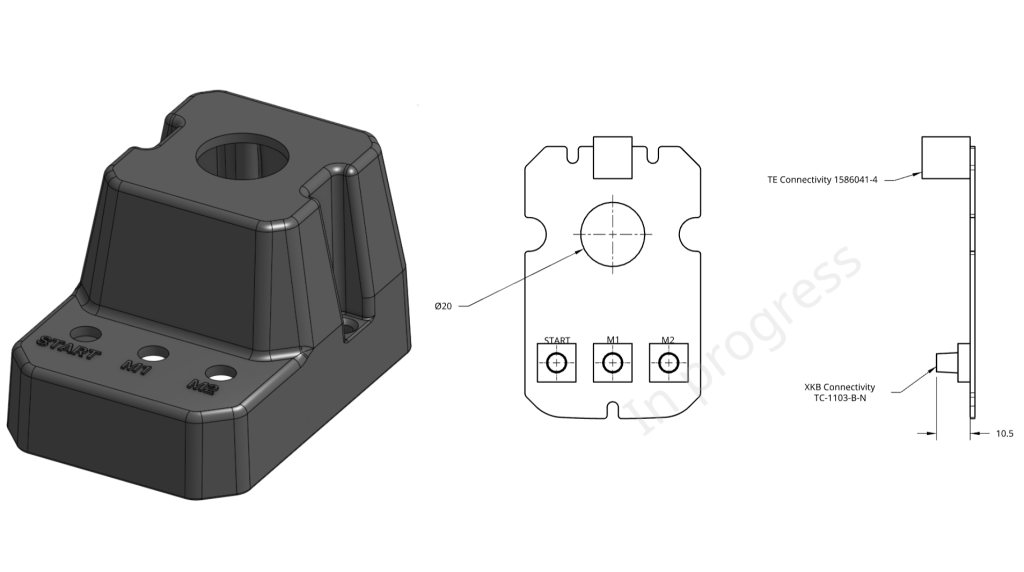
This is also mostly completed, just waiting for some last few checks. You’ll notice on the earlier feature list that we wanted to move away from the 3 buttons attached directly to our board. This is because there was feedback that people didn’t tend to use the existing buttons because of their fixed function, and when people mounted their board out of the way they couldn’t access the buttons anyway. We wanted to fix this by making the buttons separate and customizable, and this lead to a new E-stop design with 3 other customizable buttons integrated into it! Now you’ll have the freedom to have 3 physical buttons perform a myriad of custom functions to suit your workflow right next to your E-stop.
New E-stop design
Beta Testing progress
As we’re turning the corner on finalizing the board design and implementing our initial set of firmware features, our main goal over the next month will be: test, test, test! We’re now in Phase 2 of Beta testing where our main goal is to make sure that all our new features play nicely with each other, since we already know they work well in isolation.
We currently have 3 boards with testers and 2 dedicated machines in our own shop running CNC jobs every chance we can get and have already found unique situations that cause problems which we can now work toward resolving. This also involves comparisons between the old and new board and real-life durability and performance testing. One example is Ian’s Onefinity where his former setup used our original Longboard and with the SLB he’s seen drastically reduced noise and nearly doubled movement speeds. This hasn’t been as drastic for our other testers but we’re also already noticing some of the stability and perks that the SLB has to offer. Once the batch of V3 boards arrive, the plan will be to redistribute them as well as contact a new wave of testers to complete one final round of feedback. Some people we reach out to will be those with persistent and existing EMI and disconnection problems to see if the SLB is able to resolve those issues. At that point we expect to feel confident in the performance and features we can promise with the board that we can prepare for release.
Here’s a video from Andy’s last post of us testing the new programmable macro buttons. These allow you to program a specific code or function to 3 unique buttons, rather than just start, pause, and stop, which is hardwired into the current control board. In this case, it’s being used to move the machine to a specific position to assist with getting the machine out of the way for changing tools and materials.
The pricing is likely to be refined as we’ve made new decisions and near production, but I think no matter how you slice it you’ll be able to expect that the SuperLongBoard will be giving you every bang for your buck.
As far as timeline, many followers of this project would know that we’ve had to push our originally anticipated late-summer, early-fall launch. We’ll be putting out another update soon on the roll-out strategy we have in mind moving forward because we want to give people a guarantee to be in line for the SLB before Christmas, so stay tuned to hear more about that. You can get a glimpse of what some of the steps will be with the roll-out in Andy’s original post as well under “What’s Next?”.
As far as ongoing project schedule, much of it has been laid out in the sections above which I’ll try to summarize here:
Last tweaks will be made in the next week to start a batch of V3 SLB prototypes
Firmware, Beta testing, and gSender support will continue over the coming month while we wait for the V3s to arrive
SLB Enclosure and E-stop designs should also become finalized and be ready for production in the next month or so
Once V3s arrive, final checks can be made to feel confident about the circuit design and begin board production
Phase 3 of Beta testing will continue to refine Firmware and gSender support while all other production is underway
I’d say that this means the boards won’t be ready to ship in December / Christmas and are instead more likely to be able to ship around Feb-March. The first major steps we took until June 2023 involved much of the initial product churn that we expected to see, though with delays in board prototypes and unexpected difficulty interfacing with the drivers we lost about 2 additional months. Add to that the outcome of the compute module testing meant that we had to pull out a lot of components for a full redesign between V1 and V2 and now we have to address some of the missed items between V2 and V3. This is the reality of developing such a complex product and is why we now feel much more confident with the recent testing and steps that we’ve taken that the completion of the SLB for launch is just around the corner 😀
Thanks
Thanks for sticking along for the ride on this big update, I hope it answers most of your questions on where the SLB is currently at and gets you excited about what’s to come. I expect the SLB to be very unique in it’s abilities to exceed the capabilities of many hobby CNC boards, perfect even for the DIY hobby CNCer for all it’s additional IO, and still have many more plans for it in the future. Of course it’ll be an Open-source design so hopefully all this time and effort that our team has put in will be able to return to the community and benefit other efforts toward easier CNCs.
Leave any comments you have that I missed and I’ll try to answer them. As I mentioned I don’t tend to put out updates because I’m a very slow writer but I’ll ensure to keep Andy in the loop as progress continues so he can update y’all as things keep moving forward. Just remember to read the Production Updates!
An example project sent in by Andy Mctaggart, one of our beta testers
Pending LongMill orders
If you placed an order for the original version of the LongMill and you’re in the queue here, we are working on packing and shipping your order. We have been delayed in shipping the remaining LongMill orders as the couplers which were estimated to arrive on December 30, 2021 have been delayed. Due to the delay, we have ordered a rush batch of couplers which are expected to arrive around Jan 12th, and shipping for LongMills will be temporarily halted until the couplers arrive.
We’ve sent customers who are expected to be affected by this delay emails over the holidays to let them know ahead of time. We are currently assessing estimated delivery times for the remaining orders and will provide customers with updates soon. We’ll be updating order statuses on our Forum and our new Order Status page.
Response times for customer service (emails, tickets, and phone calls)
We have been overwhelmed with emails, tickets, and phone calls from customers, especially as we get caught up with messages that have come in over the past week while our offices were closed. We are working hard to respond to all of our customers, however, it may take longer than usual to get back to everyone. Thank you for everyone’s patience.
COVID situation
COVID 19 cases in the Waterloo region have seen a large increase in recent weeks. We recently had one of our employees coming back from vacation test positive for COVID 19. Fortunately, they were not exposed to everyone else at the shop as they tested positive before they came back to work, but it feels that a potential outbreak in our workplace becomes more and more likely as the pandemic becomes more severe.
To help keep our employees safe, we are pushing more of our staff to work from home. We are continuing to work to help set more of our staff to work from home and reduce the number of people at our office.
We continue to ask folks that are picking up orders from our office to stay inside their vehicles for pick-ups instead of attempting to enter our building without permission.
Lead times for LongMills and LaserBeams
We continue to wait for parts to arrive for the LongMill, LongMill MK2, and LaserBeam kits and ship products out as materials come in and get processed. We’ve created a new system for people to see the status of their order and see where they are in line for shipping.
Doing customer service when lead times are long for your products is particularly challenging for a number of reasons, including:
Folks are antsy about when they are going to get their machine, especially since they spent hundreds if not thousands of dollars on something from a random company on the internet (us)
It’s hard to keep track of when the order was placed and when it’s supposed to show up, as well as remember the estimated delivery time that was promised
There’s a lot of anticipation and excitement built up, which quickly turns into frustration when there are delays
Folks want to get their things to line up with their personal lives, such as with holidays and vacation time
We made some mistakes in terms of communication and setting expectations with our customers on when their machines would get delivered. For example, we said that we could ship a certain number of machines per day, so customers were expecting us to be shipping that number every day. However, because the number we can ship is limited to other factors, such as parts availability and the number of machines that the couriers can take that day, we were not clear on the fact that the number that we said we could ship was not always the number that we actually shipped. Some of our customers were calculating the number of days they would be waiting to get their machine based on the best-case scenario.
More realistically, customers should be planning their delivery based on the number of weeks that we advertised on our order page at the time the order was placed. Typically, the lead time will be stated as a range of weeks, such as 4-6 weeks.
The second mistake was how I sent the email out about the delay on the couplers. As some folks may know, the shipment of couplers that were slated to arrive on Dec 30, 2021, but was delayed until the middle of January. I emailed customers that this may affect the delivery time of their order. This email was only sent out to a small handful of customers who would potentially see that their orders would ship outside of the initial lead time that was promised, however, customers who the delay would not be affected also were upset that delays were happening, even though it would not affect the delivery time of their order as it is scheduled to ship later.
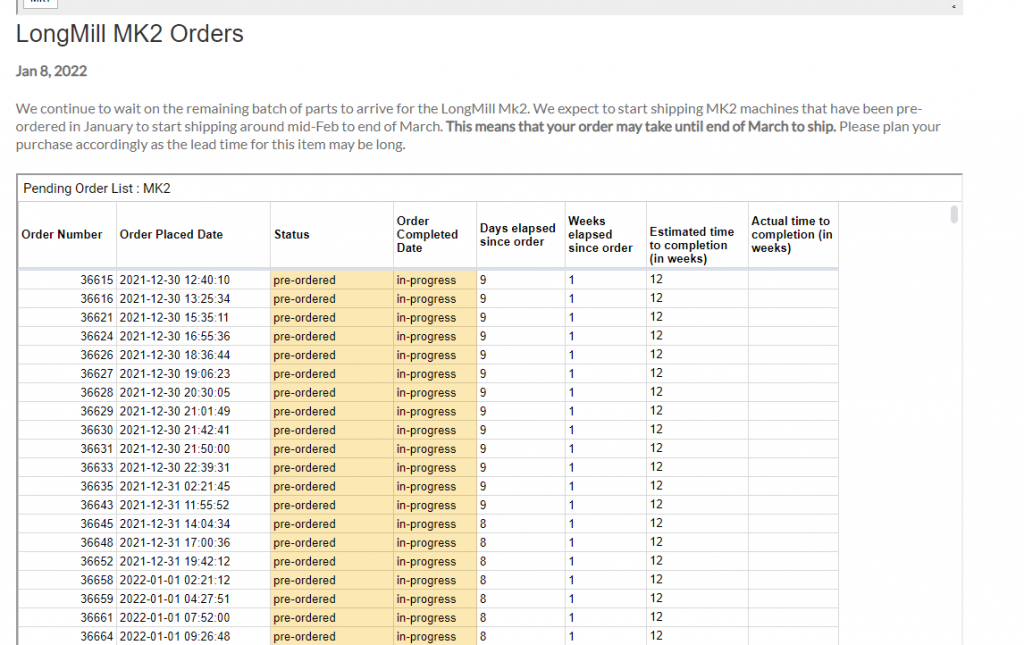
Our team is working to find new ways to improve transparency and communication with customers, but in the meantime, we’ve created a simple auto-updating list for new orders.
Our goal with this system is:
Customers can see what the status of their order is at any time, reducing the need to contact us directly about the order
They can see what the lead time was and how much time had elapsed, providing clarity on what delivery time was promised and if we are meeting them
Creating this system was actually a bit eye-opening as well. Given how much pressure we were putting on ourselves to ship quickly and manage customers with high expectations, we were feeling that we were always missing shipping deadlines. Now that we can visually see how much time had passed, it appears that we’ve been shipping almost all of our LongMills within our estimated times.
It’s not often I post here, most often it’s Andy or Kelly keeping y’all up to date on the status of things happening here at Sienci Labs Headquarters; I’m much more behind-the-scenes. Today I’ve come out of the woodwork for a very exciting and momentous announcement for us, the release of gSender 1.0.
Since much of gSenders development hasn’t made much of an appearance on the company blog, let me bring you up to speed on where this project started and what the release to 1.0 now means:
Origin
Back in 2016 when Andy and I first started Sienci Labs around our Mill One CNC, the range of free and paid g-code senders specific to operating hobby CNCs was surprising wide. Options like UGS and Candle were quite widely used and more were in active development at the time such as UGSPlatform, CNCjs, bCNC, and more. We were able to make a wide range of recommendations to our CNC users as well as made documentation around specifically UGS at the time since we felt it was the most intuitive to use.
Jumping to 2020 we’ve now got more machines in the wild then ever before. If you’re familiar with working at scale, you know that a 5% failure rate, for example, is very manageable when you’re working in the hundreds but starts to be more of a headache in the thousands. This is what we were starting to encounter with the g-code senders available at the time. And I’ll clarify, when I say “failure rate” this isn’t me saying that the software didn’t work. There were outlying bugs, quirks, and stable versions that were more stable than others; but what also stuck out was that many of the available options were made for more technically savvy people.
What were our options?
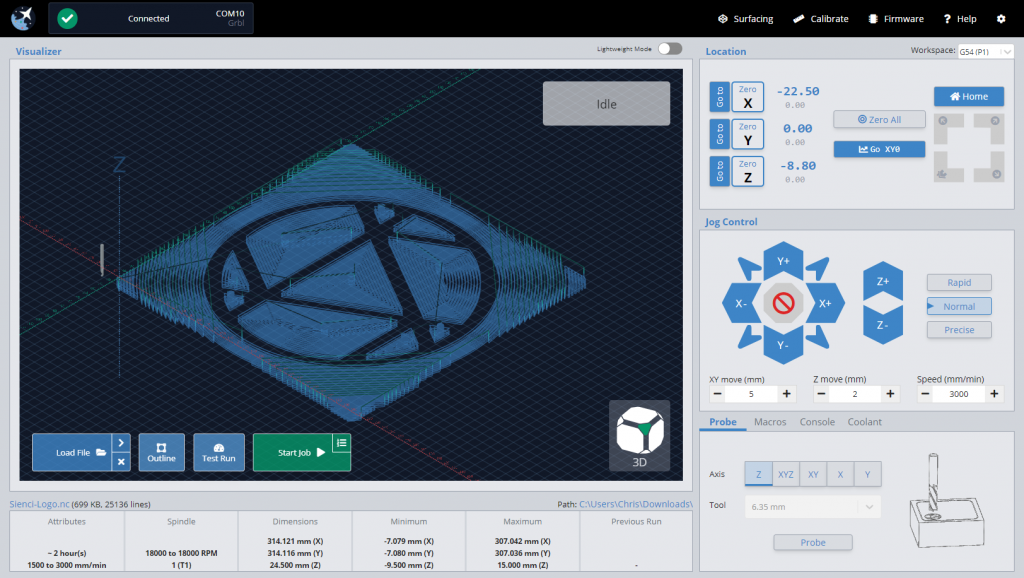
With more and more calls coming in, we could tell our users were getting confused with existing sender options. We heard questions about basic functions, confusion about behaviour, and one of the hardest things for us to hear was that our users were blaming the functionality and abilities of our CNCs in cases where we knew it was coming down to the sender. I remember personally dealing with situations of broken bits because of probing operations, or even a time I remember vividly where I helped someone out for a whole hour over the phone because he thought his file was visualizing correctly and we found that he’d just accidentally closed the visualization window within the sender.
I want to make it clear that I have the utmost respect and thanks for all those who took the time to make their own g-code senders for hobby use. These contributors to the hobby CNC community as a whole have taken the time to take what would otherwise be a personal project and have released it for the world to use. Not only that, but they continue to support updates, bug fixes, new features, and much more – all on their own time and out of the passion that they themselves have for CNC. But ultimately, the origin of these projects is what made me realize around that time that the goals of these open-source projects were never going to meet the goals that Andy and I have always had for the company: to make CNC routing fully accessible to the public. As long as open-source developers were at the helm, customization and a diverse range of features would take priority over UI design, streamlined use, and catering towards beginners by using more understandable language.
This left us with two options. Either we help fund an existing project or put more man-power toward it and get it moving in the direction we felt would be best for the next generation of g-code sender, or we begin making our own. I sent some emails around, and spoke with some other developers I knew and the consensus was that we’d go with the latter. Seeing as these projects were the ‘babies’ of each respective group of open-source developers, we felt it wouldn’t be our place to ask for more from people who wanted to do development on their own schedule, or try to push our vision onto others. Thus gSender was begun.
Goals and Principals of gSender
Starting ideation in October 2020, we began testing existing senders and outlined our core goals and design principals that we felt would guide development:
Goals
Act as new default machine interface / sender for LongMill customers (this means including all the functions and features that users are already used to from there existing sending options)
Supercharge our customers’ experience with their LongMill by streamlining / simplifying machine interaction and making even more machine operations easily available (a.k.a. nice-to-haves)
Keep design open for use by other hobby CNCers to provide benefit outside of just our own community (this means leaving some wiggle room for broader customization and adaptability to other CNC machines on the market as well as even further advanced features)
Principals
If it’s set once it doesn’t need to be visible 100% of the time
Options most users don’t need should not be obvious or take up much screen real estate
Most actions should be 1 click
“Someone off the street should be able to figure out how to get started”
Order of widgets should be close to order of operations/steps to proceed
Machine state should be obvious at a glance
Use colour patterns to subconsciously communicate button functions
Substitute CNC jargon with simple language when possible
We knew the other primary holes we wanted to fill roughly included:
Easy interface for beginners yet advanced features available for more experienced hobbyists
Smart handling of error cases, probing, jogging, firmware editing, machine connection, etc.
Built-in tools for convenient CNC management: stock/wasteboard flattening, motor calibration, machine squaring, etc.
Extensive keymapping and built-in joystick compatibility
Support of tool changing, start/stop g-code, macros, coding variables
The idea was to branch off of the well-known and provably reliable open-source codebase so we could be confident that we were starting with a good foundation to build off of. We also wanted the software to be made available easily for all systems so that future implementations could support standalone machines. After a wide range of tests performed over many weeks, CNCjs’ codebase was chosen for the previous reasons and because testing showed reliable operation on a variety of computer systems.
Present Day Release
I’m very excited to announce that gSender 1.0 is now available for free to anyone who wants it!
After nearly a year in development, the first couple months being in Alpha and the remaining ones being in BETA, we’ve now become confident enough to declare our first reliable version. We’re really excited to see more people begin to use it as we’ve now got a whole swath of great features and about 2000 users using it to run jobs every day.
Some things that you can expect from gSender in its current state:
Reliability of operation
Accommodates a wide range of computing systems via its ‘Lightweight mode’
Easy to understand and use due to its interface layout
Takes care of a lot of complexities behind the scenes, making mistakes and errors less likely and easier to deal with when they do happen
Built-in tools for surfacing, machine calibration, firmware editing
Ability to ‘start from line’, tool change, run custom macros, quick-travel with limit switches, and much more
If you’d like to learn more, we’ve got a primary download page, a documentation area, our full Github page, a discussion forum, and even though we’ve reached 1.0 we’ll still be releasing new dev builds for the foreseeable future as we continue development on gSender:
The team and I are very excited that we’ve reached this point. We set out to make our very own open-source and FREE g-code sender after gaining inspiration from some of the other commonly available options and we feel we’ve made a strong start towards those goals. To get here we owe a huge amount of thanks to our original 10 Alpha testers (you know who you are 😉 ), all those who participated in BETA testing and sending us suggestions and feedback, and importantly our greatest thanks to Will Winder and Cheton Wu for driving the UGS and CNCjs projects that not only were there for our initial users but also acted as a indispensable step towards us embarking on this project ourselves.
We want gSender to be the next-level open-source sender that’s available for all green CNCers to turn to whether they own a LongMill or otherwise: guided and easy to approach as a beginner yet customizable and feature-rich for higher-tier hobby CNCers. This means that it not only works for our Mill One and LongMill CNCs, but has already been proven to work on other machines like X-Carve, Shapeoko, Bob’s CNC, 3018, PROVer, and many more!
If you’re interested, the full list of features up to this point is as follows 😀 :
3-axis digital readout (DRO) with manual value entry
All-directional jogging with XY diagonals, jog presets, and incremental/continuous single-button handling
Zero-setting and gotos (independent and combined)
Probing in any direction plus safe continuity detection ensures no broken cutting tools
Full imperial/metric compatibility
Responsive screen design and workspace customizations including visualizer light and dark theme
3D toolpath visualization (no machine connection required)
File insight on load (feed range, spindle range, tools used, estimated cutting time, and overall, max, and min dimensions)
Feed override and active job status indicators
Fully exposed keyboard shortcuts for external keyboard/keypad control
Joystick support built-in for a variety of controllers
Safe height movements – accommodates machines with or without endstops
Homing cycle and quick-movement locations available for machines with homing hardware
Full spindle/laser support via manual control widgets, active alerting, and live overrides
Full mist/flood coolant support via manual control widgets and active alerting
Macros buttons (rearrangeable) with enhanced macro variables and individually assignable keyboard shortcuts
Lightweight mode reduces processing intensity on less powerful hardware or when running larger files
Easy workspace swapping for more advanced jigging or alignment work
Optional automatic handling for common error throwing g-code
Firmware tool for easier GRBL EEPROM changes, loading defaults, and GRBL flashing
Surfacing tool auto-generates surfacing g-code based on machine cutting area and other preferences, ready to execute
Calibration tool for axis alignment – a step by step process to make sure your CNC is square
Movement tuning tool for calibrating motor axis movements
Tool change functionality – pause, ignore, or run code blocks on M6 commands
Start-from-line functionality to resume jobs part-way through in case of failure of abort
Outline functionality indicates the rough bounds of the job before cutting
Customizable g-code injection at job start & end
Tooltips for data entry points
Alarm warning explanations to better contextualize CNC errors
Sleep management to keep PC awake during g-code sending
Pre-built machine profiles, including: LongMill
Shapeoko
X-carve
OpenBuilds CNCs
3018 CNC & PROVer
BobsCNC CNCs
CNC4Newbie CNCs
Mill Right CNCs
Ooznest WorkBee
Nomad
Carvey
Mill One, and more…
What’s the plan moving forward?
Even though we’ll be taking a quick breather after release of 1.0, we’ll still be working toward even more features into the coming future. Some of these will include:
Headless Pi operation
Surface probing and other ‘fancier’ probing types
Built-in g-code editing
3D cutting visualization
We left these off to the side ‘till now since we know that many of them would be more appealing to the more advanced users, but we’re confident that with everything currently built-in it’ll satisfy the vast majority of y’all.
Whatever comes next, we’ll be developing in two distinct branches. One that is for stable releases only, and another that you can optionally follow if you’re okay with a little less reliability but are wanting to be a part of shaping the new features that come to gSender.
Closing
It’s been great to spill this story out to y’all, there’s been a lot going on behind the scenes here at Sienci Labs this past year and I’m excited for you all to not only get more out of your machines via gSender but also via some more upcoming projects that we’ll be announcing in the coming months. Cheers everyone!
Hi everyone. Here’s a production update for September/October 2021.
We’ve seen a small uptick in LongMill sales over the last couple of months. Overall, shipping and production have been moving along smoothly, and most of the LongMill orders have been shipping out within a few days. We’ve reached the middle of Batch 5 a little sooner than we expected, and we may start to see us run out of a few parts as we wait on parts to complete the second half of Batch 5.
Just as a side note, we build machines in batches, and Batch 5 consists of 1000 LongMills. With smaller or inexpensive parts, parts with long lead times, and parts that we need to make large quantities of to take advantage of the economies of scale, we order 1000 sets of parts. On the other hand, larger or more expensive parts, parts that have short lead times, and parts that are made locally, we produce in smaller batches. In this case, we produced 500 sets of gantries, control box parts, and rails.
It’s important for us as a business to try to time the production and purchasing for each of our components. Over-producing means having to pay for inventory that needs to sit on shelves, while under-producing means having longer wait times for completed products. We of course try to balance these things and make production as seamless as possible.
Due to the uptick in sales, we’re running out of parts sooner than we expected, which may lead to shortages of parts. Currently, we are expecting to run out of gantries in the next few days. The laser cutting for the gantries is expected to be completed on Monday, with painting and finishing of the gantries to take about 2 weeks to complete. We will be working with our manufacturers to coat the parts that we are lowest first so that we can keep production going, but regardless, you should expect the lead time to increase until the rest of the gantries are completed.
Other parts that are still in production, but are expected to arrive before we run out include:
Rails
Control boards
Control box parts
Drivers
Flange bearings
Expected lead times
With the gantries expected to be our bottleneck, we expect machines, once they are out of stock, to start shipping LongMills again around the third week of October.
If you are planning to order a LongMill, please check the estimated shipping date on the LongMill order page for the most accurate information.
Surging ocean freight prices and continued instability in the shipping industry
Increased consumer spending and pandemic woes have continued to cause instability in the shipping industry. Recent surges in ocean freight prices now mean that shipping products between China and North America have roughly quadrupled in price compared to the start of this year. The chart below represents a pricing index to compare shipping rates.
This of course impacts us. A reasonable percentage of parts that we use for the LongMill comes from China, so we are also at the mercy of ever-changing shipping prices.
Luckily, the LongMill is a non-commodity product with a reasonably large profit margin, allowing us to adjust to changes in fluctuation prices more easily than commodity items that have low margins, such as general household items. We have kept the price of the LongMill the same for the past two years, but inflation and current events may eventually warrant increasing our prices as well.
In the longer term, I hope that shipping prices do stabilize. Realistically though, I expect that shipping prices will stay high in the near future, and other unexpected factors may come up, so we will have to keep our eyes peeled for that.
Batch 6 is now currently in production as well, with this batch being 1500 LongMills. By increasing our batch sizes, I hope to smooth out the supply chain and give ourselves more time and flexibility between batches.
Hey everyone, Andy here. I’m here to announce that Vectric VCarve Pro is now available for sale on our store.
We first offered Vectric VCarve Desktop for purchase through our store after many LongMill users praised its ease of use, a wide array of resources, and powerful features that made it worth the price. Over the past year it has become one of my go-to programs for creating gcode, as it has been proven to be easy to use and come with many presets and features that I have found useful.
One very significant downside to using VCarve Desktop is its size limitation. The software limits you to projects to up to 25″x25″. This of course leaves several inches of wasted potential for LongMill users that have a 30″x30″ work area or requires users to split or tile projects. Here’s an example of one of my personal projects making a trim piece for my old Volvo out of plywood that required splitting the project into several pieces.
Vectric Pro does not have a size limitation. This, of course, comes at a price. While Desktop is priced at around $460CAD, Pro is priced at $896, a +$400 difference for the convenience of having a little extra working area and a couple of other extra features.
I still firmly believe that all new users should try out free software, as discussed in my previous article. But for advanced users who are making their bread and butter with their machines, it is easier to justify paying for software if it can save time and improve productivity. Initially, when the LongMill first was released, all of our users were new to CNC, which meant that we were focused mostly on helping beginners by focusing on supporting and recommending free and low cost software options. Now, with many users having had used the LongMill for a long time, we now have a growing community of advanced users who demand more functionality from their machines, some of which already have VCarve Pro and other paid software. So to cater to this growing community, as well as prepare for future machines such as the AltMill, which will focus on production and larger scale CNCing, VCarve Pro is now available for purchase on our website.
Just as a side note, we’ve updated the license distribution process so that all licenses get sent out automatically. This means that if you place an order for any Vectric software on our store, you will get an email with the license details right away.