
Hey there! Disclaimer: This is a guest blog article, the views and opinions expressed in this guest post are those of the author and do not necessarily reflect the official stance of Sienci Labs.
Creating a flawless V-carve inlay may seem intimidating, but this step-by-step guide will simplify the process, even for beginners. With no overcomplications and no need for CNC expertise, you’ll be crafting detailed inlays in no time.
If you want to watch the full video on youtube click here.
Understanding V-Carve Inlays vs. Straight Flute Inlays
Before diving into the process, it’s essential to understand how V-carve inlays differ from traditional straight flute inlays.
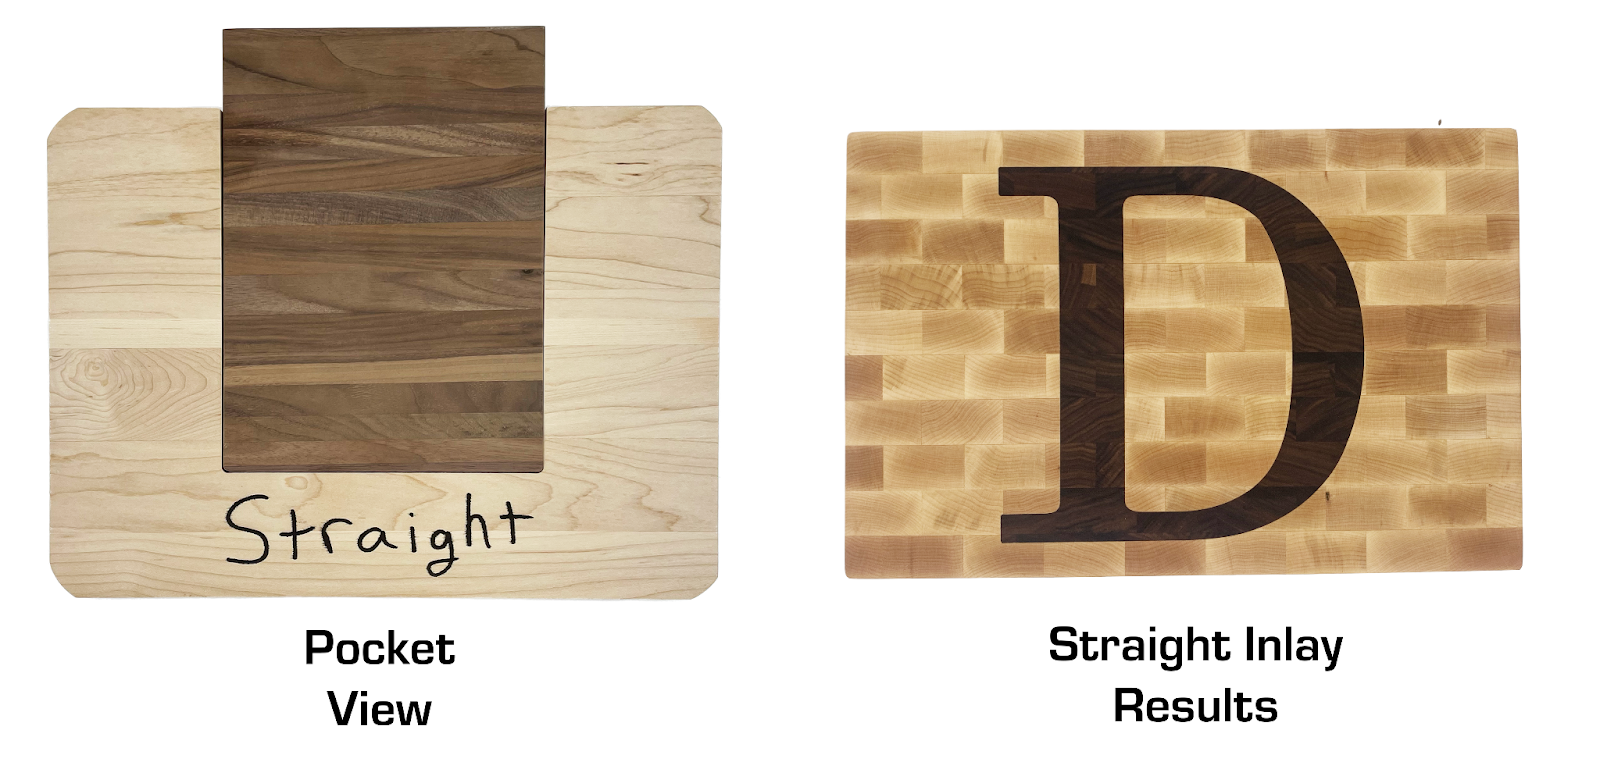
- Straight Flute Inlays involve pocketing material with a straight bit and inserting another piece of wood into the pocket. However, they limit fine detail work due to the bit’s diameter.
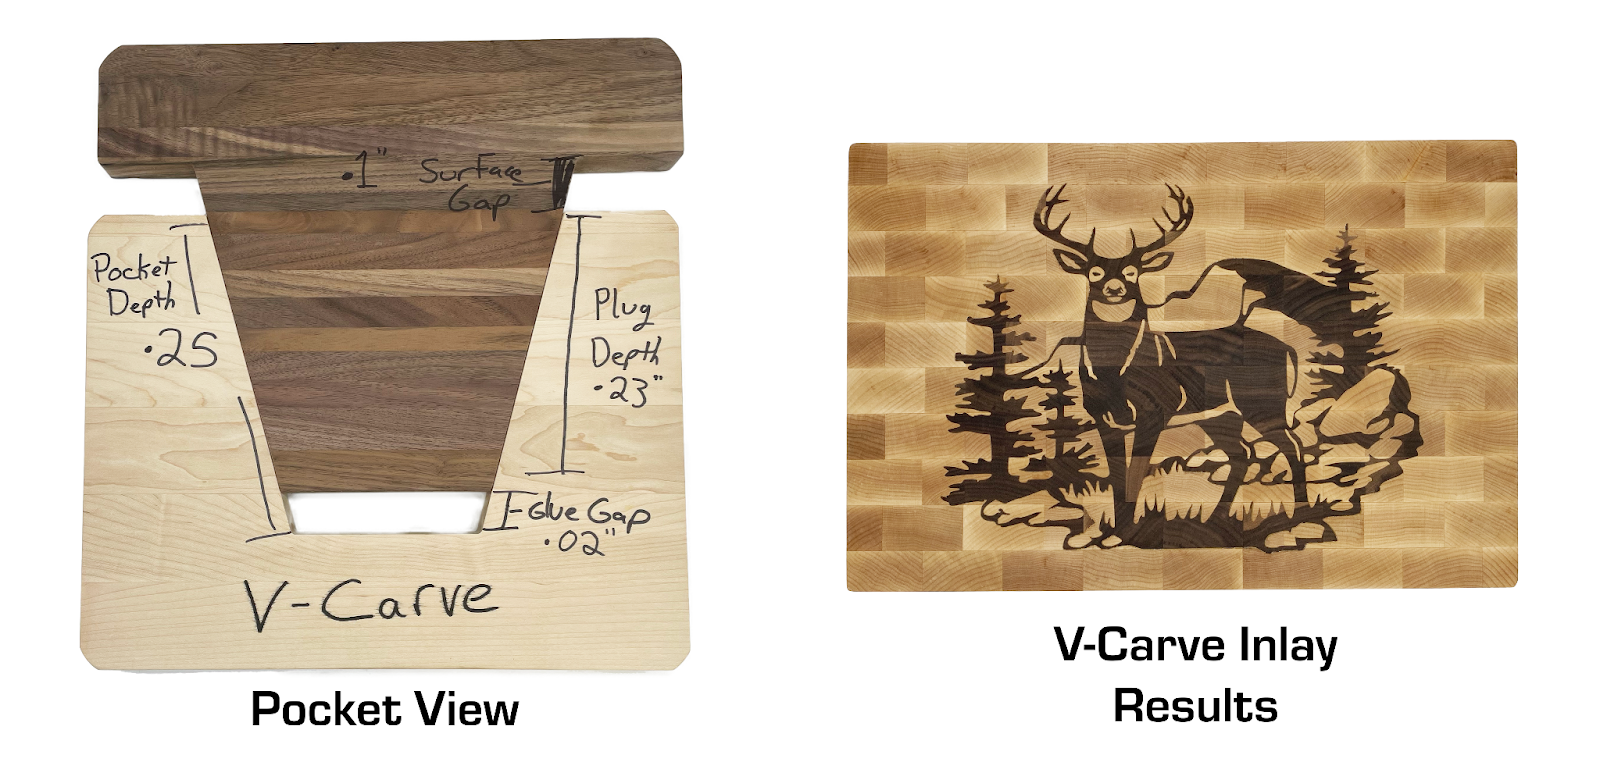
- V-Carve Inlays, on the other hand, use a V-bit that cuts at varying depths and angles, allowing for intricate designs. The angled cuts form a tight bond between the male and female parts of the inlay, providing a seamless and professional finish.
What You’ll Need: Tools & Materials
Materials:
- Female Material: Light colored hardwood for the base (1.7” thick)
- Male Material: Dark colored hardwood for the insert (0.6” thick)
- We’re using the maple and walnut inlay kit from CICWorkshop. These premade endgrain boards are the perfect size and ready to use without the extra prep work. Link: https://cicworkshop.com/collections/inlay-kits/products/inlay-top-bottom
- Tip: Due to the direction of the wood, endgrain has the best texture for V-Carve inlays.
Bit Selection:
- 3/16” Upcut Bit: For clearing the bulk of material before adding final details. Link: https://cicworkshop.com/collections/bits/products/3-16x-3-4-upcut-1-4-shank-uc2875
- 30 Degree V-Bit: To finish carving the image with accuracy and precision. Link: https://cicworkshop.com/collections/bits/products/30-deg-v-groove-3-flute-1-4-shank-vsc30
- Make sure to use the same bit on both sides of your inlay to ensure both pieces fit together securely
Recommended CNC Machine:
- We are using the Altmill CNC, it’s reliable and cost-effective. Affiliate Link: https://www.sienci.com/?ref=zte3ztn
Digital File:
- Design your own or Use this free digital file from CICworkshop.com Link: https://cicworkshop.com/collections/digital-files/products/deer-inlay-digital-file
Step 1: Program the Female Inlay Piece
- Set your design in the CNC software (e.g., an 18×12-inch scene or any custom design).
- Apply a flat depth of 0.25 inches for the V-carve.
- CNC Settings:
- Feed Rate: 80 inches per minute
- Plunge Rate: 50 inches per minute
- Add a Clearance Toolpath: Use the 3/16-inch up-cut bit for faster material clearing.
Step 2: Program the Male Inlay Piece
- Mirror the Design: To ensure a perfect fit when assembled.
- Key Parameters:
- Glue Gap: 0.02 inches (provides tolerance for minor errors and prevents hollow sounds).
- Plug Depth: 0.23 inches (pocket depth minus glue gap).
- Surface Gap: 0.1 inches (prevents glue from sticking to the base, making sanding easier).
- CNC Settings for Male Inlay:
- Use the same bits and settings as the female inlay to ensure consistency.
Step 3: CNC Cutting Process
Once your design is programmed it’s time to start carving your Inlay:
Carving the Female Inlay:
- Secure the base material to the CNC table using clamps.
- Start with the 3/16-inch up-cut bit for clearing material.
- Recalibrate the Z-zero point before switching to the 30-degree V-bit for detail work.
DON’T FORGET: Each bit is different length so remember to set your Z-zero after switching bits. X and Y zeros remain the same because the material stays in the same spot.
Carving the Male Inlay:
- Secure the insert material to the CNC table.
- Use the 3/16-inch up-cut bit for clearing.
- Follow up with the 30-degree V-bit for detailed engraving. (Remember, reset your Z-Zero)
- Cut the male inlay and carefully remove any tabs.
Step 4: Assembly and Gluing
- Check for Debris: Ensure no large wood chunks are left in the pockets to achieve a proper glue-up. Use a stainless steel steel brush and/or compressed air to remove any debris.
- Dry Fit: Test the fit before applying glue. A 0.1-inch surface gap should be visible, which will compress when pressed.
- Apply Glue:
- Use a high-quality wood glue like Titebond II or III.
- A silicone brush works well for spreading glue evenly in all crevices.
- Ensure every detail has glue coverage to avoid weak spots. Tip you can insert the male piece and remove it to ensure all contact point are covered in glue.
- Pressing the Inlay:
- Use an inlay press for even pressure. You can make your own press with this file from CIC Workshop
- Alternatively, a piece of plywood with weights or C-clamps will work.
Step 5: Surfacing and Finishing
- Surfacing the Top:
- Use the 3/16-inch up-cut bit to surface the top, removing the 0.1-inch surface gap.
- The CNC should follow a simple rectangular toolpath for uniform surfacing.
- Sanding and Edging:
- Sand the surface for smoothness.
- Add desired edges or chamfers for a refined look.
- Finishing:
- Dip the board in mineral oil to enhance the wood’s natural beauty.
- Apply additional finishes as desired for durability and aesthetics.
Step 6: Final Reveal and Resources
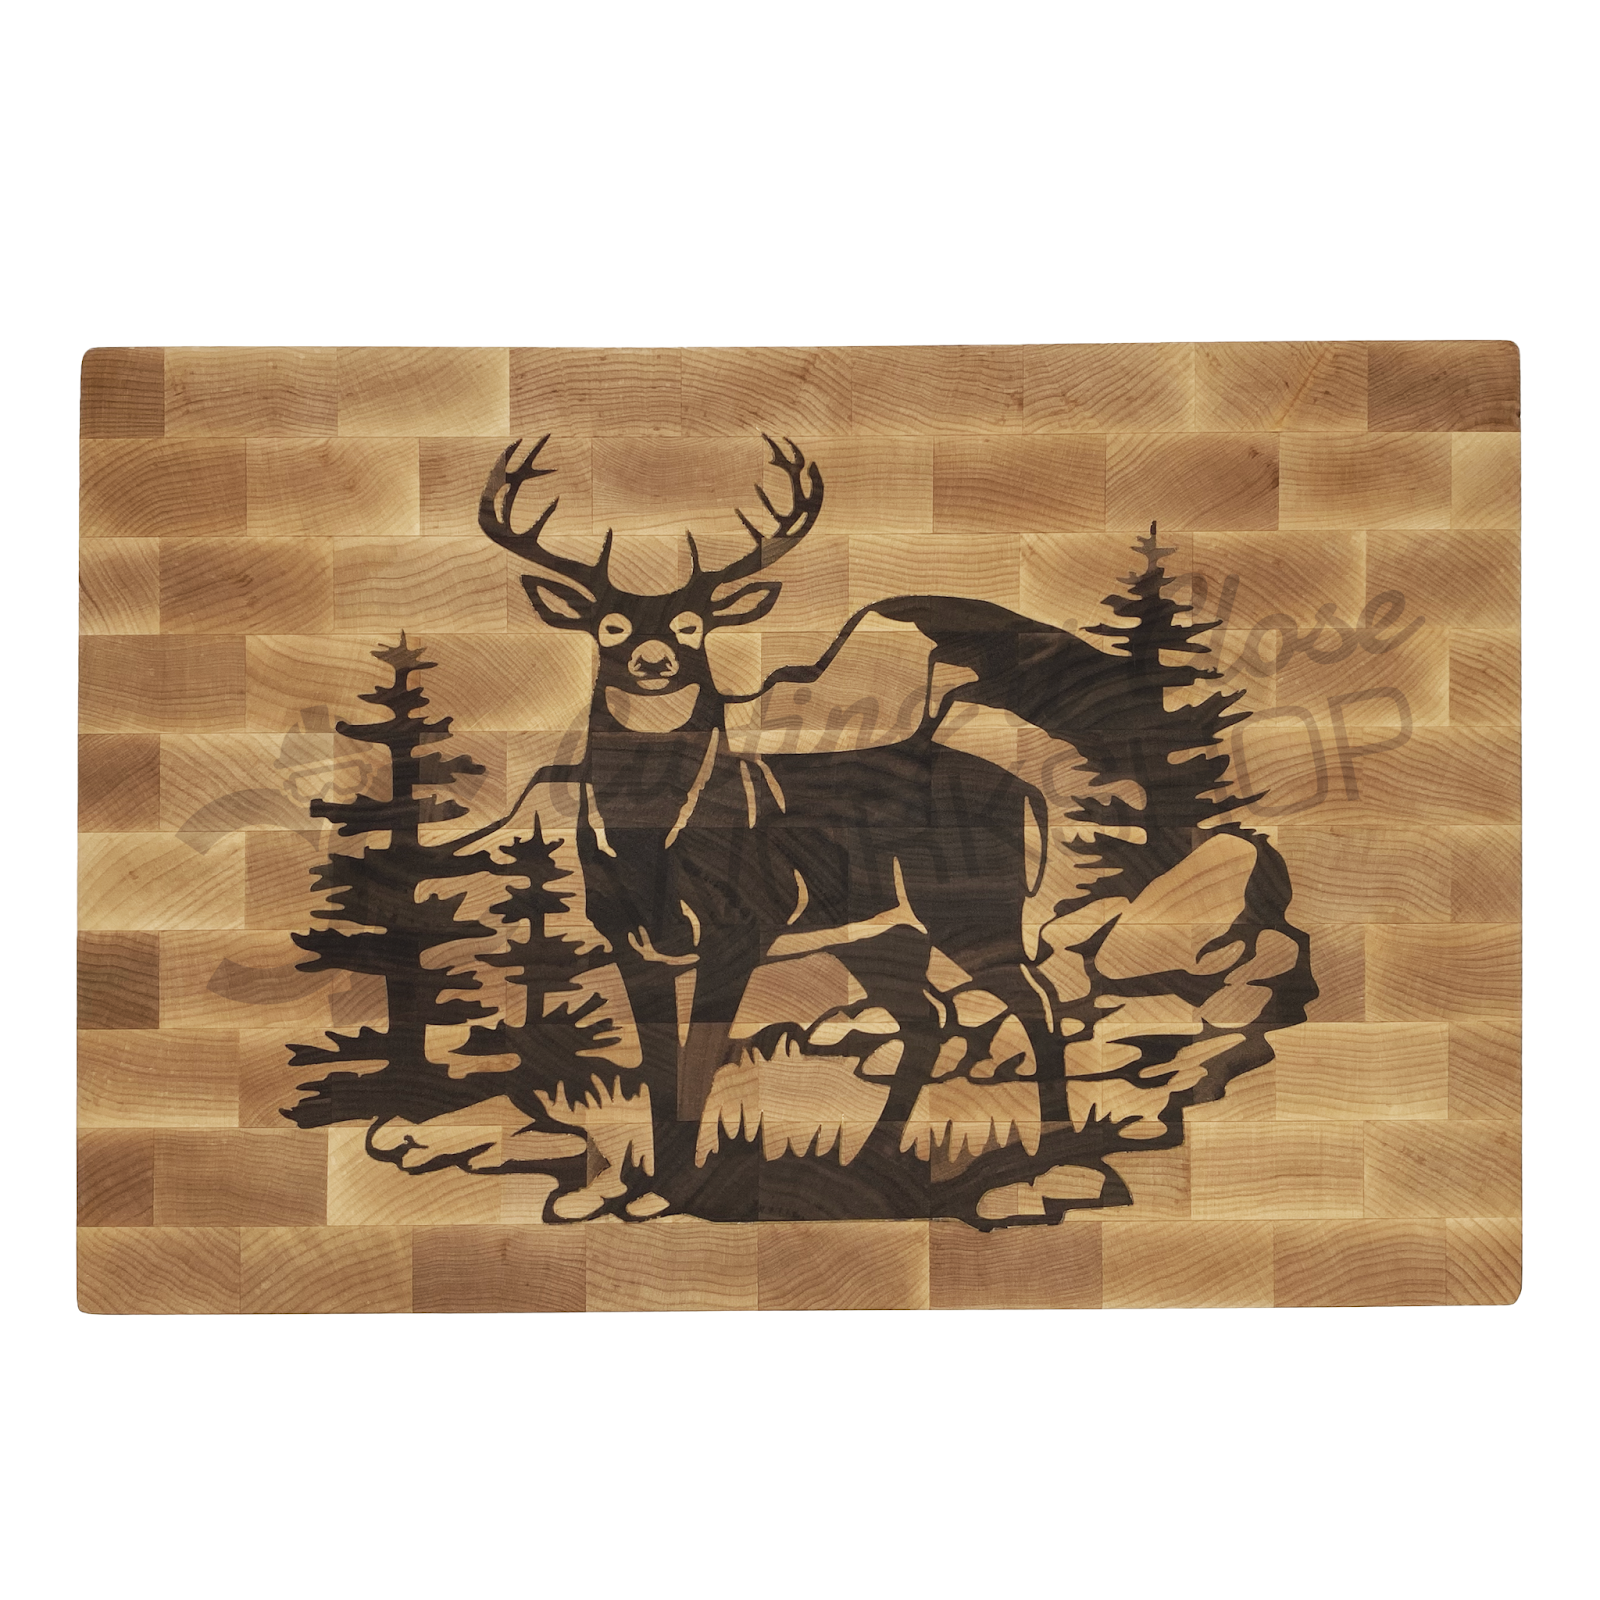
The digital file for the deer scene used in this guide is available for free at cicworkshop.com. Download it and follow the steps outlined here to create your own stunning V-carve inlays.
With the right tools, materials, and this straightforward guide, crafting detailed and professional V-carve inlays is entirely achievable.
Remember: If you ain’t cutting it close, you ain’t cutting it right.