Hi everyone. it’s Andy here to provide a new update for LongMill production. As mentioned in the last update, we’ve seen continual growth in LongMill sales which has been a lot faster than we expected. I want to take a moment to thank all of our customers who’ve been sharing their positive experiences with the community and helping us grow.
We expected to run out of machines at the end of July, which was our estimate back April based on what we expected our sales to be at during that time. However, it appears we will be running out of stock on Batch 2 in the next few days.
Lead times
We are nearly out of stock on the current batch of LongMills, with around 30-40 machines left. Ikenna, our operations manager, has told me that he expects that we will likely run out of machines by Thursday (correction, we have now run out of stock a few hours after the time of writing, another 20-30 machines will be available in the first or second week of July).
That means for the rest of the machines in stock, you can expect a lead time of around 1 week, and the following orders will have a lead time of around 3 weeks.
We expect to have around 500 more LongMills in stock by the end of July. We will ship machines based on the order of which they were ordered, and we will ship machines as they become available. We will provide a more detailed update on the availability and shipping times over the next few weeks.
If you want to order a LongMill and want it as soon as possible, I recommend ordering one as soon as possible so that you will be first in line for a machine once we run out of stock or you can get one of the ones that are still remaining.
For parts and end mills, we currently have plenty of stock, so you should expect these items to ship typically within one business day.
Shipping times
Also as mentioned in our last update, due to COVID-19, shipping times may be a little slower than usual. For the most part, we have seen that shipping times are a little faster than it was a month or two ago, but I would still expect that shipping for some customers may be a little bit slower than normal.
For most customers, I would recommend that you expect to have shipping times take 3-5 extra days.
If you prefer to pick up your items, we are still offering pick ups on our dock but we are not allowing visitors inside at the time.
I’ve decided to create this post as the most common issue people run into when starting up their LongMill for the first time is with connecting their machine with UGSPlatform.
From my personal experience helping LongMill users, if you are running into problems with UGS, it is likely just with choosing the right port. However I do cover some of the very very rare cases that other issues might be happening.
This post should cover in detail on connecting to your machine. You can also use some of the tips and info from this if you ever want to use a different g-code sending software as well.
Please note that as long as you follow the instructions in the LongMill resources you should be fine. This post will help you guide you through some of the lesser common issues and go into more detail on how things work.
Before you begin
There are a couple of issues that you may have with your machine that is not caused by UGSPlatform. This can include:
Motors not running correctly or the right amount
Issues with accuracy
Power to the controller
I figured I would mention this in case you are troubleshooting your machine.
Choosing ports
With UGSPlatform, you must choose the correct port to ensure that your software and machine are communicating properly.
So what is a “port”. Well essentially it is the address or location of each of the USB ports and can also include other input and output options on our computer such as Bluetooth and Ethernet.
On most Windows computers, each port is called COM then a number. For example, you may have a connection with COM3 and COM8. On most MacOS computer, the ports can be called other things, such as “cu.usbmodem14101” or “tty.Bluetooth-Incoming-Port”. There may be different designations for different computers but this is typically the most common format.
Your computer must 1) recognize that there is something plugged into your computer port 2) know how to communicate to the device that is connected to that port 3) use the correct port to communicate with the device.
For both Windows and MacOS, the baud rate is set to 115200.
Drivers
For the large majority of computers, the drivers needed to communicate to the Arduino inside the controller comes pre-installed or is automatically installed when you plug in the controller. However, in the rare case that it is not, it is possible to manually install the driver.
Although we found that it is possible to just download the driver itself, we found that it is easier to download and install the Arduino IDE which comes with all of the drivers needed to connect to the Arduino. We can also use the Arduino IDE later on if we need to do additional troubleshooting.
I recommend connecting your controller via USB to your computer before starting UGSPlatform. This allows your computer to download and install any drivers the first time you connect before UGSPlatform starts, as well as allowing the software to check each port for the Arduino as it loads.
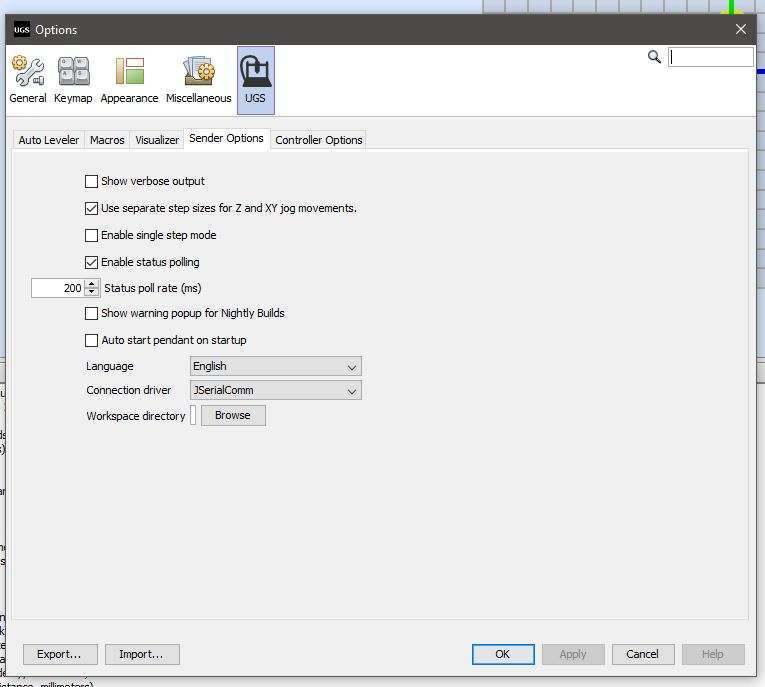
Selecting your port in Windows:
Click the refresh icon then the drop down to choose a port. If you have multiple items connected, you may have more than one port available. You can try each port until you find the right one.
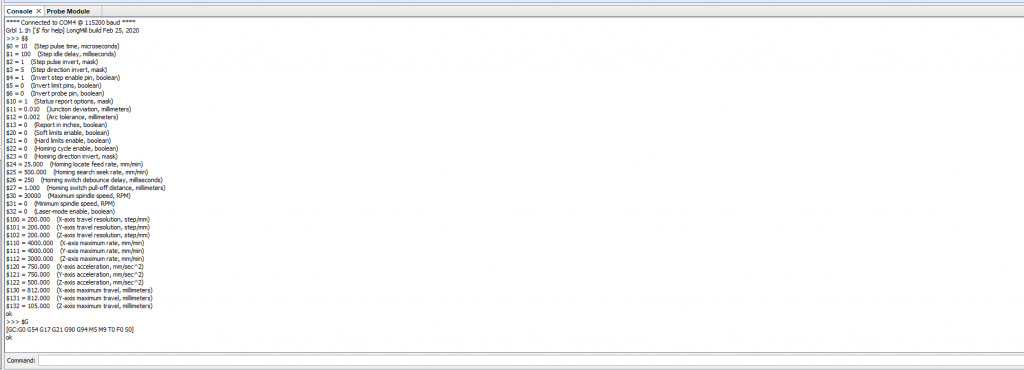
When you’ve connected to the correct port, you’ll get a series of messages and other info come through on the “Console” module. This window is typically on the bottom right area of the program. You may also hear a characteristic “clunk” sound when you connect as well.
In some cases, you can connect to each of the different ports, but if you are not connected to your LongMill you will not see the messages in the console.
If you have tried all of the ports and still cannot connect to your machine, you may either need to install the drivers or may need to flash the firmware onto your controller (discussed later in this post).
Selecting your port in MacOS
Click the refresh icon then the drop down to choose a port. If you have multiple items connected, you may have more than one port available. You can try each port until you find the right one. For most Mac computers the USB port is typically denoted by “cu.usbmodem” followed by a number so your best bet is to start with those. The ports with “Bluetooth” or “WirelessAP” are typically for the wireless connection so I would recommend skipping testing them.
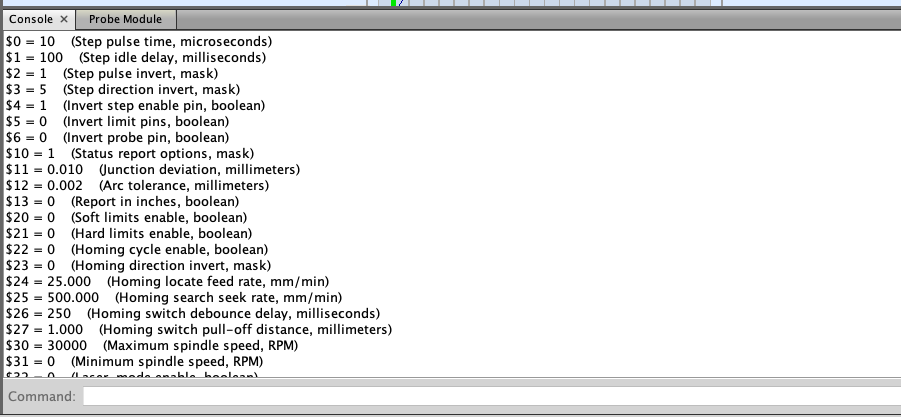
When you connect to the right port, you should see a string of messages on your console.
If you still cannot connect
If you try all your ports and have no response, you can check if your Arduino has its firmware flashed.
UGSPlatform uses Java, and thus, you must have Java installed on your computer to make UGSPlaform work. The large majority of computers will already have Java installed as it is typically needed in conjunction with other softwares and your browser to do other things.
Because of the way MacOS is built and since you don’t have to choose between a 32 bit or 64 bit option, we won’t cover fixing issues with Java since I have not heard of or experienced any issues with Java on Mac.
However, due to the way Java and UGSPlatform work together, you may encounter some issues on Windows.
I highly recommend installing Java first before you run UGSPlatform for the first time, as it will ensure that UGSPlatform can run Java to open the program the first time.
Java not found/access error
When starting UGSPlatform, you may get a “Java not found” or similar message. This can mean several things.
First, you may not have Java installed. If that is the case, make sure to download the latest version online.
Second, UGSPlatform might not be able to find where Java was installed on your computer. The easiest way to solve this issue is to delete all of the files for UGSPlatform and reinstall a fresh version. This will typically point the program to the right direction.
Sometimes if you run into issues such as being able to open UGSPlatform, you can also uninstall and reinstall Java to try to fix this issue.
If you do not wish to delete and reinstall as you will lose your settings and layout on UGSPlatform, you can also follow these additional instructions as well to point UGSPlatform to the right location of where Java is installed:
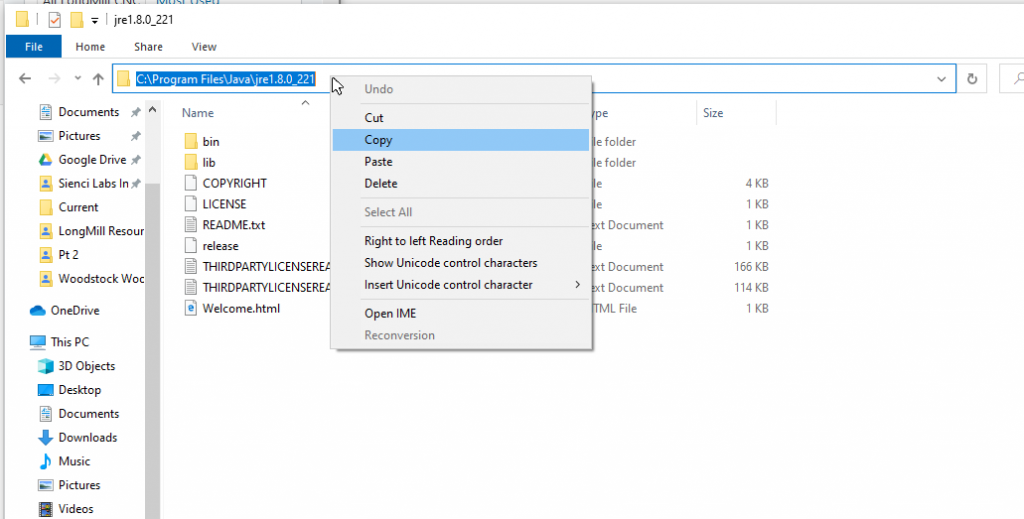
If USG is still not able to open due to a Java access error, then there is another program on your computer blocking UGS from opening properly. UGS is usually able to automatically detect where Java is located on your computer, but since this detection is being blocked the way to fix this is to explicitly inform UGS where Java is. First you’ll need to locate Java. You can usually find it by going to the Windows file explorer under ‘This PC → Windows (C:) → Programs Files → Java → jre###‘ or ‘This PC → Windows (C:) → Programs Files (x86) → Java → jre###‘. Once inside the ‘jre’ folder, left-click the navigation path at the top of the file explorer then right-click the selected text and left click the ‘Copy’ option to copy the path.
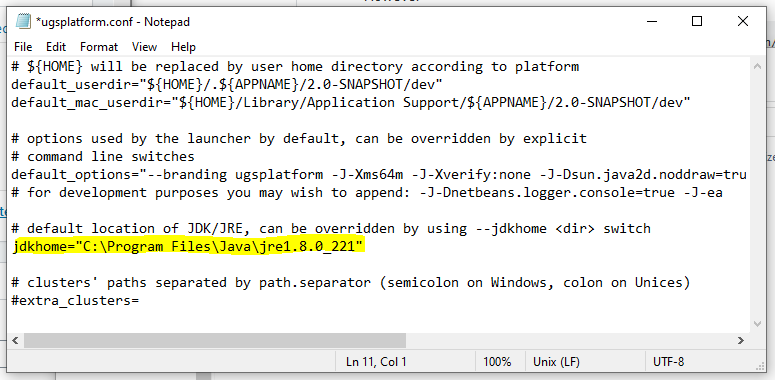
Once the path is copied, navigate to where you downloaded UGS; this will normally be located inside your ‘Downloads’ folder. Once there, go to: ‘ugs-platform-app-2.0-SNAPSHOT → ugsplatform → etc’. In this folder should be a file called ‘ugsplatform.conf’. Opening this with a text editor like Notepad, you’ll want to find the line which says: “#jdkhome=”/path/to/jdk“, delete the ‘#’, then replace the text within the quotes with the Java path by right-clicking and selecting ‘Paste‘. The completed edit should look like this:
To confirm the changes, click ‘File‘ in the top bar and ‘Save‘. With all this done, once you go back to the UGS .exe launcher you should now be able to get UGS to start up without any errors.
The 64 bit version of UGSPlatform does not open but the 32 bit version does on Windows
This part of the post is if you can run the 32 bit version of UGSPlatform (which in practice should not matter), but might not be able to open the 64 bit version. This is likely because you have the 32 bit version of Java installed but not the 64 bit. You can try downloading the 64 bit version of Java on their website here: https://www.java.com/en/download/manual.jsp
You may need to delete and redownload UGSPlatform for it to start working if it doesn’t work right away when you click on the .exe file.
Other topics
JSerialComm
UGSPlatform allows you to choose different connection drivers. I’ve been using JSerialComm which is working well. However, some users may want to try a different driver if they are finding that connection is being lost.
USB Cables
Shielded USB cables with ferrite chokes or other noise reduction cables can help ensure that the connection to your machine is noise free.
The standard USB cable on the LongMill comes with ferrite chokes and shielding and has been working well for customers, however, some customers who have been using non-stock cables without extra protection have reported some issues with UGS. Excess electromagnetic interference can cause UGS to freeze or error out. If you need a longer/new cable, I would recommend a USB cable that come with features to limit EMI.
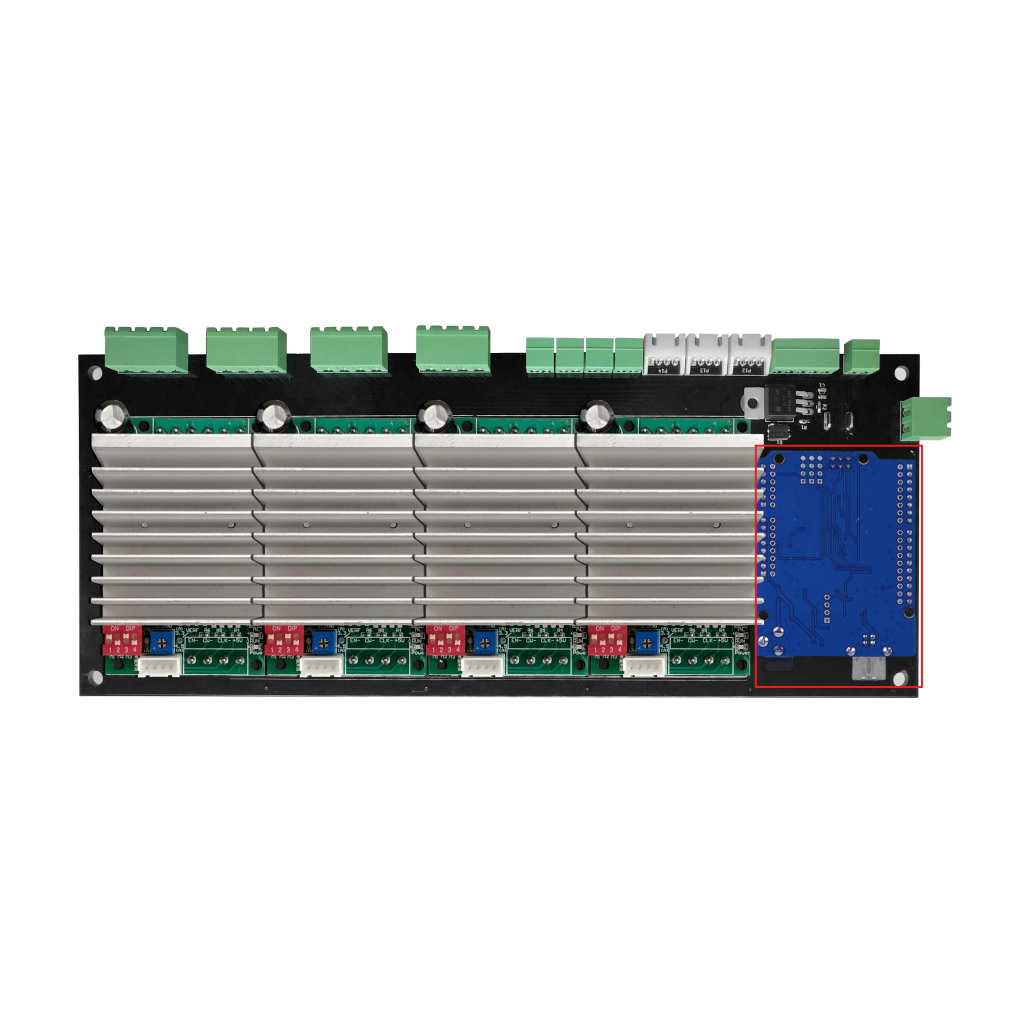
If your Arduino is coming loose inside your controller, you may have connection/control issues.
You can either use a non-conductive tool to push the Arduino in through the grates of your controller, or take the panels off to get to it more easily.
One of the most frequently asked questions is “Can you make a bigger version of the LongMill?” Well the short answer may be “yes”, but there are many other considerations that you should to consider.
Screw whip
Screw whip, or “whip” refers to when a rotating rod wobbles or flexes, which is exacerbated by the length of the rod, the speed of the rotation, or how off balance the rod is. The LongMill 30×30 uses a 8mm diameter steel leadscrew that is approximately 1030mm long. At the speeds that the NEMA 23 motors turn at and the length of the lead screw are such that the effect of a properly assembled machine are minimally affected by whip.
When you start to go longer in lead screw length, the effects of whip become more pronounced to the point where you will either need to increase the diameter of the screw or use a lower motor speed, both of which present different challenges and downsides.
There are different lead screw designs that can be used for this application, but may need modification with bearings, mounting feet, couplers, and motor mounts.
Motor speed
For practical purposes, it is best for the machine’s speed to increase proportional to the size of the machine. For context, the Mill One with a work area of around 258mm x 185mm has a maximum speed of 1800mm/min. The LongMill on the otherhand, comes has a maximum speed of 4000mm/min, more than double the speed of a Mill One but also significantly larger.
It is important for a machine to offer faster speeds to accommodate for a larger size machine as doing large jobs at a slow speed would take forever. Typically, you can run a LongMill 2.5x the speed of a Mill One, which means that a project that takes 30 minutes to do on a LongMill would take 1 hour 15 minutes to complete.
If you want to run the machine faster, you will likely need to provide more power to your motors as well. You can do this by increasing current and voltage supplied to your stepper motors, which may also need upgrading your power supply and motors to support the changes.
Luckily the LongBoard controller can support higher voltages and current with a larger power supply, but you will still need to consider upgrading the stepper motors (rated for up to 2.8A).
Rail rigidity
The longer your rails are, the more flex you’ll have if you don’t fully support or reinforce the rail. While the Y-axis is easy to do, as all you need are more feet to support the rail, you may want to consider adding additional reinforcement to their X-axis rail which is a free-floating part.
Without modifying the rails, you may experience more deflection, which will need to be combated by decreasing your cutting speeds.
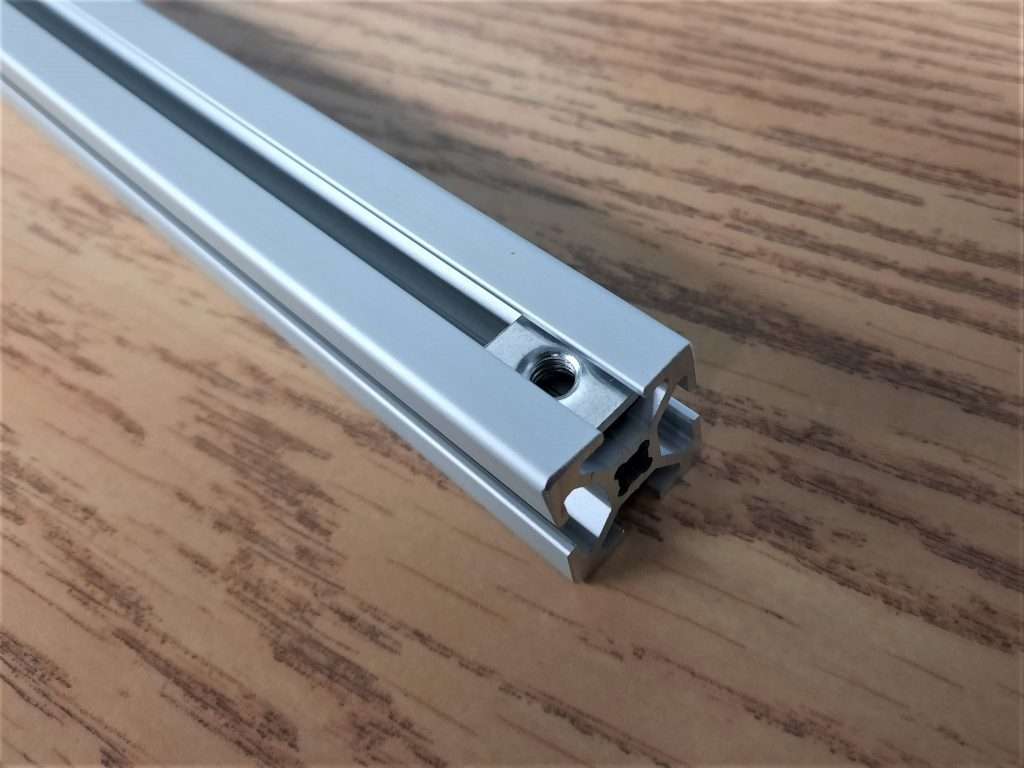
The other consideration to make is how straight and parallel your rails are. Aluminum extrusion is relatively straight due to the process used to manufacture them. However, deviance in straightness increases the longer your rails are. This also applies when considering if your rails are skewed as well.
A larger machine cost more to ship, as there are restrictions on how large shipments by courier can be. This can vary region and country, which limits the ability to transport the parts for the machine, which is why we don’t offer longer rails for the LongMill. That being said, you can typically find 2×2″ and 3×3″ angle aluminum from most metal supermarkets as it is a standard material.
Conclusion
We believe that the sizes offered for the LongMill are optimal in terms of price, performance, and usability. However, we encourage folks to build their own machines if they choose to, which is why we provide all of our design files open and updated for free: https://sienci.com/dmx-longmill/open-source-and-modifications/
On the other hand, there are a lot of things that need to be considered in terms of building a longer version of the LongMill which can add to the cost and complexity of the machine. There’s a reason why costs can go up exponentially as size goes up as well. There is also a strong case to be made to avoid expanding this design without significant modification or purchasing a pre-made, larger machine as well.
For those who want to do larger pieces without modifying their machines, consider looking at putting your materials in diagonally, or using “tiling“.
We hope you enjoyed this read, or even inspired you to mess around with our LongMill design. In any case, we hope you share with the community what you learn and what you build.
Hi everyone, we have an exciting announcement to make! We are expanding our office space! Over the last few months, we’ve seen growth in sales which also resulted in us quickly running out of space in our shop.
Luckily, our landlord had space in the connecting unit next to our current one that he was using for storage and office space, and was gracious enough to allow us to clear out space for us.
Adding another 1170sqft to our 2200sqft gives us a total of 3370sqft of space in total, giving us enough room to stretch our legs a little bit.
Here’s what we’re doing to our space:
A new, larger workshop with more tools to help us test and build stuff
More packing and assembly tables to streamline production
Additional floor space for pallets and skids
Break and lunch area with tables and couches
Extra desks and computers for desk work
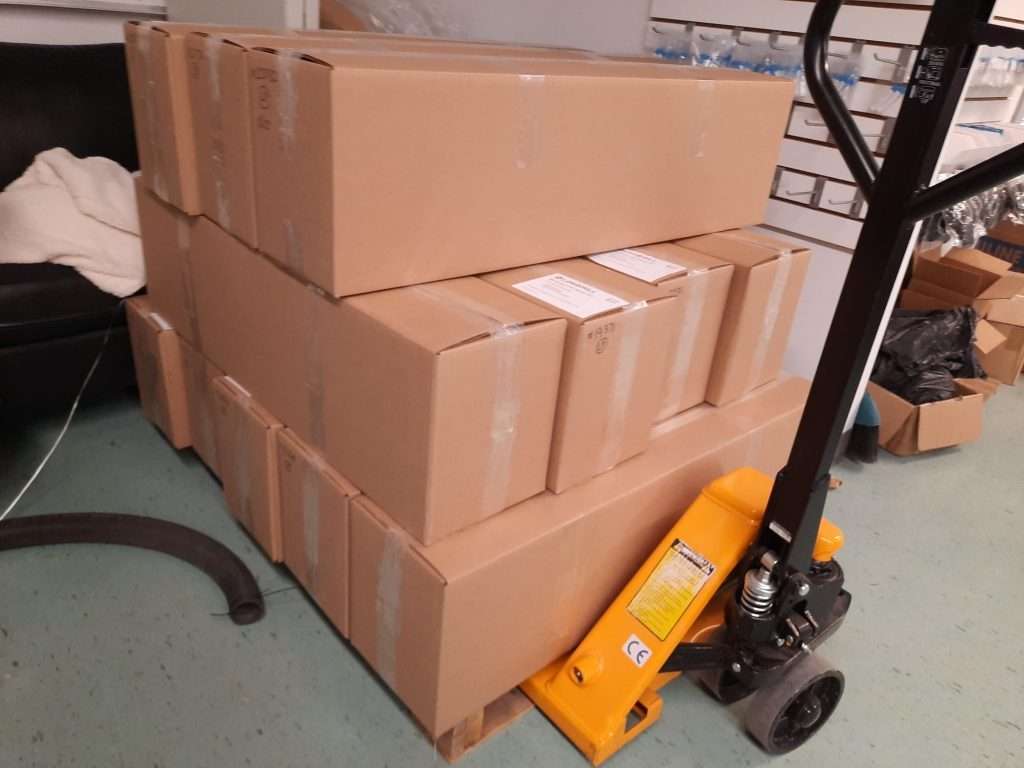
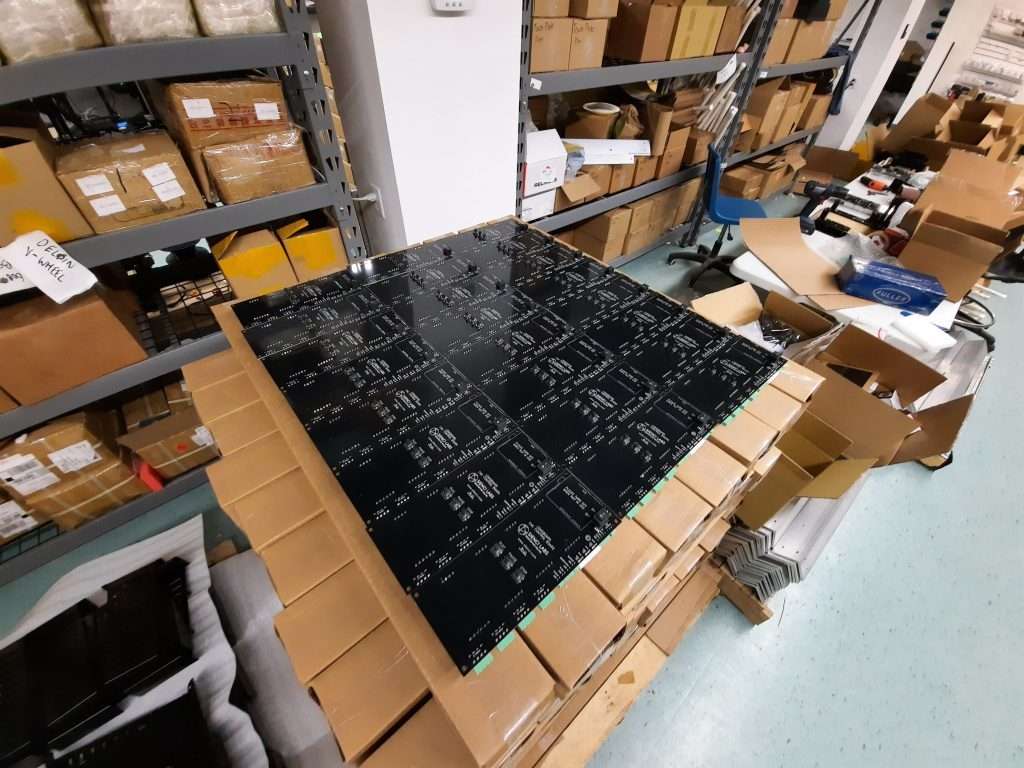
The space is currently fairly bare as we reach the end of batch 2 production for the LongMill, but we are expecting to see supplies and parts come in for an additional 500 units over the next couple weeks. This means that all the empty space will be quickly filling up.
We’re still working on getting stuff shuffled around, but if you want to see a quick tour of the space, make sure to check out Chris’ video!
Hi everyone, we’ve updated our assembly part of our resources for the LongMill. Here are some changes we’ve made:
– Printable PDF versions of both V1 and V2 assembly guides – New diagrams, graphics, and images to help with assembly – Cues for where to find parts in your LongMill packaging
It’s Andy here. If you’ve read our blog, you guys will know I like to post updates about the company and the milestones we’ve had. This past April has been an incredibly busy time for us, especially with adapting to life with a global pandemic going on and a boatload of new orders coming in during this time.
Because of all the craziness I haven’t been able to post as much as I would like to, but we are continuing to adapt as best we can. Here are some updates.
Lead times
April brought us more than double the number of orders than March. Ikenna and the rest of our team have been working hard to ship machines out as quickly as possible, and as we go into the month of May, we don’t see signs of stopping.
As far as shipping goes, we have been able to get most LongMills out the door within a week of when they are ordered, and we are currently working on some new ways to improve our speed and efficiency of getting machines out the door.
Shipping delays and slowdowns
Due to the COVID-19 pandemic, we have seen an overall slowdown in the courier system. Packages sent through UPS and Canada Post have been slower than usual to be delivered. We have typically seen most packages impacted by 2-3 days, with Canada Post seeming to be more delayed than UPS.
Rest assured, our courier companies have been very responsive on helping us with shipments at this time and are doing their best to keep up with demand.
Here’s what you should know about shipping at this time.
Packages no longer require signatures and will be left at the door.
If you have customs duties from UPS, pay-at-the-door services may be suspended. You should receive an email or call about duties and taxes. This only applies to orders above $800USD.
If your order is going to a commercial location that is known to be closed, it may either be held at a post office for pick up or sent back to the sender. Please note that local post offices may be closed or have reduced hours. We recommend shipping your orders directly to your home or residence.
Tracking information may be slower to update at times.
We will continue to offer pick-up during business pick-up hours (10AM-4PM) Monday to Friday. Orders will be placed on our dock for pick-up in Waterloo ON.
Batch 3 is in production
With our current rate of orders, we expect stock for Batch 2 of LongMills to run out by July or sooner. We are currently working on building inventory for Batch 3 so that we’ll have machines ready to go as soon as we can once we run out of Batch 2.
We’ve also added additional racking to our space to accommodate larger batches of inventory and help us smooth out our operations and give us some additional space for new products and parts to come down the line.
We still aren’t 100% yet but we are working on getting there!
Growth in our very active commuities
It’s been awesome to see a lot of growth and great vibes on our Facebook Group and Online Forum. In the last 30 days, we’ve seen over 4400 comments, posts, and reactions on our Facebook group and over 28,000 views on our Forum, which is amazing. Many of these interactions involve sharing tips, ideas, and assistance to users.
It’s also awesome to see several of our beta testers and many of our senior users continue to welcome newcomers and help them get their machines set up. Our team has continually been impressed at the quality and detail we’ve seen in customer projects, especially first-time projects.
Updates to the LongMill Resources
We’ve been continually updating our LongMill Resources. A quick thank you to our customers who’ve sent us compliments as well as feedback on our resources. We’ve been working with our friend Aleks (https://agontarz.com/) to update the resources and assembly for the last couple weeks. If you don’t already know, Aleks helped us make the highly acclaimed Mill One Assembly Manual. You should expect to see changes happen over the next few weeks!
One year since our Kickstarter…
On April 25, 2019, we raised over $400,000 for the LongMill. It has officially been a year since then and we have now shipped over 600 machines to more than 30 countries. Over a million dollars worth of LongMills have now been sold. We are excited to see what our next year brings!
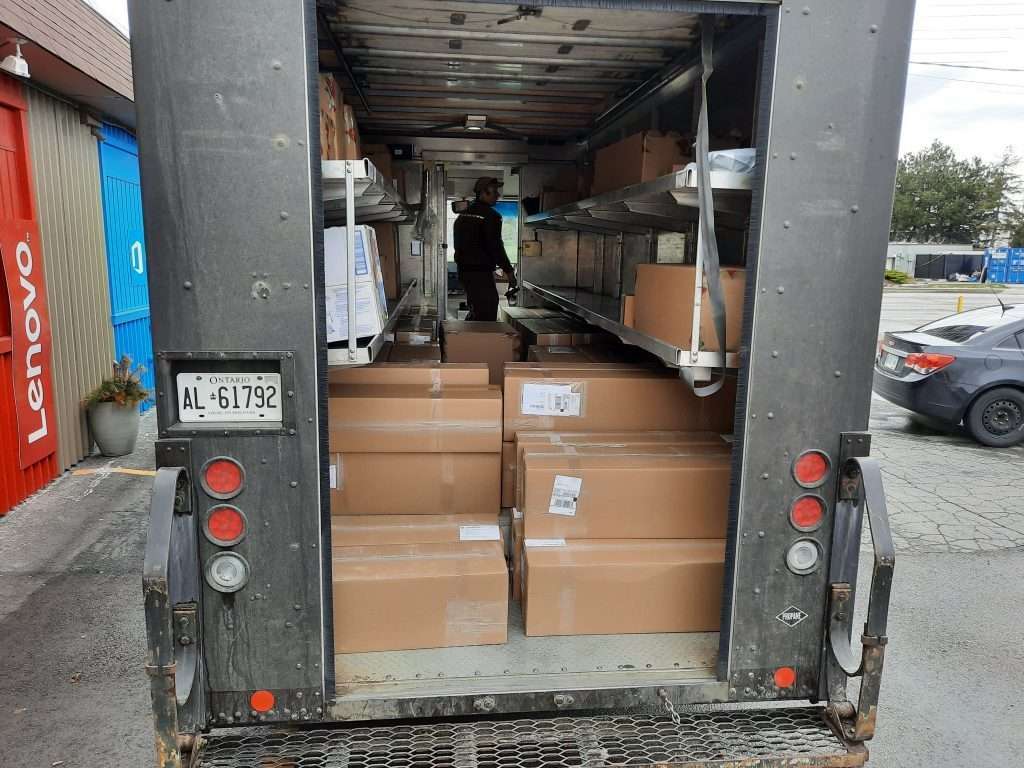
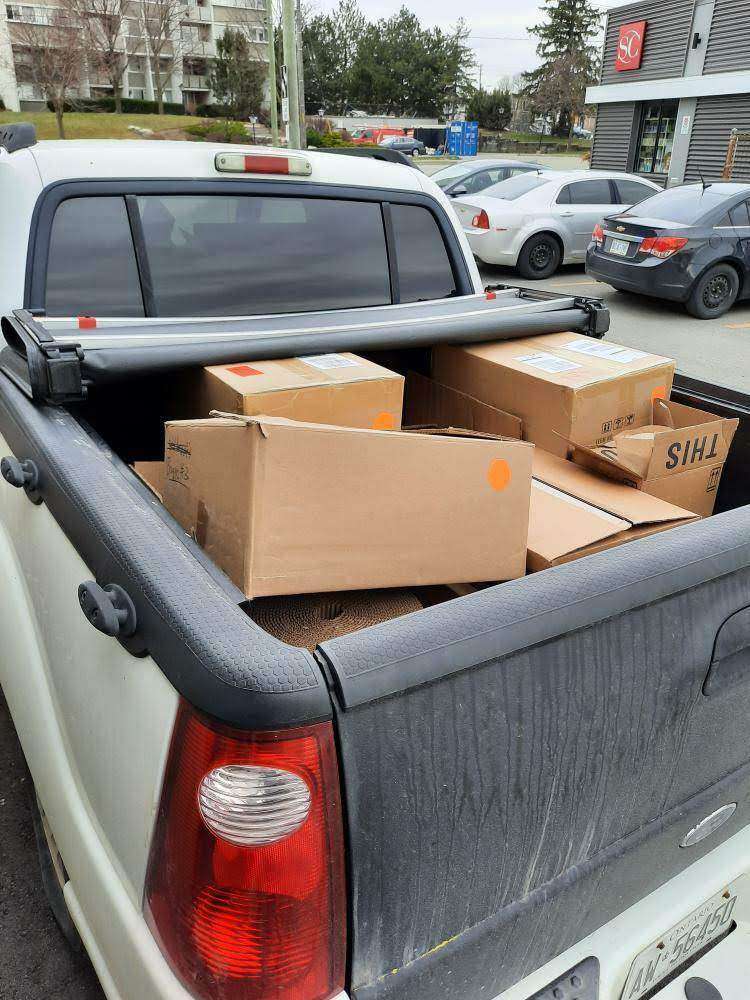
Hi everyone. I hope everyone is staying safe and healthy out there. Yesterday we shipped another 50 machines, which covers for most of the remaining Feb-March orders. We are currently packing March-April orders and expect them to ship in the next week or so.
Lead times for new LongMill orders
Now that we’ve cleared out our backlog, we will be shortening our lead times for LongMills.
LongMill 30x30s should take about up to 2 weeks.
LongMill 12×12 and 12x30s should take 2 to 3 weeks to ship.
Pick up orders
We are still allowing pick-ups for orders, however, visitors will not be allowed inside our facility. If you want to arrange a pick-up, please email or call us to schedule a pick-up and we will leave your order on the dock.
Although we are still allowing pick-ups, we recommend having your order shipped to reduce contact. Shipping within the local area is typically quite fast (1-2 business days).
Working from home
Dropping off and picking up materials for our team working from home
To reduce the spread of COVID-19, most of our production has moved to work from home. Ikenna, our operations manager remains at the office to conduct shipments and day to day activities.
Version 1 of the LongMill mounted the back steel plate for the dust shoe using the two M3 screws on the X-axis gantry linear guides which were finicky. The latest version for the LongMill now uses M5 screws mounted independently from the M3 screws that provide easier assembly and more secure fitment.
Thank you for everyone’s feedback on the fitment and design of our dust shoe, we are excited to continue to develop our machines and additional add-ons that go with it!
Please note that this video only applies to customers with the latest version of the LongMill shipped March 2020 and later.
Folks assembling their dust shoe may find that fitting the t-nuts into the aluminum extrusion is easier by turning the t-nuts opposite to what is shown in the video. This will depend on the 2020 extrusion profile that was provided with your kit.
Hi everyone. As we all know, the COVID-19 pandemic has affected day to day lives of people all around the world, and we are no exception. This post will cover the extent of what that impact looks like to us and to our customers.
We want to thank everyone for their patience and support in this tumultuous time.
Ontario list of essential businesses
To slow the spread of COVID-19, the Ontario government has ordered all non-essential businesses to close. Under these new regulations, we fall under number 19 as an essential workplace ( https://www.ontario.ca/page/list-essential-workplaces ).
19. Businesses that extract, manufacture, process and distribute goods, products, equipment and materials, including businesses that manufacture inputs to other manufacturers (e.g. primary metal/ steel, blow molding, component manufacturers, chemicals, etc. that feed the end-product manufacturer);
On top of this, all online commerce is permitted at all times. We will be open for the time being under our own discretion and we will continue production as scheduled.
Local pickups and visitors
Visitors will not be permitted in our shop. If you have arranged for a local pickup of your machine we can prepare your shipment and leave it on the dock or make other arrangements. This is to ensure the safety of our employees and prevent the risk of transmitting COVID-19.
Pickups can be made between 10AM and 5PM.
If you want to pick up your machine from our office and you have received a notice for your pickup, please call us 10 minutes before pickup and we will leave your order on the dock.Our phone number is 1-855-220-1231.
If you want to purchase any other items and pick it up from the shop, please order items on our website ahead of time and call us 10 minutes before pick up and we will leave your order on the dock. Our phone number is 1-855-220-1231.
If you have indicated that you want to pick up your order previously, but would like for us to ship it instead, please email us with your order number and shipping address to hi@sienci.com. We will send you a Paypal invoice for shipping costs. Shipping costs within Ontario range between $30-50 for LongMills.
Shipping progress
By the end of day today, we expect the first 100 machines to be shipped or ready for pick up by courier tomorrow. This covers orders between November to January. Orders from February to March will most likely ship by the end of this week or by the start of next week.
Lead times for new LongMill orders
We are changing lead times for LongMill orders from 8-10 weeks to 4-6 weeks. We currently have stock for approximately 200 LongMills. As always, we try to orders as quickly as possible and there is a possibility that some orders may ship sooner than this.
Giving ourselves 4-6 weeks lead time to ship helps ensure that we can take appropriate measures to stay safe and healthy, as well enough buffer if we are further affected by COVID-19
Here are some things that may impact lead times for orders.
Things get worse with COVID-19
While business and production is currently not closed for us, there is a potential that 1) the Ontario government may place new regulations that may affect production 2) someone on our team gets sick, requiring us to go into quarantine.
Supply chain lines are affected by COVID-19
We send and receive components and shipments domestically and around the world. If supply chain lines are affected, such as couriers that ship orders to customers, that may affect lead times.
How quickly we can pack
The speed of which we can ship is determined by how quickly we can pack orders. This may be affected if some workers elect to quarantine or work from home. We will not be bringing on additional workers beyond our core team at this time.
We will continue to monitor the situation and provide production updates if there are significant changes to lead times for new orders.
We have started shipping orders! Customers should be expecting emails and tracking info from us soon. Please be patient as we get through our backlog.
Orders from Dec and January should be shipping this week and next week, and orders from February and March should ship by the following week.
We will be shipping all orders for LongMills, all order numbers will be fulfilled.
Pickups
We will be getting in touch for customers who have opted for local pickups.
If you are unable to arrange for a pick-up due to the coronavirus, please contact us for other arrangements.
Control box replacements
There are three or four customers that are waiting on replacement control boards. These will ship out in the next few days.
Assembly for LongMill V2
There are some small variations between LongMill V1 and V2 that have been documented in the assembly manual on our online resources. Most changes are very minor and both processes for assembly on the V1 and V2 are the same. However, if you require clarification or are stuck on assembly, please contact us and we will update the assembly manual.