The business directory at https://business.sienci.com/ has now been sunset. Users will soon no longer be able to access this page (if it hasn’t already been shut down).
The goal of this directory was to help connect LongMill users and members of the public looking for custom CNC services. However, due to the lack of engagement, I have decided to shut the page down.
Looking to connect with other CNC users still? Please check out our forum post “Where is everyone from?”.
I’m excited to share that new macros for the AutoZero Touch Plate can now be found in our resources! This means that users who wish to use the Autozero Touch Plate with gcode senders that are not gSender can now do so with senders such as UGS, CNCjs, and Buildbotics/Linux CNC controllers.
We hope that users outside of the LongMill ecosystem will be able to use our unique touch plate for their CNCing.
For folks not familiar, the AutoZero Touch Plate is a revolutionary CNC touch plate design that allows for homing of both straight and irregularly shaped bits (v-bits, ball nose, and tapered) in the X, Y, and Z directions automatically using a unique chamfered-edge design.
Unlike most conventional touch plates, AutoZero also automatically measures and calculates the size and position of the bit that you’re using, allowing users to skip the process of measuring and inputting their tooling sizes into the software. Plus, with our gSender control software, users can use pre-built settings to have a seamless experience homing bits on their CNC machines.
One of the common asks that users have been requesting has been adding a 4th axis or rotary axis to the LongMill. We’re now happy to share some of the work we’ve been doing to add this support to the machine. We are currently in the early stages of development for this addition but have been able to get some good results from our testing.
A survey can be found at the end of the article, where you can help us understand your needs and get feedback and comments if you wish to participate!
Although things are not finalized yet, here’s a breakdown of a rotary axis kit we’re looking to develop for the LongMill. Our goal is to have a kit that allows for a plug-and-play addition of a 4th axis to any LongMill.
Motorized chuck and headstock, along with a mounting solution to the machine
Cables and switches for connecting to the LongBoard controller
Resources and customer support to help set up and use the kit
What is a 4th axis?
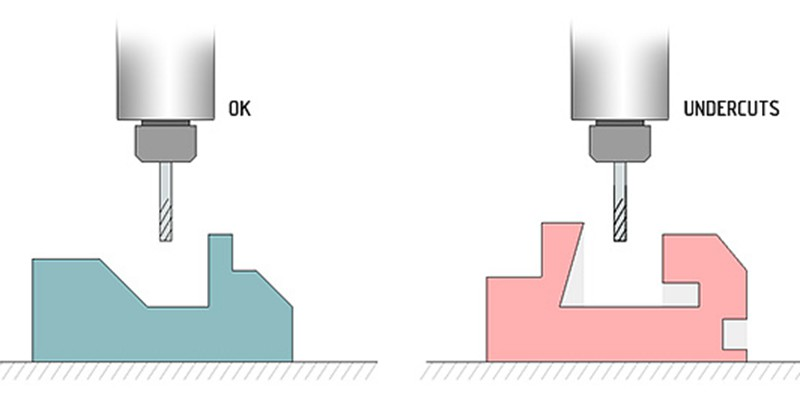
Most CNC routers like the LongMill use a 3-axis system, which consists of a X, Y, and Z linear motion system that is used to position bits and end mills. One of the limitations of a 3-axis system is the fact that 3-axis machines cannot make “undercuts” without flipping or material manually. Since the machine only can orient the bit vertically, there are limitations to the types of geometry it can carve.
To address these limitations, CNC machines can come with additional degrees of motion, typically including a 4th or even 5th axis. In the case for the LongMill, a rotary axis positioned along the X direction allows the machine to turn a part as the X and Z axis can move in sync as the material turns and rotates.
On a mechanical level, the 4th axis for the LongMill will come with a chuck to hold material as well as a series of bearings and pulleys connected to a stepper motor to rotate the material as the machine carves.
What can it be used for?
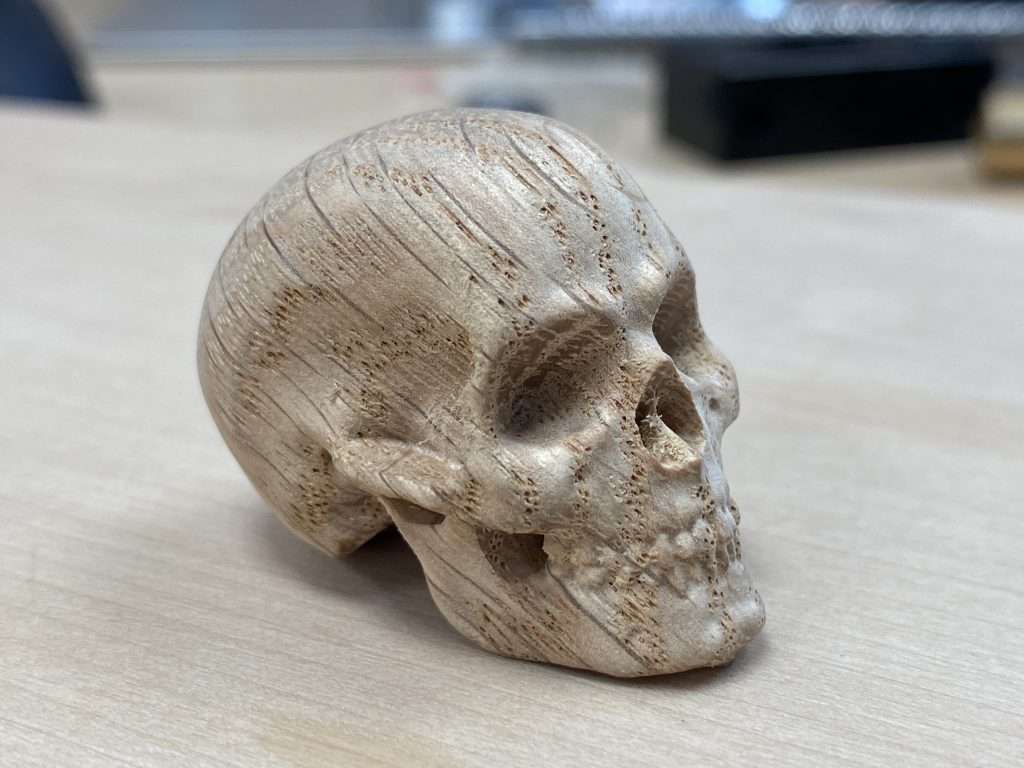
The best way to think about 4th axis is to look at it as a computer-controlled lathe. Projects that are best suited for using a 4th-axis include making table legs, chess pieces, threads, and other mostly cylindrical objects.
Who is it for?
At this current time, we are exploring the suitability of a rotary axis as examples of practical use are limited on the market. We’ve put a link to a survey at the end of the article to help us understand the use cases of a rotary axis by asking what the community is interested in creating!
Based on our research and experience, we feel that this is best suited for early adopters and people who are wanting to tinker with the technology and can accept that at this current time, it is quite primitive. There are quite a few steps to using this add-on and the learning curve involved that may not be intuitive to folks that are mostly familiar with the typical cartesian coordinate system. Additionally, there are a lot of new software features that need to be tested and created, and we expect software bugs in the initial development of the rotary axis that may be frustrating if it’s not expected in the early stages of this product.
Limitations
Software
By far the most important aspect of the viability of this project comes down to the software since a rotary axis is useless without being able to program it. At the current time, the number of software that supports 4th axis machining is limited and the ones that we feel are best suited for this application are paid. Some options include:
Vectric VCarve Desktop, VCarve Pro, and Aspire ($349USD, $699USD, $1995USD)
Fusion 360 ($1600/year)
DeskProto Multi-Axis Edition (€249.00 for the hobbyist edition, €995.00 for commercial)
From our testing, Vectric’s software, in terms of functionality, ease of use, and price, is our recommended choice.
We won’t get into any specific details comparing the software today, but it’s likely that when we start to create documentation for 4th-axis programming, that it’ll be done using Vectric software.
Electronics
It’s also important to specify that with the current setup, this is not a true 4th axis. Rather, this setup uses the motor control from the Y-axis, disabling the linear motion from the two motors and redirecting the power to a single motor that controls the rotary axis. At this current stage, the plan is to provide hardware that allows for switching between rotary and linear motion by connecting directly to the control board.
While this seems like a big downside because the programming of true 4th axis is quite complicated and not supported by most hobby-level software.
Users who wish to explore true 4th-axis machining will need to use a more advanced control system and sending program to control the extra axis. We are working on creating electronics and software that will support this in the future, but we are not quite ready to share these details yet.
Hardware
Due to the size of the LongMill and the size of the rotary axis, users should expect to be able to cut materials up to 4.5 inches in diameter and roughly 10 inches less than the length of their X-axis. So 12×30 and 30×30 users would be able to do up to 20 inches in length and 48×30 users would be able to cut up to 38 inches in length.
The longer the material, the less stable the cutting is, since the material is only supported from each end of the machine with a chuck and headstock. Further testing will show practical speeds and feeds at different sizes.
Pricepoint
During the development of the project, we explored using either an off-the-shelf rotary axis option or designing one from scratch. It turned out that at this stage, it would be difficult to beat the cost of an off-the-shelf option purchased in bulk since if we were to design and manufacture it ourselves, the investment into design and the high volume of custom parts we’d need to produce would make it economically unviable.
Additionally, the off-the-shelf option appears to be quite well-made and good value, and ubiquitous enough that customers on a budget and willing to tinker may be able to source the same or similar option and use it for their machine, rather than buying it straight from us.
We’re estimating a landed unit cost for a pre-made unit in bulk will cost around $200. Additionally, the cables and electronic hardware required would add roughly another $15-20 to the unit cost. We also may need a precision fixturing plate that may cost around $100. Once applying a margin to account for things like development cost, customer support, shipping, resources, packaging, quality control, and everything else that we need to run a business, we’d estimate a price of around $500-700CAD per unit.
Additionally, users should budget to purchase software, as at this time we do not have a recommended free software option.
Next steps
Our next step is to determine the demand and viability of providing a rotary axis option to our user base. If we see enough demand, we can start to invest more time and resources in additional work and development such as:
Sourcing parts to create a rotary axis kit
Developing new features into gSender to add 4th-axis compatibility
Design of hardware for mounting to the machine
Resource development
Stress and long-term testing
Our first step is to share this survey so that interested LongMill users can share their thoughts, wants, and opinions on what they want to see in a kit.
In terms of timeline, we expect to make decisions on the direction of this project by the end of January. Depending on demand, we’ll start taking pre-orders for the kit and start sourcing components. We expect the sourcing and manufacturing process to take around 2-3 months, which brings us to around April-May 2023 when users may start getting their rotary axis kits.
Survey
To participate in the survey, please click the link below. Your participation is greatly appreciated!
Using a new feature in our e-commerce sales tracking software, we can now look at all of our customers on a heatmap!
Here are some cool facts:
We have customers in 59 countries, including Aruba, the Faroe Islands, and Oman!
The United States represents our largest demographic, followed by Canada. We have customers in all 50 States!
We estimate that we have about 5000-6000 LongMill users in total!
LongMill and Extension Kit Orders
Last month we slowed down shipping due to a shortage of lead screws and linear guides. I’m happy to say that our new batch was expedited (at no small cost) and we are currently working to get through the current backlog. Although we expect to get through most of the backlog next week, we are currently keeping our 3-4 week lead time for the time being. Once the backlog is cleared orders should ship within 1-2 weeks. We will have an updated lead time once we have gone through initial quality checks today and early next week for the new batch of parts.
Batch 6, which consists of 1500 machines, is officially complete! New orders are now part of Batch 7. For changes and improvements we’ve made through Batch 6, check out the write-up from the last production update. Batch 7 consists of another 1500 LongMills.
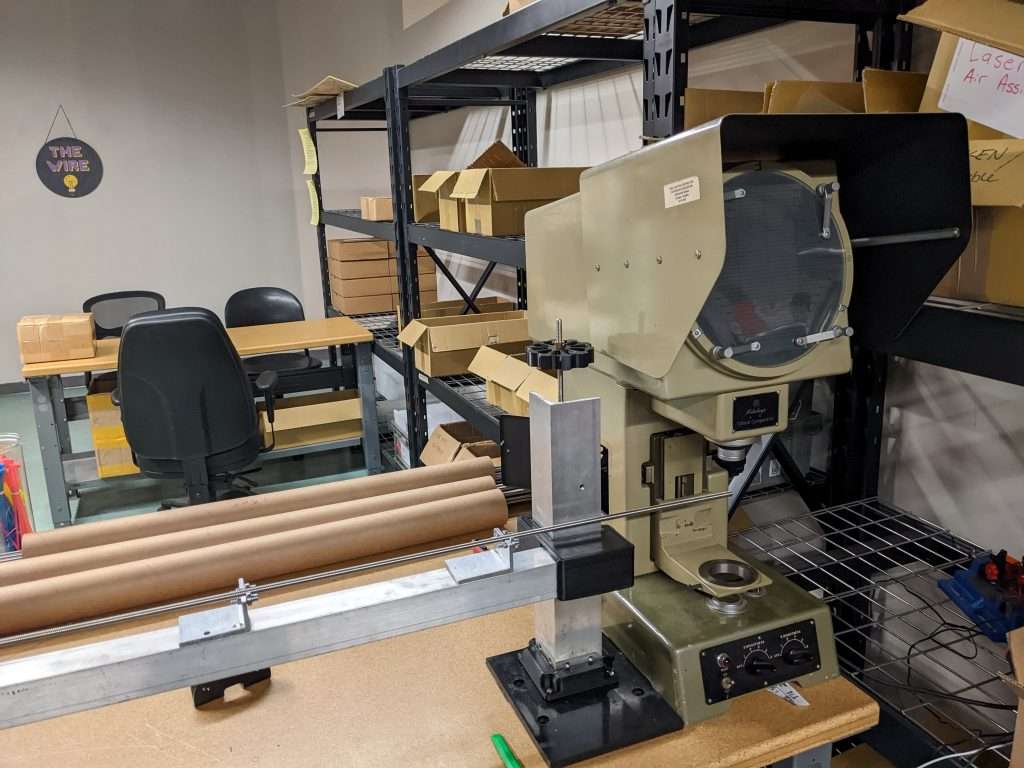
Recently we had a few issues with bent lead screws. We’re currently working on testing all of them before shipping to make sure they are straight and don’t cause binding issues. Here we’re using an optical comparator to check how much deviation each screw has.
LaserBeam Orders
Orders for LaserBeams continue to ship as usual with fairly short lead times. Although we have stock, we are currently working on adding another 500 units to inventory. Due to a sudden increase in sales, we are currently low in stock and while some order will ship quickly, customers should expect to wait 4-6 weeks for their orders to ship based on part availability.
End-of-Year Holidays
As we typically do, we are on closing for holidays from Dec 23rd to Jan 2nd. If you have any questions or need anything shipped out, please reach out to us before the 23rd. There may be some of us providing limited holiday support and getting ready for the new year, but the large majority of us will be on holiday.
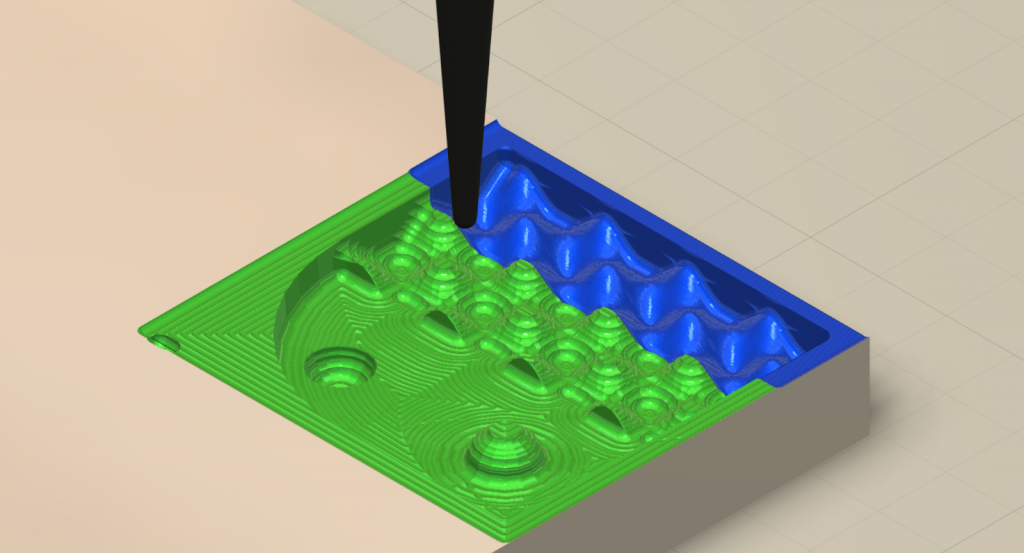
Happy Monday folks. Over the last couple of weeks, our engineering team has been working on creating a standardized testing method and recording values to provide recommended feeds and speeds for a large number of end mills that we provide in our store.
Hey everyone, it’s Andy here. Over the past few years, we’ve welcomed many thousands of CNC users into our community. Of course, with any electro-mechanical machine, some degree of troubleshooting is to be expected.
For the first year and a half since the launch of the LongMill, I had taken on the large majority of troubleshooting from customers directly through email. This was an excellent experience for me as it opened my eyes to observe almost all of the issues that were possible, as well as giving me the chance to learn and communicate with customers better. Even to this day, I am regularly checking on customer tickets and working with our support team to tackle new or more complicated support issues, although it’s typically no longer my day-to-day role.
What has been interesting to see over this period of time has been not just how we collect data and information about issues over time, but also our understanding of the human nature of users when it comes to identifying and troubleshooting issues.
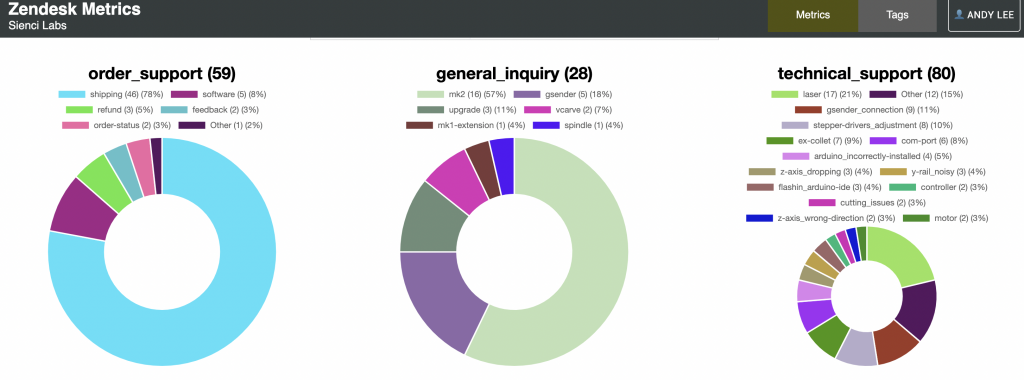
One of the things we’ve come to recognize is that there are a number of misconceptions to address in terms of troubleshooting the LongMill. This article covers some of my personal recommendations for helping you troubleshoot issues on your LongMill.
Our custom dashboard tracking what types of tickets we receive and the frequency of certain issues
Tip 1: Listen and look at your machine carefully
Simply listening and looking at what your machine is doing can help a lot in identifying problems. Is the machine making a weird sound? Do you hear the motors stalling? Is the machine stopping and starting irregularly? Is there a component that is slipping? Making a close observation can help identify the cause of an issue.
It’s important to note that the large majority of issues for the LongMill are mechanical. This means that for most issues, you can physically, hear, or feel issues. A few extra tips for this tip:
Jog your machine manually on each axis and check for smooth motion. I recommend running at the highest speed for each axis as stalling is more likely at higher speeds
Run your project in the air. Look for any irregularities and odd behavior.
Try turning lead screws and moving your gantries by hand. This can help identify looseness or binding.
Tip 2: Most issues are simple issues
The large majority of issues are caused by something simple. Always start with simple fixes first before trying something more drastic. This will save you time and give you statistically the best chance in fixing your issue.
99% of issues that our users have can be found in the Common Issues and Fixes section of our resources. I encourage everyone to read through it carefully as it covers everything that we know that may help you solve your issues. This section is updated regularly with new issues and fixes when they are found.
From my experience, users often have a tendency to jump to the conclusion that if they run into an issue, it’s a rare, complicated, or unknown issue. Sort of like being a…LongMill hypochondriac? This means that many people try to troubleshoot their issues in the wrong place and become frustrated with the machine, rather than checking the most simple reasons for issues. For example, you’d be surprised at how many people reach out to us because their machine won’t work at all because they just never turned on the machine in the first place.
Tip 3: Mechanical and electrical issues happen randomly. Software issues happen exactly the same way over and over again.
The main differentiator between a mechanical and electrical issue versus a software issue is that mechanical and electrical issues seemly happen at random and software issues happen the same way over and over again.
While mechanical and electrical issues can be caused over time by loose fasteners and connectors, wear and tear, and power fluctuations which can happen seemly randomly, software works in a series of exact pieces of code that is rigidly defined. While double-checking firmware settings and reinstalling gSender can help eliminate those as being the issue, if your issue seems random, it’s more likely to be a mechanical issue and updating or reinstalling gSender will not help.
I sometimes joke to Chris that many users use gSender as a scapegoat, as many pin their issues on gSender when they aren’t sure what’s going on. I suspect it’s because its easy to blame something that people don’t feel as comfortable with (aka the software). Sometimes it feels like gSender is messing something up randomly, however, the reality is that the vast majority of issues come from something mechanical.
Tip 4: Static and EMF cannot cause a machine to lose steps
It is a common misconception that static and EMF can cause a machine to stall or lose steps. The main symptom of static and EMF is a complete disconnect between your machine and CNC. Issues caused by static and EMF will likely cause your machine to disconnect or stop completely. Additionally to note, due to the high draw of tools such as routers and dust collectors, its easy to mistake brown-outs for static and EMF, even though they are completely separate problems.
If your machine is losing position or steps randomly, it’s best to check out the mechanics of the machine first, as static and EMF does not cause the machine to lose its position. Use the process of elimination by turning on and off different tools and dust collectors in your shop while running your machine to identify the culprit.
Tip 5: Let us help you
Don’t forget that our technical support team is here to help answer any questions and help tackle technical issues. Sending us a message with detailed information, videos, and photos of your issue through our Contact Us page.
When you send a ticket, you’re talking to:
One of our team members or engineers who designed a certain part of the machine
Someone with hundreds, if not thousands of hours of CNC experience
The whole technical support team, as tickets and information can be shared between all members
We also use tickets to collect data and improve the quality of our products and make adjustments to our resources.
Reaching out directly to our technical support team is typically the fastest and most reliable way to solve technical issues.
A note from Jason Kent, our Customer Support Manager
Provide as much information as possible. Information such as recent changes or updates made to the machine or software is useful to include. When reaching out for customer support, please add images or videos relevant to the issue. While family photos are cute, images of the issue help us to diagnose your problem faster.
TLDR:
Tip 1) Observe the mechanics of your machine carefully, such as the sound and the movement, as mechanical issues are the most common in LongMills.
Tip 2) It’s statistically more likely that an issue is caused by something simple. Always troubleshoot by checking basic things first. Troubleshooting guides in our Resources contain fixes for 99% of issues around the LongMill and are regularly updated.
Tip 3) Understand that if the problem happens randomly, it’s most likely a mechanical or electrical issue. Software does not cause random problems.
Tip 4) Static and EMF does not cause stalling or missing steps. Static and EMF causes the machine disconnects or to stop completely.
Tip 5) Don’t forget to reach out to us directly! We can help too!
Can you believe it’s been just over two years since we did our last shop tour? Since then we’ve expanded our shop and our team in leaps and bounds. Join me and Chris in our shop tour where we show you where we make our LongMills and other things at Sienci Labs!
Want to see our shop tour from 2020? Check it out below:
Hey everyone, here is our Nov 2022 Production Updates.
I’m actually writing this update at the end of October since I’ll be on vacation for the next two weeks, but this should lay out everything we’re working through this month. I’ll be in touch with the team on and off during this time, but figured I’d get this update ready to go.
After a 10-month hiatus, Louis, our CEO has returned from vacation.
LongMill MK2 and Extension Kit Orders
Production continues to move smoothly for all LongMill and Extension Kit orders. We paused production for about a week while we restocked on lead screws, but we have received the new batch and will continue to have machines go out the door at our regular pace. We’ve also restocked on a new batch of front and back steel feet, gantries, and rails. Lead times for this month should be around 1-2 weeks for most machines.
Batch 6 is nearly over with just over 100 machines left for this batch. Batch 7 will have essentially no differences since most improvements have been made gradually throughout Batch 6. Some of the improvements include:
Higher grade washers to prevent bending of the washers used with eccentric nuts
Custom machined v-wheels to higher tolerances
Additional QA processes including checking variance and tolerances throughout all of our aluminum extrusions
Additionally, we’ve implemented some process changes in the office such as:
Kanban for 3D printed parts and some assembled parts
Torque settable electric screwdrivers for XZ gantry assemblies to ensure all screws are tight before shipping
Specialized measuring tools for checking fit and tolerances
Additional foam padding in packaging to reduce denting and scratching
SOPs on tablets and QA databases
Version tracking for all variations of parts
New MRP systems to help keep track of inventory
Our operations team and our staff have generally noted that Batch 6 has been the smoothest batch we’ve had so far with minor issues (except maybe the big one at the start of 2022). We expect Batch 7 to be even better.
Currently, we are looking at seeing ourselves run low in the next few weeks on linear guides and a few small sets of hardware, but are expected to restock in mid-to-late November.
LaserBeam Orders
We are currently stocked on LaserBeams and most orders are going out within a few days. We are also expecting to complete the first batch of roughly 1000 units as well near the end of the year.
Black Friday Sales
As of this time, we do not have any sales planned for Black Friday. We simply believe that providing the same reasonable prices for our products at any time of the year is the best way to run our business. If you’re looking to get into CNCing, we recommend customers order their machines whenever they are ready. We suspect that most customers will find our pricing quite reasonable even when other companies are selling theirs at a discount.
We have never had a discount (with the exception of the Kickstarter campaign) on the LongMill since its release.
At the end of the day, we want people to have confidence that they are getting the best deal on their purchase no matter when they place their order, and we also want to focus more of our time on important stuff like designing machines and growing our community over focusing on selling more stuff.
Just a reminder for everyone to be nice
Something that I am continually grateful for is our active, healthy, and supportive community. We now have nearly 10,000 users across our platforms today from over 30 countries. For all of our amazing community members, thank you for being part of what we are today.
Based on feedback from our support staff and other members of our team, as hobby CNCing becomes more popular and prevalent in our society, expectations and demographics continue to change as well, introducing a wider audience beyond our early group of adopters. Over time, our groups have become more diverse demographically and what people are using their CNC machines for, which is amazing.
It should be noted that although we don’t personally post publically that often, many of us at the company personally stay active on the groups and read most of the posts that you make. I make it a habit to check the forums and Facebook group at least once or twice a day to see how things look in the community and see what’s new, even though it’s rare for me to post or comment in general.
But of course, with every large group, there can be some negativity. We welcome complaints and criticism, whether posted online or directed to us privately, we use these messages to make improvements to what we do on a continual basis. I also hope that customers give us a chance to help them and let us work out the kinks that may arise, as well as open to learning to work with us as we navigate to getting started in a new hobby.
That being said, with recent growth in the community, I have also seen the rate of negative commentary and harassment pointed at us and to the company directly increase as well. I do not accept harassment aimed toward our staff and I have continually been working to help our staff navigate these situations.
In response to this, we’ve worked to create some internal processes and policies to help take care of these matters, as well as post a Customer Support Terms of Service note at the end of our Contact Us page. For our online communities, thank you to our members who’ve stepped up to comment back when people have made negative and untrue comments.
We are people. We have feelings. We love and care about our community and we do our best to make this a fun and accessible ecosystem. Please remember to be nice to us and each other.
End-of-Year Holidays
As we typically do, we are on closing for holidays from Dec 23rd to Jan 2nd. If you have any questions or need anything shipped out, please reach out to us before the 23rd. There may be some of us providing limited holiday support and getting ready for the new year, but the large majority of us will be on holiday.
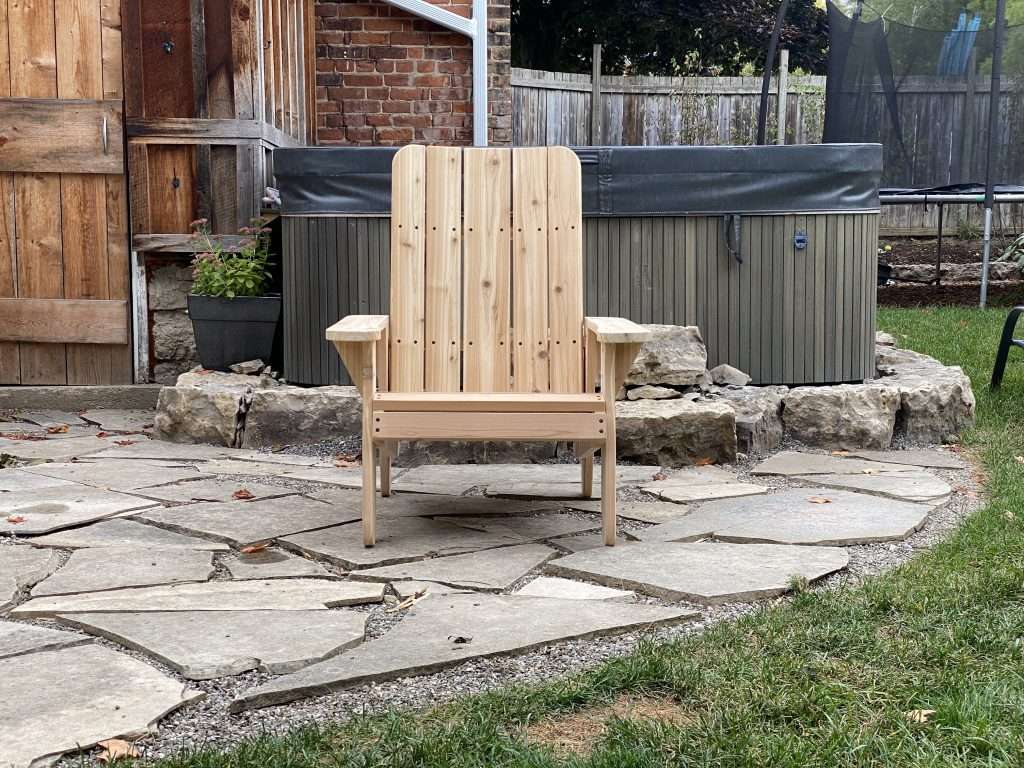
Hey folks. I’m excited to share a new project and all of the files and details to make an Adirondack/Muskoka chair on the LongMill! Scott, our in-house content creator and maker-supreme, wanted to add a few nice, high-quality chairs for his backyard, and so we set out to make a CNCable chair that can be made on the LongMill and basically any hobby CNC of a similar size.
This project was designed by me (Andy) and cut out by Scott in his shop. While this project has a lot of parts, the actual process to make them should be pretty straightforward since a lot of it is repetitive setup and cutting. While this is a perfect project for a beginner, I encourage advanced users to find ways to customize and modify our designs to add their own unique flair.
We continue our series of projects that you can make with your LongMill. To check out the one from before, visit our page here: https://sienci.com/2022/08/04/how-to-make-a-giant-connect-4-on-your-longmill. You can support us by subscribing to our Youtube channel and sharing projects that you’ve made from our designs online! If you have any ideas or projects you want to see us do, feel free to reach out or comment on our social media!
This was a bear to design. There were a lot of things we learned through the 4 or 5 different iterations it took to hammer it out. During the design process, it’s important for us to not just make a great design, but make it so that:
The materials you need for the project can be found universally and at a reasonable price
The materials can be of varying qualities but still work
The design can fit on a standard 30×30 working area
The tooling and techniques to make the project is accessible and easy enough for beginner users
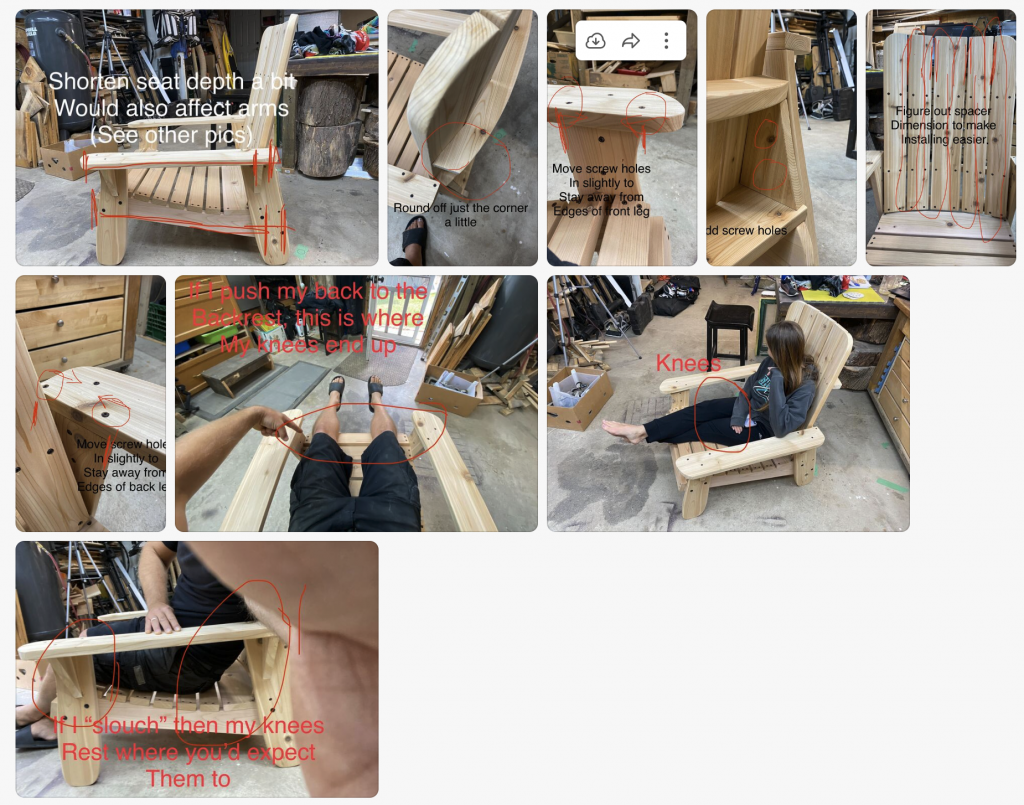
Here’s what some back and forth looked like between me and Scott for making updates:
The newest version has some tweaks made compared to the version in the video which include:
Better placement of screw holes
Slightly shorter chair to fit knees better
If you see a design flaw, please feel free to let us know.
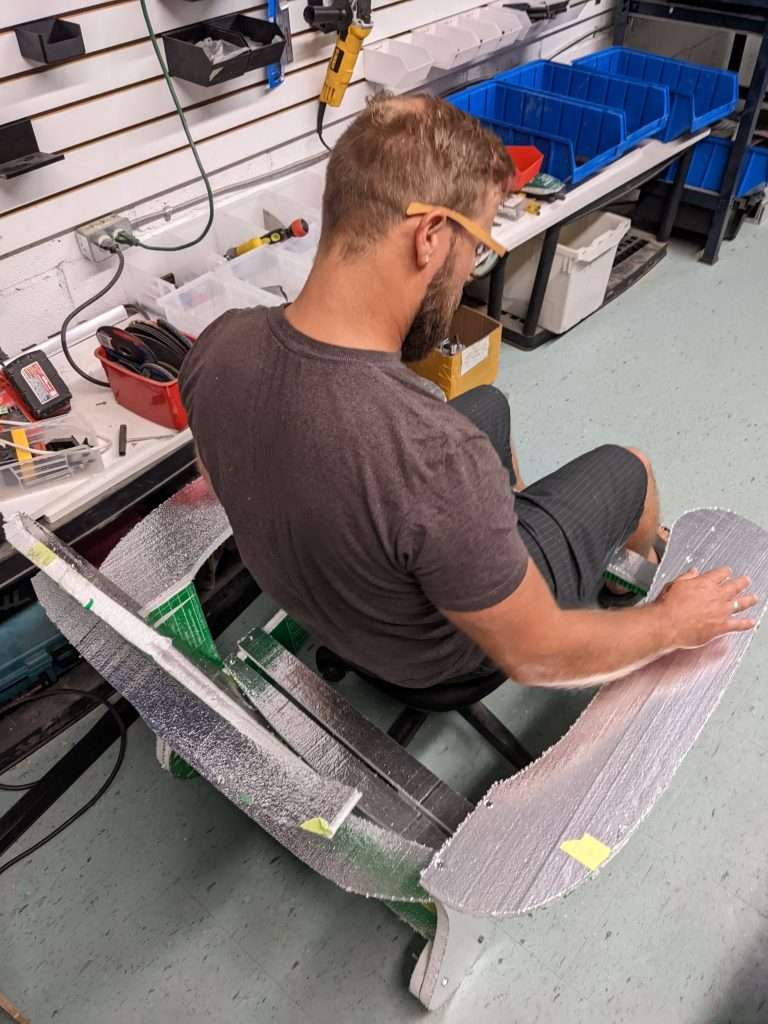
A foam test chair
Finding the right materials
Finding the right materials for this project was a major challenge. Our first prototype used some 3/4″ cedar boards, but because lumber manufacturers are bad at measuring things, the actual thickness came out closer to 1/2″, but not to a degree of consistency that would let us make good joints without doing extra work planing and cutting down the boards. There was a lot of warp and cupping in the boards, making it even more difficult to fit things together. This resulted in poorly fitting parts and weak spots in the cut boards.
You can probably see it better in these photos and videos below:
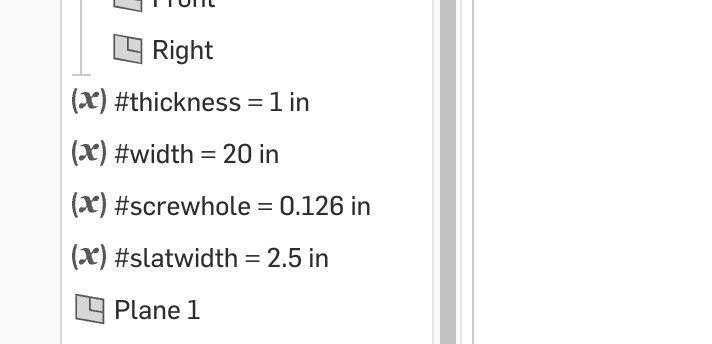
3/4″ wood is strong enough for this project, so if you can get it while being dimensionally stable, I would probably get that stuff. The Onshape document does have some variables to help you adjust the size of the model based on the material thickness.
Another slightly annoying constraint was the widths of the wood we could buy for this project. It was important to us to use solid wood, at least for the sake of the asthetics that Scott wanted for his house, so we needed to use standard size boards. In our case, the best option was to use 6in wide boards (or 5.5 – 5.7in roughly), all of the parts needed to fit within that width.
According to Scott, this project uses about 56 feet of board (or 7 x 8 ft boards).
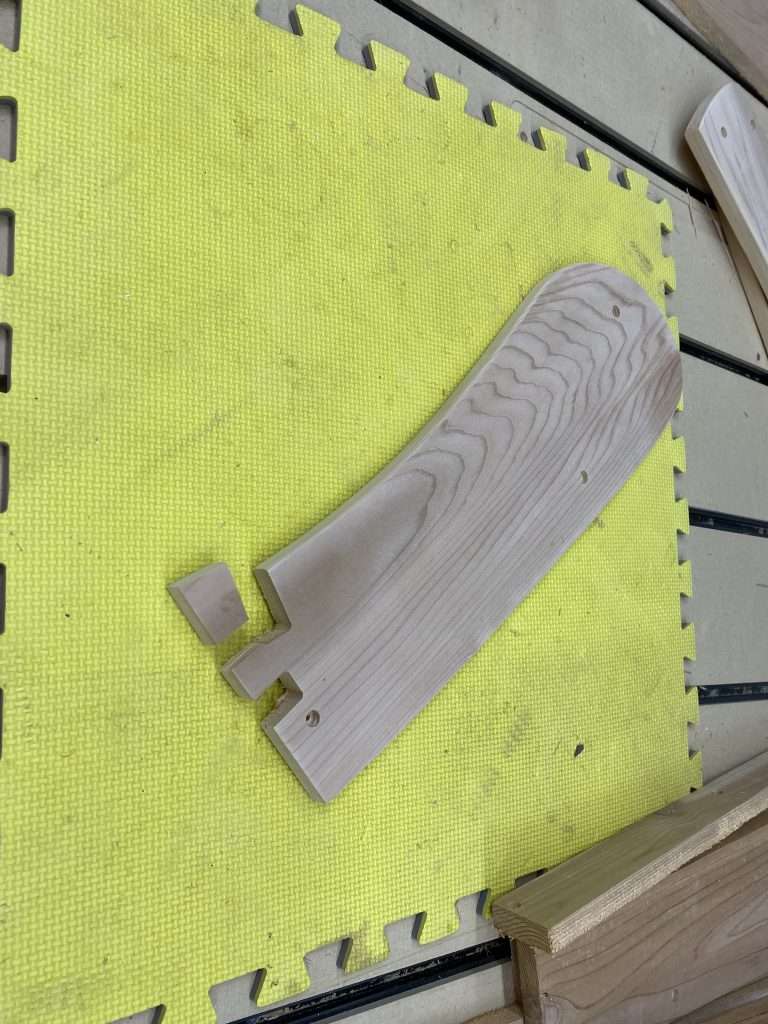
Slotting and lining things up
If you’ve seen some of the other designs I’ve made, I like to have things slot and fit together. The Connect 4 would be a good example.
Well, given the variability of the thickness in the wood boards, even between throughout the board itself, it was hard to make a design that could actually have parts slot together. So I instead removed the need for things to slot together at all. This means that even if your material isn’t exactly the right thickness, you’ll still get a great chair. Basically all of the parts have a line or surface that can be used to line things up when putting the chair together (the arm support triangles are going to need a bit of eye-balling).
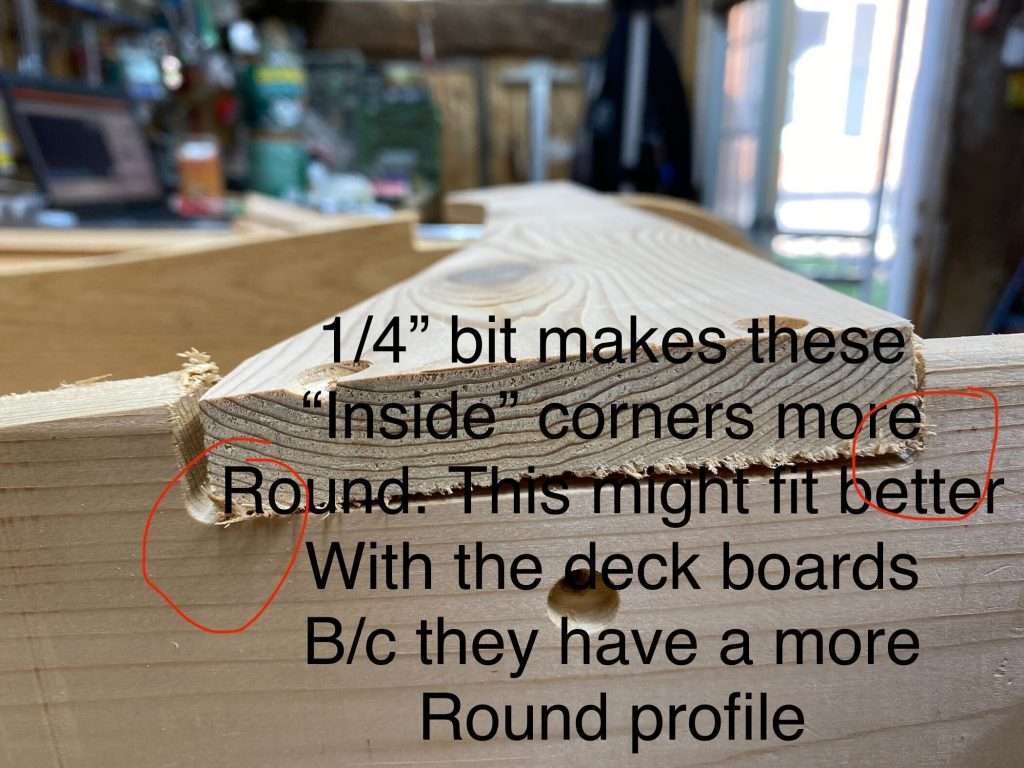
Cutting
Originally we had planned to cut the project using 1/4″ bit for the outside profiles and a 1/8″ bit for the holes, but we found that a 1/8″ bit for the whole project was a lot more convenient given that there’s no tool changes involved and less dust to clean up. Using the smaller bit does end up being a bit slower, but since this is a one-off project, time wasn’t a huge concern.
Cutting all of the parts should take about 2, maybe 3 hours. You can use feeds and speeds that you are comfortable with your material, but the gcode provided in the project files are set to 100IPM at 0.2″ depth of cut. It’s likely you can bump up the speed while cutting to your taste with the manual feedrate overrides.
Workholding
Scott suggests using hot glue as a way to keep the part coming out of its spot while cutting. I think this is a pretty good method overall, albiet a bit messy at times. For myself on the otherhand, I will cut the screw holes first and use them as a place to put some wood screws to keep the part in place as the outside gets cut out. Either method works.
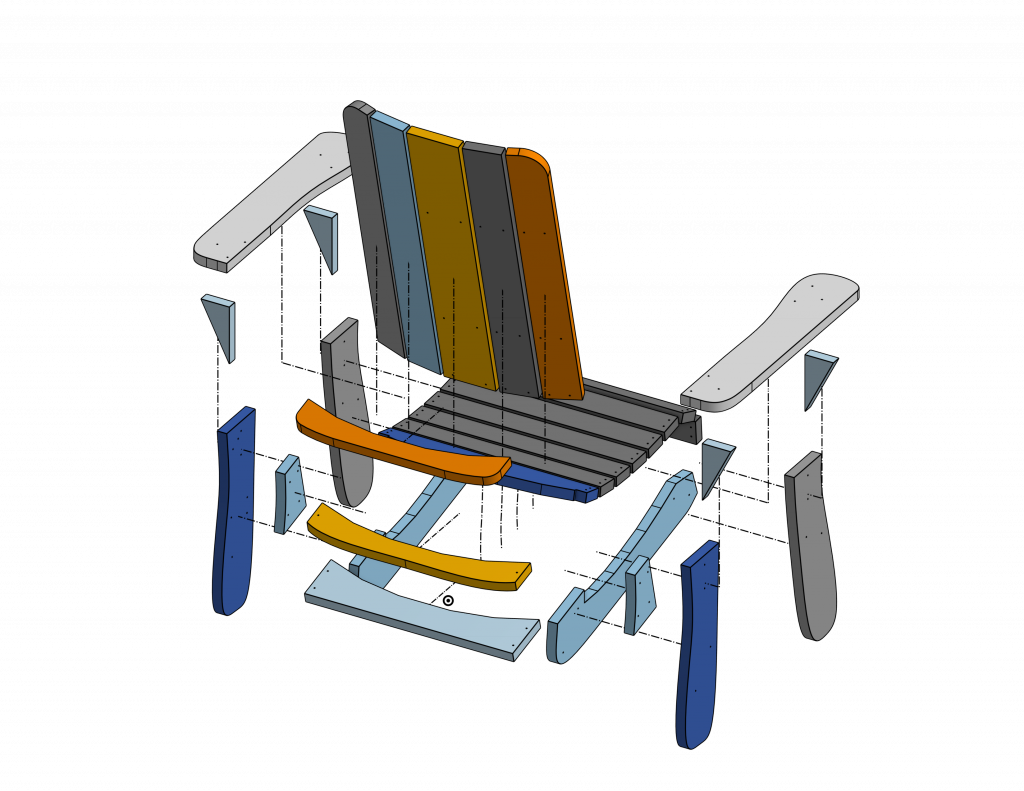
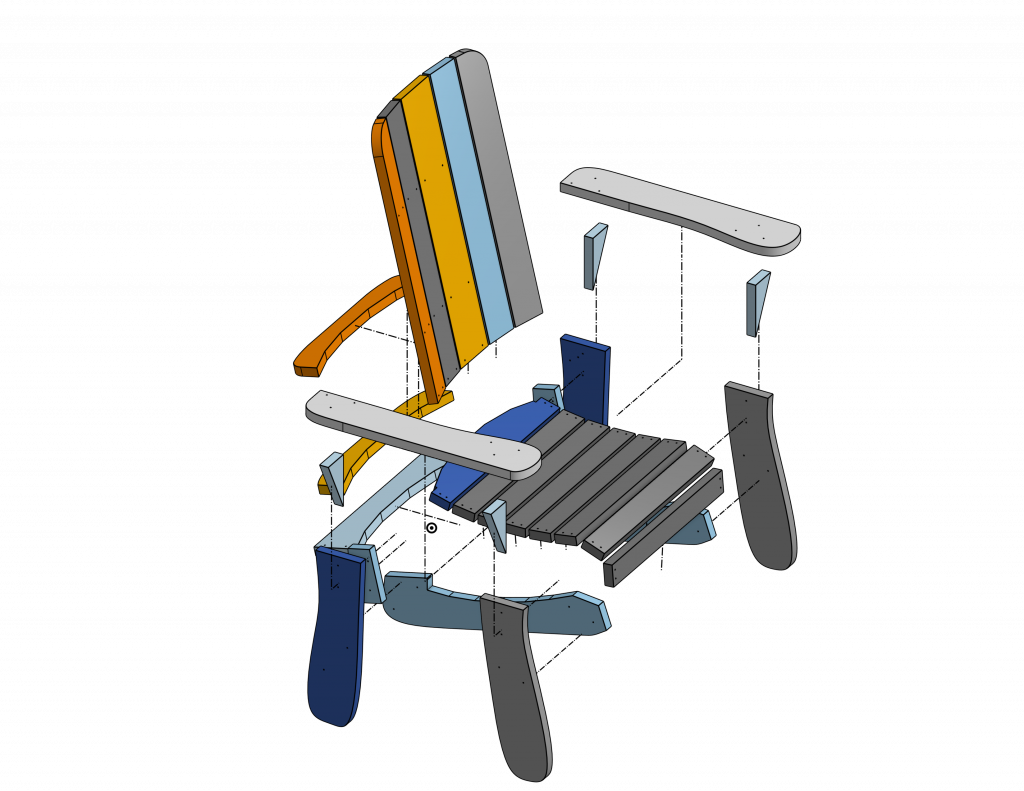
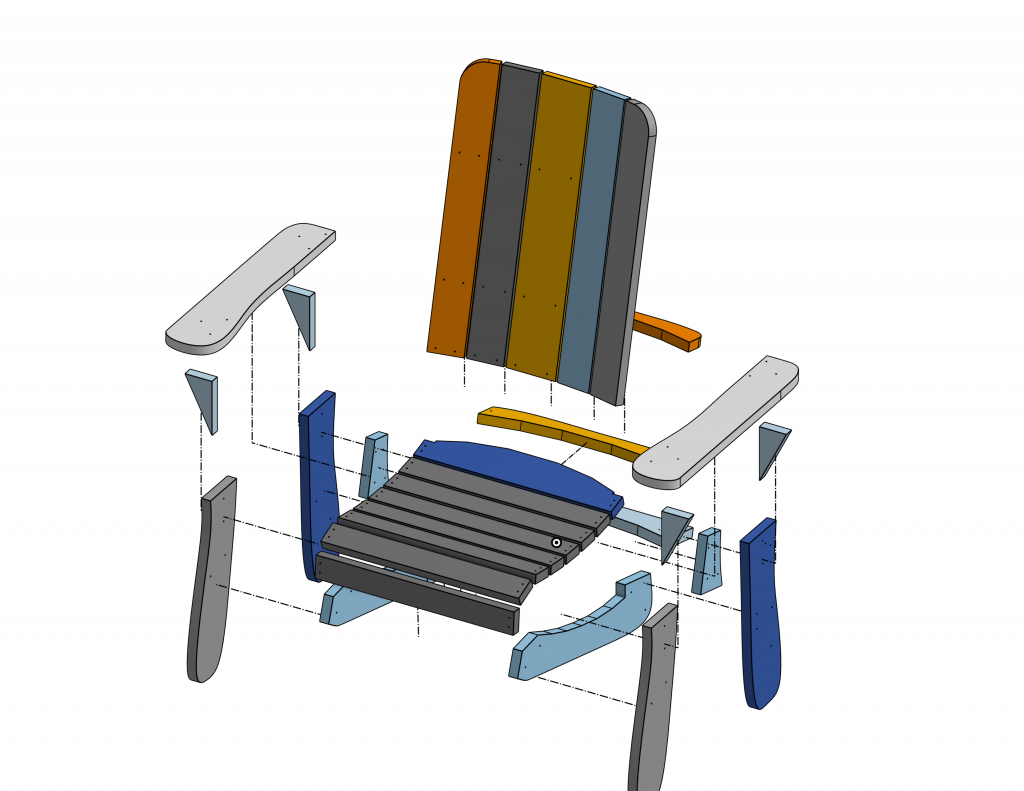
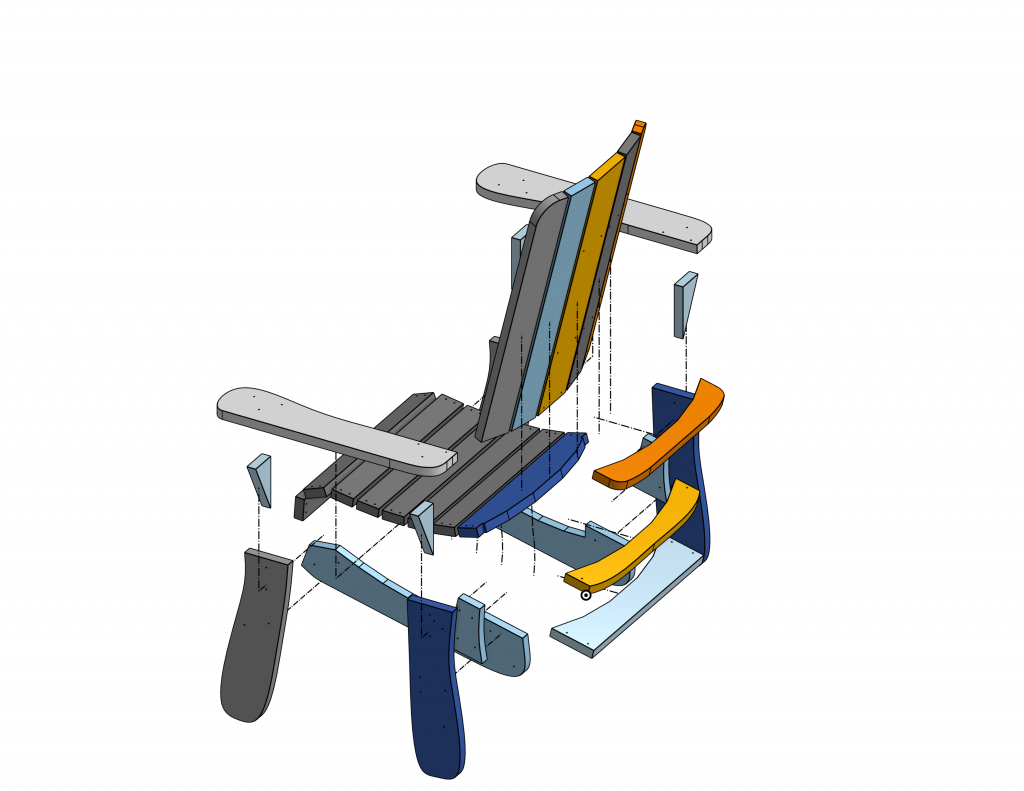
Assembly
Please enjoy these exploded views of the chair. You can also check our 3D model as a reference for where things should go.
All of the parts are designed to fit together with quality, #8-1.5″ wood screws. Holes are pre-drilled with the CNC, but you may need to drill additional holes into support parts such as the triangles and the back supports.
Canadian Thanksgiving is coming up this month. Our offices will be closed Oct7-10th.
Wow we are shipping LongMill orders by the pallet now!
LongMill MK2 and Extension Kit Orders
Production continues to move smoothly for all LongMill and Extension Kit orders. Most machines are shipping out within 1-2 weeks, and oftentimes sooner.
We are expecting to run out of the 1030mm lead screws that are used in various quantities between all sizes of the LongMill around the middle of October.
We have another partial batch expected to arrive at the end of the month, which means that shipping may be paused around this time. We will update our Order Status page with updated information if there is a shipping delay.
We expect lead times for machine orders to be around 1-2 weeks for the next few weeks before we update our lead times when we run out of lead screws.
A small piece of news to share, we have now switched completely to custom manufacturing v-wheels. This means more consistency, quality, and accuracy for the wheels in general, which have been historically a tricky point for us. The quality for the first 30,000 looks to be excellent so far.
LaserBeam Orders
We still have ready-to-go stock on LaserBeams. Most are getting shipped out within a few days.
Ikenna has been doing livestreams for working with the LaserBeam. If you haven’t checked it out yet, make sure visit our Youtube channel!
USD to CAD Exchange Rate
At the time of writing, the exchange rate for USD to CAD is 1 USD = 1.36 CAD. Because our base currency is in Canadian, this means that the exchange rate is heavily in favor of the Americans. That means that while the price for our products is basically the same for Canadians, our neighbors down South can purchase from us at a pretty significant discount.
Based on the reports that I’ve been receiving from RBC (Royal Bank of Canada), their projections are expected to see the USD to CAD conversion continue to be in favor of the USD for some time.
Because our base prices are all in CAD, this means that the margins for each machine decrease as the exchange rate changes in favor of the USD. Thankfully, because most of the material and production costs come in the local area, we are not as impacted as our competitors that have a higher percentage of materials coming from the US and overseas or US competitors selling into Canada. Additionally, much of the purchasing for Batch 7 was done when the exchange rate was around 1 USD = 1.26 CAD, a more favorable rate.
As the continuing economic turmoil continues, it will be interesting to see how us as a business will move forward.
The silver lining to this is that the small discount that our southern neighbors will be getting may stimulate more economic business in Canada.