Using FEA to find maximum deflection in the XZ gantry

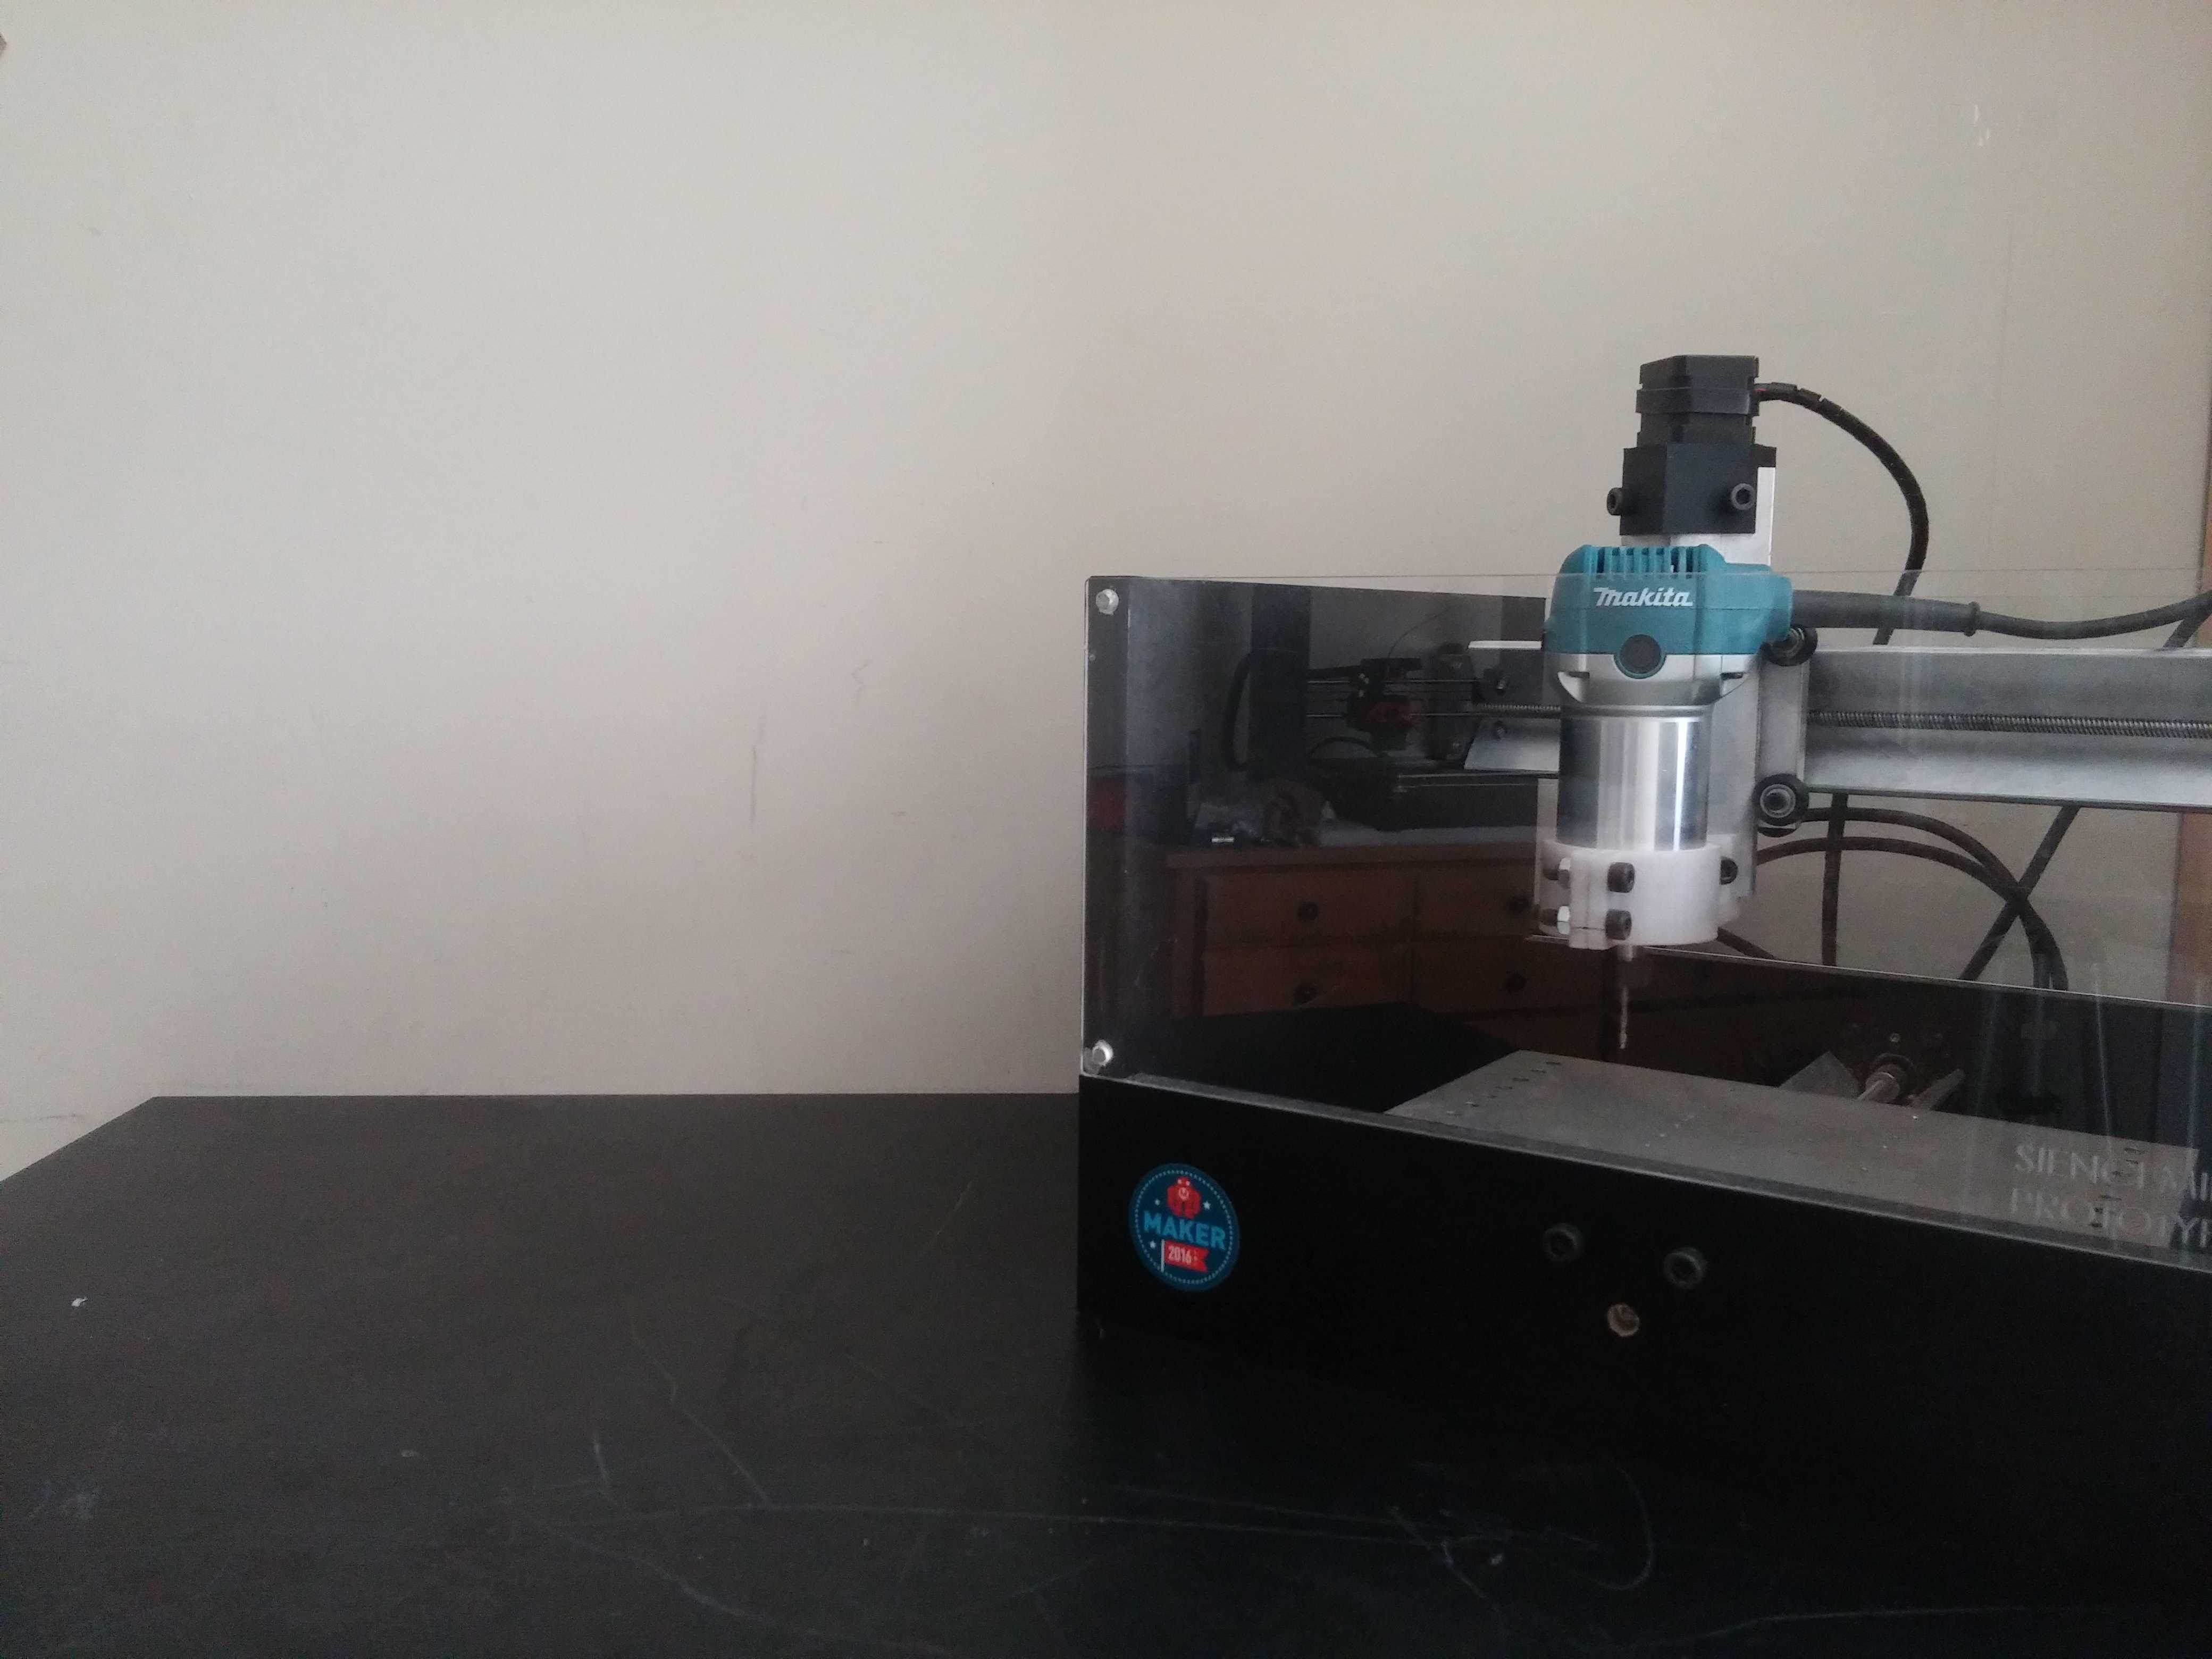
The XZ gantry on the Mill One is one of its core parts and thus requires a high level of rigidity to have an overall high level of performance and precision. This blog post will give a quick look into some of the engineering that goes into the Mill One.

What are we looking for?

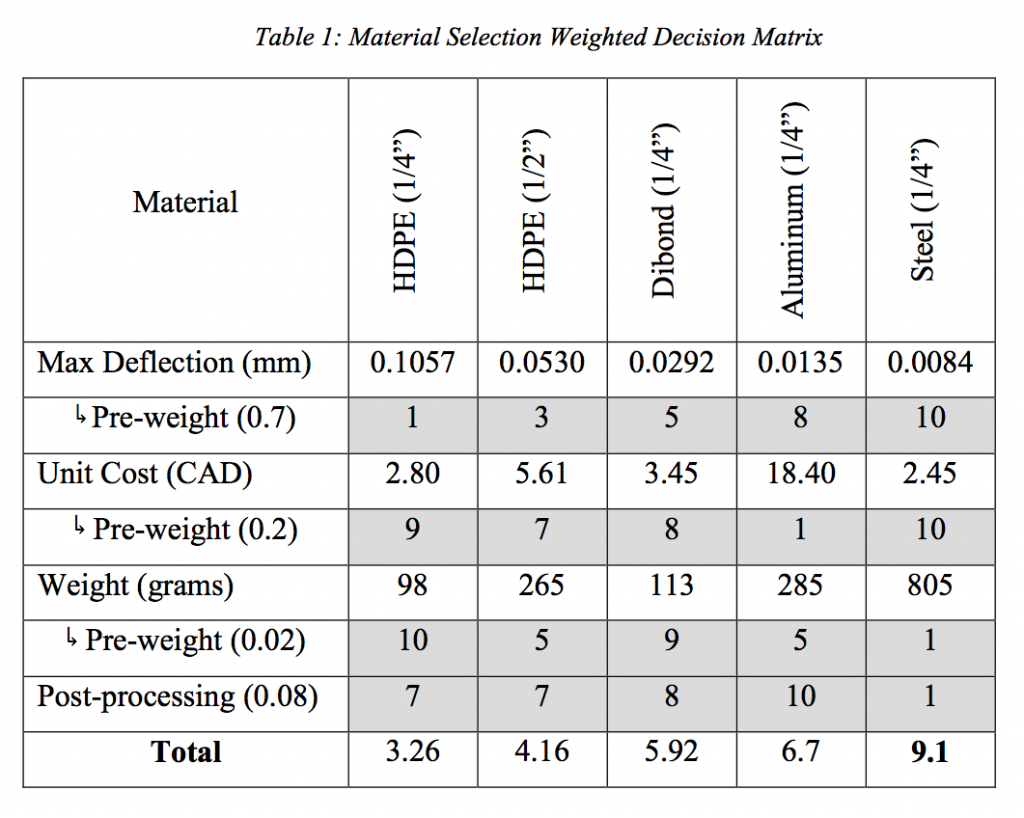
Appropriate material selection for the Mill Ones XZ gantry is essential. Initial prototypes were made from 1/4″ PVC, but as the design and performance of the Mill One improved, we found a need for a stronger material to replace the PVC.

A balance of cost and performance determined the material we’d use for the new XZ gantry.

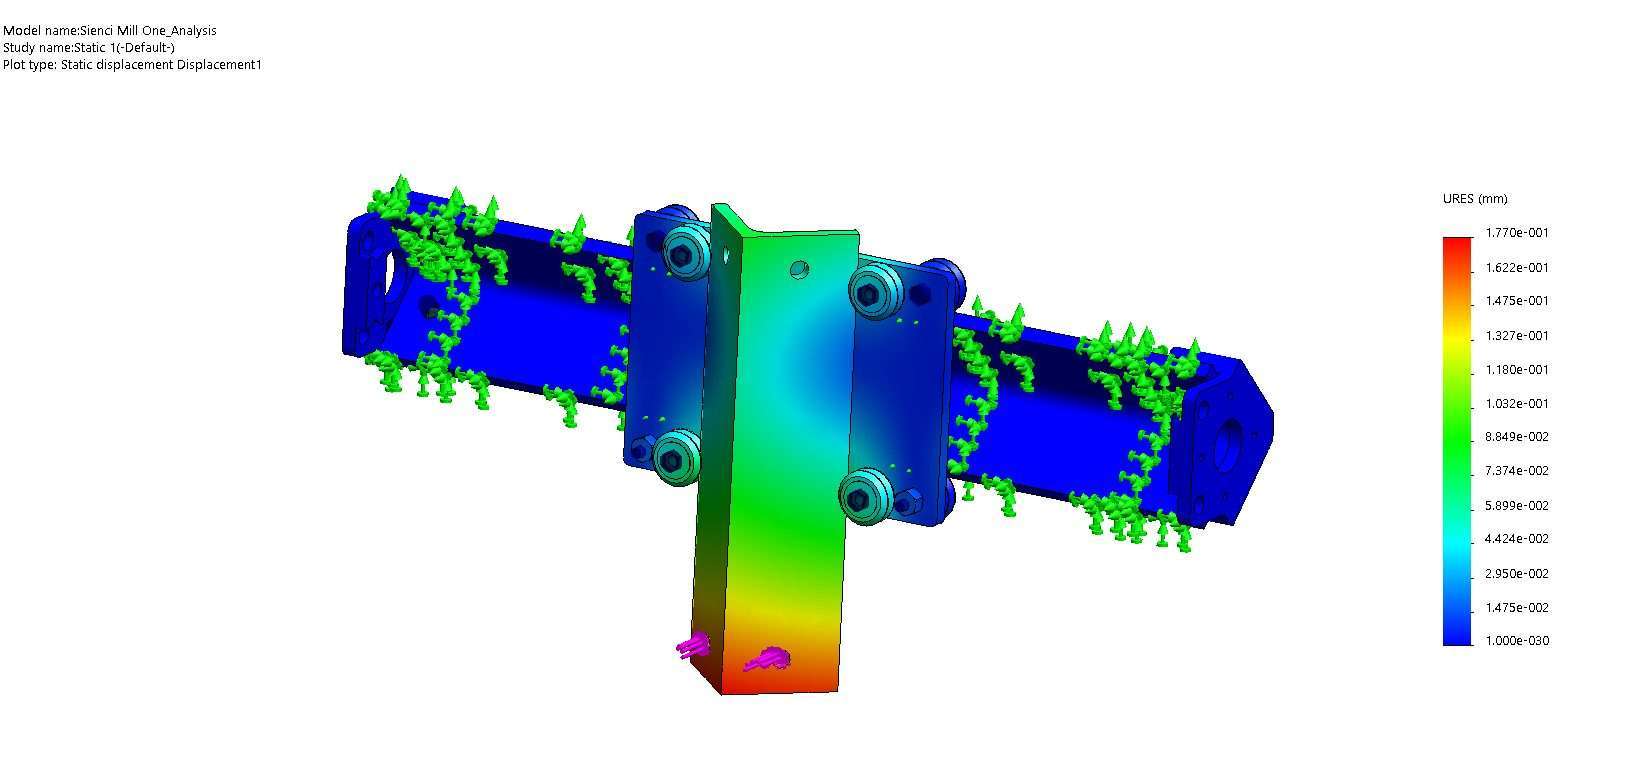
To test for the maximum deflection of the gantry, everything was held steady around the aluminum rails, and a force was applied to the end of the Z axis rail. The red areas have the largest amount of deflection, and we can get an idea of the amount of deflection by taking a look at the legend on the right.

Results

Each material was tested using FEA (finite element analysis) to give us a total max deflection (max deflection occurs at the red areas). Here are some examples:


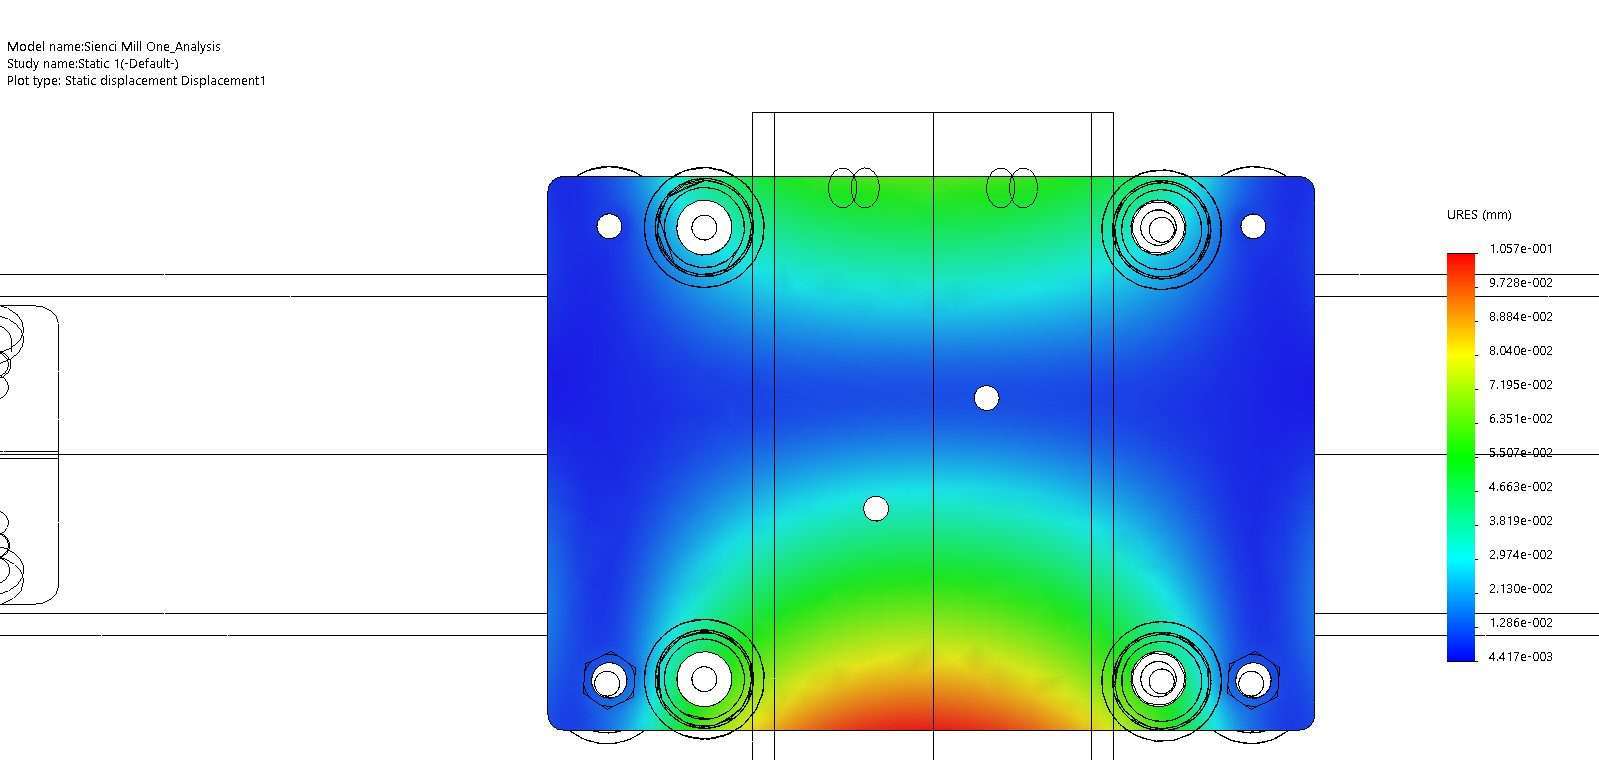
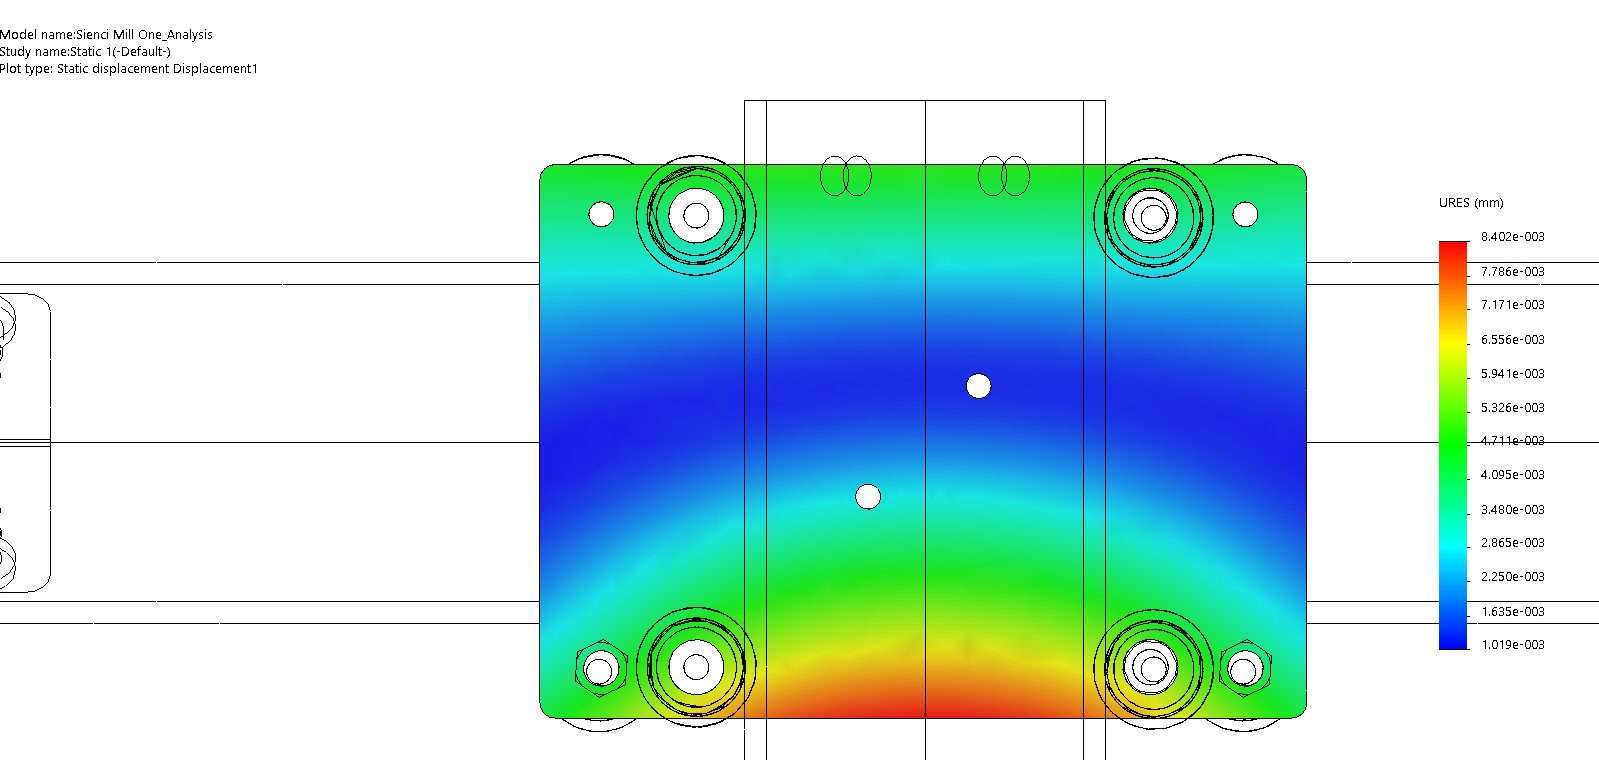
You can see that the maximum deflection occurs at the bottom of the gantry. If we were to make changes to the design, we know that stiffening up at that area would be the best place to start. Now that we have our results, we could choose the best material.

Using a decision matrix, we look at all relevant specifications and rank each one. We can see that after calculating out all the factors, 1/4″ steel is our best material choice for the gantry.

Conclusion

There are many factors that go into choosing the right material for different parts of a well engineered machine, but this article gives a basic look at how we help make these engineering choices. Every aspect of the Mill One goes through rigorous scrutiny to make it the best machine possible with the constraints we face.


Maker Festival 2017 coming up this weekend!

Maker Festival: Maker Extravaganza is happening again this weekend from July 8th to 9th! If you’re in the area and love making, this is an event you don’t want to miss! Last year was a blast, and this year is going to be a blast as well!

Maker Festival aims to bring together a community of makers, hobbyists, technologists, and craftspeople to celebrate technology, creativity, and DIY. The Maker Extravaganza is a huge gathering of folks to share and learn new ideas and technologies happening over the weekend, a part of dozens of other smaller events throughout the summer.

Last years Maker Festival was a unique and exciting experience for us. At that time, we had built our seventh or eighth prototype and were demoing the Mill One. Through Maker Festival, we met many of our beta testers and people who would eventually go on to support our Kickstarter. You can see in the photo below that the prototype Mill One looked a bit different than it does today.

Looking back, it is so amazing to see the progress Sienci Labs has made in the past year. This year at Maker Extravaganza, we will have the latest Mill One V2s (a final product!) and lots of cool samples again, but stay tuned in case we bring anything else special.

There were a few zany new materials we tried cutting for the first time. One was leather.

And the other one was banana!

If you plan on heading out to the Extravaganza, make sure to come by our booth and say hi. We will be on the second floor of the Toronto Reference Library.

For details about the event, visit: https://www.eventbrite.com/e/maker-extravaganza-2017-tickets-33446484335 

New reviews coming out for the Mill One

We just recently sent out two of our Mill Ones for review, one to Tom Salanderer in Germany, and one to Make Magazine for the 2017 Digital Fabrication Shootout!

Who is Tom? Well those folks who are active in the 3D printing community would know him as a Youtuber covering all sorts of things related to 3D printing. He does product reviews, interviews, filament test, and more. So why CNC milling? Well CNC milling has before now, been an expensive and difficult hobby. Now with the Mill One, desktop CNC milling can be as accessible as 3D printing is today. Partnering with Tom was an awesome opportunity as we are opening up a new channel for rapid prototyping tools that many 3D printer enthusiasts have been waiting for.

What is the Make Magazine Digital Fabrication Shootout? Every year, Make Magazine gathers some of the best digital fabrication tools like 3D printers, CNC machines, and laser cutters to see which products are the best. In the past, Make Magazine has reviewed desktop CNC machines from Carbide 3D, Inventables, and Shopbot, and we’re excited to be on the playing field with the big boys. The even more exciting part is that we’re up against machines that are anywhere from three to twelve times the price of one Mill One. So how will the Mill One stack up? I guess we’ll see when the shootout comes out in November!


New pricing on the Mill One

It’s been about six months since we first started shipping our first Mill One desktop CNC machines, and we’ve learned a lot since then. With this new knowledge, we have been able to lower our cost of manufacture while increasing the quality of our products and customer service. The Mill One offers phenomenal value for the power and precision it provides, but at Sienci Labs we are continuing to develop tools that make automated manufacturing accessible to makers.

With this in mind, we have decided to do something unprecedented and lower the price of the Mill One. Starting Monday June 26th, the Mill One kit will be offered at $399USD.

Thanks to our customer and community support, we’ve  been able to tackle many challenges and improve many aspects of our company and design. Here are just a few:

  • Establish reliable manufacturers that offer high quality work while keeping jobs in the local area
  • Larger manufacturing batches mean lower per part prices and transport/shipping costs
  • Establish reliable suppliers that offer high quality components and increase machine reliability
  • Bulk packaging material purchases mean lower packaging costs per machine
  • Redesigned packaging layout means items are better protected
  • More efficient packaging design means items are easier to package, thus lowering the labor cost in each kit
  • Higher shipping volume means lower shipping rates for our customers

We’re super excited to be entering this stage in our company and accomplishing our vision as an industry leader in the desktop manufacturing industry! Join us as we continue to move toward a future of providing more affordable and accessible rapid prototyping tools.

International shipping now available

For our friends outside of the US and Canada, we have finally arranged a shipping agreement to offer reduced prices to ship internationally, allowing us to open up sales around the world.

We now offer flat rates for all Mill One desktop CNC kits for DHL Express International (3-5 day shipping):

  • Europe (UK, France, Germany, Netherlands, and more) = $80
  • Asia (China, Hong Kong, Korea, Japan and more) = $110
  • Australia and New Zealand = $130
  • Rest of the world = $210

We have also updated shipping algorithms for smaller packages with Canada Post to work with international shipments.

If you run across any issues, or find a bug in the shipping calculator, please send us an email at hi@sienci.com to sort it out!


What is backlash?

With any screw driven mechanical positioning system, there is often some degree of slop or “backlash“, including the one used in the Mill One. To explain further, backlash occurs when there is a gap between the threads of the nut and the lead screw and the nut is allowed to move within the gap which is present. With most people, the level of precision that the Mill One provides is more than enough, but for those who want to push their machine further, or want to need their Mill One extremely high precision work, this is an important topic to discuss.

We tested the backlash on our ACME nuts by attaching a dial indicator to the Mill One’s gantry and running the gantry back and forth. We chose a point to call zero on the dial indicator, and moved the gantry past zero, moved it back, then moved back even more, and then moved it forward again. The gap between the zero and where the needle landed was our backlash. A better explanation can be found here: http://www.cncexpo.com/MeasuringBacklash.aspx

We tested this way for both a brand new stock ACME nut, as well as after running for many cycles. We ran the gantry back and forth for about 8 hours, with an additional load simulated by using bungee cords as to wear the nut as far as possible.

The results of this test, are as follows:

  • Brand new stock ACME nut: 0.001″ or less in backlash
  • Stock ACME nut after 2-3 hours: 0.002″to 0.003″ in backlash
  • Stock ACME nut after 6 hours: 0.003″ in backlash
  • Stock ACME nut past 8 hours: 0.003″ in backlash

Based on these results, we can see that the backlash of the ACME nut had gone from just under 0.001″ to around 0.003″. Just to put that into perspective, 0.003″ is approximately the thickness of a sheet of paper. For most projects, this is a great level of precision. But for something like PCB milling, where the width of each trace can be less than 0.006″, 0.003″ is a big number.

Over the last few months we have been testing anti-backlash nuts on the Mill One, which “preloads” two sides of the ACME nut to eliminate the gap which causes backlash. Using the same tests, the anti backlash nuts manage decrease backlash to less than 0.001″, greatly improving its accuracy. This resulted in parts coming out with much better dimensional accuracy, with tolerances of +/-0.002″ (0.05mm) or better being easily achievable.

Here’s an example of a test cut we milled from some brass:

Because of these good results and since the upgrade is simple to do and fairly inexpensive, we have created kits to allow users to install their own anti backlash nuts. You can order a kit here: https://sienci.com/product/anti-backlash-nut-kit/. We’re really happy to make this upgrade available to let users take their projects to the next level. We will continue to do tests with the anti backlash nuts with a variety of projects, so make sure to check out the blog to find out more!


Back from Hamilton Maker Faire 2017

I hope that everyone who came out to Hamilton Maker Faire this year had as much as a blast as we did. It was a toasty 30 degrees Celsius yesterday and Amy (who helped out for the day) and I got up around 8am to begin the 1 hour drive from Waterloo to Hamilton. Once we arrived, we set up our booth inside the Electric Pumphouse building, including our little shop of parts.

It’s really see how far we’ve come since the last time we were at Maker Faire Hamilton a year ago. At that time, we had built a few prototypes of what would become the Mill One, but were still quite a ways away from completing the testing and design of the V1 machines. Desktop CNC milling at that time was still quite an unknown technology. This year, however, we met a lot of folks who had been following our progress or had already purchased a Mill One from us.

We also had a chance to talk to many makers about their projects and their own personal roadblocks in manufacturing, whether it was time, money, skill, or something else, which gives us ideas on how we can help makers turn their ideas into reality. We also had many great discussions on what the future of making will look like and how our industry will change over the next few decades.

I’d like to thank Amy for coming out to help me, everyone who came out to Hamilton Maker Faire 2017, as well as all the amazing organizers and volunteers! Thank you so much! Until next year!

Milling a linoleum stamp

Milling materials like rubber and linoleum can be an interesting experience. Due to the elastic properties of these materials, some of the material will compress rather than being cut away by the bit or endmill the CNC is using. Getting the right feeds and speeds took a little bit of time and patience to get good results. For this particular project, we used a v-bit and F-engrave‘s v carving feature to create the negative image of the stamp.

The first step is to create a design. We used Inkscape to draw a black and white image. When we bring the image into F-engrave, the program will use the v-bit to carve all the profiles which are black and leave the white areas alone. Choose the v-bit you have and adjust the feeds and speeds for your project. A tutorial on using the v carve feature can be found here: http://www.scorchworks.com/Fengrave/F-engrave_tutorial.htm.

Next, we secure the linoleum with a bit of hot glue and let the Mill One do the rest of the work. After milling, a little bit of post processing, namely getting excess material out of the cuts, was needed. A small screwdriver or other tool works well in scraping out the material.

Here are the feeds/speeds:

Linoleum

Feedrate: 300mm/min
V engraving at 2mm max DOC
1/8″ 20 degree v bit
28 minute engraving time

Cedar Wood

Feedrate: 700mm/min
DOC: 5mm
1/4″ 2 flute upcut router bit
8 minute milling time

We carved a quick block of wood to make a holder for the linoleum. Having a block which holds the linoleum is good because you want to be able to provide even pressure across the whole stamp, as well as keep your hands away from the ink. We pushed the depth of cut to 5mm, and the Mill One carved it out quite quickly.

The rest of the stamp came together pretty easily. The linoleum fit perfectly into the holder and no glue or adhesive was needed.

In conclusion, it was a pretty easy process to create a custom stamp. Next time however, we may try a harder rubber material, since it would be easier to mill.


Hamilton Maker Faire 2017 coming this Sunday

Mark your calendars, because Hamilton Maker Faire is coming up this Sunday, June 11th in Hamilton Ontario. Hamilton Maker Faire will bring together hundreds of makers to share projects and ideas, and we’ll be there to show off the Mill One V2. Learn more at the event page on Facebook.

We were there last year with our early prototypes of the Mill One, and got awesome feedback and support. It’ll be a lot of fun to go back with our newest Mill One and show off how much progress we’ve made since then. We also look forward to meeting lots of new people and exploring different projects happening in the community.

A couple of highlights

  • Lots and lots of 3D printers
  • Amazing art projects and things for sale
  • A blacksmith showing off his forging skilss
  • A tour of the giant steam pumps

We look forward to seeing everyone there!


Milling aluminum at 0.1″ (2.54mm) depth of cut

It’s been awesome to see what users on the Sienci Mill One Group on Facebook have been up to, especially with the mods that they have been making to improve the performance of the Mill One, as well as pushing the machine to its furthest extents. One example of this is Eddie’s latest endeavour to cut aluminum at 0.1″ or 2.54mm depth of cut at 5 in/min (127mm/min) to 8in/min (203mm/min) with a 3/8″ (9.525mm) end mill.

While the feedrates are fairly slow, it’s cool to see the Mill One taking substantial chunks of aluminum out per pass. Based on some quick calculations on http://www.productivity.com/resources/calculators/, Eddie was able to achieve a material removal rate nearly 10x higher that with a 1/8″ bit at 0.1mm depth of cut at 1000mm/min.

You can see in this video where Eddie is making some chips and get a sense of what’s going on in the machine. Also, make sure to note some of the unique mods he’s made.

https://www.facebook.com/edmundo.pasaoa/videos/10155168338150985/

With the improved rigidity made to the Mill One V2 coming soon, we look forward to seeing how much further folks will be able to take the Mill One and test the limits of the design.

https://www.facebook.com/edmundo.pasaoa/videos/10155176685070985/