*Very important: If you are a customer looking to order a LongMill this month, please read this part carefully.
Due to low stock and high demand, our lead times for the LongMill are now extended to 4-6 weeks. New orders will not ship before Christmas. We are now limiting stock and customers may not be able to order once we go out of stock on our machines. A pre-order page for the LongMill MK2, the new version of the LongMill is scheduled to be available at the end of December, and orders for the LongMill MK2 will ship at the start of February. The new LongMill will have adjusted pricing that will be released at a later date, but are estimated to be around $1800CAD for the 30×30 version.
If you are interested in learning more about the differences between the MK2 and the original version of the LongMill, please read our development posts from our blog here: https://sienci.com/?s=longmill+MK2. More information will come soon.
Because of our shortage of parts, new orders (starting Dec 10, 2021) will start to use some of the parts that may have cosmetic defects on gantry plates and rails which do not affect the overall performance and use of the machine. We expect most customers to not even notice the cosmetic defects. All machines will come with the same high quality customer service and technical support, as well as the standard 90 day warranty.
Also, not all parts will have a cosmetic defect, as you may, for example, have a cosmetically perfect set of rails and one gantry that has a scratch. All parts are carefully inspected before being packed and shipped.
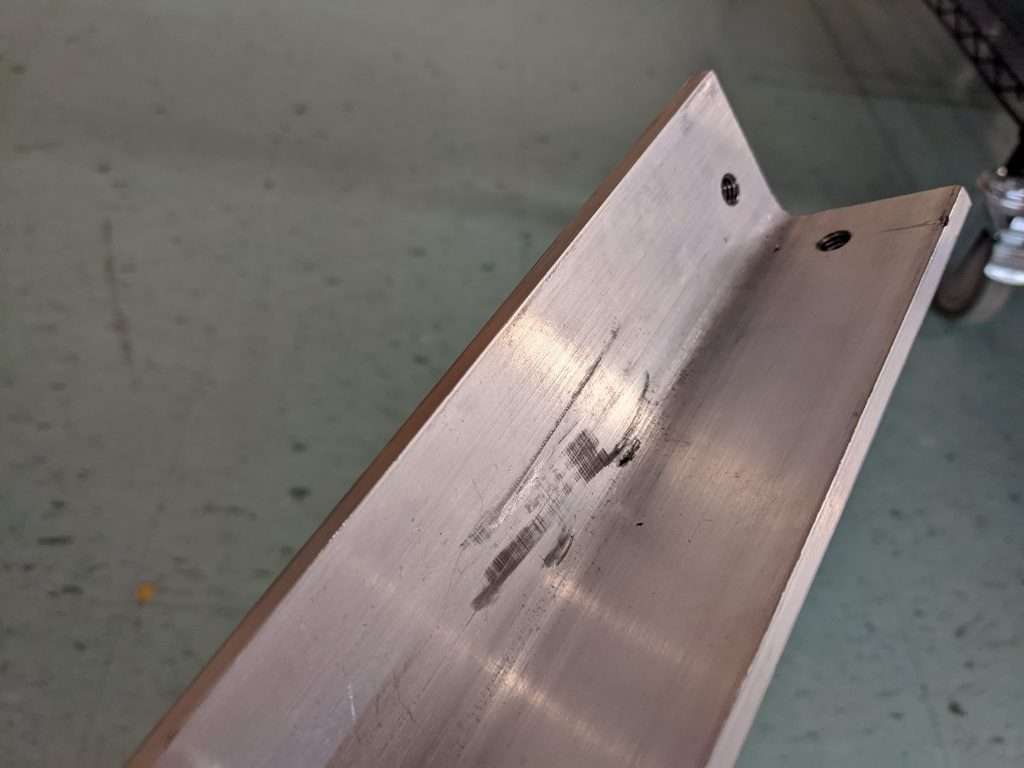
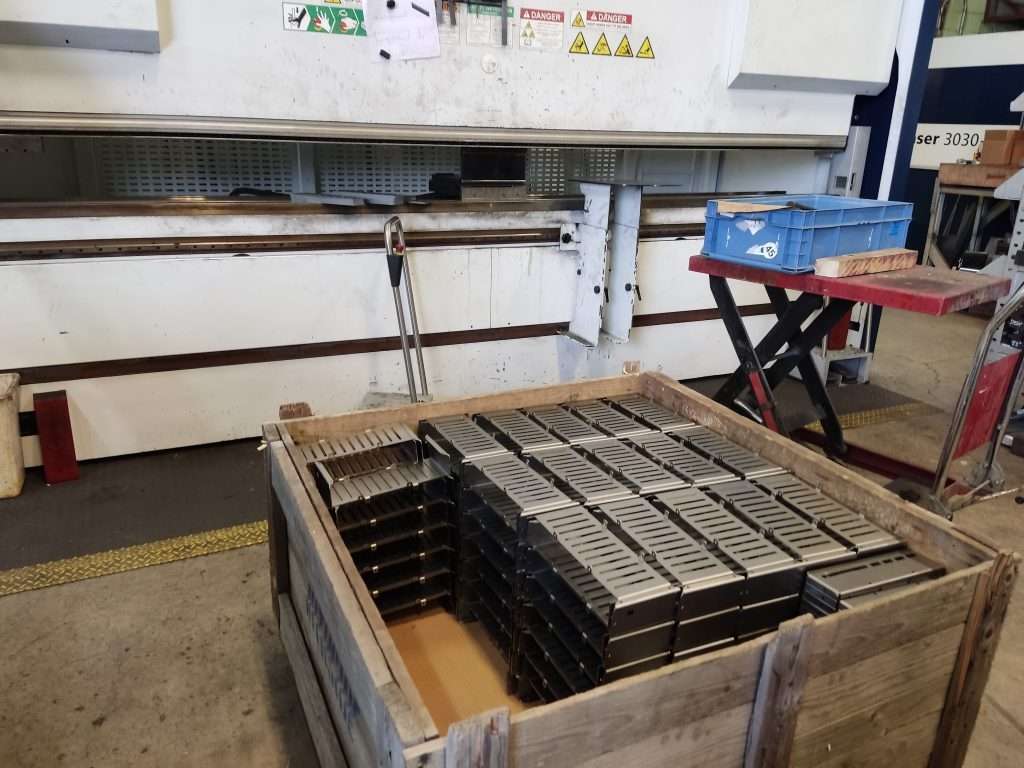
Some examples of scratches, dents, and other cosmetic dings
Every rail we ship out gets checked for:
Dimensional accuracy
Dings and dents that may impede with the travel of the v-wheels along the edge
Cosmetic damage
While the first two criteria are critical to making sure that the LongMill works, cosmetic damage along the sides and inside of the rail does not impact the performance and functionality of the machine. Rails that were rejected due to cosmetic damage but not from the first two criteria would be used in this version of the machine.
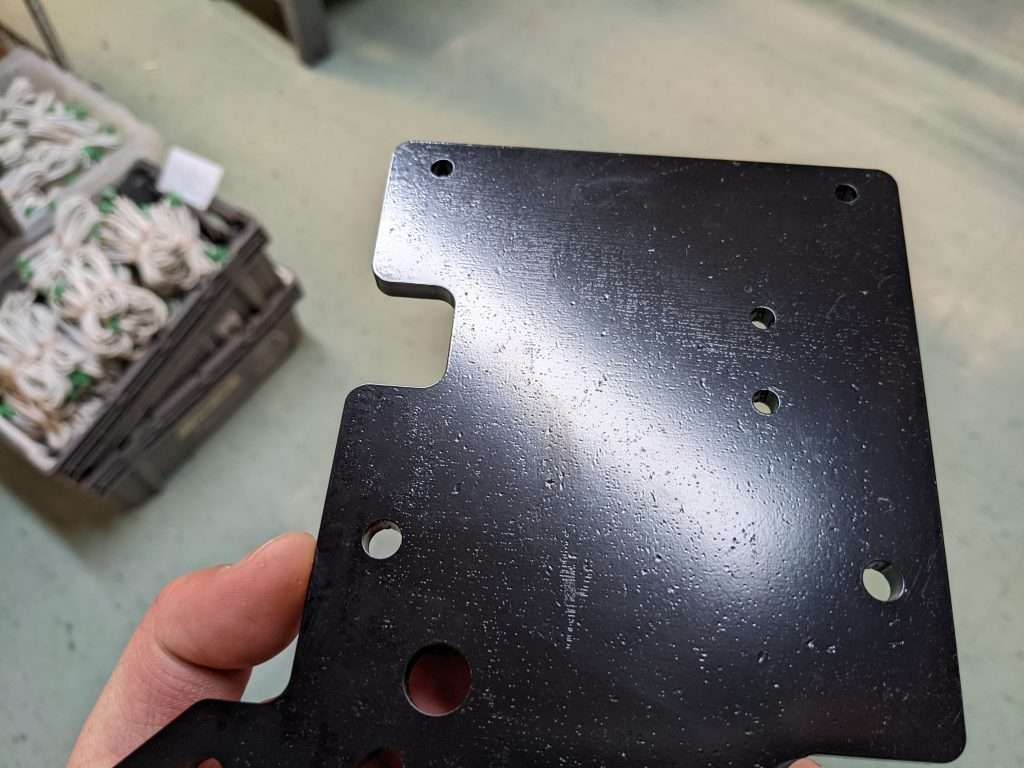
Every gantry plate gets checked for:
Paint defects, such as chipping and orange peel
Gouges and scratches
Uneven paint
Plates, such as the one shown above show orange peeling and would be rejected in production. This may be caused by contamination on the plate surface before coating, but overall does not affect the use and performance of the machine.
Why did we make this decision?
Our goal is to use the remaining stock of rails and gantries to bridge the gap between when we’ll be able to restock on parts again in January and February. Between each batch of production, we’ve kept our functional but cosmetically imperfect parts in storage. Using up these parts will help us use excess materials and clear out space for new inventory, as well as keep our lead times lower.
This is actually not the first time we’ve done this. On some rare occasions where we run out of a part and are waiting to restock, we’ve asked customers if we can provide them with imperfect parts, and all of our customers preferred to get their machine a week or two earlier, rather than wait till the new parts arrived.
Although we have considered remaking or repainting the rest of the parts, this would extend the lead time significantly, as new parts can take upwards of 8 weeks to produce. Instead, we figured we would let the customer know that some of their LongMill parts may be cosmetically imperfect, and let them make the decision at purchase.
LongMill MK2 Production
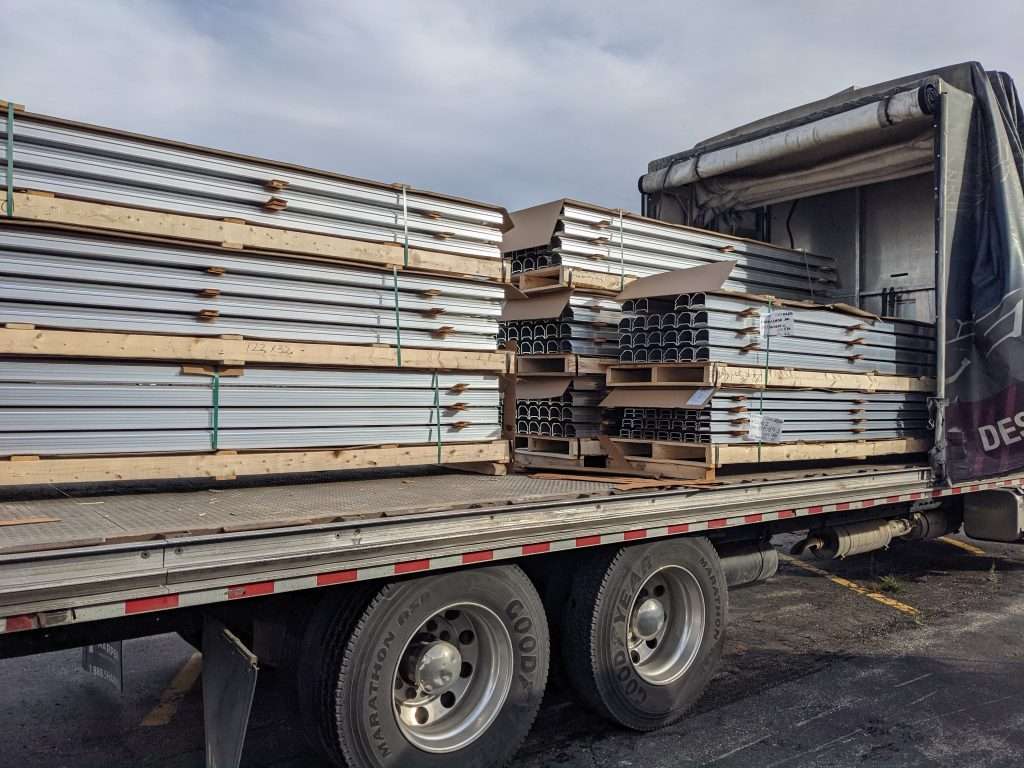
We’ve slowly started to gather parts for the production of the LongMill MK2. In our last update, we talked about the extended lead times for the MK2’s aluminum rails. It just happens that Almag was able to rush order the rails and have them dropped off a lot earlier than expected. Yay!
On top of this, we have also received full or partial shipments of:
Linear guides
Lead screws
Fasteners
Delrin nuts
Z motor mounts
Drag chains
There are still a lot of parts that are in transit and production, such as:
Control boards
Power supplies
Motors
Couplers
Packaging materials
We are crossing our fingers that these parts will arrive by the end of December or early January.
Holiday schedule and office closures
Please note that our offices will be closed from Dec 24th to Jan 3rd. We will be back in action and shipping again on Jan 4th.
If you have any orders that need to be shipped out before the holidays, please place your orders before Dec 23rd so that they can be shipped out before we close.
Hey everyone, we’ve been getting a lot of calls, emails, and messages asking if we’re planning on doing any Black Friday Sales. Unfortunately for this year, there will be no Black Friday discounts. Due to extremely high and growing demand for the LongMill, as well as overall shortages and challenges in the supply chain, we believe that offering any sales or discounts at this time will further overwhelm our production and packaging.
Thank you everyone for their continued patience and support!
For additional info about our company and production, please feel free to check out our Production Updates: https://sienci.com/2021/11/17/november-production-update-pt-2/
These past couple of weeks has been a bit stressful, as we continue to deal with delays in supply chain. I’m happy to announce that the new control boards that we’d been waiting on in the last update have finally arrived and we have started shipping machines again. We expect to get through the backlog over the next couple of weeks.
We also now have touch plates back in stock as well.
The end of Batch 5 is coming
We are quickly reaching the end of Batch 5, and expect to be out of stock on Batch 5 machines in around 3 to 4 weeks. Customers should expect lead times for machines to get much longer as we work on parts for Batch 6 to finish.
If you aren’t familiar, we build machines in batches. In this case, Batch 5 is 1000 machines.
In the meantime, there are a few things we can continue to do, such as extending Batch 5 by balancing the inventory and using all of the leftover parts and hardware to keep making kits beyond 1000 machines. This could also mean pulling inventory coming in for Batch 6 to use for Batch 5, as we wait for all of the Batch 6 parts to arrive.
Once we get closer to the end of Batch 5, customers should expect lead times to go up, possibly to 4-6 weeks.
Current supply chain and production issues
One of the major hurdles we’re currently dealing with is the long lead times with aluminum extrusions. With our current manufacturer, we’ve jumped from a 2 week lead time to 13 week lead time between September and November, meaning that our order for rails placed this month is expected to complete sometime between January and February. I’ve “rush ordered” these parts so that we try to have them in stock by the start of January, but this all comes down to scheduling at the press. I’ve also reached out to other presses in the area, but most have even longer lead times.
To account for the unstable lead times, we’ve been working on installing our own cutting and tapping set up to cut and tap our own rails. This should allow us to have more control over the lead times, as we don’t have to worry about the extra machining time that the manufacturers need to have added on top of the total production time.
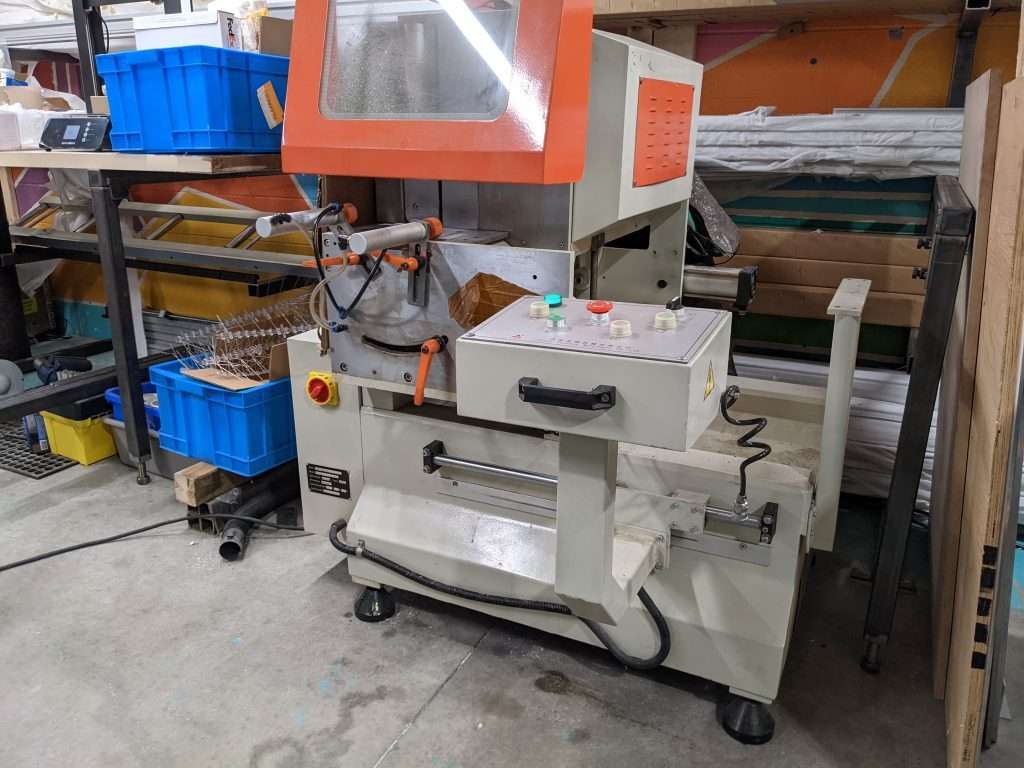
Our new saw
In other news, we are likely going to see gaps in shipping based on shipping delays. For example, although we have allocated the v-wheels for the machines in Batch 5 for pending orders, the batch that we are waiting for to be able to complete the batch have been delayed in transit for about 2 weeks. Although I expect to see the wheels before we finish shipping the pending orders, any additional delays may cause a gap in shipping again as well for new customers.
Lastly, lead times for cardboard packaging have gone from a few weeks to around 10 weeks now, which means that we’ve started working early on manufacturing the packaging for Batch 6 machines.
All in all, although we are doing our best to keep production going, customers should expect longer lead times on LongMills.
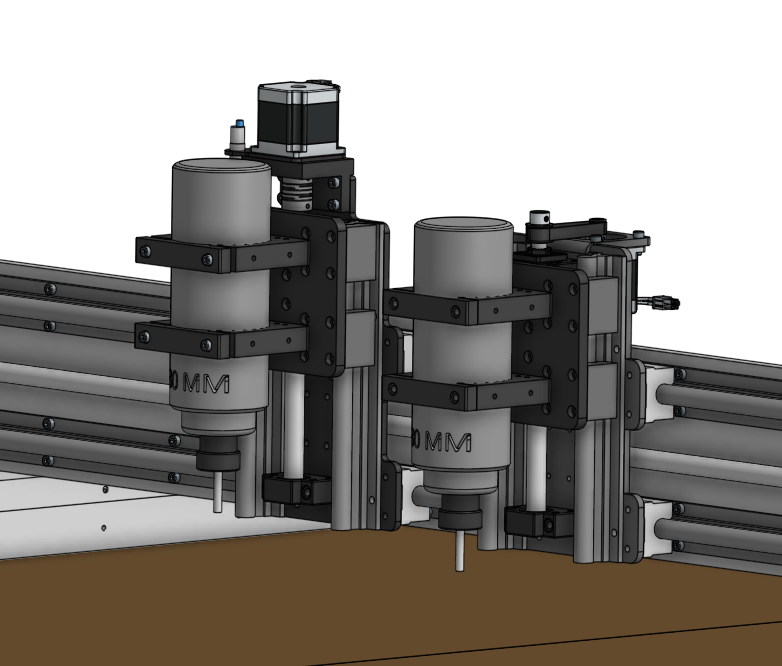
Hey everyone. Thanks for following along in the development of our new generation of CNC machines.
One of our first prototype machines in a 30×30 form factor
As we discussed in our previous blog posts, we’ve been working on making our own custom extrusions for a new generation of LongMills. Just to recap, here are some of the improvements that the new extrusions should bring:
Improved weight to rigidity, as well as improved rigidity overall
Lower number of parts and overall ease of assembly
Ability to extend the working area beyond 30×30 inches
We’re excited to share that we’ve put together our first machine with the new parts and gantries to make a fully working prototype. We’re really happy with the way it’s come together as well as the overall fit and finish of the machine. Now that we’re at this stage, we have a couple more steps towards launching the product.
Beta testing the MK2 30×30
Now that we have parts ready for the 30×30 version of the LongMill MK2, we are looking for beta testers to test the machine between November 2021 and Jan 2022. We are looking to get beta testers set up with machines as soon as possible. If you want to sign up as a beta tester (only for the 30×30 model, you can fill out the form here:
Beta testing involves the process of testing and using a product in a real-world environment before mass production or general release. In our case, the LongMill MK2 platform is a new product that has been active in development. While we are confident in the performance of the new machines, we feel that it is important to get it into the hands of real users to obtain feedback and information about how well the machine performs, how it works, and potential issues that may happen in manufacturing and production of the final product. We also want to identify users and use cases for the product to help us target our machines to the right people based on what you do during the beta testing period.
As a beta tester, your responsibilities are:
Put your beta machine through the paces
Report back to us with feedback on a regular basis
Let us observe and test your machine
Share your learnings and testing with the community
As the company providing the beta machine, our responsibilities are:
Provide you with one-on-one technical support for your machine
Help you set up your machine (either in person or virtually)
Provide you with updated parts to ensure your machine aligns closely with the final production version
There are several differences that you may see between the beta testing machines and production machines.
Some parts will be uncoated, such as the gantry plates and aluminum parts
Machines will either be partially assembled or come in non-production ready packaging
Some parts may be off the shelf components not from our regular manufacturers
Once beta testing is complete and we begin production for completed units, we will provide you with updated parts to bring you to spec with production machines.
Pricing
We charge for our beta testing machines. We believe that is the best way in vetting between folks that are purely looking for a discounted or free machine and folks who truly need or want a machine. It is our top priority to work with beta testers that will find true value from owning a CNC machine and using it long-term. We ask beta testers to ask themselves “if this was a product I could buy now, would it bring enough value to me to warrant the amount I would pay?”.
If you’d like to hear some interviews from our former beta testers, please check out our channel here:
The LongMill MK2 30×30 serves as the successor to the original LongMill that we started shipping in late 2019. This version of the machine offers simpler, but more rigid construction, and is a great entry into the world of hobby CNCing.
Pricing:
The pricing for the beta LongMill MK2 30×30 will be $1500CAD, plus applicable taxes.
The production price will be $1800CAD at the time of release.
What you get:
A full, LongMill MK2 machine with a working area of 30×30 inches
Our one-on-one technical support and set up assistance
Parts to upgrade your machine to production level spec at release
Talking about the now (and the later)…
I’d like to talk about customer perception and management of the release of a new product. The elephant in the (my) room, is the fact that while the LongMill in its current state is awesome, the new one is going to be even more awesome. If you are an older customer, I’m hoping that you’ve been enjoying using your machine and feel that you’ve gotten the value out of your machine. For new customers, I suspect that some folks are either possibly feeling that 1) maybe they should have waited to get the new version 2) worried about losing support on the current version.
To address the first concern, the reality is that as time goes on, our machines are going to get better. Even between the first generation of machines, we’ve made a lot of changes to make the machines better. The machines that we ship today have many changes and improvements, and we pride ourselves to build the best machines at reasonable prices. The point is, if you use this logic forever, you’ll also be waiting forever to get a machine. The real question should be, is this the best time for me to get a CNC machine?
We also have to talk about the change in price. The original LongMill 30×30’s base price is $1500CAD. The new one will be $1800CAD. We are increasing the price of the machine for a couple of reasons.
First of all, we need to address increasing costs, inflation, and instability in prices over the last two years. We have not increased the price of the LongMill since 2019. We also have not increased the price on most of our parts, consumables, and other items we sell. Because of our growth, we’ve been able to keep prices for our customers the same while being able to negotiate lower prices with our suppliers due to our economies of scale, we no longer see better cost breakdowns at our scale to significantly make up for lost margin of prices going up. We also continue to increase the pay and benefits of our staff. We believe in providing an excellent workplace environment and reasonable pay, but we also need to account for these costs as well. The $300 difference addresses the increased costs of the materials that go into production and ensure that we have the profits to pay our employees well.
Second, the price difference accounts for the performance difference between the two machines. The MK2 is a more rigid machine, and it costs more to make. At this point, we offer a bit of a choice between the two machines with their respective price points.
And lastly, when customers choose to purchase from us, Sienci Labs, they are also investing in our company and the development of new technologies and products. For example, a bit portion of our profits go towards building and supporting gSender, which now is open for use for free for all hobby CNC users. We also have a bunch of other cool stuff coming down the pipeline that the money goes towards to as well. We want to make sure our pricing is in line where these developments are sustainable in the long term and we can provide our team with the funding needed.
To address the second concern, we’ve made a lot of the two machines inter-compatible and backwards compatible. I go into a lot more detail in the last blog post: https://sienci.com/2021/10/15/altmill-and-longmill-survey-results-and-development-progress/, as I cover more pros and cons of this change. Wear components, such as v-wheels, ACME nuts are the same across both machines, and both machines also share the same electronics, power supplies, bearings, linear guides, motors, locking nuts, couplers, and more. We will have parts and services available for both generations of machines, as well as a stockpile of parts on hand. We can also make 3D printed components as needed, so we don’t expect any issues there either. Since the underlying software and electronics remain the same as well, all of our software will continue to be developed with both machines in mind.
To also note, for some people who might be wondering, making a dedicated kit to swap out rails and gantries to change a current LongMill to a MK2 is not our priority. We don’t think the extra cost doesn’t justify the real-life increase in performance, we don’t want to create a lot of extra waste, and if a machine is already assembled, most of the benefits that come with the faster/easier assembly is never realized (since you have to take apart and reassemble a machine). We will still offer individual parts on our store for customers (as we already do), so folks can make up their own mind. I’d also like to note that there WILL be a kit to use the original LongMill and add a longer X-axis (48×30 in the working area).
So in conclusion, if the LongMill at its current design and price point works for you, and you’re thinking of ordering a machine, this is a great time to do so. If you want a bit more rigidity and have a larger budget, the MK2 may be the better option. But regardless, you’ll still be getting a fantastic machine, and I would recommend making your decision based on your personal timing of when you want to get into CNCing.
Availability
The LongMill MK2 30×30 is expected to launch in mid to late January 2022. Pricing for the 30×30 model will be $1800CAD.
Please stay tuned for when orders will open up, and pricing for other size models.
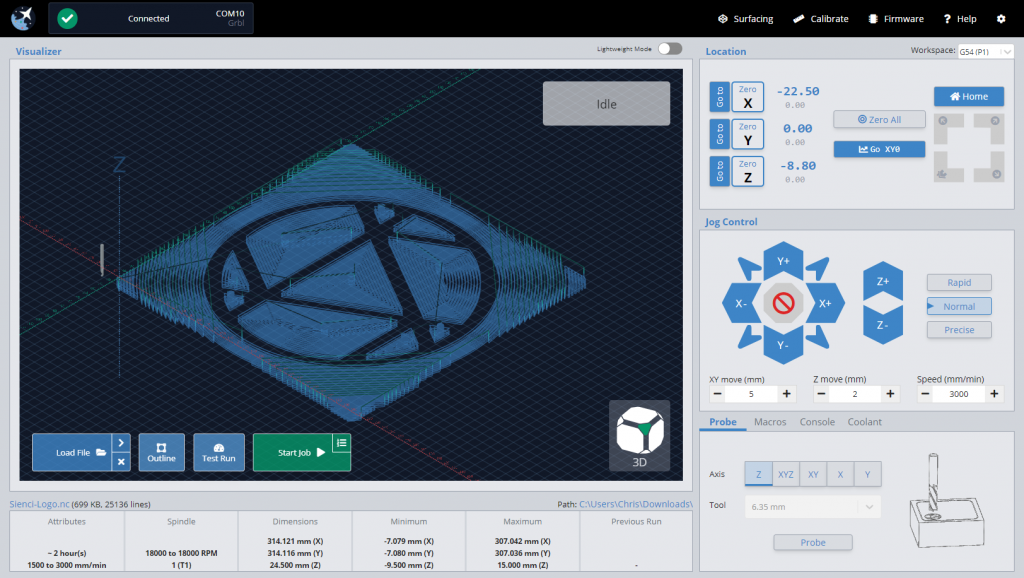
It’s not often I post here, most often it’s Andy or Kelly keeping y’all up to date on the status of things happening here at Sienci Labs Headquarters; I’m much more behind-the-scenes. Today I’ve come out of the woodwork for a very exciting and momentous announcement for us, the release of gSender 1.0.
Since much of gSenders development hasn’t made much of an appearance on the company blog, let me bring you up to speed on where this project started and what the release to 1.0 now means:
Origin
Back in 2016 when Andy and I first started Sienci Labs around our Mill One CNC, the range of free and paid g-code senders specific to operating hobby CNCs was surprising wide. Options like UGS and Candle were quite widely used and more were in active development at the time such as UGSPlatform, CNCjs, bCNC, and more. We were able to make a wide range of recommendations to our CNC users as well as made documentation around specifically UGS at the time since we felt it was the most intuitive to use.
Jumping to 2020 we’ve now got more machines in the wild then ever before. If you’re familiar with working at scale, you know that a 5% failure rate, for example, is very manageable when you’re working in the hundreds but starts to be more of a headache in the thousands. This is what we were starting to encounter with the g-code senders available at the time. And I’ll clarify, when I say “failure rate” this isn’t me saying that the software didn’t work. There were outlying bugs, quirks, and stable versions that were more stable than others; but what also stuck out was that many of the available options were made for more technically savvy people.
What were our options?
With more and more calls coming in, we could tell our users were getting confused with existing sender options. We heard questions about basic functions, confusion about behaviour, and one of the hardest things for us to hear was that our users were blaming the functionality and abilities of our CNCs in cases where we knew it was coming down to the sender. I remember personally dealing with situations of broken bits because of probing operations, or even a time I remember vividly where I helped someone out for a whole hour over the phone because he thought his file was visualizing correctly and we found that he’d just accidentally closed the visualization window within the sender.
I want to make it clear that I have the utmost respect and thanks for all those who took the time to make their own g-code senders for hobby use. These contributors to the hobby CNC community as a whole have taken the time to take what would otherwise be a personal project and have released it for the world to use. Not only that, but they continue to support updates, bug fixes, new features, and much more – all on their own time and out of the passion that they themselves have for CNC. But ultimately, the origin of these projects is what made me realize around that time that the goals of these open-source projects were never going to meet the goals that Andy and I have always had for the company: to make CNC routing fully accessible to the public. As long as open-source developers were at the helm, customization and a diverse range of features would take priority over UI design, streamlined use, and catering towards beginners by using more understandable language.
This left us with two options. Either we help fund an existing project or put more man-power toward it and get it moving in the direction we felt would be best for the next generation of g-code sender, or we begin making our own. I sent some emails around, and spoke with some other developers I knew and the consensus was that we’d go with the latter. Seeing as these projects were the ‘babies’ of each respective group of open-source developers, we felt it wouldn’t be our place to ask for more from people who wanted to do development on their own schedule, or try to push our vision onto others. Thus gSender was begun.
Goals and Principals of gSender
Starting ideation in October 2020, we began testing existing senders and outlined our core goals and design principals that we felt would guide development:
Goals
Act as new default machine interface / sender for LongMill customers (this means including all the functions and features that users are already used to from there existing sending options)
Supercharge our customers’ experience with their LongMill by streamlining / simplifying machine interaction and making even more machine operations easily available (a.k.a. nice-to-haves)
Keep design open for use by other hobby CNCers to provide benefit outside of just our own community (this means leaving some wiggle room for broader customization and adaptability to other CNC machines on the market as well as even further advanced features)
Principals
If it’s set once it doesn’t need to be visible 100% of the time
Options most users don’t need should not be obvious or take up much screen real estate
Most actions should be 1 click
“Someone off the street should be able to figure out how to get started”
Order of widgets should be close to order of operations/steps to proceed
Machine state should be obvious at a glance
Use colour patterns to subconsciously communicate button functions
Substitute CNC jargon with simple language when possible
We knew the other primary holes we wanted to fill roughly included:
Easy interface for beginners yet advanced features available for more experienced hobbyists
Smart handling of error cases, probing, jogging, firmware editing, machine connection, etc.
Built-in tools for convenient CNC management: stock/wasteboard flattening, motor calibration, machine squaring, etc.
Extensive keymapping and built-in joystick compatibility
Support of tool changing, start/stop g-code, macros, coding variables
The idea was to branch off of the well-known and provably reliable open-source codebase so we could be confident that we were starting with a good foundation to build off of. We also wanted the software to be made available easily for all systems so that future implementations could support standalone machines. After a wide range of tests performed over many weeks, CNCjs’ codebase was chosen for the previous reasons and because testing showed reliable operation on a variety of computer systems.
Present Day Release
I’m very excited to announce that gSender 1.0 is now available for free to anyone who wants it!
After nearly a year in development, the first couple months being in Alpha and the remaining ones being in BETA, we’ve now become confident enough to declare our first reliable version. We’re really excited to see more people begin to use it as we’ve now got a whole swath of great features and about 2000 users using it to run jobs every day.
Some things that you can expect from gSender in its current state:
Reliability of operation
Accommodates a wide range of computing systems via its ‘Lightweight mode’
Easy to understand and use due to its interface layout
Takes care of a lot of complexities behind the scenes, making mistakes and errors less likely and easier to deal with when they do happen
Built-in tools for surfacing, machine calibration, firmware editing
Ability to ‘start from line’, tool change, run custom macros, quick-travel with limit switches, and much more
If you’d like to learn more, we’ve got a primary download page, a documentation area, our full Github page, a discussion forum, and even though we’ve reached 1.0 we’ll still be releasing new dev builds for the foreseeable future as we continue development on gSender:
The team and I are very excited that we’ve reached this point. We set out to make our very own open-source and FREE g-code sender after gaining inspiration from some of the other commonly available options and we feel we’ve made a strong start towards those goals. To get here we owe a huge amount of thanks to our original 10 Alpha testers (you know who you are 😉 ), all those who participated in BETA testing and sending us suggestions and feedback, and importantly our greatest thanks to Will Winder and Cheton Wu for driving the UGS and CNCjs projects that not only were there for our initial users but also acted as a indispensable step towards us embarking on this project ourselves.
We want gSender to be the next-level open-source sender that’s available for all green CNCers to turn to whether they own a LongMill or otherwise: guided and easy to approach as a beginner yet customizable and feature-rich for higher-tier hobby CNCers. This means that it not only works for our Mill One and LongMill CNCs, but has already been proven to work on other machines like X-Carve, Shapeoko, Bob’s CNC, 3018, PROVer, and many more!
If you’re interested, the full list of features up to this point is as follows 😀 :
3-axis digital readout (DRO) with manual value entry
All-directional jogging with XY diagonals, jog presets, and incremental/continuous single-button handling
Zero-setting and gotos (independent and combined)
Probing in any direction plus safe continuity detection ensures no broken cutting tools
Full imperial/metric compatibility
Responsive screen design and workspace customizations including visualizer light and dark theme
3D toolpath visualization (no machine connection required)
File insight on load (feed range, spindle range, tools used, estimated cutting time, and overall, max, and min dimensions)
Feed override and active job status indicators
Fully exposed keyboard shortcuts for external keyboard/keypad control
Joystick support built-in for a variety of controllers
Safe height movements – accommodates machines with or without endstops
Homing cycle and quick-movement locations available for machines with homing hardware
Full spindle/laser support via manual control widgets, active alerting, and live overrides
Full mist/flood coolant support via manual control widgets and active alerting
Macros buttons (rearrangeable) with enhanced macro variables and individually assignable keyboard shortcuts
Lightweight mode reduces processing intensity on less powerful hardware or when running larger files
Easy workspace swapping for more advanced jigging or alignment work
Optional automatic handling for common error throwing g-code
Firmware tool for easier GRBL EEPROM changes, loading defaults, and GRBL flashing
Surfacing tool auto-generates surfacing g-code based on machine cutting area and other preferences, ready to execute
Calibration tool for axis alignment – a step by step process to make sure your CNC is square
Movement tuning tool for calibrating motor axis movements
Tool change functionality – pause, ignore, or run code blocks on M6 commands
Start-from-line functionality to resume jobs part-way through in case of failure of abort
Outline functionality indicates the rough bounds of the job before cutting
Customizable g-code injection at job start & end
Tooltips for data entry points
Alarm warning explanations to better contextualize CNC errors
Sleep management to keep PC awake during g-code sending
Pre-built machine profiles, including: LongMill
Shapeoko
X-carve
OpenBuilds CNCs
3018 CNC & PROVer
BobsCNC CNCs
CNC4Newbie CNCs
Mill Right CNCs
Ooznest WorkBee
Nomad
Carvey
Mill One, and more…
What’s the plan moving forward?
Even though we’ll be taking a quick breather after release of 1.0, we’ll still be working toward even more features into the coming future. Some of these will include:
Headless Pi operation
Surface probing and other ‘fancier’ probing types
Built-in g-code editing
3D cutting visualization
We left these off to the side ‘till now since we know that many of them would be more appealing to the more advanced users, but we’re confident that with everything currently built-in it’ll satisfy the vast majority of y’all.
Whatever comes next, we’ll be developing in two distinct branches. One that is for stable releases only, and another that you can optionally follow if you’re okay with a little less reliability but are wanting to be a part of shaping the new features that come to gSender.
Closing
It’s been great to spill this story out to y’all, there’s been a lot going on behind the scenes here at Sienci Labs this past year and I’m excited for you all to not only get more out of your machines via gSender but also via some more upcoming projects that we’ll be announcing in the coming months. Cheers everyone!
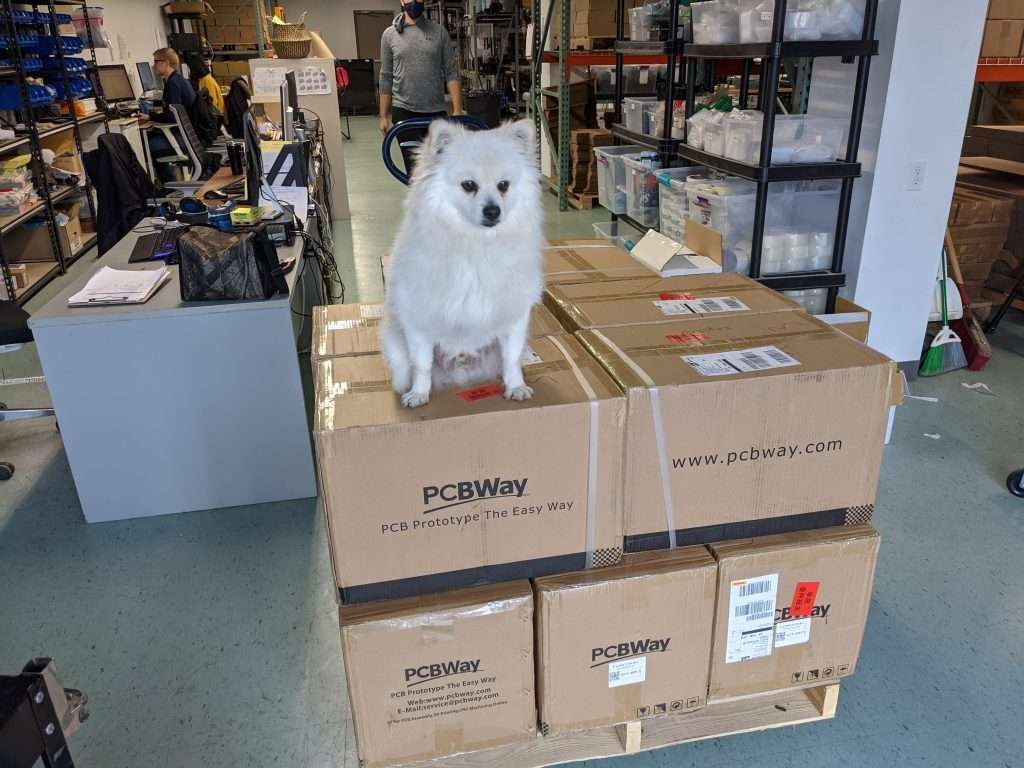
Production continues to move along. In the previous update, we talked about a couple of parts that we were waiting to restock, such as the control boards, rails, bearings, etc. At the current time, we are just waiting on PCB boards to arrive to continue shipping. PCB boards are expected to arrive on Nov 5, 2021. At the current time, we are waiting on PCB boards to arrive, and will be ready to ship when they are here. The new boards have arrived Nov 16, 2021, and we have started shipping orders out again. For more info about the status of your order, please check our forum: https://forum.sienci.com/t/list-of-shipped-machines-f-w-2021/4133.
We’ve continued to ship machines and other parts out with current stock on hand, but at the current moment, we are advising customers that LongMill orders will have a 2-3 week lead time to account for the arrival of control boards next week.
Expected lead times
Our current bottleneck is with our PCB boards. Although production is complete, we are waiting on the boards themselves to arrive. Based on tracking data, we expect them to arrive on Nov 5. If you are planning to order a LongMill, please check the estimated shipping date on the LongMill order page for the most accurate information.
Once the boards arrive, we expect to be back on our typical lead times of around 1 week until we run out of stock of Batch 5. At the current rate of sales, we expect that Batch 5 will be complete at the end of December. Lead times in Batch 6 are expected to depend on the timely arrival of new parts and components.
Batch 6 production and lead times
With the current issues with supply chain and logistics impacting the global market, we’ve continued to work hard to acquire the parts and materials to continue building machines. Although most of the parts that will be going into Batch 6 have been ordered, there still are a couple of parts that we need to order for the new batch of machines. This includes:
Drivers
Control boards
Power supplies
Arduinos
Rails
If you haven’t noticed, the first four products rely heavily on ICs, which have been impacted by the chip shortage. This has meant we have had to work with our suppliers to tackle long lead times and large increases in chip costs. This has either meant working around the long lead times, such as by shipping part of the batch by air and others by ocean freight (for our overseas suppliers), or finding new suppliers that are able to meet our manufacturing timing and requirements.
We’ve also seen big jumps in expected shipping times for both ocean shipments and express shipments. We often rely on ocean freight for shipping materials between China and Canada. With shipping times and prices increasing, we’ve had to order parts earlier than usual so that they would arrive on time. While before COVID, shipping times generally averaged between 4-6 weeks, we are now planning for shipping to take up to 12 weeks. Shipping prices have also doubled in many cases.
When we order parts from new suppliers, we also obtain samples for internal testing and QA checks. We’ve also experienced a large jump in shipping times for air express shipments, which has slowed down the ordering process. While express shipments would generally arrive in a week or so, we’ve seen packages stuck in customs or waiting for the next airplane for 3 or more weeks. This has made vetting suppliers difficult as well, as it could take over a month for us to check the quality of each new part. The most example of this would be our inductive sensors, which were heavily delayed in shipping, causing us to ship a few weeks later than we wanted.
Given the supply chain constraints, we, unfortunately, have not been able to make the changes and updates to our electronics as we’d like. Earlier last year, we had begun the development of a new control board and driver system. However, with the chip shortage, we do not expect we’ll be able to obtain the chips to make the new system until next year.
So what does this mean for Batch 6? Well, it means that customers should expect lead times to vary somewhat at the start of the batch. Without all the parts ordered and confirmed for Batch 6, we run the risk that we won’t have everything ready for shipping in January. That being said, with the measures we’re taking to order and ship things as quickly as possible, we don’t expect there to be major changes or delays in production as long as we continue to be diligent in our work.
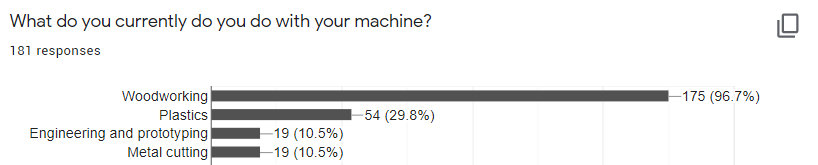
Hi everyone. Thank you to everyone who took the time to fill out our survey. We received an overwhelming amount of responses which has helped us get a better understanding of what our users are looking for in a new machine. Here’s a bit of a breakdown and a report of what we learned from your responses.
General learnings
As expected, almost all of our respondents shared that they used their CNC machines for woodworking. Also as expected, almost all respondents expressed interest in increasing the working area of their machine.
I was very happy to see that most respondents use their machine actively, with the approximate per week usage for most users being 15-30 hours per week. About a third of our respondents who use a LongMill reported that they use their machine 20 or more hours per week, which suggests that many of our users use their machines in small-scale production.
As we get into larger machines, power becomes more of a concern. We initially were worried that people would not have access to 220V/240V power in their shops (at least in North America), but it appears around half of the respondents who chose to answer this question have access to 220V outlets. This indicates that we should consider supporting both 110V and 220V spindles in future machine designs.
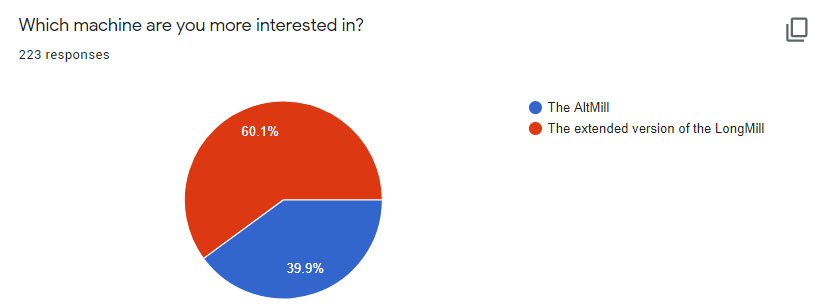
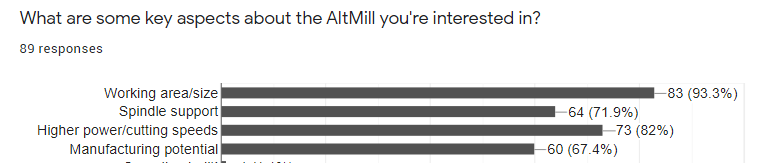
Interest between the AltMill and the Extended LongMill
We see about a 60/40 split in overall interest between the two machines. For LongMill users who are interested in upgrading from a LongMill to an AltMill shared these common sentiments:
Want to have a more rigid machine, generally to be able to use spindles and cut faster
Want to have integrated limit switches or homing switches
Want to be able to handle larger projects and half sheet
Want more speed
Have some complaints about parts such as the v-wheels and delrin nuts
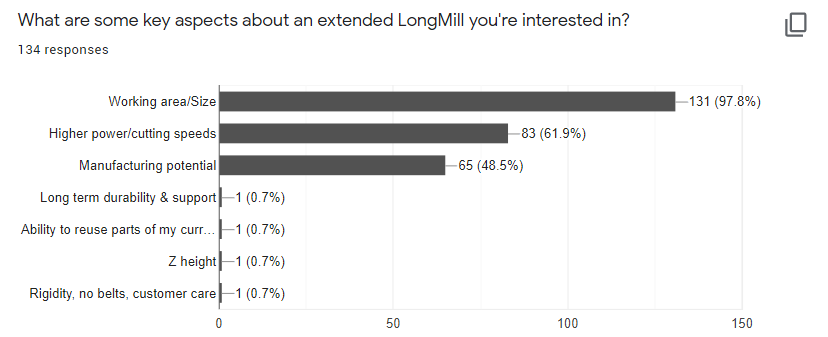
For LongMill users that are interested in extending the size of their machine shared these sentiments:
Heavily value the community support and affordablilty of the LongMill in its current state
Would like general improvements to rigidity and design of the machine
Want a way to tram
Improvements to the v-wheel and eccentric nut system
Many people indicated an interest in a spindle option for both the LongMill and AltMill. The AltMill will be designed and compatible with spindles. While we don’t currently recommend using a spindle with the current design of the LongMill’s Z-axis because of weight and size, one option we are exploring is to build the XZ axis assembly for the AltMill to be compatible with the LongMill. This should let us be able to share development efforts for the assembly across both machines. Allowing additional cross-compatibility between motors and electronics between LongMill and AltMill should also make it possible to upgrade more aspects of the LongMill as well.
Development progress (LongMill)
We’re excited to share that we’ve gotten our first batch of custom aluminum extrusions in for the new iteration of the LongMill. These rails were made for our prototyping and beta testing before starting a larger production batch.
We are planning on using custom extrusions for the next generation of LongMills. We’ll refer to them as LongMill MK2s (at least for now). The goal with this generation is to provide the same straightforward, rigid, and affordable machine at the current sizes that we offer, but allow us to provide extended versions of the machine.
I think it’s important to talk a bit about custom extrusions, as it is a big departure from our original angle aluminum design.
When we first started Sienci Labs, we found that using angle aluminum turned on its side provided a sturdy, simple, and affordable way to create a linear motion system. Given that aluminum angle extrusion was readily available off the shelf, we were able to create both small and large batches of rails quickly and easily, without worrying about custom tooling and MOQs. I would attribute this factor as an important reason for getting us to this stage in our company, as we were able to continue to scale our production as we continued to build more CNC machines.
Creating custom aluminum extrusion was always on our mind, but until recently, it was not feasible for us due to cost, and the volume we would need to make didn’t make sense at our scale. At today’s scale, we’ve learned some important things that justify making our own extrusions.
The first area to talk about would be the accuracy of rails over high volume. Since last year, we encountered a new problem. While all of the angle aluminum we had received in previous batches were made to high tolerances, we had received a new batch of material that varied in the length of each arm and angle, causing less than an optimal fit of v-wheels. This gave us an opportunity to look deeper into tolerances in extrusion manufacturing as well as performing additional quality checks to ensure each rail was made to a high accuracy. We also learned that it would be a reality that at high volumes, it would be important to ensure we tackle issues at the production side with our manufacturers, since we couldn’t trust them to make every rail perfectly unless we provided the correct specifications for the rails.
This lead us to make our own “custom” angle aluminum. Basically, we arranged production of the angle aluminum using a new die made specifically for us at a higher tolerance than the industry standard, as well as extruding the material at precision spec. With these changes, we were able to reduce the number of out-of-spec rails to near zero. This also set up a better understanding of the extrusion process and the process and costs involved in it. It also gave us a chance to work with the extrusion manufacturer to work out design kinks and set us up for future development.
Today, we use tens of thousands of pounds of aluminum a year to make our rails, way beyond practical MOQs for producing custom extrusion. We are able to spread the cost of the dies over the thousands of rails we produce to make it an affordable option as well. So financially and scale-wise, custom extrusion is a feasible option. So let’s talk about why custom extrusion makes sense, and some cons/downsides as well.
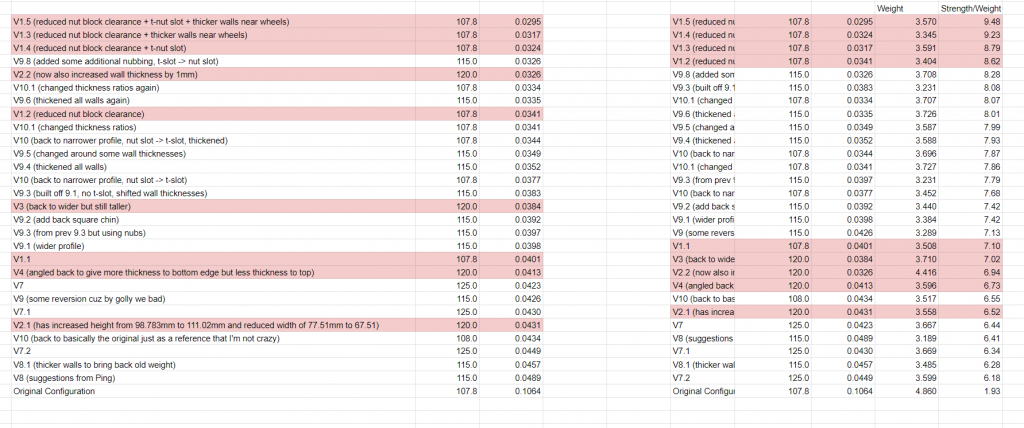
Improved performance
Designing our own custom extrusions lets us create a design that is more optimal for rigidity than angle aluminum. Chris conducted dozens of simulations and tests to find the most optimal designs for the new rails. Based on the results, we can expect 2-3 times less deflection in the rail than the original design. I would note that these are simulations, and real-life results are likely to show less of a difference since the numbers do not reflect deflection from v-wheels, linear guides, and other parts in the machine.
This is especially important as we continue the development of larger versions of the LongMill since longer rails inherently have more deflection.
Ease of assembly
The new extrusions also include additional features that will make it easier to assemble and require fewer parts. For example, by including tapped holes on each face of the extrusions, users will be able to mount the rail to the gantry plate without any brackets. Each rail also has a t-slot, so all drag chain components can be mounted without additional tapped holes. Overall this will reduce the number of fasteners needed, the number of unique fasteners, as well as assembly time and complexity.
Improved scalability
Although time will have to tell, we expect that the new rails will be easier to produce at a larger scale. Since we already need to custom manufacture our own angle aluminum, lead times for both the angle aluminum and custom extrusion are the same. Since the custom extrusion requires less machining, we expect it to be slightly easier and less expensive to process the rail after it has been extruded. Also, since the rail requires less parts and a lower number of unique parts to put together the overall machine, it will save time and effort in sourcing and purchasing as well.
We are also working on cutting and tapping rails in-house, allowing us to have more flexibility in the sizes and variations in the machines we produce as well.
Less production flexibility and a step away from replicability
Since angle aluminum is a fairly universal product that can be purchased off the shelf, a determined maker should be able to replicate the rail design of the LongMill and make their own custom machine from scratch. It would be much more difficult to replicate the new custom extrusion, as the costs to produce a small number of rails are incredibly high. This, I feel, is a step away from the openness of the platform. We will continue to fully open-source the designs as we have always done, but part of the open-source movement is considering the replicability of the product. This was an important consideration when we started this development, and these are some considerations and why we made this step:
The number of people who make their machine from scratch is incredibly low. While there are people who use the LongMill design to make their own machine, making the designs available for this purpose serves a very small population.
The net benefit of having a simpler, better machine that is more easily scalable provides more benefit in our goal to make CNC accessible to beginners than to have a machine that can be made from scratch.
Most people who make modifications to their machines generally do it after they purchase and assemble a manufactured kit. Continuing to make the design public will continue to support people who wish to simply modify a kit
Building a machine from scratch generally costs more and will not perform better than a stock LongMill. We have extensively optimized the design and put an insane amount of thought and consideration to the quality of each part. Parts such as the couplers, Delrin nuts, and even the 3D printing filament are all custom made specifically for us at a higher tolerance than off the shefl components. Since we work within high volumes, we are also able to take advantange of economies of scale that do not come with buying parts in small numbers. Because of this, I believe that folks who want to build a machine from scratch would only benefit if they plan on making extensive changes to fit a specific need, or are doing it for the fun of making the machine. There are of course other designs and options that people can build besides the LongMill that lend itself in being made from scratch.
Backward compatibility
While the rails have been designed to be as backward compatible as possible, and many of the old LongMill parts can be used on the new rails, this brings up another important debate, which is “is it better to take apart and modify an old LongMill to put new parts on it, or is it better to buy a new one?” This is what I think.
First of all, if you already have a LongMill and are happy with the current size of it, I believe that keeping it the way it is and continuing to use it is the best option. While the newer versions of the LongMill will perform better, not only does the current version work well already, the extra cost to switch over parts isn’t worth the extra performance you may get. Instead, investing in other things, such as better tooling, software, and materials for projects may give a better return on investment. It should also be noted that the price of the MK2 LongMill will be higher than the current LongMill, so that we can account for changes in material prices, cost to build the machines themselves, and inflation.
If you are wanting to upgrade the machine to a larger size, then the debate gets a little more tricky. If you take apart your old LongMill to swap in new rails and lead screws, you’ll be left with a lot of leftover parts. Instead, it may make more sense to sell the LongMill and buy a whole new machine instead. So the formula would go:
(Cost to buy a larger LongMill – Price you sell your old LongMill) v.s. Price of the upgrade
I personally like the idea that instead of having this be an opportunity for a new user to scoop up a used LongMill at a discount so that they can get into the CNC hobby and prevent having a bunch of unused parts lying around. The net number of machines is one instead of two.
Of course, we will offer both an upgrade kit and full kit options to customers. These parts are interchangeable between all generations of the LongMill:
Motors and electronics
Lead screws, couplers, and nuts
V-wheels, fasteners, and eccentric nuts
XZ gantry assembly
Drag chains
Development progress (AltMill)
We’ve completed the baseline CAD design for the AltMill and are currently in the process of having our first prototype machined. We expect the parts to arrive in mid-November. This will be our first fully functional prototype which will be used to test performance and make design changes.
Next steps
We’ll be talking about next steps for sales and beta testing of these products. If you wish to sign up for beta testing, please fill out our survey: https://forms.gle/XZgWCi1TagmYytZ87
LongMill/Extended version of the LongMill
We are waiting on a couple more parts to arrive to start building working versions of the LongMill MK2, at which point we’ll be contacting and working with beta testers.
Parts that we are still working on making include:
Steel Gantries
Feet and Z axis mount
Thicker lead screws (for larger versions of the LongMill)
We expect the first two parts to be ready in the next 2-3 weeks, with the thicker lead screws arriving in about a month.
AltMill
The prototype parts are currently in production. We will be building one single prototype and putting it through the paces. Once we’re happy with the performance of the machine, we’ll be opening up pre-orders for beta testers. We expect this to happen around the end of the year or start of 2022.
As we talked about in our last blog post about the inductive limit switches, we had been waiting on the sensors. While the sensors were shipped out at the end of August/start of September, due to some shipping delays, the sensors took much longer than we expected. They have finally arrived, and we are able to start making and shipping out the kits.
Inductive sensors and gSender
Just a quick thank you to Garrett Fromme (https://www.youtube.com/c/IDCWoodcraft) and Dana Andrews (https://www.youtube.com/c/BuckysCustoms) who have been our beta testers for the past month and a half. We sent them our first prototypes of the inductive sensor.
During the testing of the sensor system, we found a couple of interesting bugs in GRBL and gSender. First involves the coordinate system. It turns out that GRBL counts the bottom left corner in the negative space. We’ve updated the latest version of the firmware for the LongMill to change this to make it in the positive space, making it more intuitive to use the sensors. You can now update to the latest version of the firmware using the latest version of gSender. Instructions can be found in our resources.
Second is the way that the gcode sender handles moving away from a hard limit. If you were to trigger a hard limit on the machine, the machine would not let you travel in that direction any further. However, since the limit will be triggered continuously and the machine cannot move away from the limit switch, gSender has been updated to allow users to move away from a triggered switch. It is important to note that other gcode senders may not have this functionality built-in, and the sender may need to be restarted or the machine moved manually to stop the trigger.
Ordering your sensors
You can now order the kits directly on our store. We are currently in the process of assembling and packing sensors so that we can ship them to folks as quickly as we can.
What coming next?
While the inductive sensor kit is a bandaid solution to add the functionality to older versions of the LongMill, we are planning on updating the LongMill around the end of this year to provide hard mounting points for inductive sensors. This means that brackets will not be needed to install the sensors.
We will also be adding more functionality and tools to utilize the sensors further through gSender updates.
Hi everyone. Here’s a production update for September/October 2021.
We’ve seen a small uptick in LongMill sales over the last couple of months. Overall, shipping and production have been moving along smoothly, and most of the LongMill orders have been shipping out within a few days. We’ve reached the middle of Batch 5 a little sooner than we expected, and we may start to see us run out of a few parts as we wait on parts to complete the second half of Batch 5.
Just as a side note, we build machines in batches, and Batch 5 consists of 1000 LongMills. With smaller or inexpensive parts, parts with long lead times, and parts that we need to make large quantities of to take advantage of the economies of scale, we order 1000 sets of parts. On the other hand, larger or more expensive parts, parts that have short lead times, and parts that are made locally, we produce in smaller batches. In this case, we produced 500 sets of gantries, control box parts, and rails.
It’s important for us as a business to try to time the production and purchasing for each of our components. Over-producing means having to pay for inventory that needs to sit on shelves, while under-producing means having longer wait times for completed products. We of course try to balance these things and make production as seamless as possible.
Due to the uptick in sales, we’re running out of parts sooner than we expected, which may lead to shortages of parts. Currently, we are expecting to run out of gantries in the next few days. The laser cutting for the gantries is expected to be completed on Monday, with painting and finishing of the gantries to take about 2 weeks to complete. We will be working with our manufacturers to coat the parts that we are lowest first so that we can keep production going, but regardless, you should expect the lead time to increase until the rest of the gantries are completed.
Other parts that are still in production, but are expected to arrive before we run out include:
Rails
Control boards
Control box parts
Drivers
Flange bearings
Expected lead times
With the gantries expected to be our bottleneck, we expect machines, once they are out of stock, to start shipping LongMills again around the third week of October.
If you are planning to order a LongMill, please check the estimated shipping date on the LongMill order page for the most accurate information.
Surging ocean freight prices and continued instability in the shipping industry
Increased consumer spending and pandemic woes have continued to cause instability in the shipping industry. Recent surges in ocean freight prices now mean that shipping products between China and North America have roughly quadrupled in price compared to the start of this year. The chart below represents a pricing index to compare shipping rates.
This of course impacts us. A reasonable percentage of parts that we use for the LongMill comes from China, so we are also at the mercy of ever-changing shipping prices.
Luckily, the LongMill is a non-commodity product with a reasonably large profit margin, allowing us to adjust to changes in fluctuation prices more easily than commodity items that have low margins, such as general household items. We have kept the price of the LongMill the same for the past two years, but inflation and current events may eventually warrant increasing our prices as well.
In the longer term, I hope that shipping prices do stabilize. Realistically though, I expect that shipping prices will stay high in the near future, and other unexpected factors may come up, so we will have to keep our eyes peeled for that.
Batch 6 is now currently in production as well, with this batch being 1500 LongMills. By increasing our batch sizes, I hope to smooth out the supply chain and give ourselves more time and flexibility between batches.