Hey everyone. Take a look at our CNC tutorials, resources, assembly videos, and behind-the-scenes projects! Stay informed about our latest builds, production insights, and tips to enhance your maker journey. Discover new techniques and best practices for your CNC projects!
AltMill CNC Assembly Guide | Full Setup Tutorial
Learn how to assemble the AltMill CNC with this step-by-step guide. Follow along for detailed setup instructions and discover key features to get your CNC running efficiently. For written instructions, visit: https://resources.sienci.com/view/altmill-assembly/
Testing the 4.5KW AltMill CNC Spindle: Behind the Scenes with Sienci Labs
Join us for an exclusive behind-the-scenes look at our mechanical engineering team’s latest project! In this video, Daniel is tinkering with a 4.5KW spindle concept for the AltMill CNC. AltMill accelerations are 1500mm/s2 during cutting demos. Interested in this concept? Share your feedback and suggestions through our Product or Feature Request Form and AltMill Spindle Survey. Product or Feature Request Form: https://sienci.com/faq/company-faq/can-i-give-you-a-suggestion-for-a-product-or-feature/ AltMill Spindle Survey: https://forms.gle/jpcvYQgB78mpcmVQ9
Maximize Profits $$$! CNC & Laser Customization of Stanley Tumblers | Cottage Country Sienci S2 EP3
Discover how to boost your earnings by customizing trending items! In this video, Scott demonstrates the process of personalizing the popular 40 oz Stanley Quencher Tumbler using top-notch tools like the LongMill CNC, Vortex Rotary Axis, and LaserBeam Laser system. Learn step-by-step techniques to transform everyday products into unique, high-value creations that stand out in the market. Perfect for makers and entrepreneurs looking to tap into the customization trend!
Behind the Scenes of the 39″x52″ Smaller AltMill CNC Idea | Sienci Labs
Discover the latest innovations from our mechanical engineering team as we take you behind the scenes. In this video, Ben is tinkering with a concept for a smaller version of our AltMill CNC, sized 39 inches by 52 inches. Interested in this concept? Share your feedback and suggestions through our Product or Feature Request Form: https://sienci.com/faq/company-faq/can-i-give-you-a-suggestion-for-a-product-or-feature/
LongMill Spindle Kit Installation and gSender Setup
In this instructional video, we will show you how to install the LongMill Spindle Kit onto your LongMill MK2 CNC machine. In the last half of the video, we will show you how to set up the software side of the spindle installation using gSender. Minimum tools are required. All you need is a small flat-head screwdriver and the Allen key that came with the LongMill Mk2 or Mk1 machines.
DIY LongMill CNC Vertical Clamping Setup Part 2
Join Dennis Harlock as he demonstrates how to set and define the zeros (origins) for your projects using the vertical clamping system on the LongMill CNC. Vertical Clamping Setup Part 1: https://youtu.be/RcsLYTHdpPc
Installation Guide for Closed-Loop Stepper Motors on Vortex Rotary Axis for LongMill & AltMill CNCs
We explore the advantages and differences between closed and open-loop stepper motors. You’ll learn how each system affects precision, performance, and reliability in CNC machining. We also provide a step-by-step guide to installing and setting up a closed-loop stepper system on the Vortex Rotary Axis for both the LongMill and AltMill CNC machines. This video will help you understand the benefits of a closed-loop system and how it can improve your CNC setup. For written instructions, visit our Resources page: https://resources.sienci.com/view/vx-closed-loop-motor/
Hi everyone, Chris here. It’s great to be speaking with y’all again, it’s not often I get around to writing blog posts since I tend to be more behind the curtain on the tech development we do here at Sienci. As Andy mentioned in his November Production Update post, there’s a lot to update on so I’ll spread as many juicy details as I can. We’re now at over 400 people interested in buying the new SLB system we’ve been working very hard at so thank you for your support! It’s very clear that our community is very excited about this massive upgrade to the LongMill and for the future of the hobby CNC industry.
There’s also a video I filmed which you can feel free to watch if you prefer to see more of my face 🙂
Recap
Let’s start with a quick refresher about how the SLB came to be Sienci’s biggest project to-date.
As many of you know, Sienci Labs has historically been built up by our mechanical solutions – an expected direction seeing as myself and Andy co-founded the company while studying Mechanical Engineering. Our goal with Sienci was always to take advanced, industry technology and try to find a way to simplify it in ways that made it less expensive and easier to use so that everyone could have access to making complex things at home. We feel like that goal of price-point and ease-of-access is something we’ve been proud and successful at to-date with our big projects like the LongMill turned LongMill MK2 CNC, LaserBeam laser system, Vortex rotary axis, AutoZero touch plate, and our unique MK2 Magnetic Dust Shoe.
What’s been clear to us since the start though is that the CNC experience won’t be able to be improved with mechanics alone. Most hobby CNC communities have quirks with their machines, but once those quirks are understood the majority of confusion comes from everything else you see day-to-day when you use it: designing projects, tool selection, feeds and speeds, machine control, and reliable cutting. This is why we started working hard on non-mechanical solutions that we’re also very proud of like gSender for open-source CNC control, our in-house feeds and speeds charts, our expansive resources for learning and understanding CNC, ever-growing roster of tutorial videos, and now the SLB.
Why the SLB?
The SuperLongBoard is a next-generation CNC control board we’ve been dreaming of making for years now and is getting closer to completion. We believe that at this current stage, integrating smarter, more reliable, and more capable CNC control electronics will make the biggest improvement to the CNC experience. If you look at options on the market there’s been a large divide between the capabilities and reliability of the typical hobby CNC boards in the $40-$200 price range and the far more expensive, semi-industrial options that can reach the several-hundred-dollar range to over $1000. With chips getting more powerful and lower cost, we thought that gap in ability could be reduced while still staying in the lower price range by making a board with those new technologies. We knew this was going to be a big challenge – there are reasons why it’s typically easier to up-sell older technologies than it is to develop new ones – but we felt strongly in our decision. We felt that creating a new, improved, and unique solution could bring new innovation to the market to benefit everyone by reducing barriers to entry, keeping the industry progressing, and making more reliable and capable CNCs at lower price-points.
Working alongside Andrew and his team at Expatria Technologies, and building off of Terje Io’s amazing grblHAL project, all these tools need to work hand-in-hand so we can set our sights on resolving two major areas that we think hobby CNCs could benefit from:
Reliability: this is such a broad topic to solve, but it can be more-or less divided into a couple categories.
Board wiring and protections: designing a board with proper grounding and plenty of voltage protection and isolation takes a lot of time and experience but is needed to shelter the electronics from CNCing – an electrically ‘noisy’ environment from all the moving motors and static electricity buildup from cutting and vacuuming materials
USB protocol: this is implemented in firmware and grblHAL comes with far more checks with data communication mechanisms in place to guarantee delivery over USB and know when to resend lost information
Backup Communications: adding Ethernet on top of grblHAL’s already robust USB implementation isn’t necessary but having an alternate communication method to turn to is always a great option if you’re ever experiencing problems with the primary style – an onboard SD card also gives you that flexibility
Processor speed: a slower processor can’t buffer as much information when dealing with short and complex movements, meaning better chips can reduce the chance of errors popping up
Room for growth & “Wow factor”
Motor drivers: the same stepper motor controlled by different motor drivers can see notably better performance with all else being equal – so why not upgrade to newer-age drivers to get better speed with less motor noise out of the same CNC
Smarter CNC: having the CNC better tell you when something has gone wrong, automatically fix a problem for you, or make one of your existing processes easier creates far less room for error
More control options: there are typically specific limitations on what a CNC can do, so why not expand it’s options to support all commonly used CNC accessories plus leave space for even more customizable outputs. This can include things like independent Macros buttons, independent Spindle and Laser control, Modbus over RS485 for more closed-loop VFD control, tool length sensor support, ring and rail lights, door sensor, CANBUS, CNC pendant options to control the machine more easily, adapting to plasma cutting, and more
Multi-axis control: benefits those who have started to dive into cutting rotary projects to create ornate, fully 3D projects on their CNC and want either a simpler transition between cutting styles or are interested in full 4-axis cutting
Onboard computer: if you’ve ever run into problems with a Windows update, USB port falling asleep, or having hardware too underpowered to run your CNC, these problems can all be solved with a dedicated, purpose-built, and built-in computing solution running something like gSender onboard
We think we can address most of these aspects with the SLB at the time it ships so it can play a part of the next big step in hobby CNC technology. It’s advanced electronics and software will bring not just new features and functionality to the LongMill, but at a price point that we believe will be affordable for hobbyists. With it being a Sienci project, it can also guarantee that the SLB will be backward compatible with ALL LONGMILL CNC MACHINES OF ALL GENERATIONS, which means that users can upgrade their machine’s capabilities by simply replacing the controller. It will also support all our current plug-in add-ons. We also plan, just like with gSender, to make our board well documented and able to be adapted to many other CNC form-factors when we start to work through rolling it out in production.
How it’s coming along
Very well! Since Andy’s last update, our SLB team has been working hard to prioritize checking the functionality of the physical circuitry on the V2 prototype board are we’re now feeling confident that the following circuity is good to go:
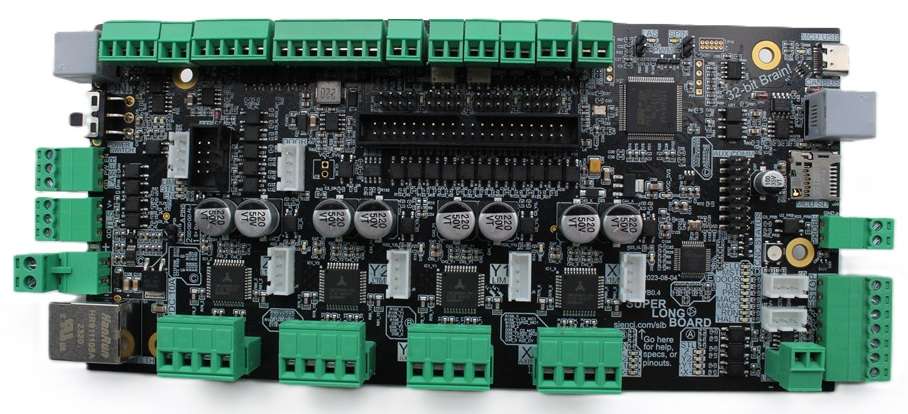
Newest version of the SLB (V2)
24V 12.5A brick power supply input with power switch (no more power over computer USB)
External, detachable E-stop with light, controller feedback, plus 3 customizable buttons
More reliable implementation of serial communication over USB-C (no drivers needed) as well as Ethernet
4 higher-end, independent motor drivers rated for 2.8A RMS (TMC2660C, higher efficiency, less noise and resonance)
RGB Machine status LED
‘Contact’ style touch plate input
4 independent limit switches with two connector styles and 5V or 24V output
Coolant digital output set via M8 and M9 commands (5V 40mA)
Independent rotary axis support with dedicated limit switch
Tool length sensor input for easier tool changes
Modbus over RS485 to control spindles and other accessories with two connector styles, terminal breakout and CAT3 cable with RJ11-6C/RJ25 and supports daisy-chaining
Very dust resilient enclosure with quick assembly
Many status LEDs for troubleshooting
Tons of opto-coupling for optimal protection against incorrect wiring and electrical noise
Less heavy boards with less fragile components should lead to lower failure rate
Extendable RGB LED ring light and rail strip output
4 customizable outputs to external circuits, controllable via M62/64/63/65, M7/M9, M8/M9, and M3/M5 (2 SSR pin shorting and 2 relay/solenoid/motor driving)
SD card to store onboard information and possible g-code file overflow (min 512MB)
Door sensor for input to pause cutting
Special CANBUS for pendant communication
Extra breakout IO to access spare MCU pins and other alternate outputs
ADC input for future sensor input
Communication connections (e.g. Rx and Tx) available for future control via external controller / pendant
These could still change a little on our way to production but I’m very confident that this will give an accurate image of what the SLB will be capable of. The gray items on the list might not be ready at the time of launch but the great news is that we have verified all their circuitry and put them on the board so all that’d be missing is a firmware update we plan to put out after shipping boards to enable those features as well.
The main items absent from the list are twofold:
Firstly, though we aimed for the V2 board to be our second and last prototype, we did find some areas that we wanted to tweak. These were: changing the Spindle 0-10V output back to 5V PWM to support the new spindle we’re working on, changing the Laser PWM and Flood output circuitry to deliver a signal that’s more in-line with the previous LongBoard, tweaking the RGB LED driver buffer, fixing some onboard status LEDs that were floating, and adding some more EMI improvements. Most of these changes are quite small, but we decided that getting a V3 prototype made will help us feel confident in finalizing the design for production. This is a hard decision as it’s likely going to add another 1 month to our board release timeline, but we really wanted to be sure to support one of the key features we wanted the board to have “Independant 5V PWM and EN Spindle and Laser control set via M3, M4, M5, and S g-code commands, plus SpinDir“. The V3 design should be sent out to get made in the next week and should now lock-down the full SLB design. While we wait for it to arrive we’ll be focusing fully on testing and firmware improvements.
Secondly, for those who might not have been following Andy’s production updates, we’d originally envisioned the SLB as being a system of two different parts working together. The first being the board itself, containing all of the core CNC functionality controlling motors and handling g-code, and second being an optional onboard compute module that would act to replace a computer or laptop and instead be integrated. Users could connect a keyboard, mouse, and monitor to control all functions of the machine directly through the SLB. This was very exciting to us given the considerably low price of the compute module over a computer, around $40-80 dollars plus the cost of the monitor, keyboard, and mouse, as well as the extra speed, user experience, and reliability of an onboard system.
In our extended tests with this idea in mind, we weren’t finding the success we’d hoped in creating a seamless user experience with this solution. Despite trying many Linux kernels, drivers, GPU acceleration, and bringing many more efficiencies to gSender, the Broadcom and Rockwell-based processors used on smaller compute modules were not powerful enough to accommodate the visualization of g-code directly onboard. This also meant they didn’t have extra headroom if in the future we wanted to implement other features such as having a camera monitoring system or other sensor inputs. With many months delay trying to chip away at a resolution we decided to split the development of SLB back into its two parts; prioritize improving the baseline machine performance first so CNCers don’t have to wait any longer for the SLB to make better machines, and strip out all the on-board connectors and switch to a higher-power off-board solution that we’ll implement at a later stage. This will mean anyone could still upgrade at a later date. Higher-power Fanless PCs will cost more, from our initial budget of around $80CAD/60USD for the compute module, to somewhere around $100-$200USD depending on the specs and configuration, but would ensure a smooth and seamless experience as well as provide headroom for future applications.
To summarize, we decided to take the concept of the onboard computer and divide and conquer on it at a later date. It would’ve been really cool to have a fully integrated system but it kept pushing our board delivery back further and we felt it would benefit everyone if we just pushed ahead on the other features that will all still bring great benefit to the CNC experience. This means that users will still need to connect their computers to the board to control their machines when the first batch of SLBs release, but should still see drastic improvement.
To-date, SLB development costs have tallied to more than $300k, making it easily our most expensive project to-date if you don’t count gSender which is I’d guess is around $500k at this point. These costs are pretty standard and have mostly come from paying salaries to do in-depth research on board infrastructure options, decisions on features that CNCers would like, designing robust PCBs, lots of custom firmware development, and testing. The new board uses a large number of components, adding to the challenge and complexity in manufacturing, but this was expected and we’re working through it. We feel confident that we’ve done something useful here and we’re excited to see the interest in the SLB on launch and continue moving development forward.
grblHAL support in gSender
Another big effort we’re having to undertake to support the SLB has been with gSender. Though grblHAL has “grbl” in the name, it might as well be a completely new firmware with all the new work that our development team has had to put in so far to make a seamless CNC control experience and UI. Since grblHAL is such a new firmware on the hobby CNC scene, it’s still growing and not widely adapted, and we want to help change that. There’s so much documentation that has already been made but there’s also a lot more we have to figure out. We’ve been working on an all-new firmware flashing utility for the new board, and had to build in a lot of modularity so gSender can be compatible with old and new boards alike
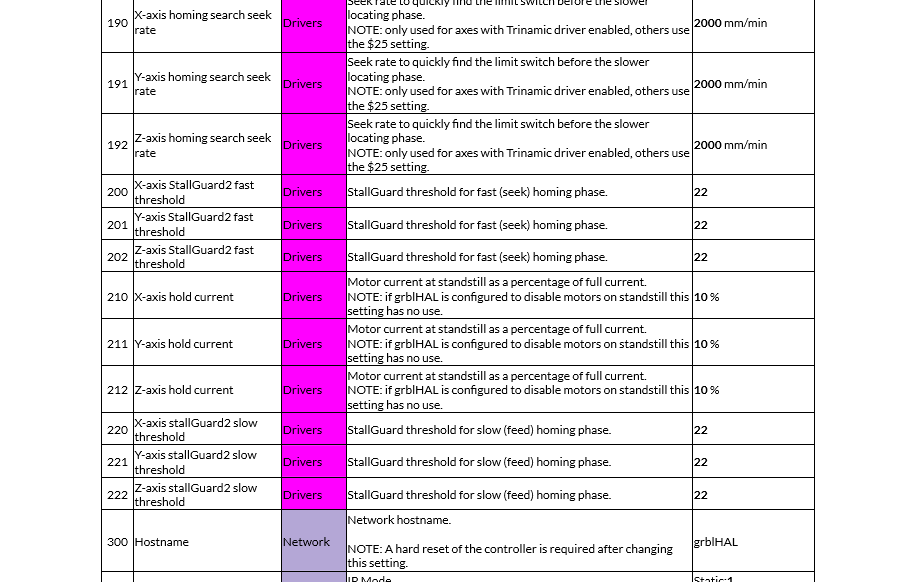
Look at an example of all these new EEPROM settings!
Iteration on the SLB enclosure I think is coming along well, the design is now pretty much locked in 🙂
Back in April I put out a post on our Forum with the leading design we had at the time to get peoples feedback on what they thought (https://forum.sienci.com/t/official-call-for-feedback-on-new-board-in-development/8519) and the results were positive but still mixed. I wanted to take a new approach to the enclosure design to accommodate all the new plugs without them all being exposed, as well as improve cable management on the LongMill in particular. Though many people were on board, many still expressed concern with my idea behind mounting the board to the Y-axis rail due to their fear of dust, vibration, or accommodating enclosures.
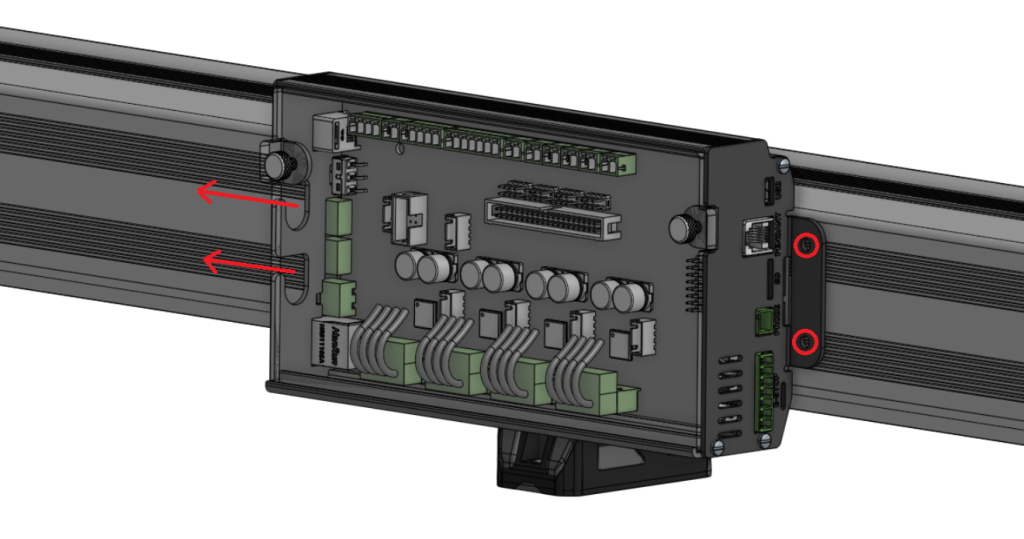
After going through way more iterations internally, this is now our revised design which I feel much more confident will suit everyone’s needs:
#image_title
The main perks of this enclosure is it’s mounting versatility and wire management. With this new setup, anything that you’d expect to have more common access to faces toward the front and all other wires can be routed out the rear. The RGB status LED will be visible through the faceplate put the panel will also be easily removable for troubleshooting or servicing. All the components on the board face upwards so everything is accessible and the board has been tested to run very cool so even in hot environments and with the bit of venting we’ve added in we expect everything to operate as normal.
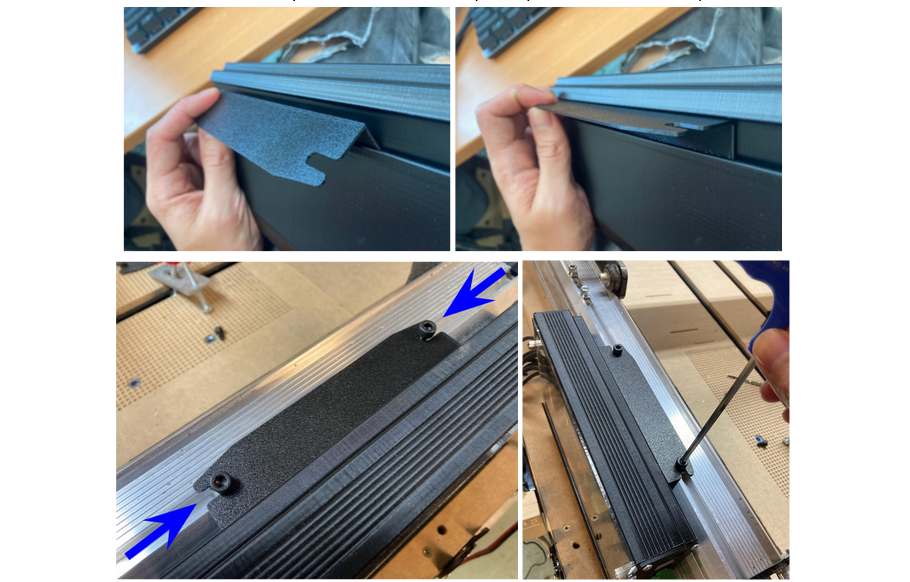
Rail mounting bracket
The rail mounting is also a separate piece that can be used or not. This gives versatility to mount the SLB on any surface (rail, vertical, or horizontal) with 2 or 4 screws. We’ve already begun production of the parts and should be getting them in Nov-Dec.
E-stop Design
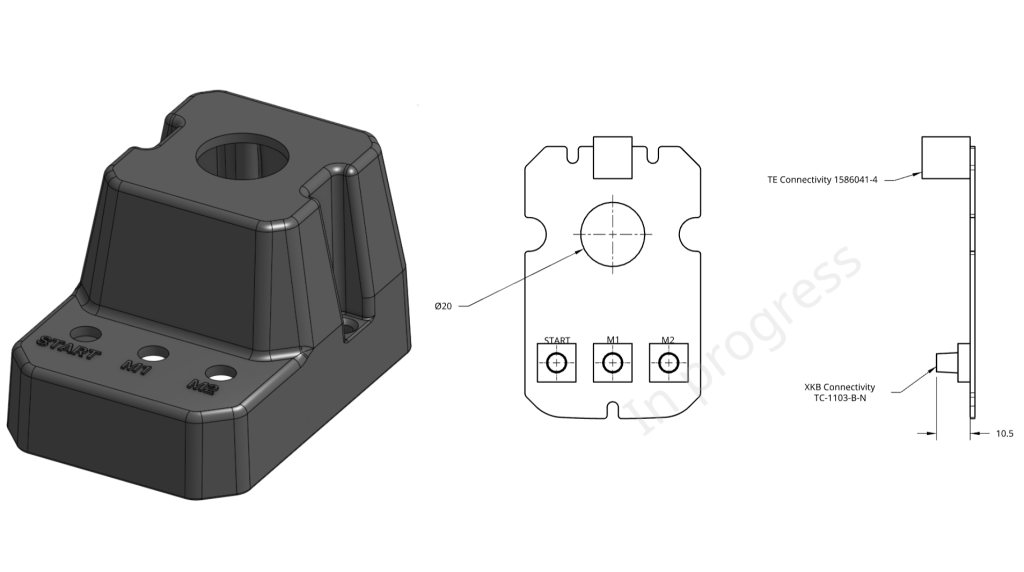
This is also mostly completed, just waiting for some last few checks. You’ll notice on the earlier feature list that we wanted to move away from the 3 buttons attached directly to our board. This is because there was feedback that people didn’t tend to use the existing buttons because of their fixed function, and when people mounted their board out of the way they couldn’t access the buttons anyway. We wanted to fix this by making the buttons separate and customizable, and this lead to a new E-stop design with 3 other customizable buttons integrated into it! Now you’ll have the freedom to have 3 physical buttons perform a myriad of custom functions to suit your workflow right next to your E-stop.
New E-stop design
Beta Testing progress
As we’re turning the corner on finalizing the board design and implementing our initial set of firmware features, our main goal over the next month will be: test, test, test! We’re now in Phase 2 of Beta testing where our main goal is to make sure that all our new features play nicely with each other, since we already know they work well in isolation.
We currently have 3 boards with testers and 2 dedicated machines in our own shop running CNC jobs every chance we can get and have already found unique situations that cause problems which we can now work toward resolving. This also involves comparisons between the old and new board and real-life durability and performance testing. One example is Ian’s Onefinity where his former setup used our original Longboard and with the SLB he’s seen drastically reduced noise and nearly doubled movement speeds. This hasn’t been as drastic for our other testers but we’re also already noticing some of the stability and perks that the SLB has to offer. Once the batch of V3 boards arrive, the plan will be to redistribute them as well as contact a new wave of testers to complete one final round of feedback. Some people we reach out to will be those with persistent and existing EMI and disconnection problems to see if the SLB is able to resolve those issues. At that point we expect to feel confident in the performance and features we can promise with the board that we can prepare for release.
Here’s a video from Andy’s last post of us testing the new programmable macro buttons. These allow you to program a specific code or function to 3 unique buttons, rather than just start, pause, and stop, which is hardwired into the current control board. In this case, it’s being used to move the machine to a specific position to assist with getting the machine out of the way for changing tools and materials.
The pricing is likely to be refined as we’ve made new decisions and near production, but I think no matter how you slice it you’ll be able to expect that the SuperLongBoard will be giving you every bang for your buck.
As far as timeline, many followers of this project would know that we’ve had to push our originally anticipated late-summer, early-fall launch. We’ll be putting out another update soon on the roll-out strategy we have in mind moving forward because we want to give people a guarantee to be in line for the SLB before Christmas, so stay tuned to hear more about that. You can get a glimpse of what some of the steps will be with the roll-out in Andy’s original post as well under “What’s Next?”.
As far as ongoing project schedule, much of it has been laid out in the sections above which I’ll try to summarize here:
Last tweaks will be made in the next week to start a batch of V3 SLB prototypes
Firmware, Beta testing, and gSender support will continue over the coming month while we wait for the V3s to arrive
SLB Enclosure and E-stop designs should also become finalized and be ready for production in the next month or so
Once V3s arrive, final checks can be made to feel confident about the circuit design and begin board production
Phase 3 of Beta testing will continue to refine Firmware and gSender support while all other production is underway
I’d say that this means the boards won’t be ready to ship in December / Christmas and are instead more likely to be able to ship around Feb-March. The first major steps we took until June 2023 involved much of the initial product churn that we expected to see, though with delays in board prototypes and unexpected difficulty interfacing with the drivers we lost about 2 additional months. Add to that the outcome of the compute module testing meant that we had to pull out a lot of components for a full redesign between V1 and V2 and now we have to address some of the missed items between V2 and V3. This is the reality of developing such a complex product and is why we now feel much more confident with the recent testing and steps that we’ve taken that the completion of the SLB for launch is just around the corner 😀
Thanks
Thanks for sticking along for the ride on this big update, I hope it answers most of your questions on where the SLB is currently at and gets you excited about what’s to come. I expect the SLB to be very unique in it’s abilities to exceed the capabilities of many hobby CNC boards, perfect even for the DIY hobby CNCer for all it’s additional IO, and still have many more plans for it in the future. Of course it’ll be an Open-source design so hopefully all this time and effort that our team has put in will be able to return to the community and benefit other efforts toward easier CNCs.
Leave any comments you have that I missed and I’ll try to answer them. As I mentioned I don’t tend to put out updates because I’m a very slow writer but I’ll ensure to keep Andy in the loop as progress continues so he can update y’all as things keep moving forward. Just remember to read the Production Updates!
Hey everyone. Here are some informative videos that you might have missed last month. Check them out below and make sure to subscribe to our YouTube channel to keep up with our CNC-related videos.
LongMill MK2 User Spotlight: Interview with Ed Clarke
Over 18 months have passed since the debut of the LongMill MK2. In our ongoing quest for valuable insights, we have recently engaged in fresh interviews with our customer base. In one such interview, we had the pleasure of conversing with Ed Clarke. Join us as he recounts his CNC milling journey, shares his experiences with the LongMill MK2, and explores the exciting opportunities it has provided for him.
First Vortex Rotary Axis Project: Crafting a Chess Piece
Now that your Vortex rotary axis is fully configured, it’s time to kickstart your inaugural project! Follow along with Daniel and Johann as they walk you through the process of crafting a captivating chess piece. This project is designed to be both beginner-friendly and strategically advantageous for your checkmate tactics.
Cottage Country Sienci: Creating Multiple Copies of a Fishing Lure on the LongMill CNC
In this installment of Cottage Country Sienci, Scott shares valuable knowledge on efficiently crafting numerous replicas of a fishing lure using the LongMill. Mastering this technique will enable you to boost your production capacity and make the most of your time—ideal for those looking to enhance their business endeavours.
LongMill MK2 User Spotlight: Interview with Carmine De Luca
It has been over 18 months since we introduced the LongMill MK2. To gather valuable insights, we recently carried out fresh interviews with our customers. In one such interview, we had a conversation with Carmine De Luca. Come and join us as he recounts his CNC milling journey, discusses his experiences with the LongMill MK2, and explores the doors it has opened for him.
Quick Start Guide for the Vortex Rotary Axis
This video is a definitive guide on how to set up your Vortex Rotary Axis for carving. You will see us set some zeroes, explore the various work-holding options, and make some beautifully round stock and the whole works, so sit back and enjoy the show!
Cottage Country Sienci: Creating Profitable In Scale Coasters Using the LongMill MK2 CNC
In this exciting episode of Cottage Country Sienci, Scott will be your guide as he demonstrates the art of crafting high-volume projects for your business using cutting-edge CNC technology. Watch as Scott masterfully leverages the power of the LongMill and the LaserBeam to craft a stunning collection of meticulously scaled coasters, each designed for maximum profitability.
Hey everyone. Here are some informative videos that you might have missed last month. Check them out below and make sure to subscribe to our YouTube channel to keep up with our CNC-related videos.
LongMill MK2 User Spotlight: Interview with Benjamin Pope of Koala Karvings
It’s been more than a year and a half since we launched the LongMill MK2. To capture valuable insights, we recently conducted updated interviews with our customers. In this interview, we spoke with Benjamin Pope from Koala Karvings. Join us as he shares his journey with CNC milling, highlights his experience with the LongMill MK2, and the opportunities it has unlocked for him.
Sienci Labs Presents: The LongMill MK2 CNC Beginners Kit
Introducing the Sienci Labs LongMill MK2 Beginners Kit—a complete package for an effortless CNC journey. The kit includes your preferred LongMill variant (30×30 or 48×30), a reliable Makita Router, a Dust Shoe for workspace cleanliness, an Autozero Touch Plate for precise zeroing, and a Starter End Mill Set for beginners. Plus, enjoy gSender software and lifelong technical support for guaranteed success.
Basics For CNC Beginners Series
New to CNC? Explore our Basics for Beginners series and master Vcarve from start to finish: document setup, toolpaths, previewing, saving, gSender interface, importing vectors, tracing images, and more. Become a CNC champion with essential skills and tips for a successful start!
Definitive Guide to Mounting Your Vortex Rotary Axis and First Moves
With assembly out of the way, it is time we mount the Vortex to the LongMill and take it out for a spin! In this video, we will cover how to set up your machine for maximum compatibility, create the mounting holes needed to secure the Vortex, and switch over to rotary mode for the first time! Sit tight as your Vortex will start spinning by the end of this video!
Cottage Country Sienci: Crafting a Paddle using the Tiling Technique on the LongMill MK2 CNC
Introducing Episode 2 of our captivating Cottage Country Sienci series! Dive deeper with us as we explore tiling techniques and the art of two-sided carving. By the end, you’ll be equipped to skillfully craft and customize your very own paddle for unforgettable paddling adventures.
Complete Guide to Unboxing and Assembling the Vortex Rotary Axis
Welcome to our comprehensive Vortex Rotary Axis assembly guide. In the following video, we’ll guide you through the gratifying journey of unboxing and precisely assembling your very own Vortex Rotary Axis. Let’s enthusiastically delve in, ensuring your Vortex Rotary Axis is primed and poised for optimal performance!
Everything You Need to Get for Starting CNCing With Your LongMill
Are you interested in starting your CNC journey but unsure where to begin? We have prepared a comprehensive video guide to help you kickstart your CNCing adventure. Discover the essential tools and equipment you need to get started with CNCing in our easy-to-follow tutorial.
Cottage Country Sienci: Elevate Your Custom Cornhole Board With the LongMill MK2 CNC
Welcome to the first episode of our Sienci Cottage Country series! In this captivating video, Scott will expertly guide you through crafting a lit cornhole board using the LongMill. This delightful game is tailor-made for quality moments with your youngsters at the cottage.
Building a Guitar on a CNC Part 6: Assembly
Time to SHRED X6! Welcome to the exciting conclusion of our epic guitar journey! We are thrilled to showcase the delightful process of assembling an actual, fully-functional custom guitar, crafted with precision using our LongMill MK2 CNC.
Hey everyone. Here are some informative videos that you might have missed last month. Check them out below and make sure to subscribe to our YouTube channel to keep up with our CNC-related videos.
Building a Guitar on a CNC Part 6: Assembly
Time to SHRED X6! Welcome to the exciting conclusion of our epic guitar journey! We are thrilled to showcase the delightful process of assembling an actual, fully-functional custom guitar, crafted with precision using our LongMill MK2 CNC.
Making a Unique Tabletop Inlay on the LongMill MK2 CNC
Are you looking for a project that does not require a lot of programming? In this video, Dennis Harlock shows us how to easily take an oddly shaped piece of wood and turn it into a unique tabletop inlay using the LongMill.
The Cottage Country Sienci Series
We’re on the road, CNC in hand, headed to the lake to set up shop. We’re going to show you that you don’t need a big footprint or all kinds of fancy tools to create amazing projects on your CNC. Follow along as the Cottage Country Sienci series comes to life!
Building a Guitar on a CNC Part 5: Pickguard
Time to SHRED X5! In part 5 of our CNC guitar series, Scott walks us through making a custom pickguard on the LongMil to protect your guitar. Follow along as we provide you with all the files and more!
Hey everyone. Here are some informative videos that you might have missed last month. Check them out below and make sure to subscribe to our YouTube channel to keep up with our CNC-related videos.
Enabling the Inductive Sensors for the LongMill CNC from Sienci Labs
Hey everyone. In this tutorial video, Jason walks us through enabling the inductive sensors, how to set up multiple workspaces, changing the machine home position, and troubleshooting.
Building a Guitar on a CNC Part 4: The Fretboard
Time to SHRED X4! In part 4 of our CNC guitar series, Scott shows us how to create a stylish fretboard for your custom guitar on the LongMill. From providing you with all the files, setup, tips, and more!
How to VCarve an Image on Wood Using Your CNC
Did you know that taking images and carving them into wood/other materials is a great way to make signs and other projects? In this video, Scott shows us how to do a VCarving of an image on wood from start to finish using the LongMill.
Sienci Labs Presents: The Vortex Rotary Axis
The Vortex is a compact, precise, high-quality rotary axis we designed from scratch, with direct integration into gSender. Just like all our products, the Vortex comes with high-quality tutorials, support, and resources to make it easy to install, learn, and use your rotary axis.
Hey everyone. Here are some informative videos that you might have missed last month. Check them out below and make sure to subscribe to our YouTube channel to keep up with our CNC-related videos.
Sienci Labs Presents: The Vortex Rotary Axis
We are excited to announce that the first 300 units of the Vortex Rotary Axis are now available for pre-order!
The Vortex is a compact, precise, high-quality rotary axis we designed from scratch, with direct integration into gSender. Just like all our products, the Vortex comes with high-quality tutorials, support, and resources to make it easy to install, learn, and use your rotary axis.
Knocking It Out of the Park With the Vortex Rotary Axis
Batter up! We took a piece of wood and turned it into a beautiful customized baseball bat with the Vortex Rotary Axis. This bat is only one of many other projects the Vortex can make.
Introducing the Vortex Rotary Axis
Take your projects to the next level with our Vortex Rotary Axis. Our Mechanical Engineers, Daniel and Johann are here to explain what it is, how it works, what it includes, what it can produce, software, other supporting features, and more.
Making an Easy and Personalized Mother’s Day Gift on Your CNC
In need of a gift idea for Mother’s Day? Well, we have one! Follow along with Scott as he demonstrates how to make a set of personalized wooden kitchen utensils with the doodles and handwriting of loved ones on the LongMill.