gSender 1.6.0 Edge-4 is now out, bringing a solid round of improvements, fixes, and general polish.
We’re officially in the part of the Edge cycle where the focus shifts away from big new features and toward testing, optimization, and cleanup. A lot of this release is about making things faster, smoother, and more reliable based on feedback from everyone testing Edge so far.
If you’ve been waiting to try Edge, this is a really good time to jump in. As always, reports from early testers are extremely valuable.
Visualizer parsing improvements
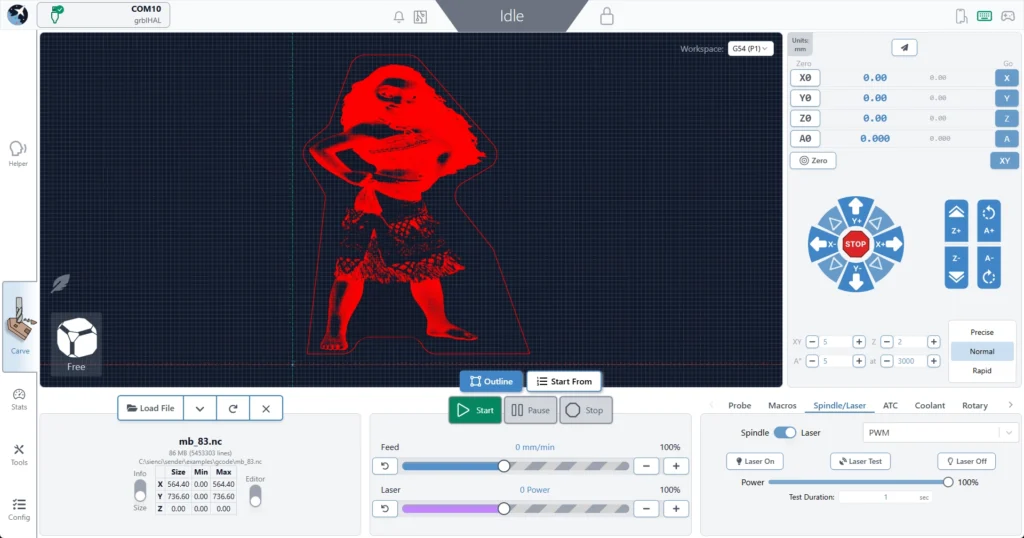
This release includes a major rewrite of the file parsing and visualization worker used when loading G-code files.
Performance gains:
~55% faster visualization time for most files
~75% faster visualization for rotary files
~35% less memory usage for typical files
~86% less memory usage for rotary files
What this means in practice:
Bigger files load faster
Less RAM usage while previewing
Much better handling of large jobs
For reference, we successfully loaded an 85 MB / 5.5 million line file, which wasn’t possible in previous versions.
Connection process is generally smoother and more reliable
Better handling of reconnect scenarios
No resets in the connection workflow
Should reduce Alarm 14 and error 1s on connection and clearing alarms
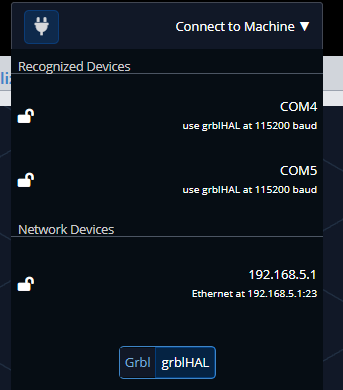
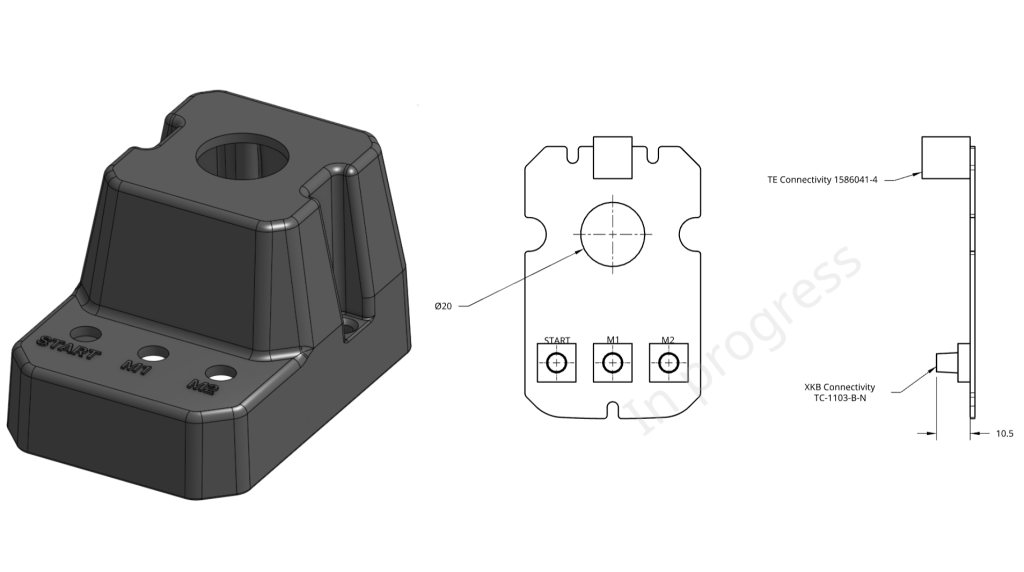
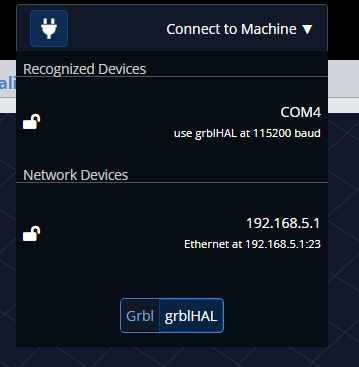
We no longer assume ethernet is always grblHAL, so fluidNC/non-vanilla grbl users connecting over ethernet should properly fallback to grbl if configured as such
Responsiveness
Better support for smaller screens
Wide-but-short resolutions (like ~13xx × 7xx) should no longer cut off UI elements
Fixed some Remote Mode responsiveness regressions
Cleaner spacing in the top bar on smaller displays
Packaging
Fixed slow startup on AppImage builds caused by ASAR compression
Continued build pipeline cleanup
Smaller installs overall
Example: Mac .app size reduced from ~550 MB → <400 MB
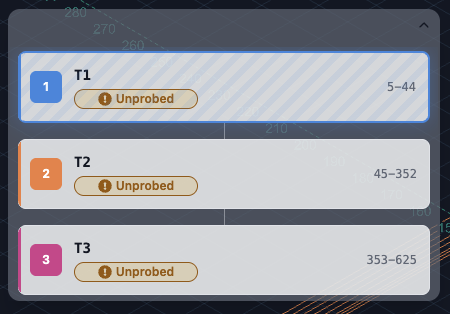
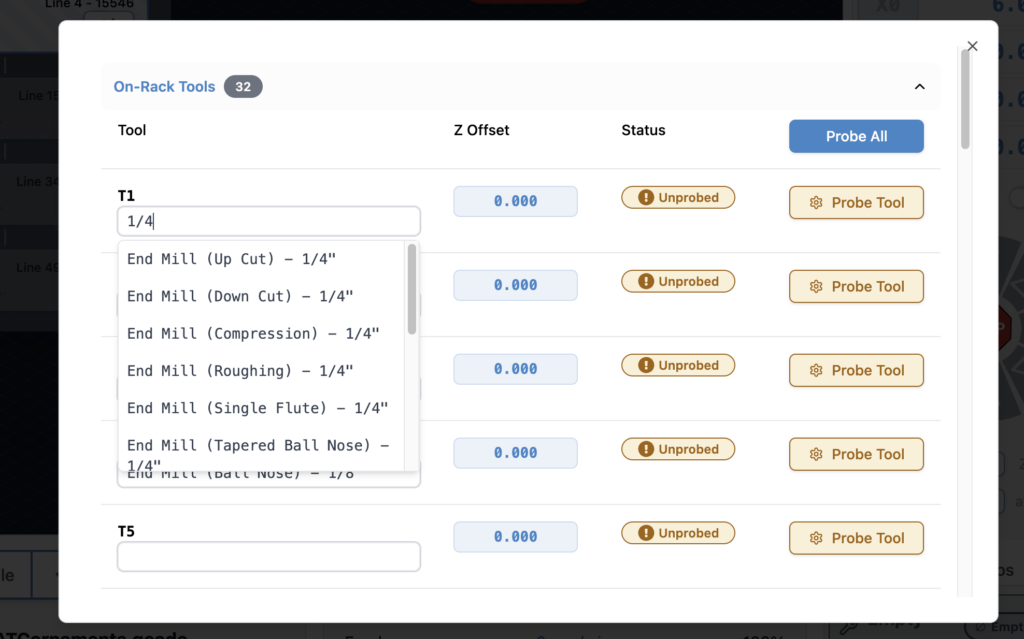
ATC – status updates and other
Probed, unprobed, and off-rack/manual states are now separate statuses
You can always see both offset status and manual/off-rack state when applicable
Tool Timeline received a visual refresh for better clarity and information layout
Tool nicknames are now included anywhere a tool number is shown in the UI
Config and Templates moves into Accessory Installation Wizard
Extremely professional placeholder images added to ATC Installation wizard while we wait for marketing
New timeline look
New machine profiles & grblHAL Core support
Updated AltMill 4×8 machine profile
Added support for new/remapped firmware values and keys for grblHAL Core
Config automatically adapts based on firmware version
Affects EEPROM-related areas including:
Restore Defaults
Config Tool
Outline improvements
Outline process improved – should be faster, should work better for all types of files. Travel direction is always consistent.
Added new option – Rapidless Square – which computes a bounding box of only the cutting movements (G1/G2/G3) and ignores G0.
Can now configure outline to use custom feed rates and G1 rather than G0 (Thanks, kieraneglin)
Inner islands no longer considered when generating hulls for details outline – so file outline should be more consistent overall
G0 ignored, just outline cutting motions
Config updates
Various logic changes to config area to improve performance
You should notice the population of entries and search to be more performative
No delay when connecting on the config page
Various improvements & fixes
Selecting the current jog preset now resets values back to configured defaults
Config imports are validated before being applied
Diagnostic PDF now clearly shows when disconnected data isn’t available
Improved Run Check on Load workflow:
Prompts before enabling check mode and running the file
Probe corner can now be changed directly in the Run Probe dialog
Warning shown when using a non-default corner (no more probing the wrong spot)
Improved grblHAL flashing UX
Spindle selection now updates correctly when configurations change
Fixed connection widget interaction issues when dropdown menus are open
Alarm descriptions now pulled directly from grblHAL firmware
Various Dark Mode polish improvements
Fixed diameter parsing for DeskProto rotary files (for real this time). This must be toggled on inside the config section under “Rotary Diameter offset”
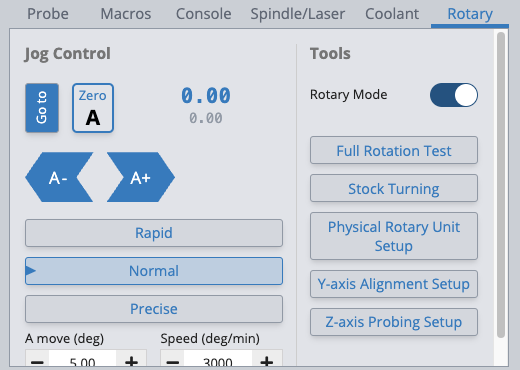
grbl Rotary – can now pass A through natively rather than always hijack Y when rotary mode switched off. This is mostly for compatibility with fluidNC/non-standard grbl variations that natively support A axis commands.
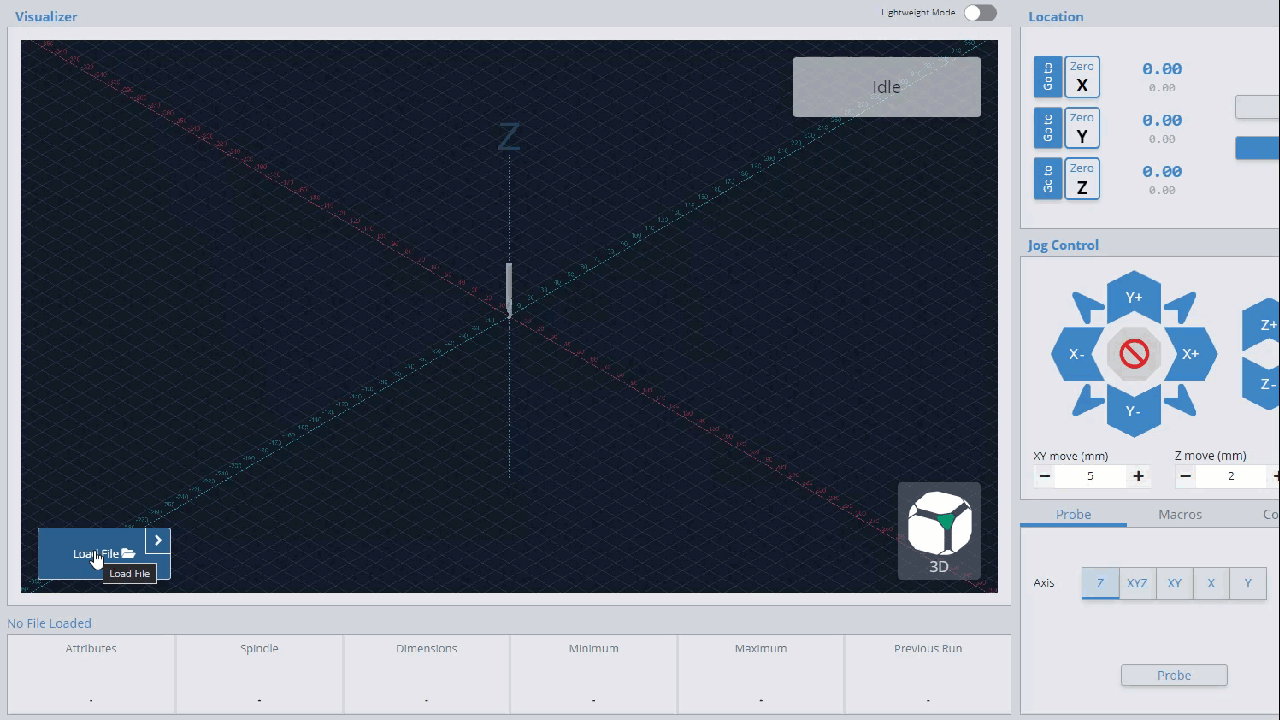
Camera cube added to visualizer in surfacing and rotary surfacing tools
No longer show the special animation for spindle/coolant when disconnected and spindle/coolant state is indeterminate
Download
gSender Edge is beta software, so expect the occasional rough edge. You can safely install gSender and gSender Edge side-by-side.
Huge thanks to everyone testing Edge and sending feedback — it directly helps shape the final 1.6.0 release.
gSender 1.6.0-Edge-3 is rolling out with a solid set of improvements and long requested fixes.
We are approaching the feature freeze for 1.6.0, so most remaining work before the March release will focus on stability, polish, and small behaviour adjustments. It’s likely we have one more Edge release that’ll prioritize various bugs and remaining improvements. If you have been waiting to try Edge, this is a good moment to jump in. As always, reports from early testers are extremely valuable.
This update includes several notable enhancements, including major gains in load time and improvements to remote mode.
Faster load and install times
Significant changes to the packing system and build process have produced much faster startup across all tested devices.
A load time of roughly 25 seconds or longer has been reduced to about 4. Similar improvements appear on every device, including gControl.
This has been one of the most common complaints about gSender, so we are pleased with the progress and expect further gains.
Check out the load time comparisons below:
1.5.7 on PC (~25 seconds)
Edge on PC (~5 seconds)
Edge on gControl (~7 seconds)
Installation is also noticeably faster.
Silicon Mac builds, Mac Signing, and new Electron version
We’ve updated the Electron version for packaging to the latest release, which means dropping support for earlier macOS versions. The minimum OS requirements are now as follows:
macOS: Monterey (v12, released 2021) and up
Windows: Windows 10
Linux:
Ubuntu 18.04 and newer
Fedora 32 and newer
Debian 10 and newer
We are building and providing both an Intel (universal) build and now a Silicon (ARM64) version of gSender for macOS. Silicon users should notice a performance improvement.
We are now also signing our macOS builds, so hooray! Coming soon to an app store near you!
Better portrait mode
We continue refining layout behaviour to make better use of space across different display configurations.
Larger, clearer buttons in portrait mode and elsewhere
Improved spacing and alignment
More adjustments planned throughout the Edge cycle
A new guided installation tool walks users through setting up supported CNC accessories.
First supported workflow is ATC setup
Future plans include spindle, laser, and first time CNC setup guides
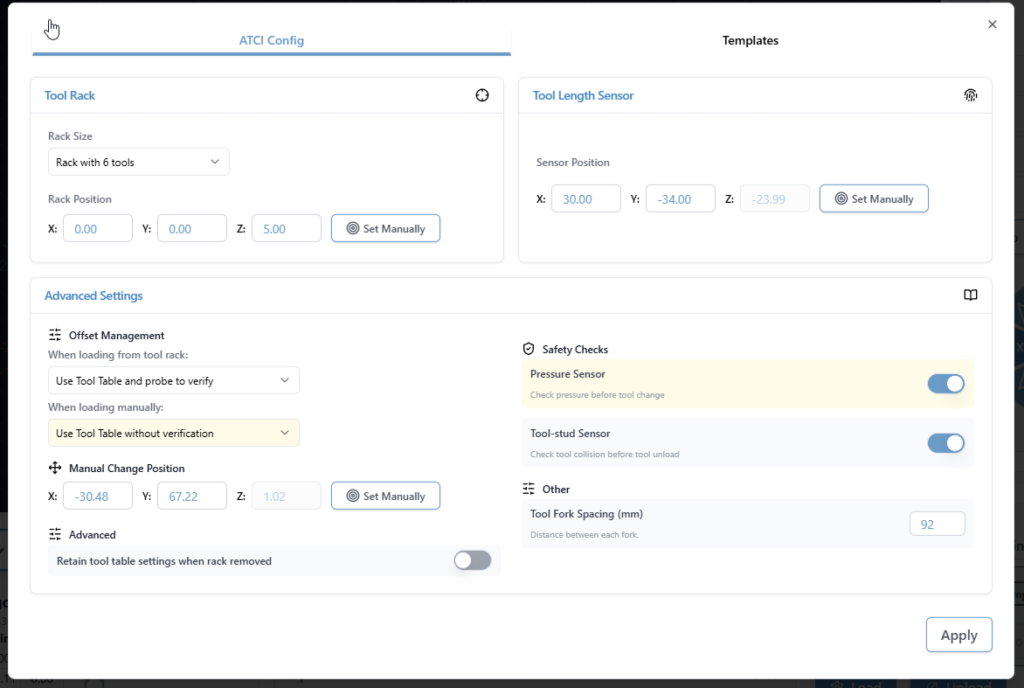
ATC configuration
The ATC configuration tool has been streamlined.
Combined and reorganized options
Improved flow and clarity
Updated interface for a smoother configuration experience
Look at all the options when it comes to ATC configuration
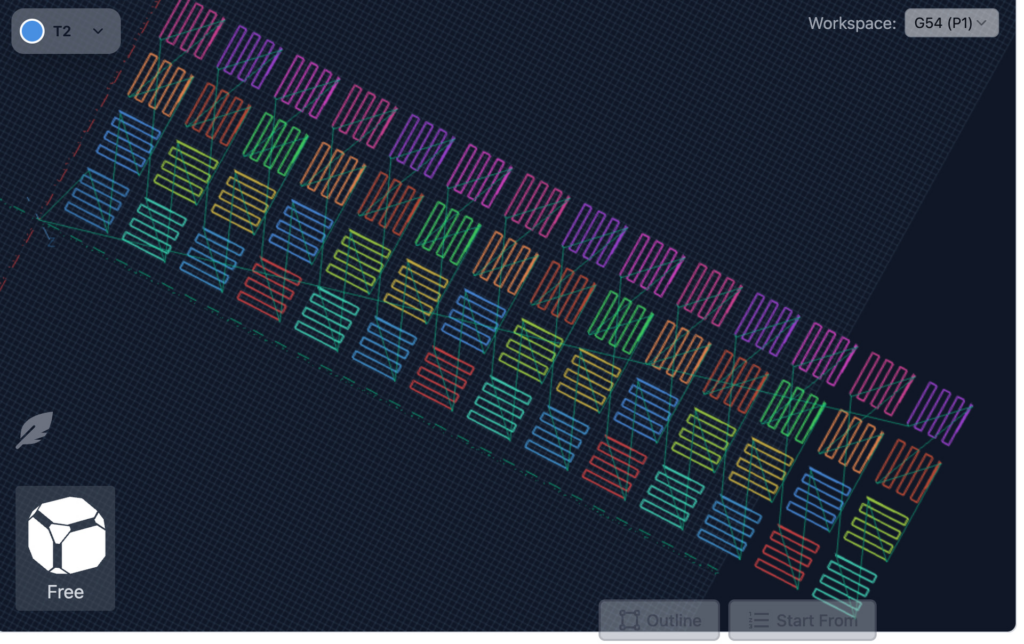
ATC Visualization and Tool Table
Updated colours to a designated set of 12 for better toolpath distinction. It’s now funky fresh
Tool table tool nicknames are now selectable from a database of common bits, which includes search and still the ability to type in a custom note for a specific T command.
New toolpath colours
Tool table – selectable tool database
SD and FTP support
FTP support added, allowing uploads over Ethernet instead of USB only
Simplified workflow with a single refresh/list button
Automatic SD mount attempts when the tool opens
Dark mode and portrait mode updates
Progress bar improvements
Safety checks to disable the tool when connected to grbl or grblHAL devices without Ymodem or FTP support
EEPROM and configuration improvements
Added support for new settings in the upcoming grblCore release
EEPROM tool now handles all reported EEPROM settings, not only those surfaced in Config
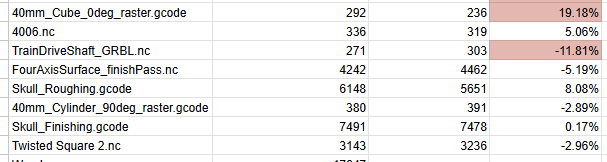
Rotary time estimation
Time estimation for rotary jobs is now more accurate. Travel distance calculations now correctly account for A axis rotation, bringing estimates closer to real world results. Accuracy is approaching within 10 percent, with more refinement planned.
Some of the test file results for new rotary estimation
Visualization for rotary files has also improved. DeskProto typically sets Z to the surface and stores workpiece diameter in comments. gSender now uses that information to produce correct visualizations. Most gcode viewers cannot do this without explicit diameter data, so this is a meaningful improvement.
Better Rotary Visualization
Visualization matches end results
Remote mode
Updated look and feel
Settings now sync between desktop and remote clients, ensuring consistent preferences such as jog speeds, probe type, and units
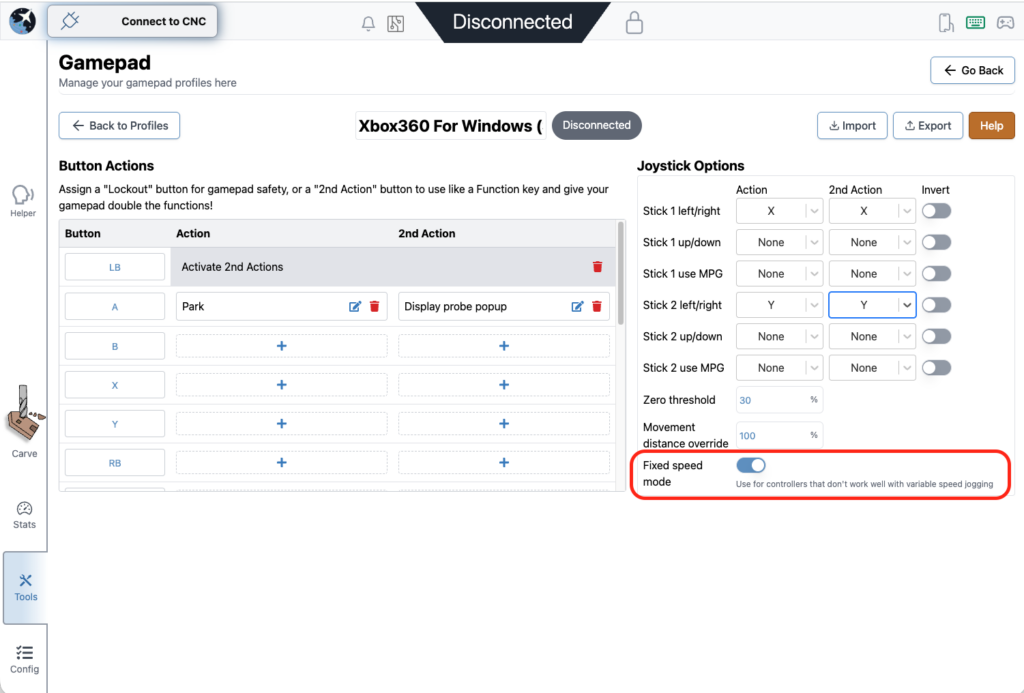
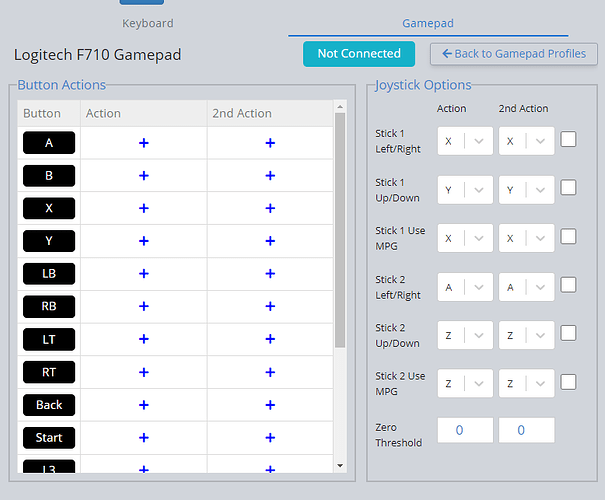
Gamepad Updates
Fixes to certain shortcuts on gamepad firing twice, specifically the park button and probe popup
Added a new feature to disable dynamic speed and use a fixed value for thumbstick jogging
All these changes were done by a community member. Thank you for your contribution Kesmit13!
Fixed speed mode
Various fixes and improvements
ATC functionality updates
Fixed issues where tool offset was being incorrectly zeroed out on board reset
$SpindleESH now sent correctly on spindle select for core firmware
Gamepad jogging improvements, including fixed speed jogging
TLO probe offsets captured mid toolpath to keep UI elements current
Error and Alarm descriptions populated by grblHAL firmware
Helper accessible across all gSender tools, not only the carve page
Optional prompt on program close to prevent accidental exits
AltMill 4X8 machine profile added
Now using grblHAL error and alarm descriptions throughout the application
AltMill ZxY plus Spindle configurations removed
Added probe profile for BitZero 2 probe block (thanks Krudoy)
Download
gSender Edge is beta software, so expect occasional instability. You can install both gSender and gSender Edge side by side.
Thank you to everyone testing Edge and sending feedback. Your reports help shape the final 1.6.0 release.
We’re excited to announce the release of gSender v1.5.7, a version focused on refining performance, fixing long-standing quirks, and adding new functionality to make your CNC workflow smoother than ever.
Check below for a full list of changes. Updates are available via Github or follow the update prompts in-app on gSender startup.
v1.5.7 Changelog
Fixed issue with start job shortcut not firing in some situations.
Park shortcut now persists between sessions.
Unlock button now has same logic as large Alarm unlock button for Alarm 10 and 17 where it will reset and unlock for you.
Corner selection hidden for Z-only probe type.
Squaring tool calculations for custom distances are now correct.
Added support for Teensy boards in recognized devices.
Error line reporting mismatch fixed.
Stopping on start event codes should now correctly clear the planner and reset the board.
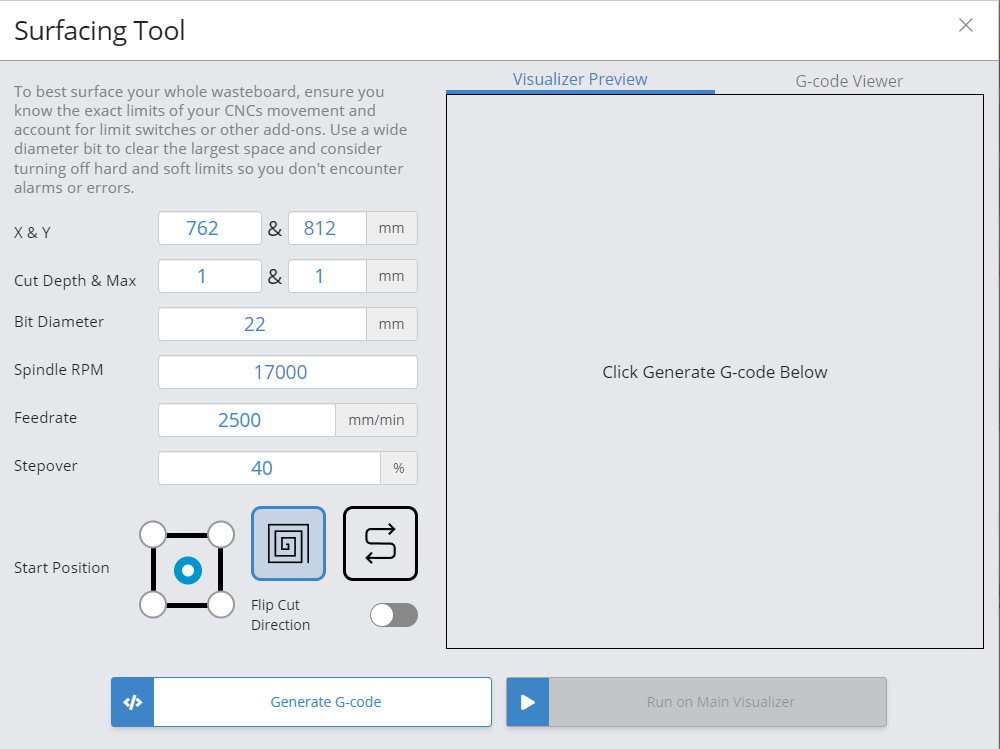
Added cut depth validation to Surfacing tool.
Auto-reconnect should work for Ethernet again.
Added import/export functionality for gamepad profiles.
Homing location now shows correctly on stats page.
Fixed issue with terminal history order.
Added new config option to run check on a file when it’s loaded in.
Fixed issue with rapid position shortcuts not memoizing positions.
GRBL spindle max/min again correctly updates the eeprom on change.
Config search behaviour updates to be more consistent with modified flag enabled.
Probe shortcut no longer causes an error 2 due to stale distance modal.
Rapid position shortcut no longer has a stale homing location value.
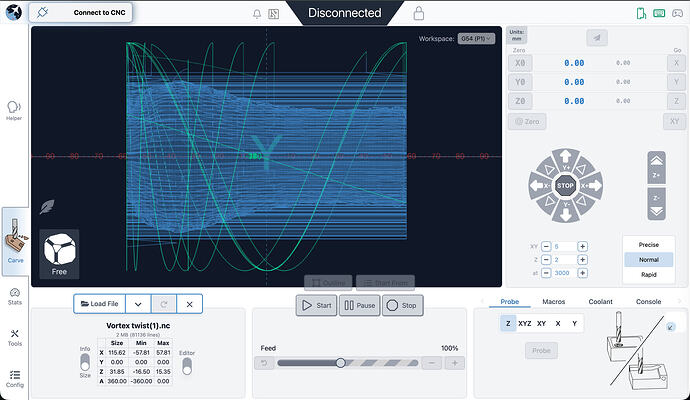
gSender 1.4.0 is now released, officially supporting grblHAL, rotary cutting and much much more!
The official theme for this update was fundamentals, which means improving and iterating on existing features to address any shortcomings, reliability issues, or add long requested functionalities.
As always, thank you to everyone involved in using, testing and giving feedback on Edge releases over the past 4 months. We’ve been working hard to address your feedback and are excited to bring these new features over to the general userbase!
Without further ado, let’s get into this update!
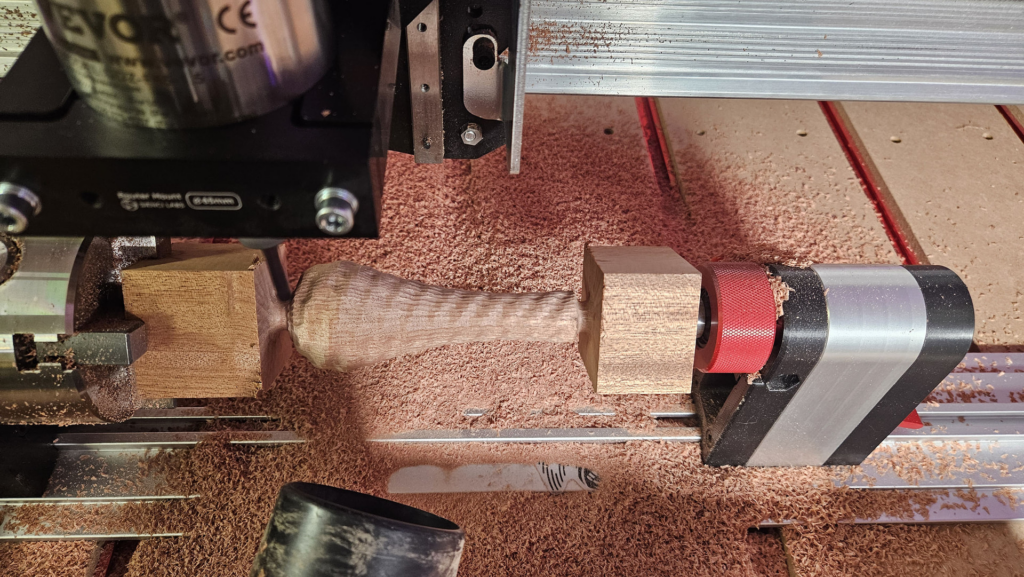
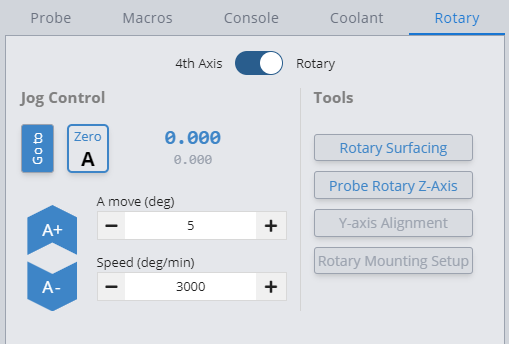
A New Spin on Carving – Rotary Support
Turning to some positive news, we’re finally bringing support for Rotary axes on both grbl and grblHAL based controllers into gSender! Whether you own the Sienci Vortex or some other rotary solution, gSender has you covered in everything you might want to do.
Once enabled in preferences, the user is able to control, probe, surface and carve using the A axis!
#image_title
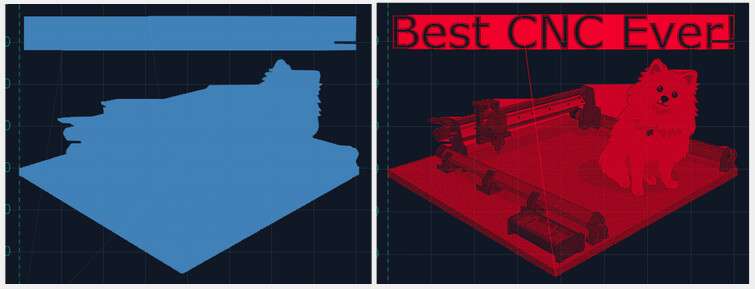
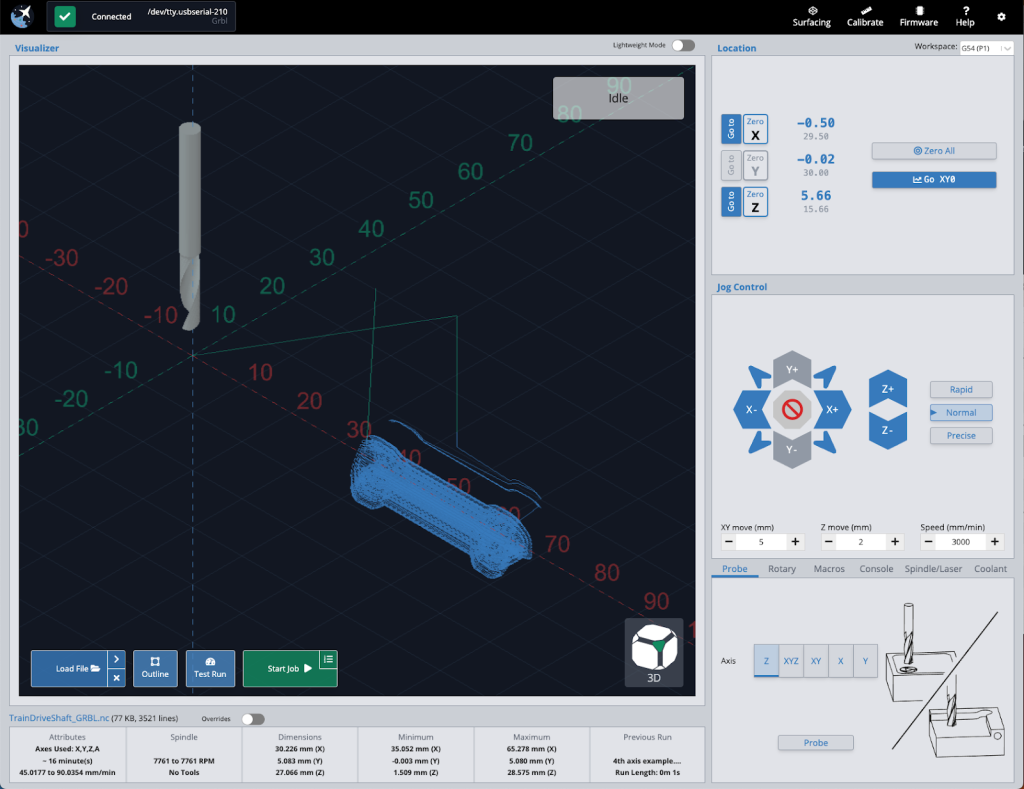
We’ve also updated the visualizer to better show the final result – so you can see your A-axis carving in all it’s glory!
Pushing Your Buttons – Better Gamepad Functionality
We’ve expanded and changed how gamepad works to give the user a whole host of new options for controlling their machine.
Joysticks are now able to jog the machine along any axis with variable speeds based on how far you’re moving the joystick.
We’ve added a new MPG mode which will let the user jog in a specific direction by rotating the joystick similar to physical MPG units.
There is also new alt modifiers for gamepad buttons, letting you map multiple functionalities to a specific button. Users are also able to assign a lockout button, preventing any gamepad buttons from firing until it is unlocked again.
Finally, we’ve altered the workflow for setting up a gamepad, letting the user map an action to a button instead of the opposite. We hope this lets users set up their new controllers quickly and easily and get back to cutting.
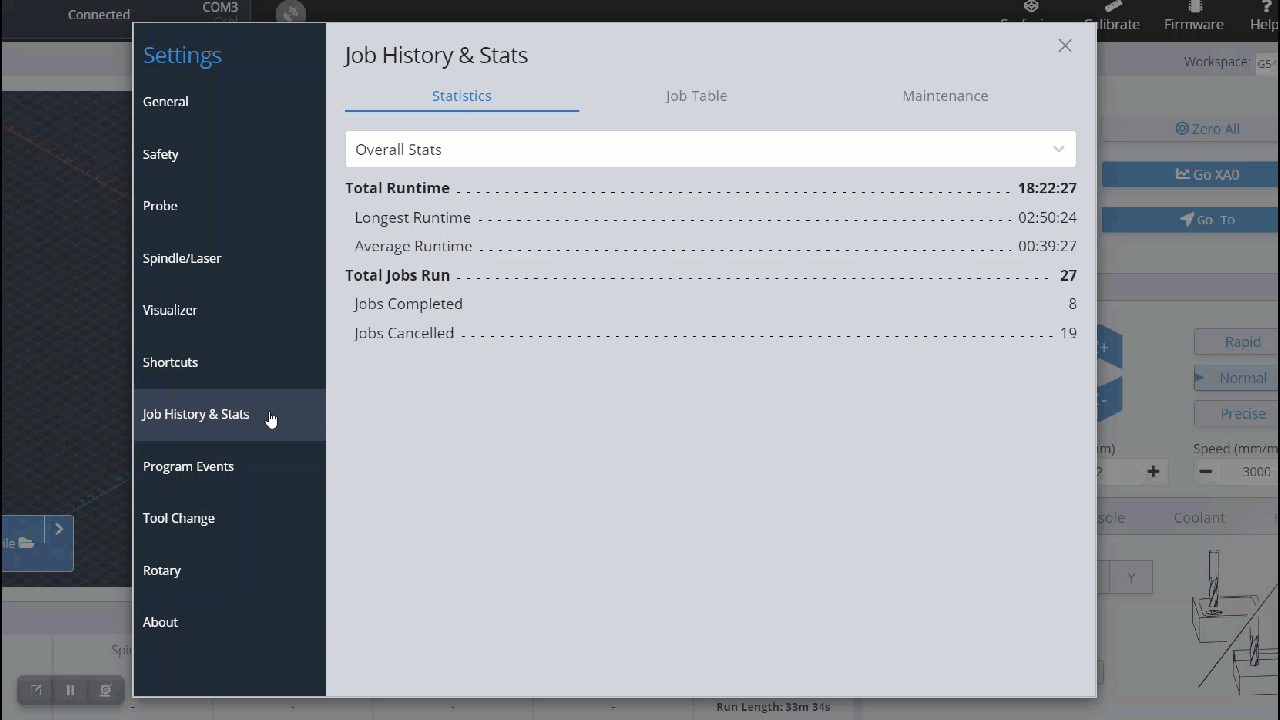
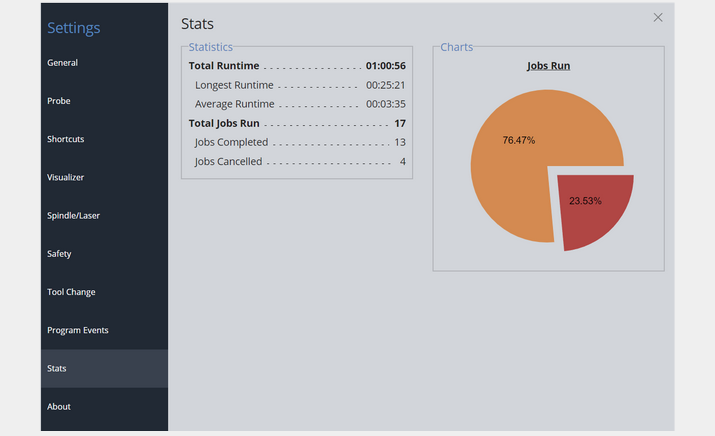
What did I just do? In-depth Job Stats and Maintenance Reminders
We’ve greatly expanded the job stats section to give you even more information about past jobs. Not only do we now track time run per com port, there is more in-depth tracking of individual jobs and any problems encountered.
We’ve also added maintenance reminders to keep you on track for keeping your machine in tip-top shape. Reminders are set up with expected run time before needing completion, and once you’ve approached that warning you’ll start to get reminders. Maintenance reminders are entirely customizable – set up your own tasks to keep on top of anything personal to your workflow.
Some Old Favourites and New Favourites
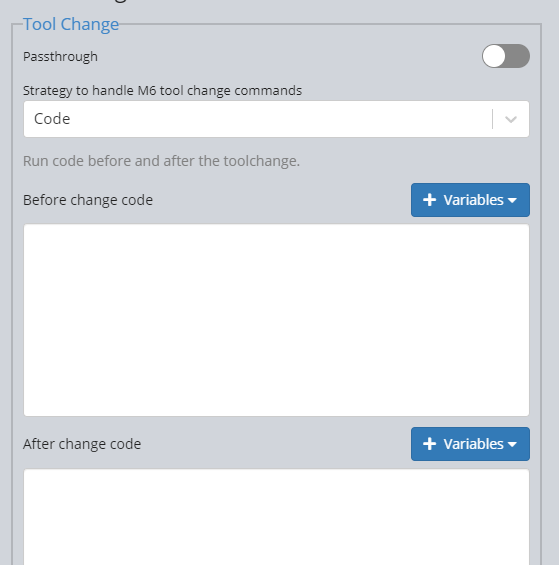
We’ve brought back code blocks for tool change to much fanfare!
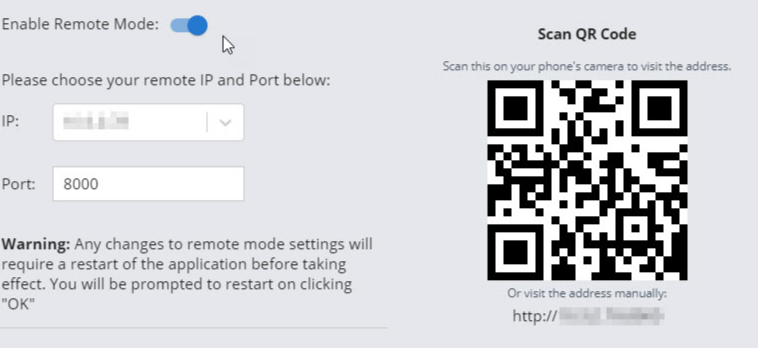
Remote mode has received a number of improvements, including workflow controls and unit selection on the remote interface on phone screen size and a QR code in-app for easier navigation on your handheld device.
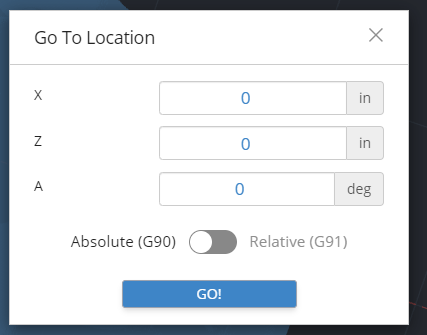
We’ve also added an easier way to go to a specific location – clicking the Go To button will now let you select a incremental or absolute position to move your machine to.
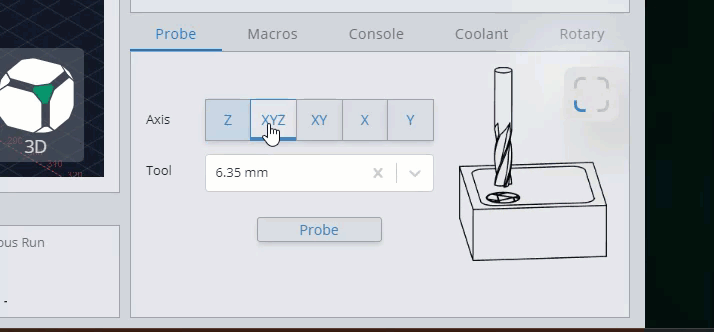
Touch Wherever You Want – Multi-corner Probing
No longer a one-trick pony, gSender now supports probing off any corner of your workpiece using both standard and auto-zero touchplates!
Selecting which corner you want is as easy as clicking a button – simply press the corner selector and the probe routine will automatically update offsets to both run and set the zero correctly at the selected corner!
Technical Notes – 32 bit no longer supported
We are officially dropping support for 32bit versions of gSender. It was a hard decision but continuing to support 32bit was a security concern for several libraries we use and we can’t be shackled long term to out of date libraries without alternatives. Version 1.2.2 should continue to work fine for the small subset of users (sub 1%) that we show as using 32 bit operating systems.
Firmware options – grblHAL Firmware Support
Our first non-grbl firmware officially supported is grblHAL – an up-and-coming solution that works on a wide variety of hardware.
Firmware flavour is selectable in the connection dropdown – by default most users will continue to use grbl, but swapping controller types is a simple click away.
We’ve updated the UI in a number of places to support all the new functionality available in grblHAL – including single axis probing, ethernet connectivity and more.
USB is no longer the only way to interact with your machine using grblHAL – so we’ve added a way to connect and run jobs using ethernet, which is more reliable overall.
grblHAL is also a bit more fluid when it comes to EEPROM options – so the firmware tool has been rebuilt to dynamically support all options are reported by the firmware itself and rebuild the table so you’ll always be able to easily update your EEPROM configuration no matter which plugins you have installed.
This is just a taste of new updates we’ve added – for all the details and changes, full notes can be found below!
Release Notes
Added Rotary Mode
gSender is now able to run 2+1 axis files on grbl and 4 axis files on grblHAL
Visualizer updated to support 4 axis rotations
A-axis DRO and jogging
Rotary probing
Added grblHAL controller support
Connect to and run jobs as normal on any grblHAL device
Connect over ethernet where hardware is supported
New grblHAL specific firmware tool that is dynamically generated based on reported settings
New UI elements where appropriate to support new functionality such as single axis homing
Gamepad improvements
Restructured logic and mapping of buttons to actions
Add secondary functionality to buttons
Added joystick MPG mode
Added lockout button to deactivate gamepad when needed
Improved job time estimation
Significantly improved initial time estimation algorithm based on machine acceleration and max speeds
Mid-job estimation uses initial estimate per line for more accurate remaining duration
Multi-corner probing – touch off any corner using both standard and auto-zero touchplates
Added Go To UI button to quickly go to an absolute or relative workspace coordinate
Clearer distinction on planned lines vs cut lines – planned lines show up as a (customizable) yellow instead of the default cut gray
Remote mode improvements
Added QR code for easier navigation to remote address on phone
Added workflow controls and unit selection to remote mode UI
Added preference to prompt on Zero to prevent accidentally resetting zero on any axis
Code block toolchange again supported
Firmware active modals now displayed in diagnostic tab
PRB values available to use in macros
Files are now parsed once per run time
Fix for DRO precision in some situations
Improved job stats area – now tracks jobs per com port, more information about each job run and the number of problems encountered
Maintenance reminders – set up and customize maintenance reminders to prompt tasks after specific run time totals have occured
Hi everyone, Chris here. It’s great to be speaking with y’all again, it’s not often I get around to writing blog posts since I tend to be more behind the curtain on the tech development we do here at Sienci. As Andy mentioned in his November Production Update post, there’s a lot to update on so I’ll spread as many juicy details as I can. We’re now at over 400 people interested in buying the new SLB system we’ve been working very hard at so thank you for your support! It’s very clear that our community is very excited about this massive upgrade to the LongMill and for the future of the hobby CNC industry.
There’s also a video I filmed which you can feel free to watch if you prefer to see more of my face 🙂
Recap
Let’s start with a quick refresher about how the SLB came to be Sienci’s biggest project to-date.
As many of you know, Sienci Labs has historically been built up by our mechanical solutions – an expected direction seeing as myself and Andy co-founded the company while studying Mechanical Engineering. Our goal with Sienci was always to take advanced, industry technology and try to find a way to simplify it in ways that made it less expensive and easier to use so that everyone could have access to making complex things at home. We feel like that goal of price-point and ease-of-access is something we’ve been proud and successful at to-date with our big projects like the LongMill turned LongMill MK2 CNC, LaserBeam laser system, Vortex rotary axis, AutoZero touch plate, and our unique MK2 Magnetic Dust Shoe.
What’s been clear to us since the start though is that the CNC experience won’t be able to be improved with mechanics alone. Most hobby CNC communities have quirks with their machines, but once those quirks are understood the majority of confusion comes from everything else you see day-to-day when you use it: designing projects, tool selection, feeds and speeds, machine control, and reliable cutting. This is why we started working hard on non-mechanical solutions that we’re also very proud of like gSender for open-source CNC control, our in-house feeds and speeds charts, our expansive resources for learning and understanding CNC, ever-growing roster of tutorial videos, and now the SLB.
Why the SLB?
The SuperLongBoard is a next-generation CNC control board we’ve been dreaming of making for years now and is getting closer to completion. We believe that at this current stage, integrating smarter, more reliable, and more capable CNC control electronics will make the biggest improvement to the CNC experience. If you look at options on the market there’s been a large divide between the capabilities and reliability of the typical hobby CNC boards in the $40-$200 price range and the far more expensive, semi-industrial options that can reach the several-hundred-dollar range to over $1000. With chips getting more powerful and lower cost, we thought that gap in ability could be reduced while still staying in the lower price range by making a board with those new technologies. We knew this was going to be a big challenge – there are reasons why it’s typically easier to up-sell older technologies than it is to develop new ones – but we felt strongly in our decision. We felt that creating a new, improved, and unique solution could bring new innovation to the market to benefit everyone by reducing barriers to entry, keeping the industry progressing, and making more reliable and capable CNCs at lower price-points.
Working alongside Andrew and his team at Expatria Technologies, and building off of Terje Io’s amazing grblHAL project, all these tools need to work hand-in-hand so we can set our sights on resolving two major areas that we think hobby CNCs could benefit from:
Reliability: this is such a broad topic to solve, but it can be more-or less divided into a couple categories.
Board wiring and protections: designing a board with proper grounding and plenty of voltage protection and isolation takes a lot of time and experience but is needed to shelter the electronics from CNCing – an electrically ‘noisy’ environment from all the moving motors and static electricity buildup from cutting and vacuuming materials
USB protocol: this is implemented in firmware and grblHAL comes with far more checks with data communication mechanisms in place to guarantee delivery over USB and know when to resend lost information
Backup Communications: adding Ethernet on top of grblHAL’s already robust USB implementation isn’t necessary but having an alternate communication method to turn to is always a great option if you’re ever experiencing problems with the primary style – an onboard SD card also gives you that flexibility
Processor speed: a slower processor can’t buffer as much information when dealing with short and complex movements, meaning better chips can reduce the chance of errors popping up
Room for growth & “Wow factor”
Motor drivers: the same stepper motor controlled by different motor drivers can see notably better performance with all else being equal – so why not upgrade to newer-age drivers to get better speed with less motor noise out of the same CNC
Smarter CNC: having the CNC better tell you when something has gone wrong, automatically fix a problem for you, or make one of your existing processes easier creates far less room for error
More control options: there are typically specific limitations on what a CNC can do, so why not expand it’s options to support all commonly used CNC accessories plus leave space for even more customizable outputs. This can include things like independent Macros buttons, independent Spindle and Laser control, Modbus over RS485 for more closed-loop VFD control, tool length sensor support, ring and rail lights, door sensor, CANBUS, CNC pendant options to control the machine more easily, adapting to plasma cutting, and more
Multi-axis control: benefits those who have started to dive into cutting rotary projects to create ornate, fully 3D projects on their CNC and want either a simpler transition between cutting styles or are interested in full 4-axis cutting
Onboard computer: if you’ve ever run into problems with a Windows update, USB port falling asleep, or having hardware too underpowered to run your CNC, these problems can all be solved with a dedicated, purpose-built, and built-in computing solution running something like gSender onboard
We think we can address most of these aspects with the SLB at the time it ships so it can play a part of the next big step in hobby CNC technology. It’s advanced electronics and software will bring not just new features and functionality to the LongMill, but at a price point that we believe will be affordable for hobbyists. With it being a Sienci project, it can also guarantee that the SLB will be backward compatible with ALL LONGMILL CNC MACHINES OF ALL GENERATIONS, which means that users can upgrade their machine’s capabilities by simply replacing the controller. It will also support all our current plug-in add-ons. We also plan, just like with gSender, to make our board well documented and able to be adapted to many other CNC form-factors when we start to work through rolling it out in production.
How it’s coming along
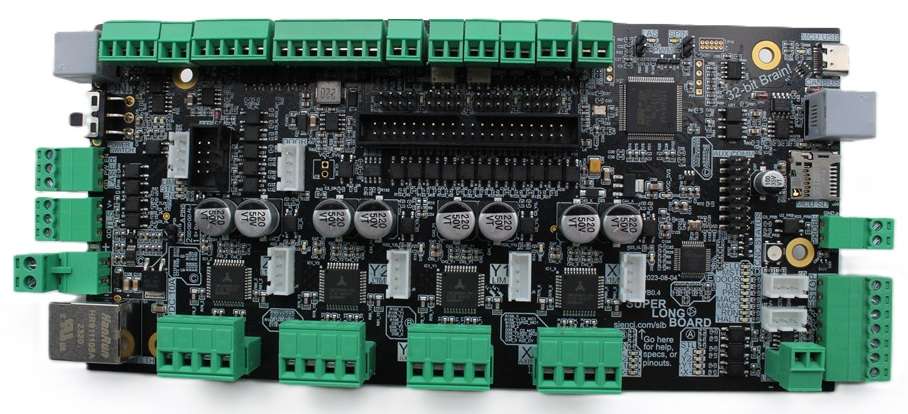
Very well! Since Andy’s last update, our SLB team has been working hard to prioritize checking the functionality of the physical circuitry on the V2 prototype board are we’re now feeling confident that the following circuity is good to go:
Newest version of the SLB (V2)
24V 12.5A brick power supply input with power switch (no more power over computer USB)
External, detachable E-stop with light, controller feedback, plus 3 customizable buttons
More reliable implementation of serial communication over USB-C (no drivers needed) as well as Ethernet
4 higher-end, independent motor drivers rated for 2.8A RMS (TMC2660C, higher efficiency, less noise and resonance)
RGB Machine status LED
‘Contact’ style touch plate input
4 independent limit switches with two connector styles and 5V or 24V output
Coolant digital output set via M8 and M9 commands (5V 40mA)
Independent rotary axis support with dedicated limit switch
Tool length sensor input for easier tool changes
Modbus over RS485 to control spindles and other accessories with two connector styles, terminal breakout and CAT3 cable with RJ11-6C/RJ25 and supports daisy-chaining
Very dust resilient enclosure with quick assembly
Many status LEDs for troubleshooting
Tons of opto-coupling for optimal protection against incorrect wiring and electrical noise
Less heavy boards with less fragile components should lead to lower failure rate
Extendable RGB LED ring light and rail strip output
4 customizable outputs to external circuits, controllable via M62/64/63/65, M7/M9, M8/M9, and M3/M5 (2 SSR pin shorting and 2 relay/solenoid/motor driving)
SD card to store onboard information and possible g-code file overflow (min 512MB)
Door sensor for input to pause cutting
Special CANBUS for pendant communication
Extra breakout IO to access spare MCU pins and other alternate outputs
ADC input for future sensor input
Communication connections (e.g. Rx and Tx) available for future control via external controller / pendant
These could still change a little on our way to production but I’m very confident that this will give an accurate image of what the SLB will be capable of. The gray items on the list might not be ready at the time of launch but the great news is that we have verified all their circuitry and put them on the board so all that’d be missing is a firmware update we plan to put out after shipping boards to enable those features as well.
The main items absent from the list are twofold:
Firstly, though we aimed for the V2 board to be our second and last prototype, we did find some areas that we wanted to tweak. These were: changing the Spindle 0-10V output back to 5V PWM to support the new spindle we’re working on, changing the Laser PWM and Flood output circuitry to deliver a signal that’s more in-line with the previous LongBoard, tweaking the RGB LED driver buffer, fixing some onboard status LEDs that were floating, and adding some more EMI improvements. Most of these changes are quite small, but we decided that getting a V3 prototype made will help us feel confident in finalizing the design for production. This is a hard decision as it’s likely going to add another 1 month to our board release timeline, but we really wanted to be sure to support one of the key features we wanted the board to have “Independant 5V PWM and EN Spindle and Laser control set via M3, M4, M5, and S g-code commands, plus SpinDir“. The V3 design should be sent out to get made in the next week and should now lock-down the full SLB design. While we wait for it to arrive we’ll be focusing fully on testing and firmware improvements.
Secondly, for those who might not have been following Andy’s production updates, we’d originally envisioned the SLB as being a system of two different parts working together. The first being the board itself, containing all of the core CNC functionality controlling motors and handling g-code, and second being an optional onboard compute module that would act to replace a computer or laptop and instead be integrated. Users could connect a keyboard, mouse, and monitor to control all functions of the machine directly through the SLB. This was very exciting to us given the considerably low price of the compute module over a computer, around $40-80 dollars plus the cost of the monitor, keyboard, and mouse, as well as the extra speed, user experience, and reliability of an onboard system.
In our extended tests with this idea in mind, we weren’t finding the success we’d hoped in creating a seamless user experience with this solution. Despite trying many Linux kernels, drivers, GPU acceleration, and bringing many more efficiencies to gSender, the Broadcom and Rockwell-based processors used on smaller compute modules were not powerful enough to accommodate the visualization of g-code directly onboard. This also meant they didn’t have extra headroom if in the future we wanted to implement other features such as having a camera monitoring system or other sensor inputs. With many months delay trying to chip away at a resolution we decided to split the development of SLB back into its two parts; prioritize improving the baseline machine performance first so CNCers don’t have to wait any longer for the SLB to make better machines, and strip out all the on-board connectors and switch to a higher-power off-board solution that we’ll implement at a later stage. This will mean anyone could still upgrade at a later date. Higher-power Fanless PCs will cost more, from our initial budget of around $80CAD/60USD for the compute module, to somewhere around $100-$200USD depending on the specs and configuration, but would ensure a smooth and seamless experience as well as provide headroom for future applications.
To summarize, we decided to take the concept of the onboard computer and divide and conquer on it at a later date. It would’ve been really cool to have a fully integrated system but it kept pushing our board delivery back further and we felt it would benefit everyone if we just pushed ahead on the other features that will all still bring great benefit to the CNC experience. This means that users will still need to connect their computers to the board to control their machines when the first batch of SLBs release, but should still see drastic improvement.
To-date, SLB development costs have tallied to more than $300k, making it easily our most expensive project to-date if you don’t count gSender which is I’d guess is around $500k at this point. These costs are pretty standard and have mostly come from paying salaries to do in-depth research on board infrastructure options, decisions on features that CNCers would like, designing robust PCBs, lots of custom firmware development, and testing. The new board uses a large number of components, adding to the challenge and complexity in manufacturing, but this was expected and we’re working through it. We feel confident that we’ve done something useful here and we’re excited to see the interest in the SLB on launch and continue moving development forward.
grblHAL support in gSender
Another big effort we’re having to undertake to support the SLB has been with gSender. Though grblHAL has “grbl” in the name, it might as well be a completely new firmware with all the new work that our development team has had to put in so far to make a seamless CNC control experience and UI. Since grblHAL is such a new firmware on the hobby CNC scene, it’s still growing and not widely adapted, and we want to help change that. There’s so much documentation that has already been made but there’s also a lot more we have to figure out. We’ve been working on an all-new firmware flashing utility for the new board, and had to build in a lot of modularity so gSender can be compatible with old and new boards alike
Look at an example of all these new EEPROM settings!
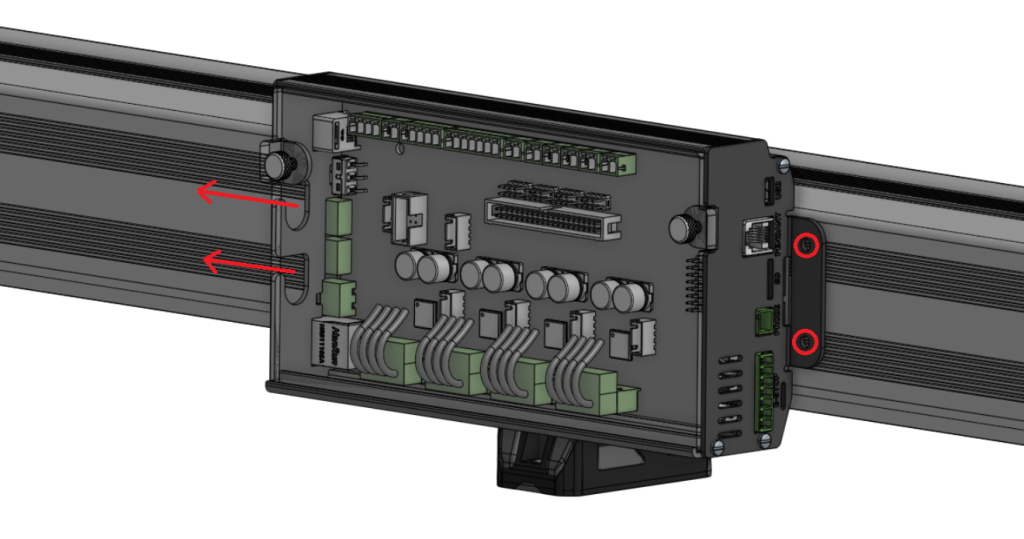
Iteration on the SLB enclosure I think is coming along well, the design is now pretty much locked in 🙂
Back in April I put out a post on our Forum with the leading design we had at the time to get peoples feedback on what they thought (https://forum.sienci.com/t/official-call-for-feedback-on-new-board-in-development/8519) and the results were positive but still mixed. I wanted to take a new approach to the enclosure design to accommodate all the new plugs without them all being exposed, as well as improve cable management on the LongMill in particular. Though many people were on board, many still expressed concern with my idea behind mounting the board to the Y-axis rail due to their fear of dust, vibration, or accommodating enclosures.
After going through way more iterations internally, this is now our revised design which I feel much more confident will suit everyone’s needs:
#image_title
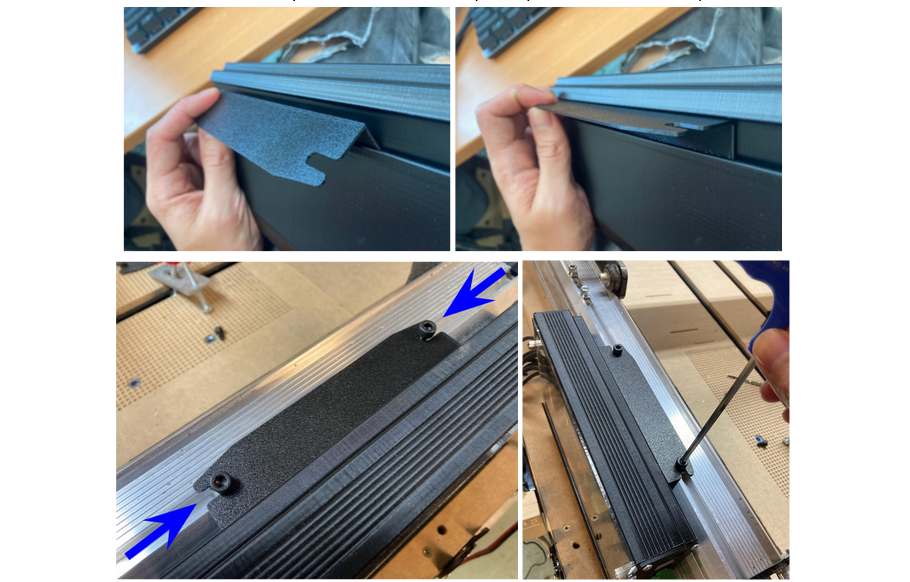
The main perks of this enclosure is it’s mounting versatility and wire management. With this new setup, anything that you’d expect to have more common access to faces toward the front and all other wires can be routed out the rear. The RGB status LED will be visible through the faceplate put the panel will also be easily removable for troubleshooting or servicing. All the components on the board face upwards so everything is accessible and the board has been tested to run very cool so even in hot environments and with the bit of venting we’ve added in we expect everything to operate as normal.
Rail mounting bracket
The rail mounting is also a separate piece that can be used or not. This gives versatility to mount the SLB on any surface (rail, vertical, or horizontal) with 2 or 4 screws. We’ve already begun production of the parts and should be getting them in Nov-Dec.
E-stop Design
This is also mostly completed, just waiting for some last few checks. You’ll notice on the earlier feature list that we wanted to move away from the 3 buttons attached directly to our board. This is because there was feedback that people didn’t tend to use the existing buttons because of their fixed function, and when people mounted their board out of the way they couldn’t access the buttons anyway. We wanted to fix this by making the buttons separate and customizable, and this lead to a new E-stop design with 3 other customizable buttons integrated into it! Now you’ll have the freedom to have 3 physical buttons perform a myriad of custom functions to suit your workflow right next to your E-stop.
New E-stop design
Beta Testing progress
As we’re turning the corner on finalizing the board design and implementing our initial set of firmware features, our main goal over the next month will be: test, test, test! We’re now in Phase 2 of Beta testing where our main goal is to make sure that all our new features play nicely with each other, since we already know they work well in isolation.
We currently have 3 boards with testers and 2 dedicated machines in our own shop running CNC jobs every chance we can get and have already found unique situations that cause problems which we can now work toward resolving. This also involves comparisons between the old and new board and real-life durability and performance testing. One example is Ian’s Onefinity where his former setup used our original Longboard and with the SLB he’s seen drastically reduced noise and nearly doubled movement speeds. This hasn’t been as drastic for our other testers but we’re also already noticing some of the stability and perks that the SLB has to offer. Once the batch of V3 boards arrive, the plan will be to redistribute them as well as contact a new wave of testers to complete one final round of feedback. Some people we reach out to will be those with persistent and existing EMI and disconnection problems to see if the SLB is able to resolve those issues. At that point we expect to feel confident in the performance and features we can promise with the board that we can prepare for release.
Here’s a video from Andy’s last post of us testing the new programmable macro buttons. These allow you to program a specific code or function to 3 unique buttons, rather than just start, pause, and stop, which is hardwired into the current control board. In this case, it’s being used to move the machine to a specific position to assist with getting the machine out of the way for changing tools and materials.
The pricing is likely to be refined as we’ve made new decisions and near production, but I think no matter how you slice it you’ll be able to expect that the SuperLongBoard will be giving you every bang for your buck.
As far as timeline, many followers of this project would know that we’ve had to push our originally anticipated late-summer, early-fall launch. We’ll be putting out another update soon on the roll-out strategy we have in mind moving forward because we want to give people a guarantee to be in line for the SLB before Christmas, so stay tuned to hear more about that. You can get a glimpse of what some of the steps will be with the roll-out in Andy’s original post as well under “What’s Next?”.
As far as ongoing project schedule, much of it has been laid out in the sections above which I’ll try to summarize here:
Last tweaks will be made in the next week to start a batch of V3 SLB prototypes
Firmware, Beta testing, and gSender support will continue over the coming month while we wait for the V3s to arrive
SLB Enclosure and E-stop designs should also become finalized and be ready for production in the next month or so
Once V3s arrive, final checks can be made to feel confident about the circuit design and begin board production
Phase 3 of Beta testing will continue to refine Firmware and gSender support while all other production is underway
I’d say that this means the boards won’t be ready to ship in December / Christmas and are instead more likely to be able to ship around Feb-March. The first major steps we took until June 2023 involved much of the initial product churn that we expected to see, though with delays in board prototypes and unexpected difficulty interfacing with the drivers we lost about 2 additional months. Add to that the outcome of the compute module testing meant that we had to pull out a lot of components for a full redesign between V1 and V2 and now we have to address some of the missed items between V2 and V3. This is the reality of developing such a complex product and is why we now feel much more confident with the recent testing and steps that we’ve taken that the completion of the SLB for launch is just around the corner 😀
Thanks
Thanks for sticking along for the ride on this big update, I hope it answers most of your questions on where the SLB is currently at and gets you excited about what’s to come. I expect the SLB to be very unique in it’s abilities to exceed the capabilities of many hobby CNC boards, perfect even for the DIY hobby CNCer for all it’s additional IO, and still have many more plans for it in the future. Of course it’ll be an Open-source design so hopefully all this time and effort that our team has put in will be able to return to the community and benefit other efforts toward easier CNCs.
Leave any comments you have that I missed and I’ll try to answer them. As I mentioned I don’t tend to put out updates because I’m a very slow writer but I’ll ensure to keep Andy in the loop as progress continues so he can update y’all as things keep moving forward. Just remember to read the Production Updates!
Edge 1.3.6 is released with some new functionality for gamepad and the grblHAL firmware!
The next Edge release will be focused on general app performance and connection reliability for vanilla GRBL controllers + a few other small new features like 4-corner probing on top of continuing to expand support for grblHAL firmware.
Ethernet Sending
Ethernet has emerged as the more reliable alternative to USB communications and is something that is both supported by more modern controllers and something that the upcoming Super Longboard will support.
We’ve added our first iteration of sending over ethernet instead of USB to this latest Edge build. If the grblHAL controller is selected, you should see a new “Network Devices” option with a configured IP address.
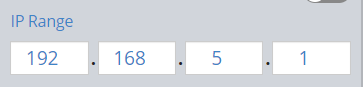
The IP address is configurable within preferences in the general tab.
For now, we’ve limited the functionality to TCP (port 23). We’ll be looking to expand it to work with websocket where supported in future releases.
Functionality should be similar as if sending over USB. We look forward to any feedback/issues experienced as we expand this functionality over the next few releases.
Gamepad Improvements
We’re slightly altering our approach to gamepad bindings, mapping available buttons as reported by the controller to actions instead of actions to buttons.
Each button can have a primary action and a secondary action by holding a modifier.
We’ve also added early iteration on joystick jogging and MPG mode jogging. Walid should have the details available for both soon.
We look forward to any feedback in this area since it will likely take a bit of iteration to get to our final implementation.
Full Notes:
General
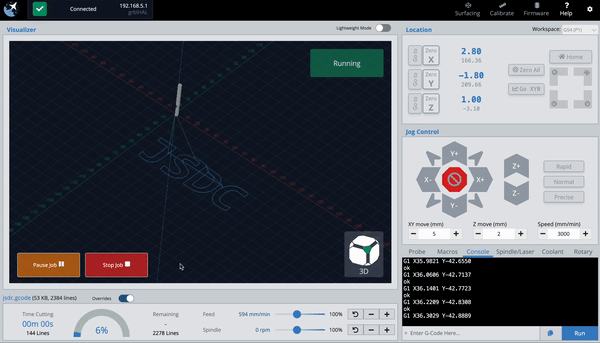
Connect over Ethernet using grblHAL controller/boards. IP address configurable within connection preferences
Fixed connection routing on HAL – should now be faster connecting
Fixed HAL pin states not reporting correctly
Unlock button now available on the UI at all times
Fixed HAL startup routine to correctly parse alarm code if in alarm state rather than assuming homing
Added better error logging to quickly address issues
Clearer distinction between planned lines and cut lines in visualizer – configurable in custom visualizer theme
Moved firmware selector in connection widget to bottom
Fixed issue with bitfield input in firmware tool
File parsing simplified to only need to parse the file once across several tools (outline, start from line)
Fixed edge case where Outline function would never return
Gamepad
Restructure of gamepad logic
Actions are set based on buttons present on your gamepad
Button labels can be modified by hovering over them and typing in your desired label
New feature allows you to add a second action to a button which can be used by pressing and holding the set button to activate the secondary actions (similar to the modifier key on keyboards)
New feature: Lockout button. Used to activate/deactivate gamepad buttons when needed. To use this feature, you must assign it to a button of your choice, then press and hold the button for 4 seconds, then it will toggle between lock and unlock
Added section for adjusting joystick functionality. Can now map joystick directions to certain axis. Have the ability to reverse the direction of the axis movement as well by checking the box next to the option
Added MPG mode for joystick
Jogging using gamepad is now dynamic, speed of jog will depend on the amount of force put on the joystick itself, if you push it all the way to the end jogging will be at max speed
After over a year of testing, debugging, and iterating we are excited to share our biggest gSender update yet!
Several of the features being released today have been in development and testing for over a year, so a big Thank You to all of those that helped us test and offer your feedback and experiences. The entire Sienci Labs team has been hard at work refining, stabilizing and speeding things up in the background, and now everyone can share in all of the new and super cool features available.
Some Quick history
You might be wondering: “a year? really? Haven’t they been updating gSender continuously?” and yes you’re right we have been.
Many typical gSender users might not know this but while gSender HAS been getting continuous updates on average every month, we’d also ‘spun-off’ what you might call a gSender sibling that we call “gSender Edge” around a year ago. The purpose of gSender Edge was to answer the question of:
With now thousands of people using gSender, we didn’t want to risk the chances that a new feature or update could ruin everyone’s experience using their CNCs, so how do we work on these new features in a safer way?
Edge Lifecycle
Edge isn’t a replacement for gSender in any way – it’s a way for us to test and get feedback on new, bigger features without exposing them to users who may not be interested or causing unexpected bugs. This follows a cycle that can be several months long where:
A new Edge version is split off from Main in order to prototype some new functionality and features (you can tell when this happens because the numbering scheme will jump up from 1.1.6 to EDGE-1.2.0, for example)
Edge eventually stops adding major features so it can become more refined from user feedback and squashing bugs
Once everything seems stable, everything that’s been added to Edge becomes a part of Main gSender so that everyone can now enjoy the new features
The process repeats
We’re happy to announce that we’re now completing that cycle for the first time and flooding a whole lot of new features into gSender!
Get ready to see a whole lot of new features that this gSender update is bringing
We’ve spent a huge time commitment just revamping the resources with about 24 new page-lengths being added to describe all the new features and better explain existing ones; that means expanding our existing documentation by about 40%!
By the way, this means that YES this new update will be including everything from Edge 1.2.5 plus more, it also means that soon enough the Rotary/HAL version will receive all these same updates and be released as the new version of gSender Edge. Edge will always be available for anyone to try and will always be ahead of gSender by having more features albeit likely less ‘stable’.
So let’s take a peek under the hood at some of the highlights to see what all the excitement is about!
Faster and Lighter
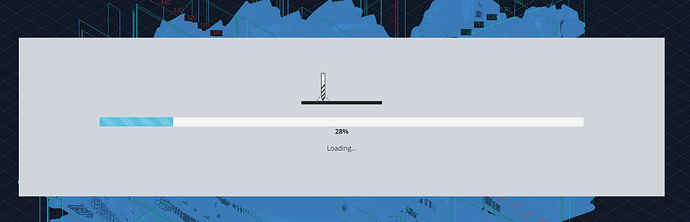
If you’ve ever found yourself waiting for a file to load, get ready to notice the speed increase! If your file still needs to load there’s even added in a fancy dancy new loading bar!
This was another big effort by our development team to speed things up under the hood and use less memory once files are loaded. There are multiple areas where on average files loaded 20% faster and gSender used 2/3rds less memory
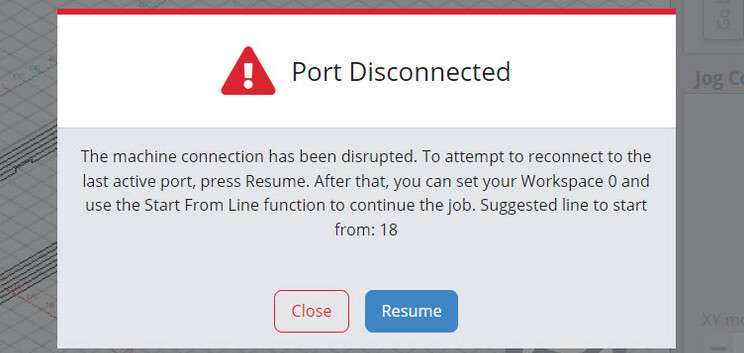
If you’ve ever experienced disconnecting during a job, you will quickly wonder “where was I just now?”. We continue to have brainstorming sessions at the Lab to think of ways to help when problems like this occur and this is a new one we think will help.
In specific cases where the USB port disconnects while running a job, gSender will now be able to recognize the problem and alert you about it, suggesting to reconnect and providing a line to resume from using our ‘Start from line’ feature. This allows you to restart close to the same spot you stopped on, saving time and materials.
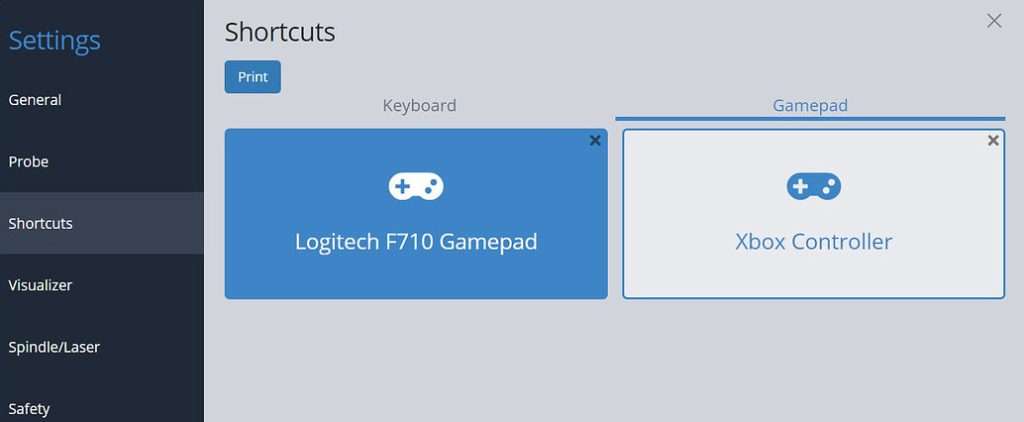
Keyboards are great, but gamepads are better! You’ve always been able to add your own gamepad profile to gSender but we’ve now done some of our own internal testing to validate some gamepads that we can recommend. With community help, we hope to continue growing this list of officially tested gamepads.
This shortlist of options are meant to be common, affordable, and easy to source. This currently includes: the YCCTeam Xbox controller and the Logitech F710. Now see that in gSender → Settings → Shortcuts → Gamepad you’ll find pre-made presets for these gamepads to easily load up and use.
Remember you can also now print a PDF of your personal keyboard or gamepad shortcuts for display in your workshop. They will quickly be committed to memory and you won’t be searching for that mouse any longer!
A laser diode in harmony with a CNC router can be great because you can clamp the material to carve and then laser engrave afterwards and know that everything is still aligned. As a diode user, enjoy some of gSender’s new unique features to support them when you turn ‘Laser Mode’ on.
Turn on the laser at low power when running a job outline (enabled in the Spindle/Laser settings). This will help you to better see where your project is going to be located on the material
Automatically apply an offset from the router/spindle to the laser so all your g-code files stay aligned (configured in the Spindle/Laser settings)
Switch to a specialized visualization designed to show raster engraving images better than typical g-code visualizers
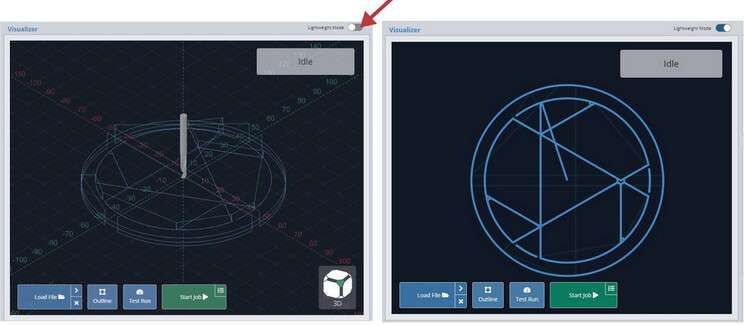
Previous Visualization versus New Laser Visualizer
What’s up Doc? Now have a little bit more insight about your machine whether it’s testing limit switches, checking firmware or profiles, and now get all this information and more in a downloadable PDF for easy sharing!
Just click to ‘Download Now!’. This PDF file is meant to include information on your computer, your CNC, recent alarms / errors, any currently loaded g-code file, and more. It’s basically a treasure trove of information that you can share on community forums, Facebook groups, or with your CNC customer support; going a long way towards getting help from others on diagnosing CNC problems .
Look no hands! Remote mode is exactly how it sounds, giving you the ability to connect to any device running gSender from any other device on the same network through a web browser. You’ll be jogging and zeroing from your phone before you know it This feature allows you to:
Load in a file from your design computer outside your shop then run it on your computer inside the shop
Use a tablet as the primary means of controlling your CNC rather than a mouse and keyboard
Use your phone to jog your machine around or run other functions
Leverage a mini PC or Raspberry Pi as the inline (tethered) computer for cheap, fanless, and reliable operation with less effort to have a display, keyboard, and mouse
Isn’t it nice when someone offers to help out? We’ve hired a wizard to assist! Having options for doing some of the repetitive processes sure makes the job easier and decreases the chances of human error. Expanding on the initial options of tool changes, we’ve added new wizards that walk you through using the ‘paper method’, a touch plate, or using a tool length sensor for single file, multi-tool jobs.
Remember that all these new features have further reading can find in the gSender Resources! Learn about the 5 revised tool changing options, what they do, and which one would best suit you.
Completely optional, completely anonymized, can be turned off anytime, only works on internet-connected devices. More and more we’re finding it would be helpful if we knew certain features are widely used or certain errors are constantly encountered to understand how we can improve the gSender or its documentation. Remember gSender’s code is open-source and viewable by anyone so we don’t have anything to hide, so if you’re fine with us knowing things like the CNC profile you use, the computer you run gSender on, and other ways that you use the app then you can decide what you prefer for this particular setting
Some other assorted features include:
Slider overrides for easier feed rate and spindle / laser adjustment on the fly
Ability to toggle between job overrides and file attributes before starting a job to fine-tune feed and speed overrides before starting a job (Using gSender – gSenderDocs)
Get a top-down snapshot image of your job with the new SVG Visualizer that bridges the gap between a fully disabled visualizer or the full 3D one (useful for less powerful computers) (Additional Features – gSender Docs)
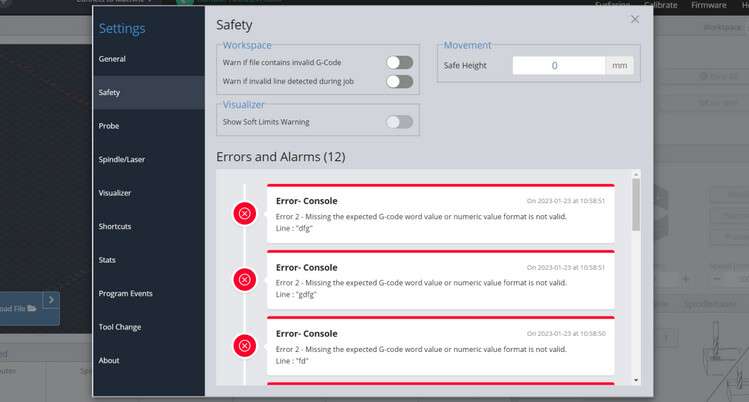
New safety tab for tracking alarms and errors and accessing safety settings
We hope you all enjoy everything new that’s been brought to gSender! We still have so many ideas that are in progress that either iterates on what’s just been release or brings even more new features to the table. If you’re already an Edge user, feel free to use this until the next Edge release comes out shortly where we’re working on supporting the new HAL firmware and Rotary axes
Remember that though the team has been working hard to make this a stable release and squash all of the bugs over the past 12+ months, we can’t guarantee that there won’t be the odd issue that needs to be addressed. Please let us know right away if you have any concerns or have found a new bug and our team will move quickly on it.
Many congratulations to the whole team that’s worked so hard to get to this point including the whole software development team of Kevin, Walid, and more, and to Jay and a new join Stephen for helping me with bringing all the new documentation up-to-date, as well as many other people behind the scenes!
@StephenCampbell actually also helped me to compile all this information together for this post and he wanted to add some words:
P.S. – I’m a new Sienci Labs team member! You may see me here in our community or helping out on the support side of things. I’ve been busy updating all of the documentation for this new update, check it out at Installation – gSender Docs 3 for more information on gSender. I’d love to hear your feedback!
Note: due to the large amount of changes from 1.1.7 to 1.2.0, we weren’t able to get the typical auto-updater to won’t so you’ll need to install the new version manually. This also goes for people with Edge installed that want to download 1.2.0
There were multiple areas where we were able to make file processing on average 20% more efficient and reduce overall program memory usage by an average of 2/3rds due to an increased node sandbox memory size and improvements to multiple run times
On files that still take a while to load we’ve now added a loading bar window to show file loading progress
Added new job recovery functionality
In specific instances where your machine’s USB port disconnects from gSender during a job it’ll be able to recommend where you should restart from
Updates to gamepad controller support
List of officially tested controllers if you’d like to select a gamepad that works more reliably with gSender
Tested controllers come with their own pre-loaded presets
Improved UI for creating controller profiles
Available PDF printout of shortcuts to hang up near your machine
Better support for Laser Diodes
Optional low-power laser enable on outlining
Laser-specific visualization: there’s a different style when laser mode is on and that colour can be customized
Laser offset now allows for negative offset values
New Diagnostic tab inside the Calibrate Tool
See at-a-glance information on whether your limit switches, touch probe, or other pins are activated
General summary on your CNCs firmware settings
The ability to generate a Diagnostic PDF file that includes information on your computer, CNC, recent alarms / errors, any currently loaded g-code file, and more! Very handy to share with our support team or other CNCers to help diagnose problems your CNC might be experiencing
Remote Mode, control your CNC remotely!
Connect to your CNC from a myriad of other internet-connected devices for loading files from other computers or jogging and zeroing from your phone
Easy to set up and configure
Tool changing is now more fully supported by our new Wizard
gSender already recognized M0 and M6 commands to initialize a pause in the middle of a file
New processes to support using the ‘paper method’, a touch plate, or a tool length sensor (choose based on your CNC setup) now allow more flexibility in handling tool changing and in some cases can pop up a Wizard to direct you through each step and without the need for custom macros
Other assorted features
Optional Anonymous Information gathering
Slider overrides for easier feed rate and spindle / laser adjustment on the fly
Ability to toggle between job overrides and file attributes before starting a job to fine-tune feed and speed overrides before starting a job
Get a top-down snapshot image of your job with the new SVG Visualizer that bridges the gap between a fully disabled visualizer or the full 3D one (useful for less powerful computers)
Colour coded Console on certain commands like alarms and errors that can also now pop-out
Assorted other settings
New safety tab for tracking alarms and errors and accessing safety settings
Soft limit warning on file load if machine has limit switches
Customizable probe fail distance in Z
More visualization theme customizations for ‘light’, ‘dark’, or your own fully custom design
New Shortcuts for controlling Probing, Visualization, and Macros and the ability to filter shortcuts by category to easily find and edit them
New stats tab for tracking jobs run on your CNC
Custom decimal places on the DRO
and other bug fixes for Linux auto updates, Settings exporting, Preferred units and file unit modals, Bounding box relative movement, Shortcut printing and more!
We’re at the point in EDGEs life where we’re mostly focused on improvements to performance and hunting down any remaining bugs. This version is largely that – going through our backlog of reported issues and making sure they’re handled.
That said, I’d like to highlight specifically some major improvements to file parsing/loading and visualization – we’re seeing 200-400% faster parsing and about 2/3rds less memory usage on some larger files. We also (finally) have a progress indicator when handling larger files.
As always, thanks to everyone who has reported issues or given feedback on EDGE – we’ll continue to work through our backlog, and are excited to release it to the general public.
New File Loading indicator that also includes progress
Significant improvements to file parsing to increase speed and reduce memory usage on large files
Fixed issue with laser offset and differing preferred units and file unit modals
Altered connection workflow to be more forgiving for non-standard startup messages
Fixed bug with feedrate unit conversion parsed from file
Fixed issue with reported bounding box not handling relative movements correctly
Fixed bug with feed override shortcuts
Firmware flashing modal now only shows Sienci profiles for flashing
Shortcut improvements to help consistency with migrations from version to version
We’re super happy with how gSender has been adopted by the hobby CNC community since it’s original release. We’re continuing to grow both new users and new features and are working to create a product that meets everyone’s needs.
Part of that growth is reaching out to newer portions of the greater CNC community. As such, we’ve begun steps towards supporting two new areas – alternative firmware, and rotary addons.
The first such firmware is grblHAL. We chose this firmware for a few reasons – it’s similar enough to GRBL to be a good first addition, and we’ve identified it as a strong candidate for the updated LongBoard controller releasing later this year.
Rotary and 4-axis is also something we’ve been repeatedly asked to support. This is also an area we’re looking at developing our own version of, and have taken some preliminary steps at how we’re going to support it at a software level. We’ve taken steps at supporting files with A-axis commands for both Grbl and grblHAL firmware flavours.
Please note that this is an exceptionally early release – we really want to get this out there to start gathering feedback as soon as possible. A number of functionalities may or may not work unexpectedly with your hardware. This is our first time branching outside of supporting specifically our machines, so there will be some growing pains as we fine tune the new firmware support.
grblHal Support
Choosing your firmware flavour should be as simple as selecting whether you want to use GRBL or grblHAL before connecting.
This is a MVP which includes all expected common functionality (visualization, sending, jogging, DRO, MDI, probing etc.), surfacing, calibration and firmware (minus flashing), macros, laser and (now) Rotary.
Functionality and ease-of-use should be the same experience regardless of what firmware flavour you’re using – all HAL specific functionality are handled behind the scenes so you can continue to interact with the program as you’re used to. Try connecting, loading jobs, jogging, probing, checking out our Firmware tool and other surfacing etc. tool interfaces and anything else you’d typically do on your grblHAL enabled CNC machine.
We’re going to continue to work on further support for HAL specific functionality, along with clean up any rough edges moving forward. Look forward to network connection, flashing, and cleaner toolchanges coming in future releases.
Primarily, this build has been tested on the Flexi-HAL CNC controller in collaboration with Andrew from Expatria Technologies.
Rotary Support
Full rotary support is on its way to gSender soon, you will now be able to run your files that have A-axis movements with ease. We are still working on improving rotary for gSender, you may see some features that don’t quite do anything as we plan on working on them and adjusting a several things in the coming weeks. We do have a few great features that we would like you to try out though:
Visualization
The visualizer in gSender will now be able to visualize A-axis movements for users to see, in addition, we decided to add an object that represents the stock material, which rotates accordingly during a job. We also updated the outline feature to work with rotary files more correctly for those who need to use it with rotary. We plan to refine the visualization in the coming weeks to improve it further.
Rotary Mode
Since GRBL does not support the rotary axis, we decided to get creative and come up with a good workaround. We have implemented a feature named “Rotary Mode” where some firmware values are adjusted to mimic the A-axis movement behaviour. You will be able to load 2+1 axes files that utilize the A-axis. You will notice that the Y-axis is disabled in this mode as the A-axis takes its place during a job and the fact that the Y-axis cannot be used when the A-axis is being used, so it is disabled in the app until you Rotary mode. This feature is meant for Grbl machines specifically.
A-axis Support
A-axis movements are not handled on machines running Grbl , so we found a way to mimic the behaviour in gSender and allow users to run files that have the A-axis. gSender will interpret A-axis movements as Y-axis movements now, this pairs with the rotary mode feature that helps us achieve this. This behaviour only applies to GRBL to allow the app to read A-axis movements correctly.
A-axis Control and Display
You can also control and see the position of the A-axis from gSender. A-axis control works just like all other axes, you have access to jog control buttons on the user interface, as well as the shortcuts on your keyboard or gamepad. The A-axis position readout is available and again works the same as the other axes, you have the ability to zero or go to the zero position, and update the position manually via the position input. Once we’re satisfied that all this functionality is working as expected and no other requests are made for features we’ve forgotten, the plan will be to refine the look and location of these buttons so that they can be implemented more seamlessly into gSender’s existing interface
Download
Note: this is not an EDGE build, it contains completely new functionality aimed at grblHal/rotary users. EDGE will continue to receive updates independently while we continue to move it towards a new, Main release in the coming weeks. Once we’re satisfied with how progress is continuing with the HAL and Rotary support version and Edge is looking relatively bug-free, then Edge will become the new Main and HAL/Rotary will become the new Edge. To make this happen, we’d greatly appreciate and and all feedback you can provide
You can find the binaries for Hal/Rotary on Github.
Use it! Please try to keep feedback to this single topic thread so that we can more easily distinguish comments that are HAL/rotary specific – we want to avoid the headache of trying to sort feedback between Main, Edge, and Hal/Rot. Any feedback in this thread about functionality either not working or not working as expected will be taken into account. As always, keep in mind this is a very preliminary release, so if you’re especially attached to your work process, bits, or expensive materials then feel free to stay away until the product is more fleshed out.
New gSender release with a number of feature improvements and fixes.
Two big ones we’d like to highlight:
Surfacing Tool Changes
The surfacing tool has been slightly redesigned and comes with some new features.
Some feature improvement highlights include:
The cutting tool now ramps into position on all generated toolpaths instead of plunging in
Can now start from center
Easy to flip direction of cutting
Easy copy-to-clipboard to save generated toolpaths for later
Number of generative issues that could leave unfinished passes
Visualizer improvements
We’ve rewritten how the visualizer generates and displays toolpaths to result in lower memory usage after parsing. This should be particularly noticeable with larger files – gSender is using less memory by a relatively large factor when visualization is enabled.
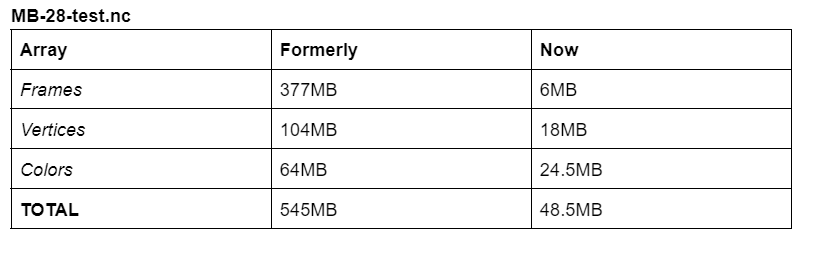
As an example, for a 28 megabyte gcode file (~1.5 million lines), these are some comparisons of what the memory values were previously and what they are now:
You should also notice slightly faster visualization due to these changes.
Our benchmarking and profiling has also identified some issues with the library we’re using to parse the toolpaths themselves using excessive amounts of memory. This will be addressed in an upcoming release. We have a relatively long list of performance improvements we plan to address over the next few builds to make sure gSender runs well on lower-hardware spec devices, and this is the first part of that.
Release Notes:
Improved surfacing tool – pattern now ramps in to support more surfacing bit types, cut direction is reversible, able to start from center, can copy gcode to clipboard for saving.
Major improvements to visualizer memory usage and parsing speed
Start from line should account for maximum file Z height when moving into position to account for situations where Z0 is set at the spoilboard.
Probe code should always return to exact starting location instead of approximating it.
Improvements to firmware flashing UX – can now select profile and port inside tool.
Fix for auto-probe code movements being too small when “$13 report as inches” EEPROM value enabled
Go To buttons only use safe height if below that position when limit switches enabled to avoid moving downwards.
Fixed values in some machine profiles.
Added machine state guards to some keyboard shortcuts.
UI Modals now more difficult to close accidentally.
Bracket Comments on M0/M1 now emitted to UI.
Laser offsets preferences allow negative values again
Bounding Box variables once again available to macros
Mac version now exits completely on close.
Higher UI clarity when connecting to board with invalid/unrecognizable firmware
Styling changes in Firmware Tool
Fixed overflow when OS had screen zoom above 100%.