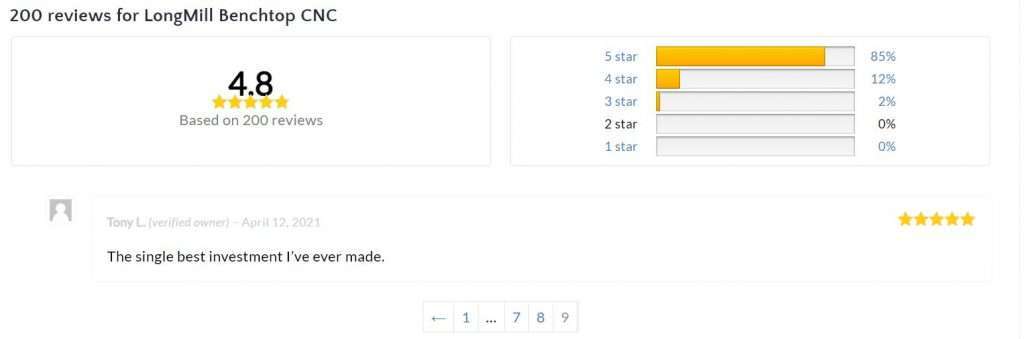
When we first launched the LongMill on our website, Chris set up a system to let people post reviews about the LongMill. These reviews have been important to us so that we can continually collect feedback and have real-world testimonials from our customers on how they feel about the machine.
With both me and Chris having used CNC machines for a long time now, one of the things that we’re always conscious of is how we can relate to our customers that are using CNC machines for the first time. The review system has been one way we can keep in touch with customers and their feedback as they journey into the realm of CNCing.
The review system of course helps share real experiences that LongMill users have had so that they can recommend to other customers on whether they should get a LongMill or not. We send an email to users roughly two months after purchasing a LongMill to ask about their experience with Sienci Labs and their machine to make sure that they’ve had enough time to get to know their purchase.
Here are some reoccurring positive points people have made in the reviews:
Excellent customer service
Price and value for money
Easy to assemble
Overall machine performance, quality, and rigidity
Here are some areas we could improve:
Missing parts and improving QA
Improving software support
Thank you for everyone who’s written a review for us. Your positive comments and support have been a great morale booster for us and the rest of the team!
As Ontario once again goes back to another state of emergency and stay at home order, we’ve gotten a lot of questions on how things are looking like for us. Here’s what you should know in regards to the impact on our business:
Businesses in the manufacturing and supply chain (such as us) are considered essential in the province of Ontario, and thus are allowed to remain open.
We expect production for machines and other parts to remain as scheduled.
No visitors are allowed into our office. Customers may request local pickup at the checkout page. PLEASE place your order at home and wait until you recieve email notification has been sent before coming to pick your order up. Most orders (that aren’t LongMills) should be ready to pick-up within an hour or two during business hours.
We’ve had a lot of people walk into our office without permission and disregard the signs. We ask that all customers remain outside for pick-ups and we will bring your order to your vehicle for the safety of our staff.
If you’re looking for more info about production and other news, feel free to check out our blog: https://sienci.com/blog/
Hi everyone, here is our April production updates. If you’re looking to order a machine or waiting on one to show up, please read this update to find out what’s going on in our shop.
We are happy to announce that we will be shortening our lead time from 4-6 weeks to 3-5 weeks! It’s been a big effort by the operations team to slowly start whittling away on our lead times.
Why the change? Well we have a couple of factors.
First of all, most of the machine orders we’ve received, we’ve been able to ship within 3 weeks this month. Having kept this up for the last little bit, we feel confident that we can continue shipping this rate and it is likely that orders that are currently waiting on their machines should see them a little earlier than initially stated on our estimate.
The second is with the availability of parts. With the exception (at this current moment) ACME locking nuts and touch plate wiring which are expected to arrive in the next 1-2 weeks, we have around 2 months of stock remaining. This means that we have the parts here in the shop, and the bottleneck is with how quickly we can pack, assemble, and ship parts.
That being said, Batch 5 parts are now in production and most of the parts that will go into Batch 5 will arrive at the end of April and middle of March. This means that if we sell out of our current stock before then, there will likely be a gap where shipping will be on pause as we prepare to ship Batch 5 machines. At the time of writing, we have 319 machines in stock.
Once we start to run low on stock, I will post another update to let everyone know.
Commonly asked questions
If you are interested in ordering a LongMill please read this section.
If I place an order today, how long will it take to ship?
3-5 weeks.
Is there any way to skip the line/get my machine faster?
No. To keep things fair for all of our customers, we ship all orders based on when they were ordered. There are no exceptions. The only way to get a machine faster is to order one sooner. If we have updates to the lead time, they will be posted here and on the forum: https://forum.sienci.com/t/list-of-shipped-machines/1215. If you want to see where you are in the queue for your order, please check the forum.
Does it make a difference in when I get my machine if I pick it up?
The only difference it will make will be that you will not have to wait for the shipping/transit time for the machine to ship. Typically, machines take around 1-3 days to ship within Ontario. Otherwise, there is no difference.
When do you charge my card/take payment for my order?
Your card will be charged at the time you place your order. This is to ensure your place in line, purchase parts ahead of time, and have the most accurate estimates on production and delivery.
How can I cancel my order?
You can cancel your order with no penalty any time before your order ships. Please contact us through our website or email us with your order number and a request to make a cancellation. A refund will be processed through your original method of payment.
Can I add other items to my order before it ships?
If you’ve ordered a LongMill and wish to add other items to your order afterwards before it ships, please choose “Local pickup” (for free shipping) and add your LongMill order number. Some items (such as the T-track sets) cannot be combined for shipping.
If you’re interested in learning more about compression bits and how they work, check out our old post about compression bits.
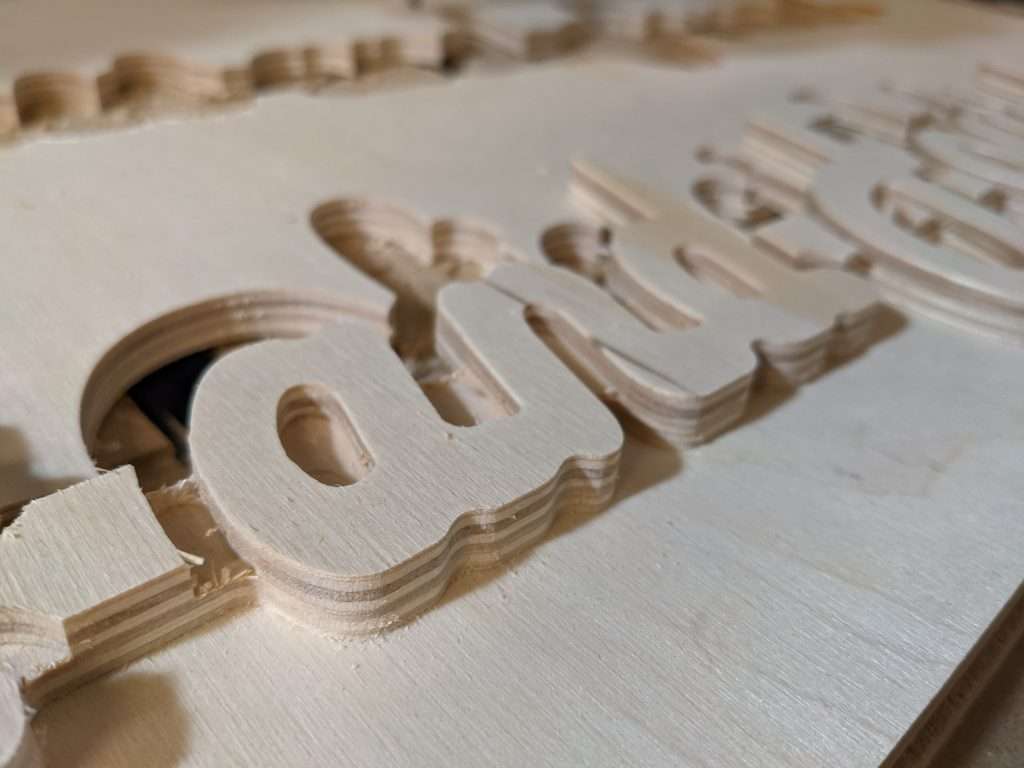
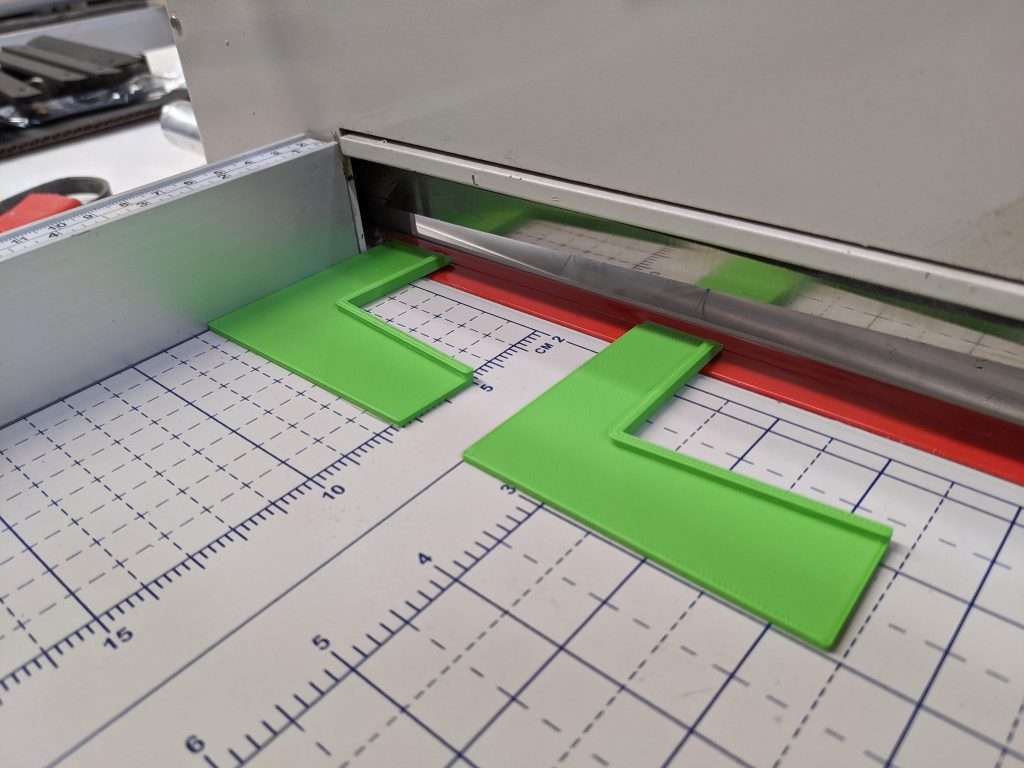
When I started cutting this project, I realized that I had set the depth of cut too shallow as to not get past the upcut part of the end mill. I stopped the cut and started it again after changing the gcode. I guess this is a bit of a happy accident as we can show the difference between using an upcut bit versus a downcut bit, and how it affects the quality of the edge on this particular piece of plywood.
Because on the first part of the cut, only the upcut portion of the end mill is being used, we are pulling the chips up, splintering the top surface of the material. Changing the depth of cut to 5mm engages the downcut portion of the bit, pulling the chips down and leaving a smoother edge.
For this project, I used a feedrate of 1400mm/min and a depth of cut of around 5mm. The upcut portion of this end mill is 4mm long, and as long as your depth of cut for your first pass exceeds 4mm, you will be engaging the downcut portion of the end mill.
In any case, after setting up the job properly, testing shows clean, crispy edges on both the top and bottom surface of the material!
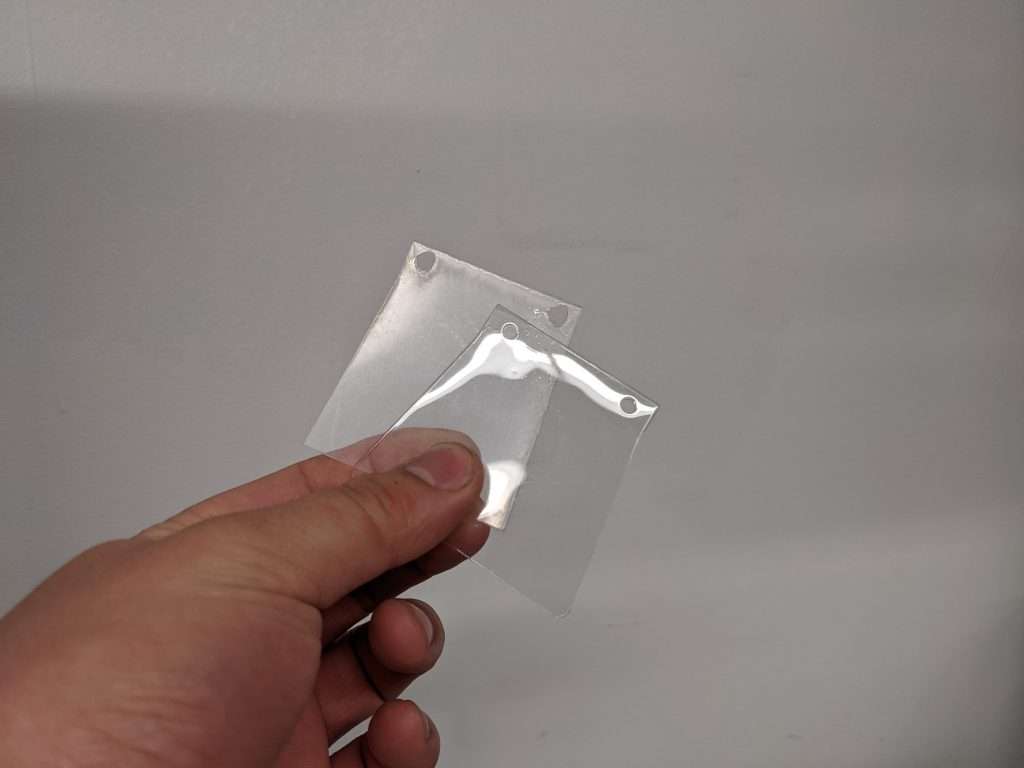
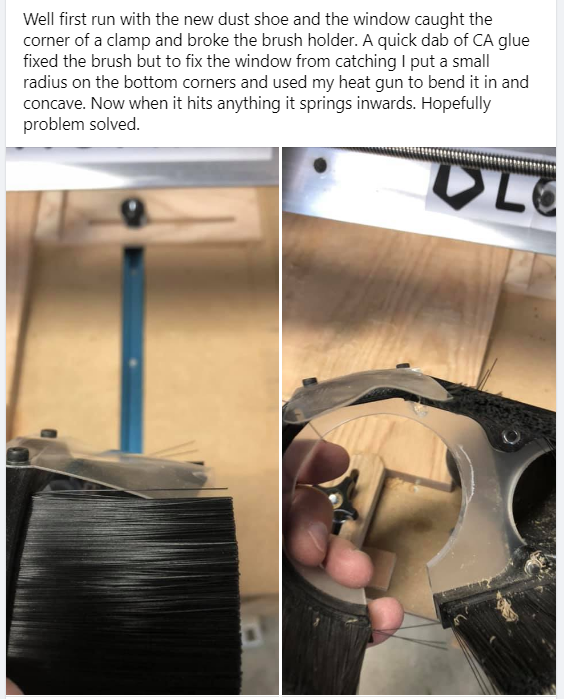
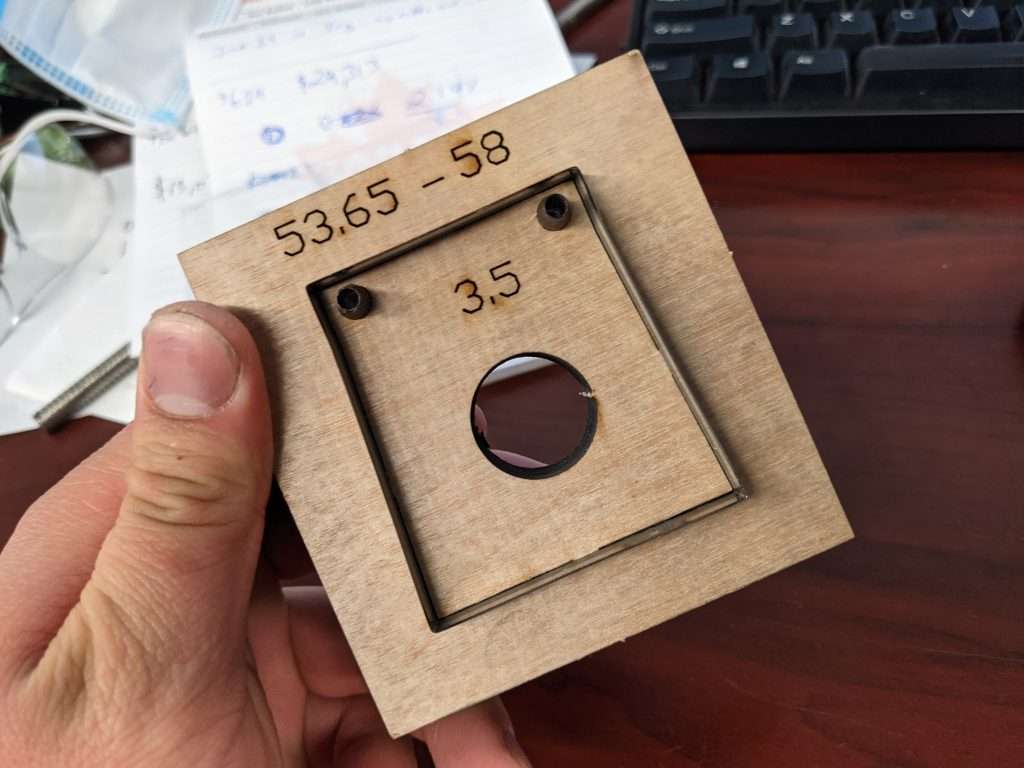
Hi everyone. If you’re familiar with our LongMill dust shoe, you might be familiar with the clear front window. We added the front window to help users see what’s going on with the endmill, but it was prone to breaking due to it being brittle. We’ve seen some hacky fixes for it, but we wanted to figure out a way to deal with this small flaw once and for all.
The old windows are made from PETG and are laser cut in a local shop in Mississauga. PETG was an inexpensive and easy to cut material, but we learned after people started using them, that they were prone to breaking. Although we provide extras in each kit, we understand it can be annoying to replace.
The new windows are made from clear vinyl. Working with vinyl was a bit of a tricky experience. Initially, we wanted to try using a CNC vinyl plotter, but we were told by some more experienced people that it would be tricky to get the holes and other details from the thicker material we were using. Our friend Adam, from BOKO came up with a process involving guillotine presses and drills, but making it that way would have cost way too much and take too long.
Guillotine press at BOKO
Eventually, we had the idea of using a press, which is used to make leather shapes, but with the vinyl being pretty thick, we needed a lot of force to punch the shapes out and we didn’t have the right type of tools to do that.
Example of a leather press we used
We finally ran into a local company called Roylco a few minutes up the road, and we were able to work out a way to die-cut the windows from vinyl. The new windows have come out beautifully and are working great!
These viewing windows seem like a small detail, but we’re always looking out for ways to improve our designs and manufacturing processes, and I just wanted to show a little part of something we’ve worked on behind the scenes.
Hi everyone, this is our March production update. If you are looking to order a machine or if you’re waiting on your machine to come in, please read this to find out what’s happening in the shop.
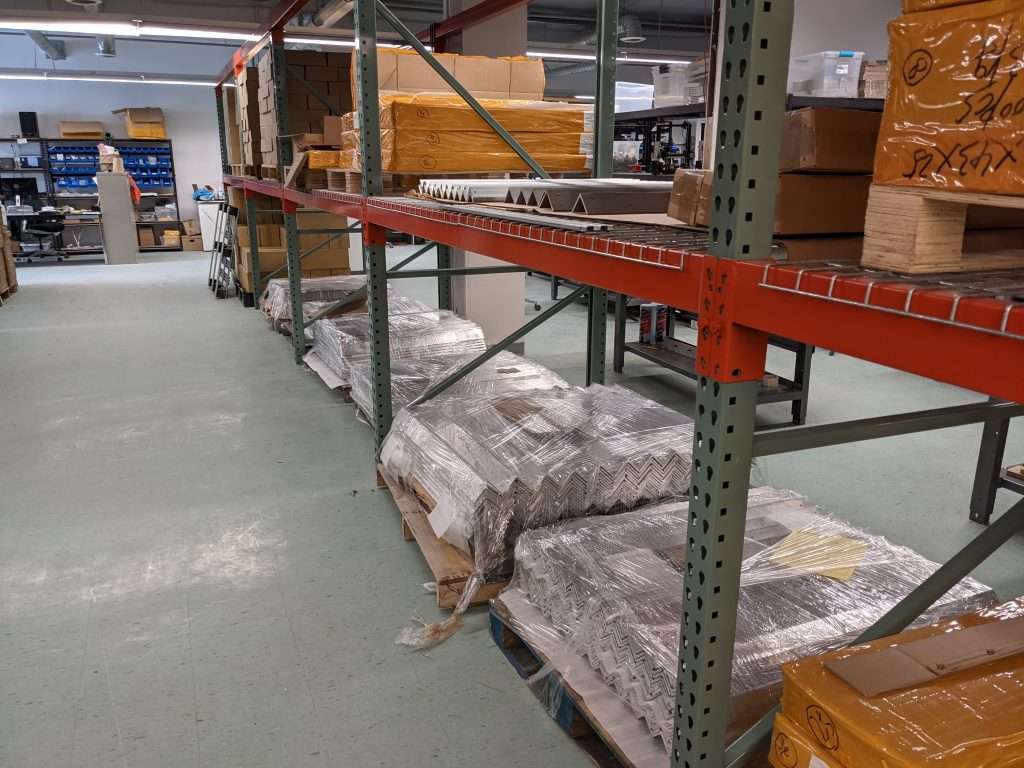
Production has continued to move smoothly. Our February update mentioned that we were running low on aluminum rails and steel gantries. I am happy to announce that these parts have arrived and we won’t need to stop shipping due to these parts. We are still waiting on the ACME locking nuts but the manufacturer has confirmed that they are completed and should be on the way soon, so we should be ok with those parts as well.
Our manufacturer for the rails has noted that the finish and quality of the new rails looks to be better than the last batch, which we are happy about.
We have also restocked on a few other parts, including packaging material, shoulder brackets, drag chain mounts, and acrylic parts, and we expect to have another large batch of parts arrive mid to late April.
If you are interested in ordering a LongMill please read this section.
If I place an order today, how long will it take to ship?
4-6 weeks.
Is there any way to skip the line/get my machine faster?
No. To keep things fair for all of our customers, we ship all orders based on when they were ordered. There are no exceptions. The only way to get a machine faster is to order one sooner. If we have updates to the lead time, they will be posted here and on the forum: https://forum.sienci.com/t/list-of-shipped-machines/1215. If you want to see where you are in the queue for your order, please check the forum.
Does it make a difference in when I get my machine if I pick it up?
The only difference it will make will be that you will not have to wait for the shipping/transit time for the machine to ship. Typically, machines take around 1-3 days to ship within Ontario. Otherwise, there is no difference.
When do you charge my card/take payment for my order?
Your card will be charged at the time you place your order. This is to ensure your place in line, purchase parts ahead of time, and have the most accurate estimates on production and delivery.
How can I cancel my order?
You can cancel your order with no penalty any time before your order ships. Please contact us through our website or email us with your order number and a request to make a cancellation. A refund will be processed through your original method of payment.
Can I add other items to my order before it ships?
If you’ve ordered a LongMill and wish to add other items to your order afterwards before it ships, please choose “Local pickup” (for free shipping) and add your LongMill order number. Some items (such as the T-track sets) cannot be combined for shipping.
Production updates
No major updates for production, we are packing and shipping machines on a regular basis. That being said, there’s lots of other interesting things going on at Sienci Labs that you can read about on our blog: https://sienci.com/blog/
Hi everyone. I just wanted to share an update about where we are about the Mill One. Over the last couple of weekends, I have been playing around with some new designs that I hope will pave the road to the successor to the original Mill One. For this new machine, I will refer to it as the Mill One Plus.
Here are some general specifications about the Mill One Plus:
Will be priced around $500-700CAD
NEMA 17 motors on all axis
Lead screws and Delrin Anti-backlash nuts on all axis
Working area of approximately 247mm x 290mm and 60mm of Z-axis travel
1/4″ steel gantries
The Mill One Plus is designed to be:
An entry-level, first CNC machine on a budget
Small
Compete against smaller, hobby CNCs such as the Sainsmart 3018 CNCs, Millright M3, OpenBuilds Minimill, etc.
Replace the original Mill One
What was the Mill One?
The Mill One was a machine that we developed and launched in the autumn of 2016. To fund the production and manufacturing of the machine, we ran a successful Kickstarter campaign that raised just over $61,000. This was a major milestone for Chris and me, taking what was originally a school project into solidifying Sienci Labs into a company.
The Mill One aimed to meet several objectives:
Be affordable. We wanted to create a product where people could use CNC technology for the first time at a price point low enough that the average hobbyist could purchase.
Be open. We wanted people to tinker, modify, and change what the Mill One was and could do. Since the launch of the Mill One, all of its design files, BOM, and other details are available for free.
Be simple. We wanted to create a machine and ecosystem that provided a machine that was easy to put together and use at a level approachable to the average hobbyist.
Depending on the time you purchased it, the Mill One could be bought for roughly $519-539CAD. If you want to read more about the Mill One, please check out our product page for it.
To this day, we focus all of our products with these three objectives, and the Mill One Plus will also focus on these objectives as well.
What’s new with the Mill One Plus?
The Mill One, although a pioneer in hobby CNCing back in 2016 in terms of what it offered, wasn’t perfect by any means. Some sacrifices in its mechanical design were made to keep costs reasonable and compared to machines of today, wasn’t able to take advantage of improvements in off-the-shelf CNC parts, decreasing part cost from increasing demand, and the economies of scale we enjoy with LongMill production. There were also many mechanical design choices we made that in hindsight may be different from our new experiences with machine design and manufacturing.
So here are some improvements between the Mill One Plus versus the original Mill One. Please note that I am still in the very early stages of prototyping and although there are many changes that I would call improvements, are not yet tested in the real world.
Fully constrained lead screws
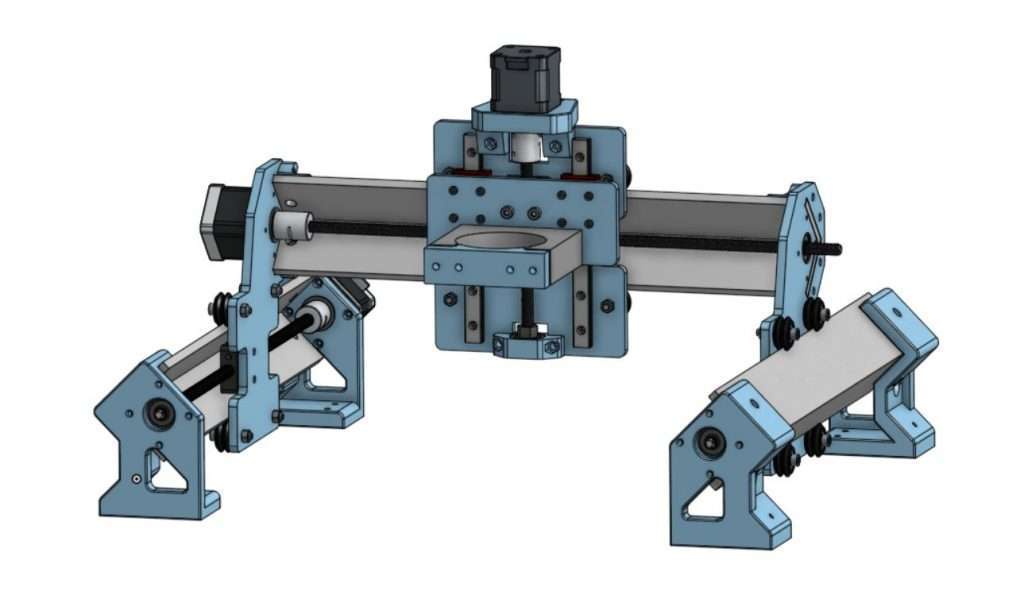
Mill One Plus Y axis design
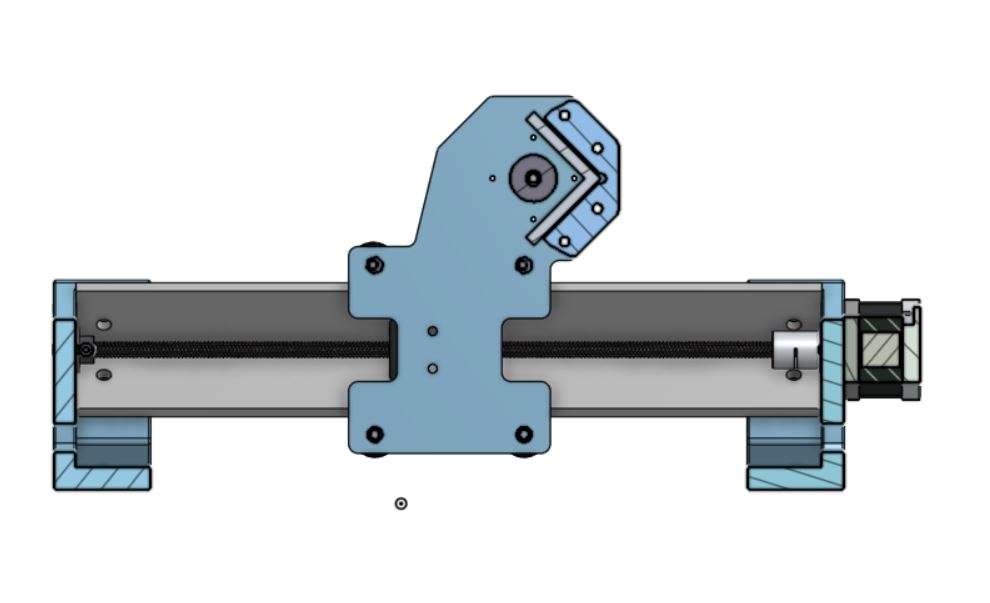
One of the limitations of the Mill One came from the fact that it relied on the bearings inside the NEMA 17 motor to constrain any axial or rotational movement. Although the motors we used were chosen to have stronger bearings and parts inside, larger forces would be able to move the shaft of the motor back and forth. The Mill One Plus uses a combination of 608ZZ flange bearings, solid couplers, and ACME locking nuts found on the LongMill to constrain the movement of the lead screw, decreasing the axial movement in the system.
H-Design/Moving Gantry/Fixed Bed Design
The Mill One Plus shares the same basic layout of the LongMill, with two Y-axis rails carrying the X-axis rail, rather than the Mill One’s fixed X-axis and fixed Y-axis rails. Although this design is generally stiffer, because of the way the Y-axis bed was designed on the Mill One, any cutting on the left or right edge of the bed would deflect significantly more than cuts that happened on the middle area of the bed.
The Mill One Plus has a fixed bed, and the cutting tool moves around a stationary workpiece. This has the advantage of having more flexibility with workholding and the ability to “pass through” materials larger than the bed itself. Although having a moving X-axis rail means two degrees of freedom of movement on the rail, I believe that the machine will be more rigid with the use of thick steel gantries over MDF walls.
This design, when using the same length rails, offers slightly more working area (around 247mm x 290mm versus 258mm x 185mm).
Using LongMill parts
The Mill One Plus uses several parts straight from the LongMill such as linear guides, Delrin ACME anti-backlash nuts, solid aluminum router mount, bearings, and ACME locking nuts, all of which are better, more precise, and durable parts than what was originally used on the Mill One.
Although the overall BOM cost of the Mill One Plus will likely be higher than the Mill One, when taking into account that if many of these parts are shared, we can reduce costs by taking advantage of the economies of scale that we already have for the LongMill.
Overall I feel that the new design is a significant leap forward compared to the original Mill One design.
Next steps for development
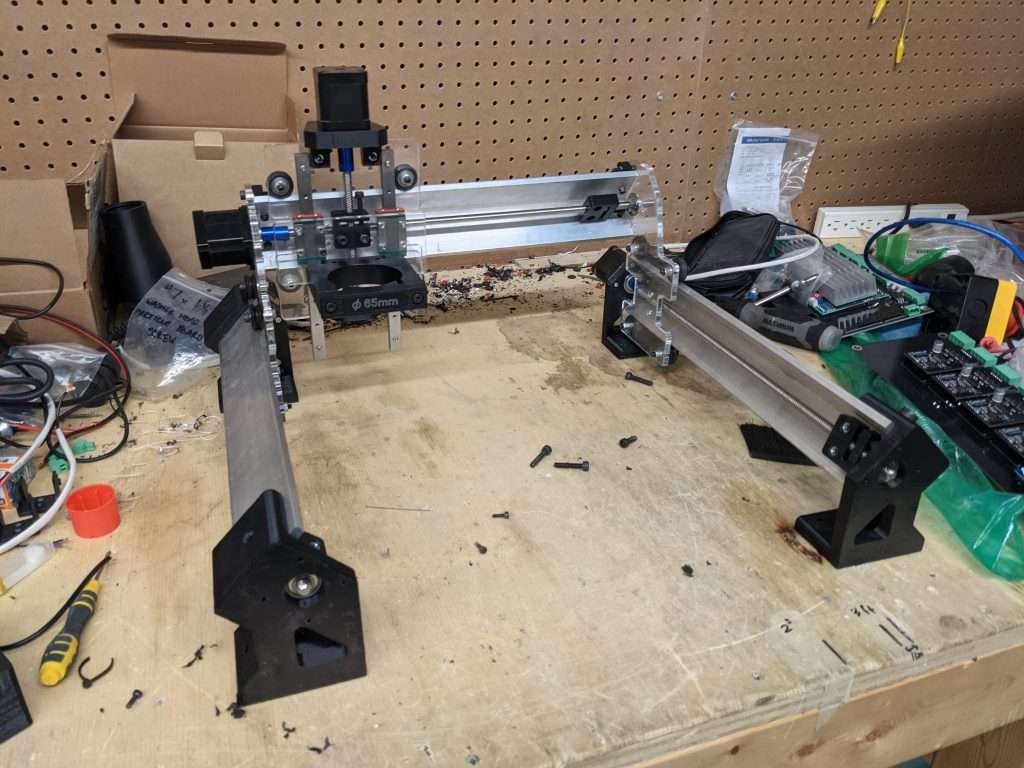
I have been testing the fit and assembly of the design over the past week or so and although there were a couple of adjustments that needed to be made, the Mill One Plus has come together surprisingly well.
Once all of the parts fit together well, my next step would be to make steel versions of the gantries, as right now I am using acrylic because we have it on hand at the shop and it allows me to see the inner workings of the machine behind each gantry. All of the other parts we already have in storage that are old Mill One parts or stuff from LongMill production.
Electronics will be the next big thing to tackle, as I believe that the original CNC shield from the Mill One won’t be up to snuff. Either we will design our own controller or use something off the shelf.
If you want to see the Mill One Plus CAD, please check it out on our Onshape document.
Making a business case
One of the reasons why the Mill One project has been put on the backburner has simply been because 1) we’ve been so busy will producing the LongMill and scaling production and 2) because the LongMill is simply more profitable than the Mill One was.
Just to put things into perspective, when we first started selling the Mill One, it was just me and Chris mostly putting together and shipping the machines from our garage after class. Today we have a team of close to 20 people to build and support the LongMill. It has been a massive undertaking for us to scale the company but now that the LongMill has started to mature as a product, we’ve started to take on new projects to improve the CNC ecosystem.
It is also important to mention that we would have to sell three to four times as many Mill One’s or Mill One Pluses to match the amount of revenue that one LongMill provides, which brings up a couple of questions:
If we have to dedicate or hire new staff, develop resources, and work on creating a manufacturing process for a new product, will it generate enough revenue to be a sustainable part of our business?
Will our new customers need the same amount of support as our LongMill users do? How will we be able to manage and scale our support team while still continuing to provide high-quality customer service?
Will we be able to sell enough Mill One Pluses to break even on fixed costs such as rent, utilities, insurance, and software?
Ultimately, there are risks in launching a new product. To mitigate this risk, I believe it is necessary to do some market research and basically see if there are enough people interested in this new machine to build it.
I’d like to know if you’d be interested in getting a Mill One Plus and why. To do this I’ve created a survey to let me know what you think. If you’re interested in this new machine, please make sure to share your thoughts. There is also an option to subscribe to a separate mailing list about updates about the Mill One project.
*Please note that this document contains files and projects that are under active development. Designs and files may change without notice. We do not assume any responsibility for your use of these designs and files and are as-is without support.
Things I think will be on our FAQ
Can you upgrade from a Mill One Plus to a LongMill
While both machines share certain parts, there is no simple upgrade path from a Mill One Plus to a LongMill. If you have a Mill One Plus and want to upgrade to a LongMill, I would recommend selling or passing along your Mill One Plus as it allows the machine to be used by someone else and you will likely recoup more of the initial cost by doing so.
I would also note that although technically the materials in the LongMill kit would be lower if certain parts can be transferred over from the Mill One Plus kit, the added time and customization of the kit for each customer will end up costing more overall due to additional labor involved in doing so, which is why we currently do not offer partial kits for the LongMill.
Can I make the Mill One Plus bigger?
For the most part, yes, if you are able to use longer rails and lead screws, the machine can theoretically be extended. There are other considerations to make that may be covered in this post for making the LongMill larger.
When it comes to offering different variations for machines, it generally is difficult to do at scale as we need to have enough sales for each size to make it viable. It is likely the Mill One Plus will only be offered in a 400mm rail per axis size and potentially a 500mm size taking rails from the LongMill 12×12/12×30 Y-axis.
When can I purchase a Mill One Plus?
Currently, we are in the middle of engineering and development of this machine. As of right now, we do not have plans to share about purchasing the Mill One Plus but the project files will be publicly available for other people to make their own.
If you want to order one, please fill out this survey as we will use this information to decide on a launch plan for the machine.
What software does it come with/work with?
The Mill One Plus will be compatible with any software that works with the LongMill. Please read our Software Resources for the LongMill for more info.
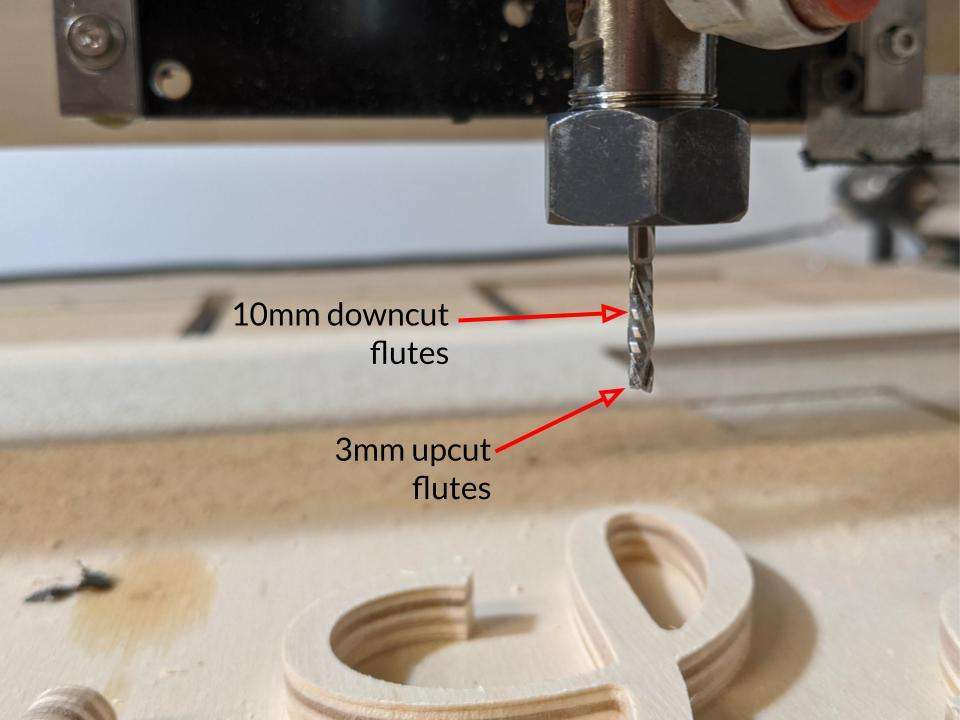
Hey everyone, I’m excited to announce the introduction of 1/8″ compression bits to our arsenal of affordable and high-quality end mills to our store! Compression bits work great for cutting products that are prone to splitting from both sides of the material, most namely with plywood and other softwoods.
This is a game-changer for folks that make signs and other plywood-based projects that require cuts that go all the way through the material. Our testing with this new compression bit results in clean edges on both sides of the material with little to no sanding needed.
So what is a compression bit? A compression bit combines both upcut and downcut flutes into the same bit.
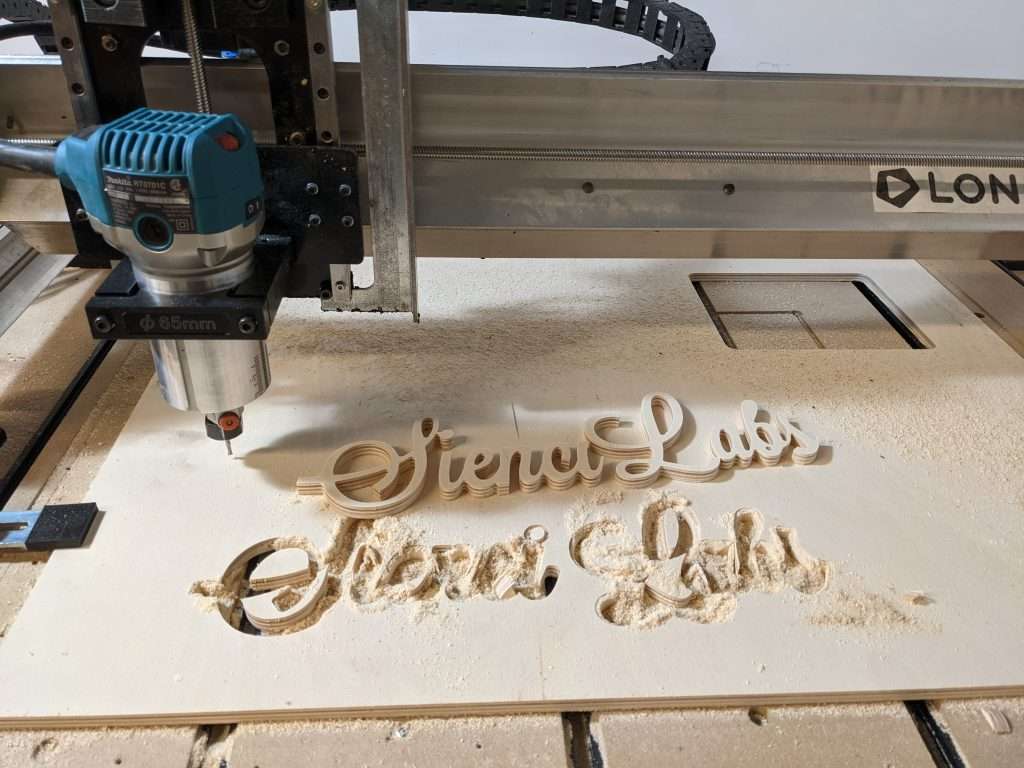
With some materials, cutting with a regular upcut bit causes splintering and fuzziness on the top edge of your cut as shown in the project below.
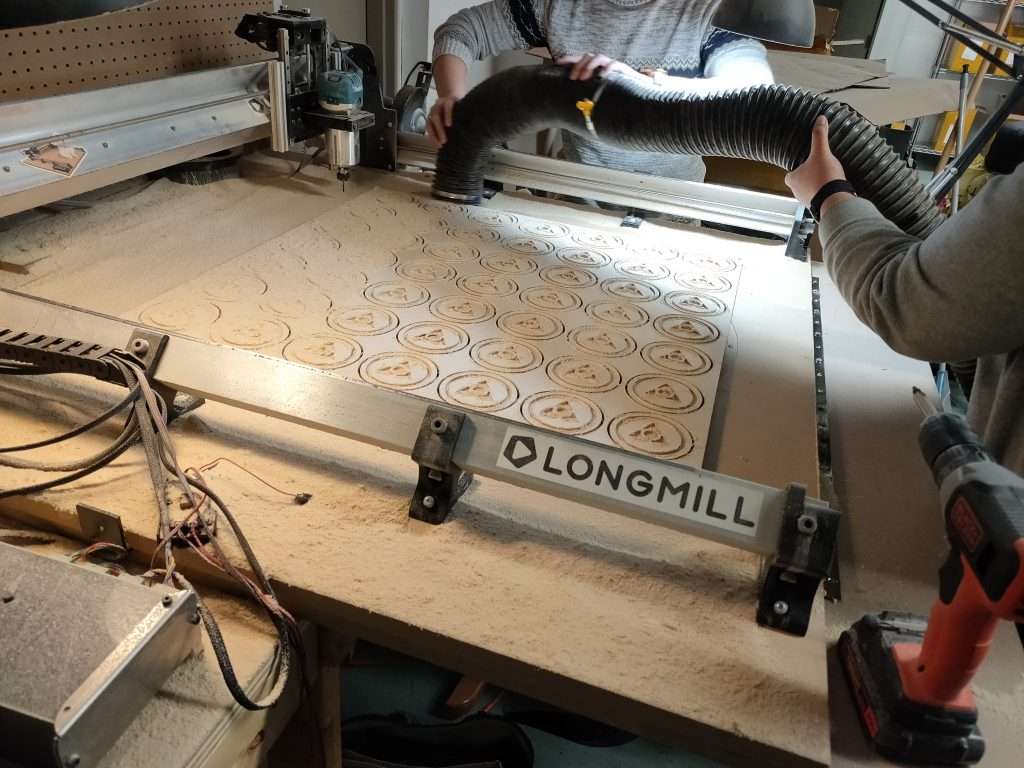
Cutting coasters for StarterHacks
Using a downcut bit pushes the chips downwards leaving a clean edge, but cuts along the bottom edge of the part are pushed down, causing a rougher edge on the bottom of the cut.
A compression bit on the other hand offers the best of both worlds. The tip of the bit works as a upcut bit, while the top of the bit works as a downcut bit. Used properly, the upcut part of the bit cuts the bottom edge of your workpiece, while the top of the workpiece is cut with the downcut part of the end mill. This helps provide a clean edge on both the top and bottom of your part.
With any compression bit, you want your first pass to be deeper than the length of the upcut side of your flute. In the case of our 1/8″ compression bit, the upcut part of the bit is 3mm long so we want our depth of cut to be larger than 3mm.
In the case of the demo video shown above, the settings this cut was 3.8mm depth per pass at 1300mm/min. You can use any depth of cut as long as your first pass is larger than the length of the upcut portion of your bit.
Then the rest of the cut should finish with the bottom of the part being cut using the upcut portion of the end mill cutting the last layer of material.
P.S. We are expecting to get 1/4″ compression bits around the end of March/start of April so make sure to look out for that!
Hi everyone. This post about maintaining the linear guides on your LongMill. We’ve had a couple of people report to us that they’ve had their Z-axis get stuck or become rough especially when they have been running over a long period of time.
I and another customer who has experienced this issue have been investigating the cause of this for a few weeks and doing more research to help customers prevent their linear guides from sticking.
I’ll just fill everyone in on our recommendation for maintaining your linear guides to ensure they work flawlessly for every cut. If you want to hear more about what we’ve done to look into linear guide maintenance, scroll down past this section to read more.
Maintaining your Linear Guides
Although the frequency of lubricating your linear guides may vary depending on the type of cutting you do and the frequency of use, we would recommend doing this procedure every 20-30 hours. However, if you experience any grinding noises or roughness in your gantry, we recommend doing this procedure more often.
Wipe your linear guides with a clean cloth, paper towel, rag, or shop towel to remove any dust that may have accumulated on your linear guides. Move your Z-axis up and down if needed.
Apply a liberal of machine oil or grease to your linear guides. Move your Z-axis up and down to ensure that the bearings inside have a chance to get coated Most general-purpose lubrication options should suffice. However, it is not recommended to use dry lubricants or anything with particulates such as graphite in the lubricant.
Here are some links to more into about lubrication:
We believe that most general-purpose lubricants such as the 3 in 1 oil should suffice since the linear guides are used in a relatively low speed, low load application.
These instructions are now a part of our Machine Maintenance page on our Resources.
Jumping into our other findings
One of our customers had reported having their Z-axis linear bearings seize several times, and with the help of this customer, we have investigated the issues further. Initially, this had been a fairly uncommon issue, with only 3 tickets in our system pertaining to these parts as well as a small number of users reporting this issue on our Facebook group so it hadn’t been top of mind for us to investigate. However, I guess it’s better to sort potential problems out than let them sit and percolate forever.
Based on research, the main reason for failure for linear guides is lack of lubrication. This is what I suspect happens.
Linear guides get coated with dust from regular use. This dust either sticks to the lubricant already on the guides and either falls off taking lubricant with it, the guides push it off, or the user wipes off dust and lubricant.
The chance of the ball bearings in the guide seizing goes up either due to the resistance between the balls rubbing against each other or dust making their way into the guide
To replicate the issue I first cleaned all of the grease and debris from a spare ZX gantry using brake cleaner. This provided a situation where the linear guides would have no lubrication. Then the guides were coated in MDF dust and were moved back and forth.
Although I was not able to create a complete failure of the bearings, were was a noticeable increase in friction, and over a longer period, I suspect that the bearings would be able to be coaxed into seizing.
After this testing, I applied machine oil to the guides as discussed in the section above and the linear guide returned to its original smooth movement. I believe that cleaning and relubricating the linear guides can return seized linear guides back to life, and maintaining them should ensure smooth operation for the years to come.
I hope that adding this helps improve the LongMill’s reliability and ensure that everyone’s machine keeps chugging along great!
Initially, we created the Business Directory because we would get a lot of phone calls and emails of people who were looking for us to do custom work. Although we were able to direct them to some of our customers who do custom work with their machines, we felt like it might be a good idea to create a directory that lets people find people in their local area for services.
It’s been great to have the directory in place to direct people to LongMill and Mill One users, it’s been difficult to maintain and update because every entry needed to be added manually. Also, there was no way to easily search for listings based on the name of the business or location.
Our new Business Directory offers a couple different functions that take it to the next level. These include:
Ability to search businesses based on location, description, name, and more
A user account system so that you can update and edit your listing at any time
Better security of email addresses and other personal info that are prone to being spammed
Ability to add photos and other details such as a description of your business
We also hope to be able to add new functions to this site as time goes on.
Whether you’re running a full time business with your machine, just doing things for fun, looking to connect with other users, or just want to browse to see a diverse community of CNC users, make sure to check out and list your business and work on our directory!