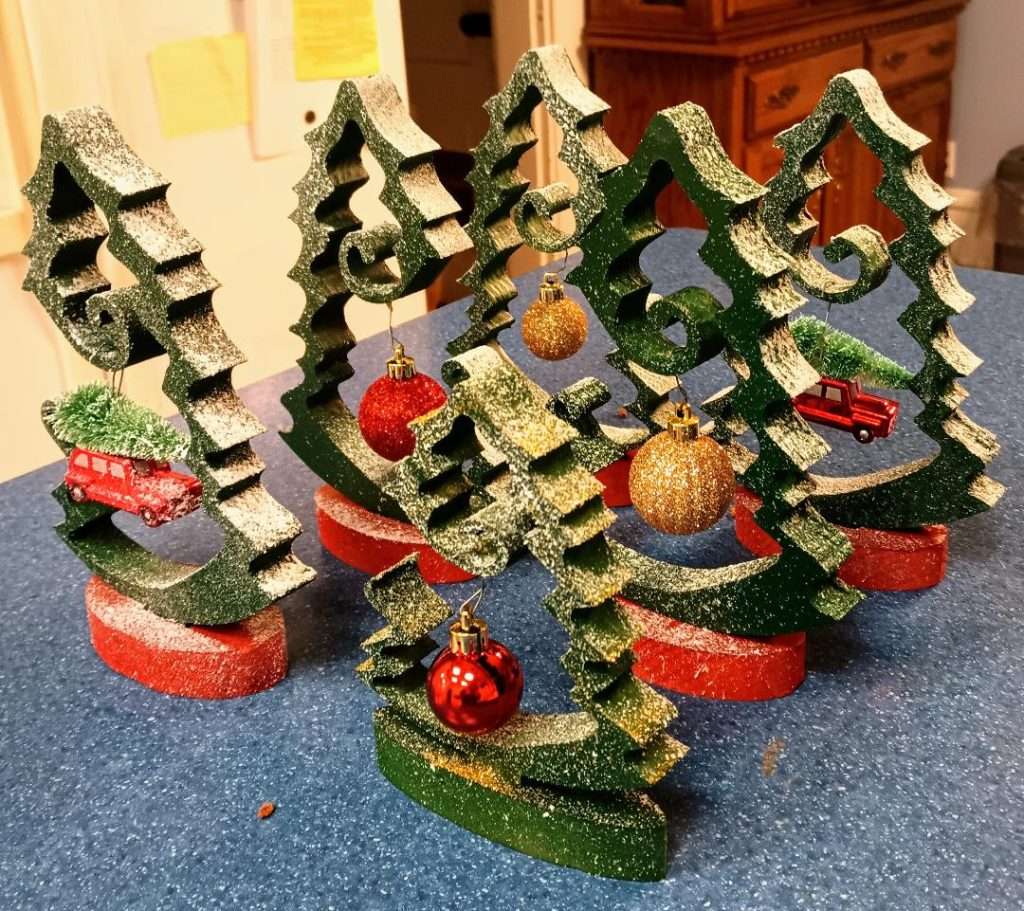
Happy Friday! Thanks once again for sharing your Winter/Christmas projects.
Last Week’s Winners
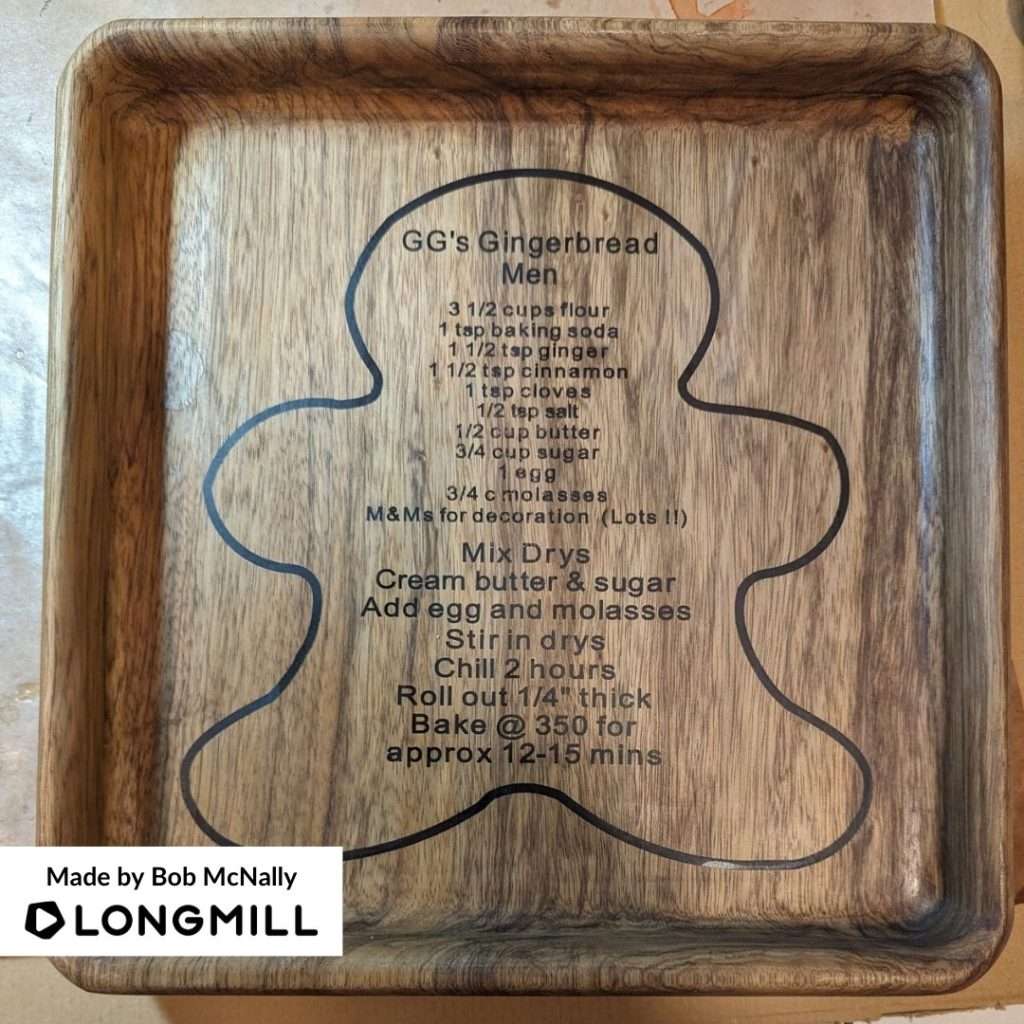
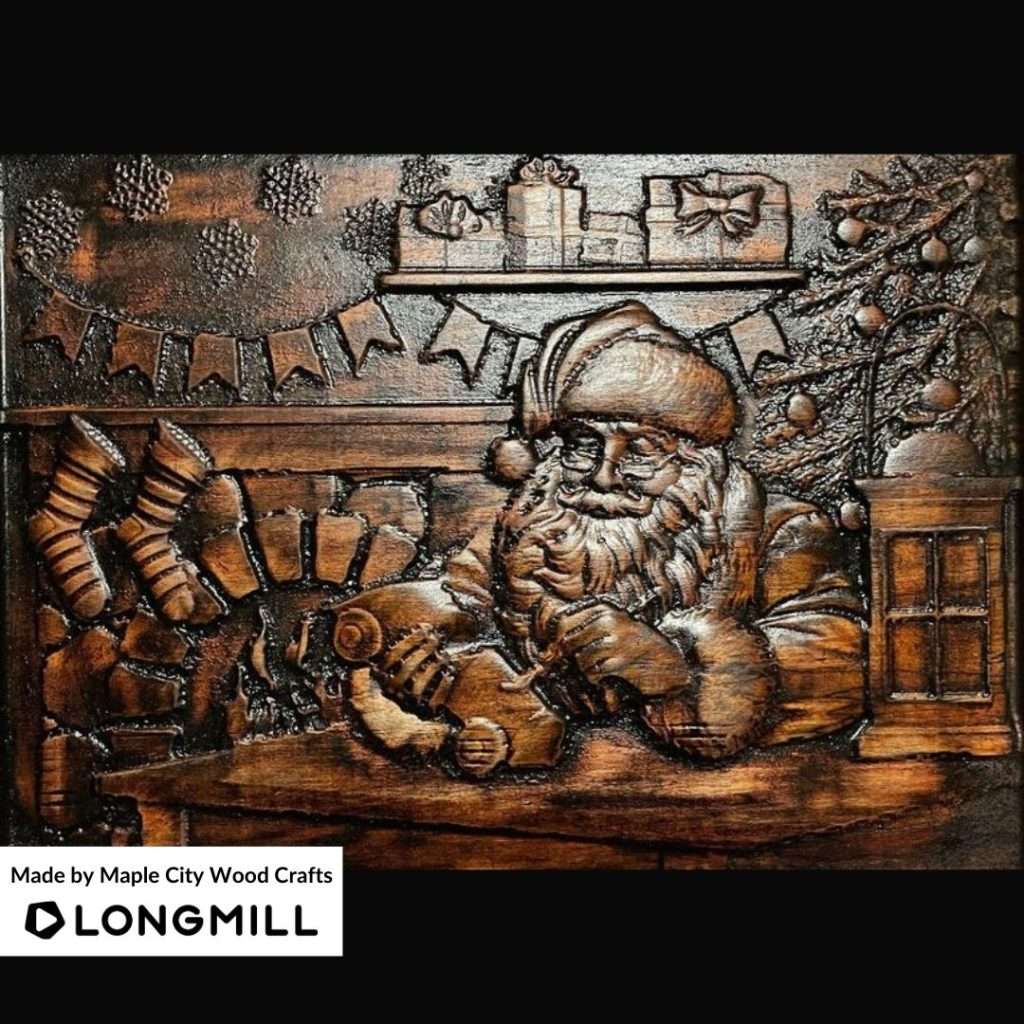
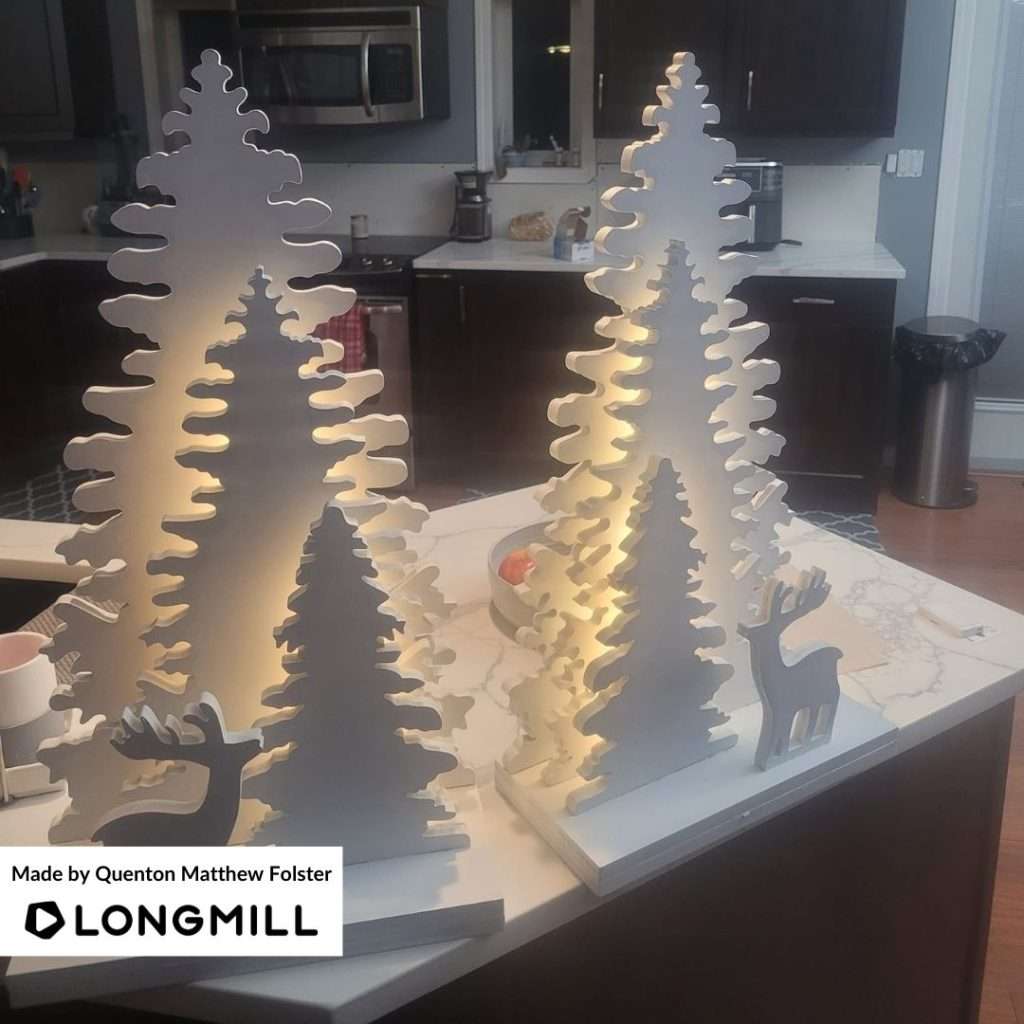
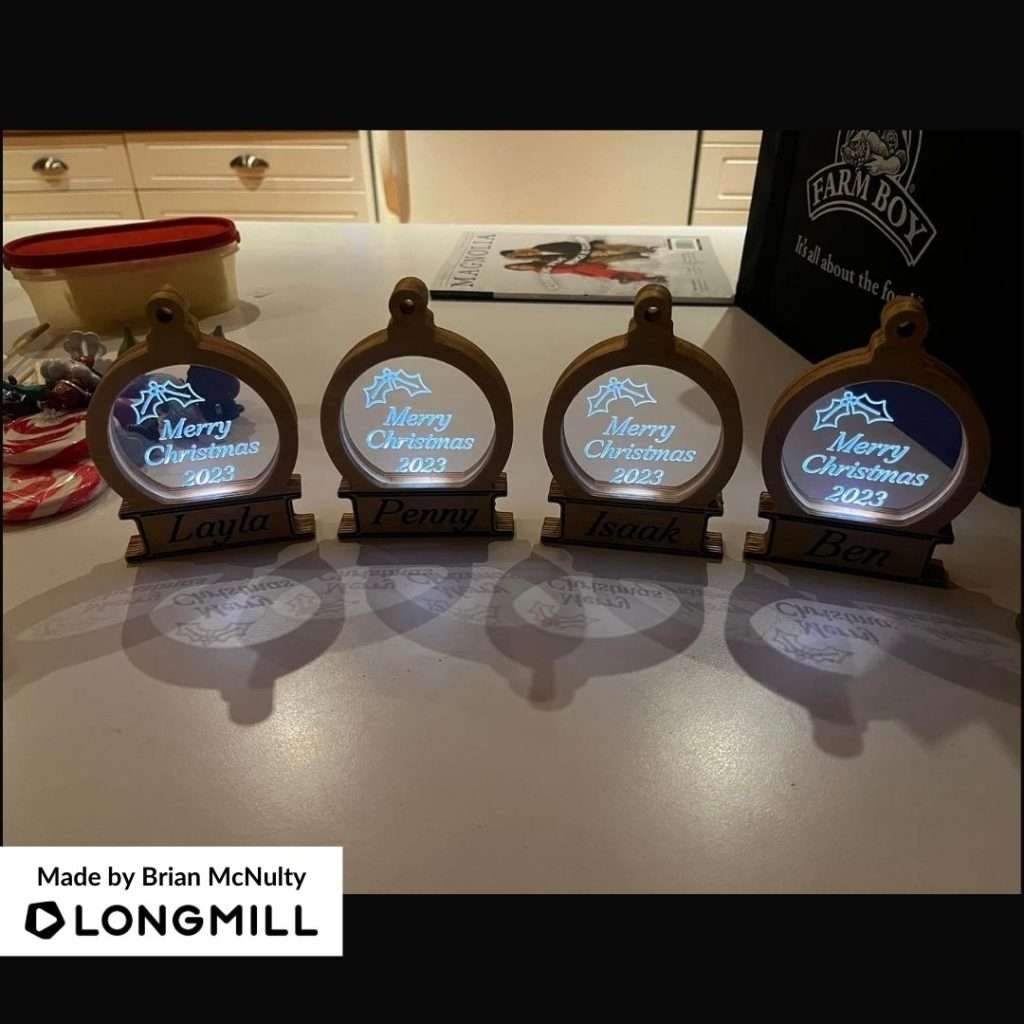
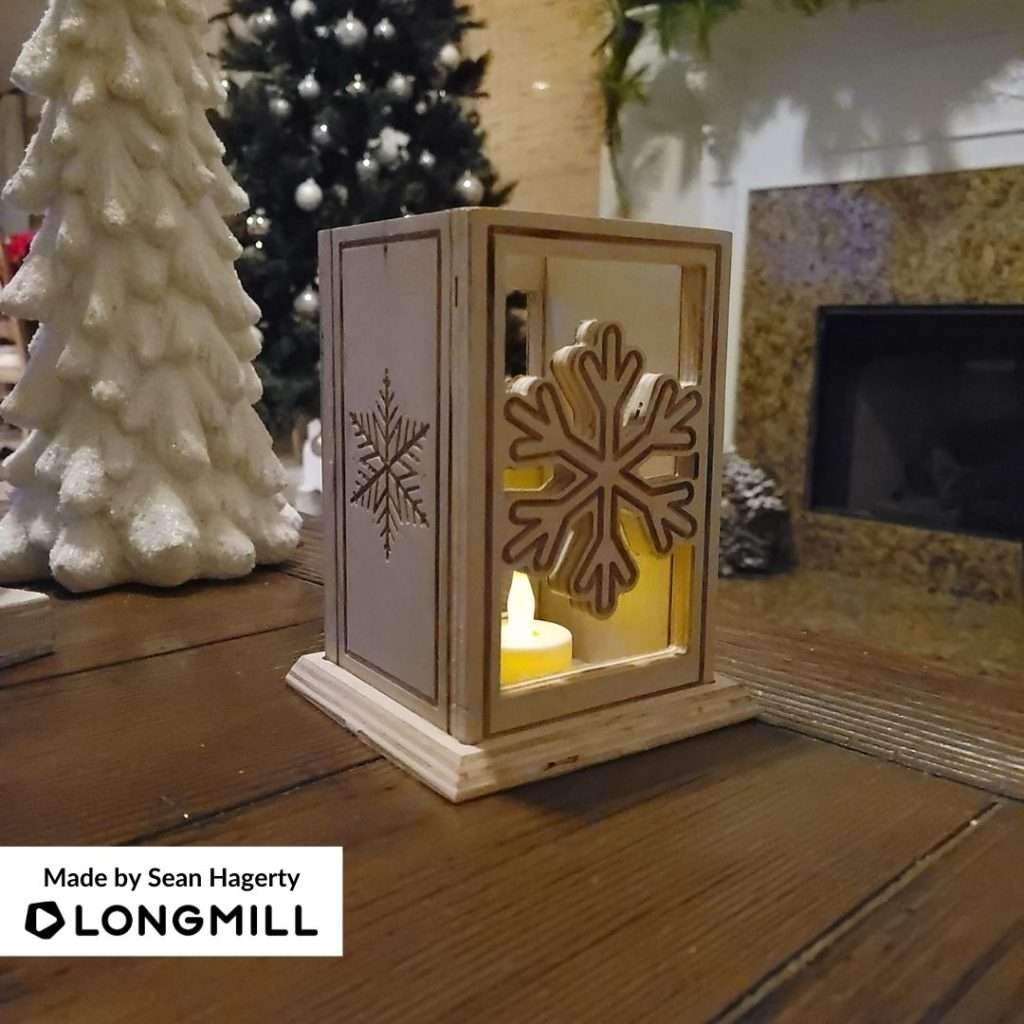
We are happy to announce that Raul Garcia, Bob McNally, Maple City Wood Crafts, Quenton Matthew Folster, Brian McNulty, and Sean Hagerty are the winners of the Winter/Christmas projects part 2 contest. A prize is on its way to you!
This Week’s Theme: Winter/Christmas Projects Part 3
Happy holidays! Celebrate the final week before Christmas with us by sharing your best Winter/Christmas LongMill projects for a chance to win cool prizes.
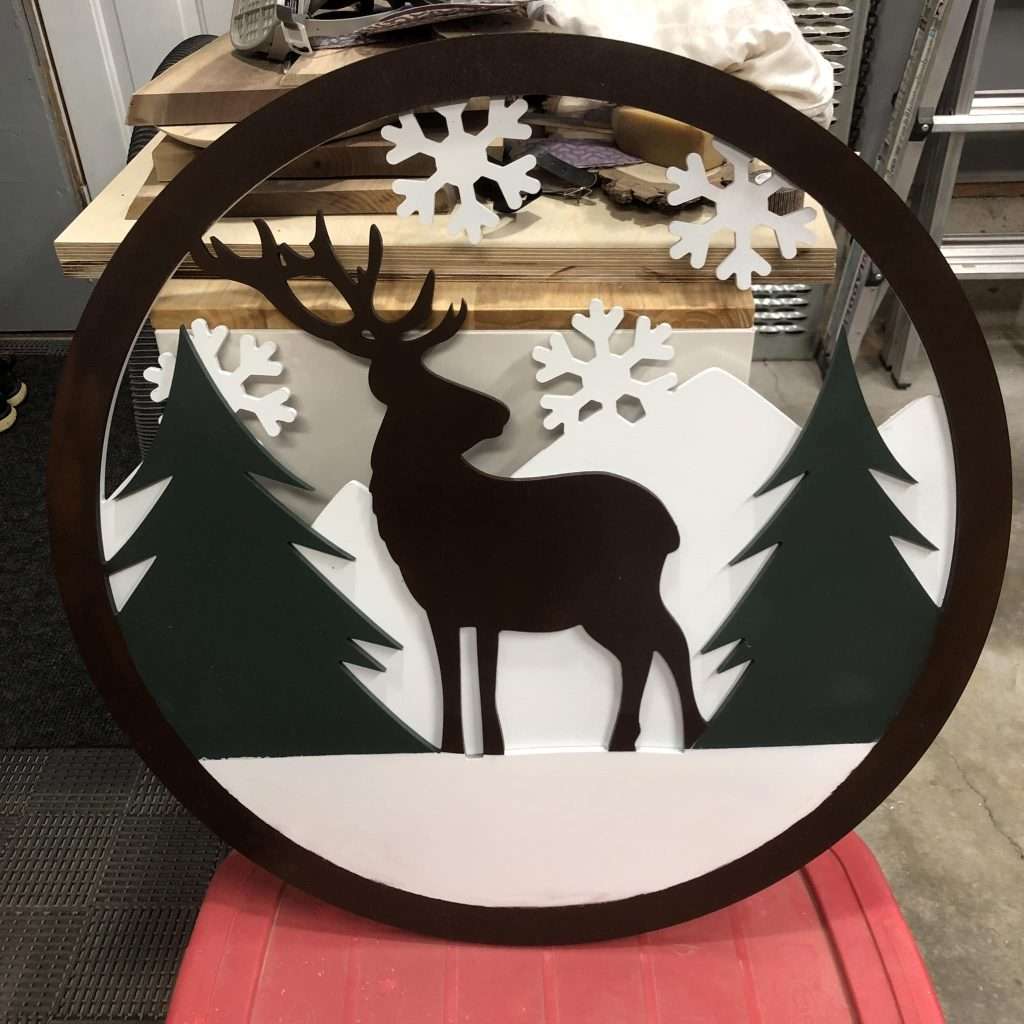
Happy weekly contest time! Thanks for sharing your Winter/Christmas projects.
Last Week’s Winners
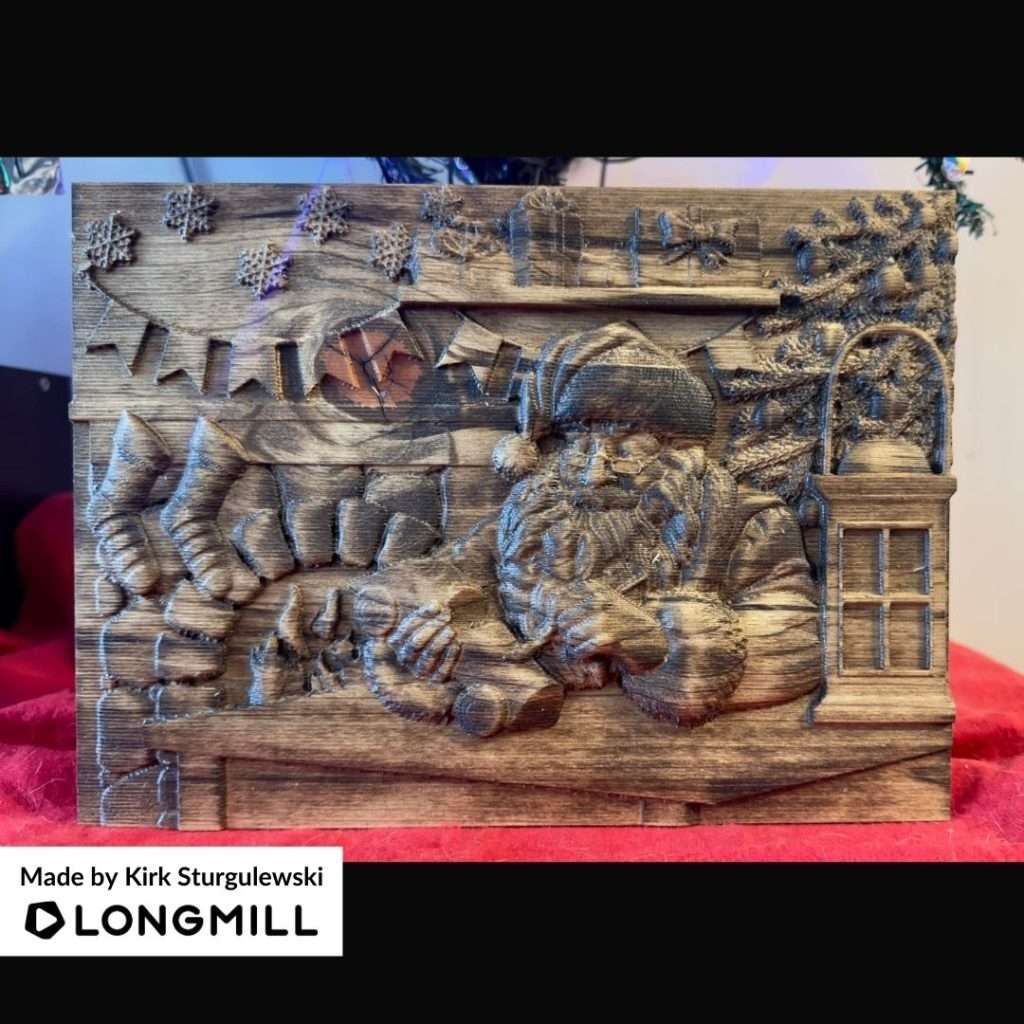
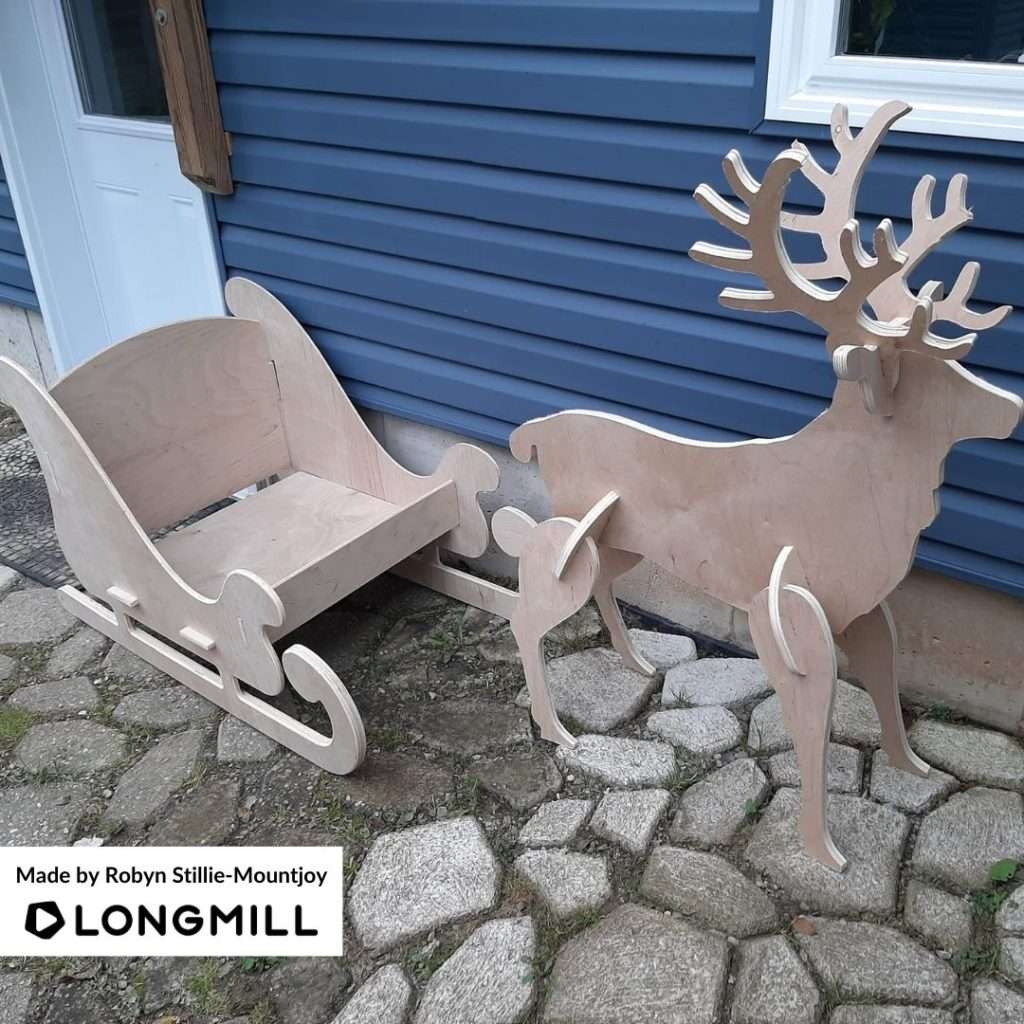
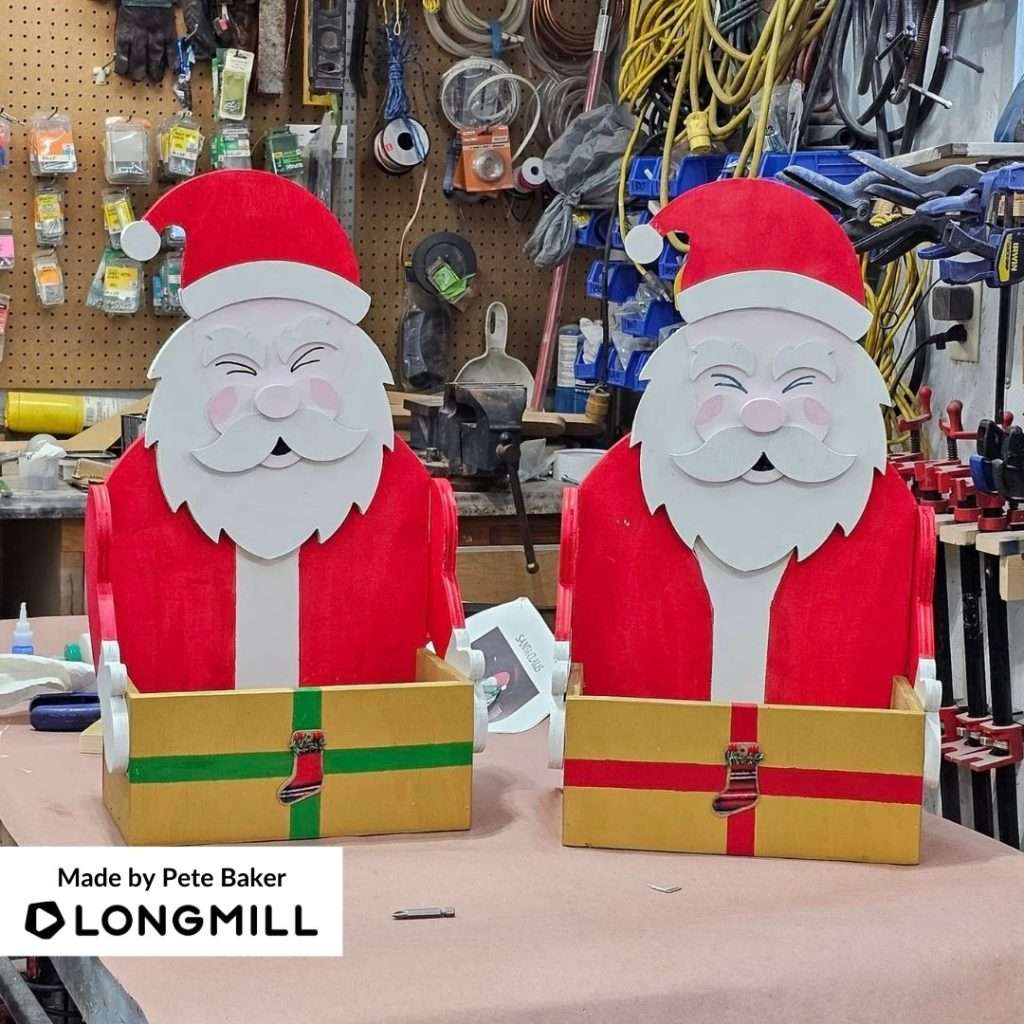
We are happy to announce that Bill Trott, Little Shadow Woodcraft, Aaron Greer, Kirk Sturgulewski, Robyn Stillie-Mountjoy, and Pete Baker are the winners of the Winter/Christmas projects part 1 contest. Watch out for a prize!
This Week’s Theme: Winter/Christmas Projects Part 2
Celebrate the rest of the festive season with us! Share your best Winter/Christmas LongMill projects for a chance to win cool prizes. Happy holidays!
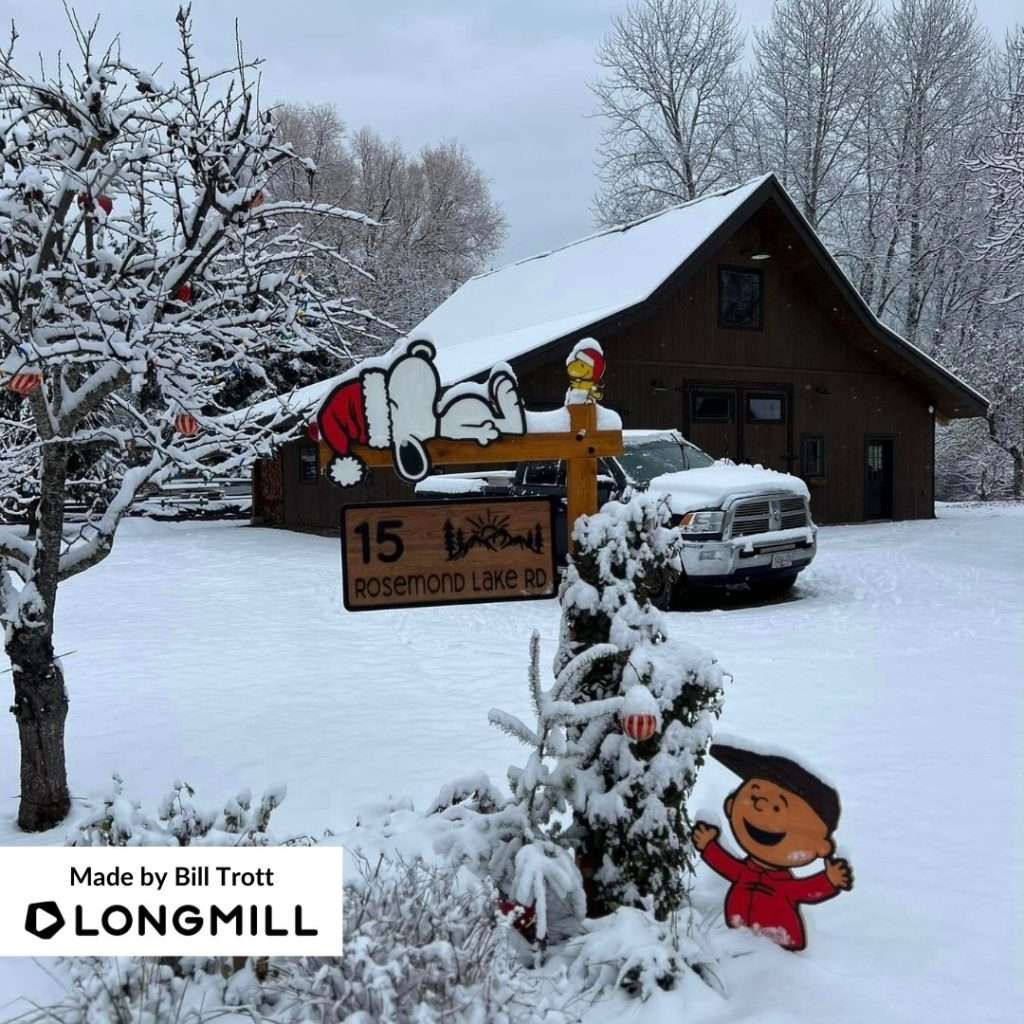
Happy Friday! Thanks for sharing your LongMill sign projects.
Last Week’s Winners
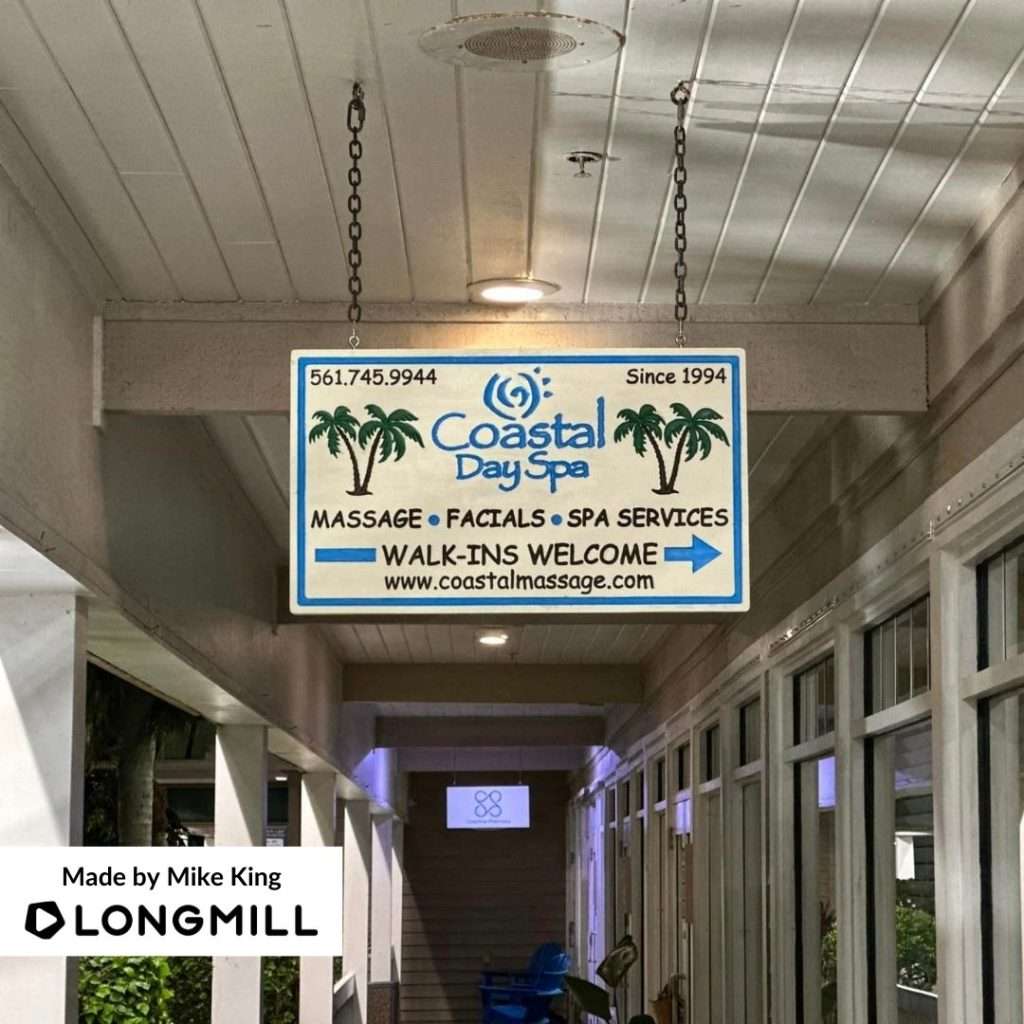
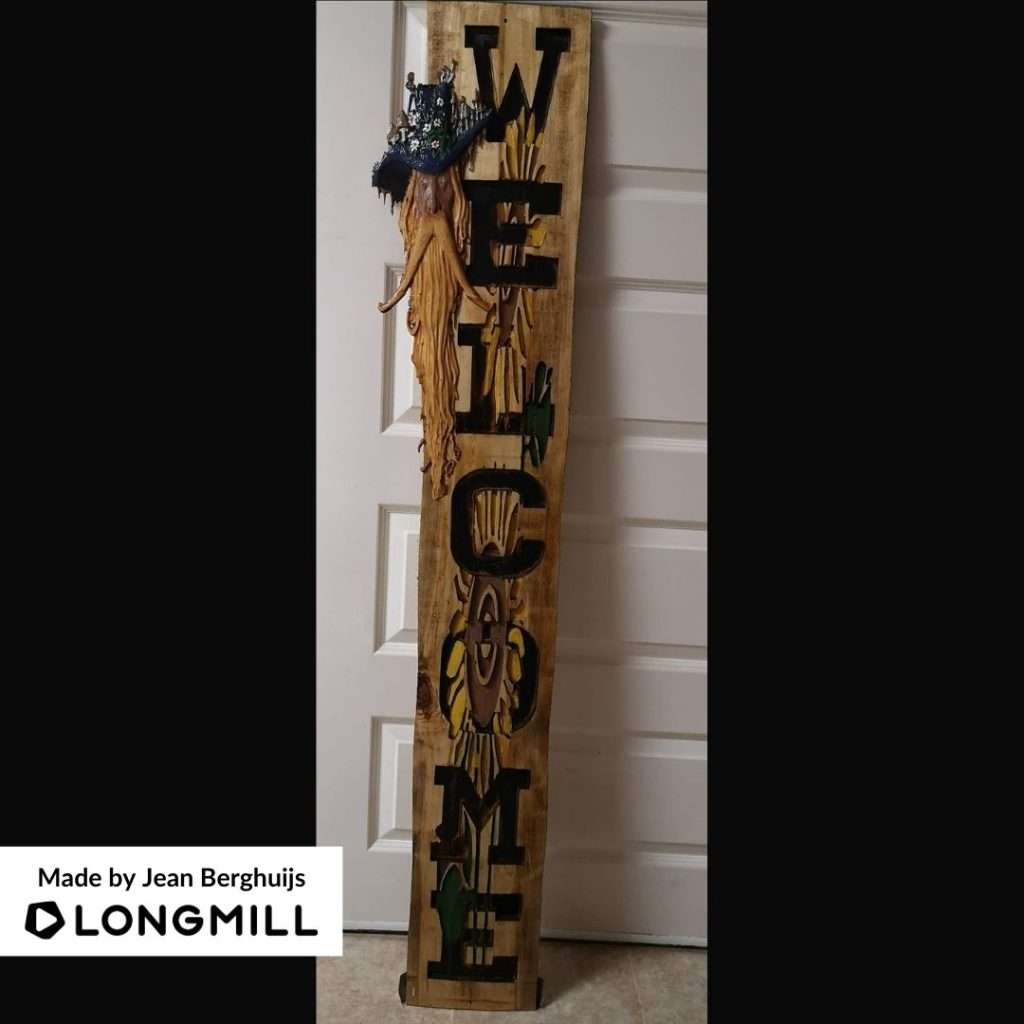
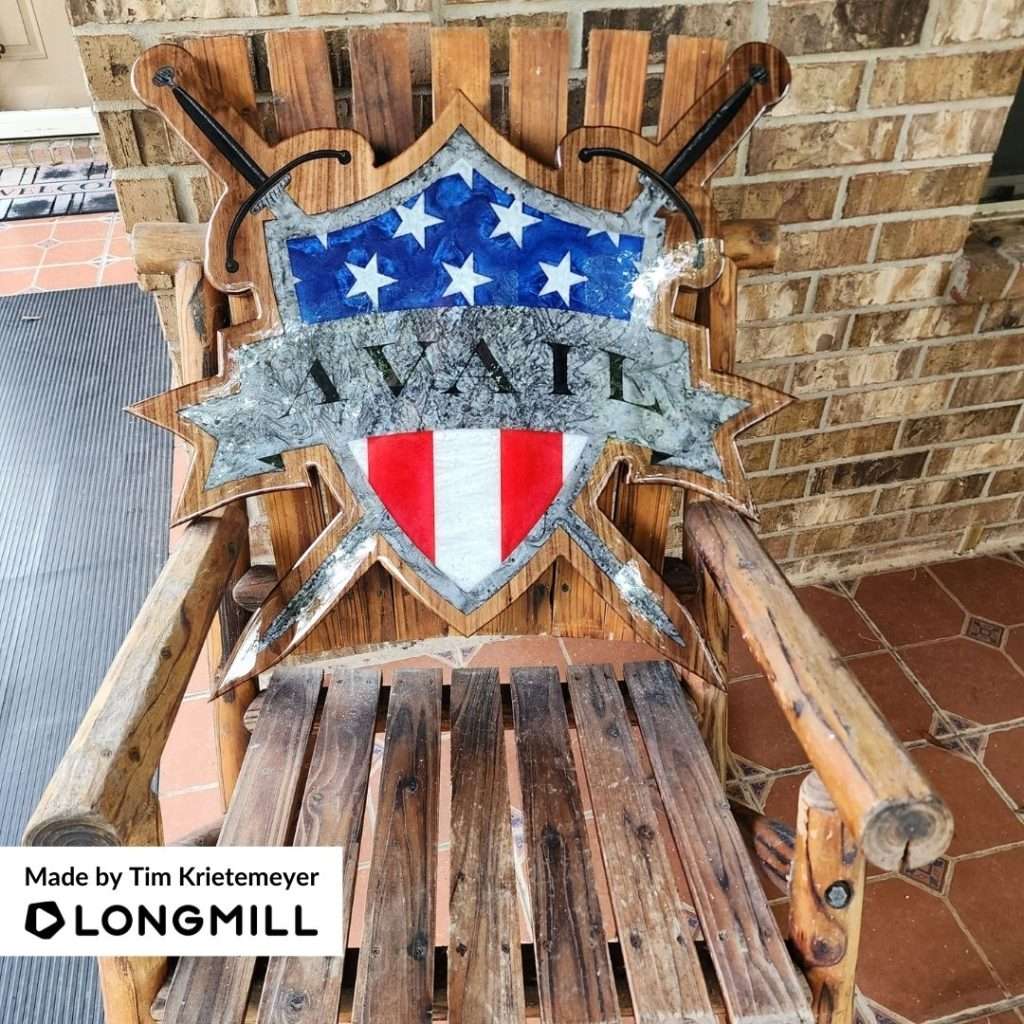
We are happy to announce that James Newman, Mark Allen, Mike King, Scooter E McMessacar, Jean Berghuijs, and Tim Krietemeyer are the winners of the sign projects contest. A prize is on its way!
This Week’s Theme: Winter/Christmas Projects
Happy festive season! Share your best Winter/Christmas LongMill projects for a chance to win cool prizes. Happy holidays to all!
Hey everyone, here’s our December production update! Many things happened in November.
On a side note, I just turned 27. I think it’s sort of crazy I’m in my “late-20s” now?
Holiday Break
Please note that our offices will be closed from Dec 23 to Jan 1st. We will reopen on Jan 2, 2024.
During this time:
Shipping of items may be paused until we return.
We may not have someone answering phones at this time.
Responses to emails may be slower than normal.
We will have a shipping cut off of noon on Dec 22. Please place your orders if you’d like to have it shipped before the end of the year.
Moving
Moving continues to chug along, with the final moving to be done before the end of the month. Please note that response times and shipping may be a little slower than usual.
Our new address will be Unit D, 120 Randall Drive Waterloo.
LongMill MK2 Orders
LongMill orders continue to ship as usual. We were a bit low on bristles for the dust shoe, which meant that some orders took a few days extra to ship.
Thanks to a grant from the government, we are getting a new CO2 laser cutter and CNC mill partially subsidized for prototyping and production use. We’re planning on taking the old CO2 laser which we’ve been using for the last 3-4 years and taking it apart for R&D use for our CO2 laser project.
We are now waiting on injection molded feet for the LongMill, which we expect will help reduce our reliance on the 3D printing farm by about 25-30%. This should help us free up more capacity for printing other parts, such as dust shoes and LaserBeam parts so that it will be less of a bottleneck for production in the future. Ron, our print farm manager, also started working with input shaping, which is a feature that allows for faster movements with less resonance by analysing the printer’s movements and adjusting its movements to cancel vibrations. This also is helping to improve print quality and increase print speed by 15-25%.
LaserBeam and Vortex
LaserBeam continues to ship as usual. We are currently waiting on a new batch of heatsinks, drivers, and cables to arrive in the next few weeks so that we can stockpile more units.
Vortex also continues to ship but we now have around 17 (at the time of writing) left. Probably by the time this post goes out, we probably will have a few less. There is another batch in production now for 300 units, which should be ready to ship early January.
SuperLongBoard
Chris just put out a update video about the SLB which can be found here:
I’ve taken a step back from helping Chris with the testing side of the board currently and working on some of the manufacturing along with Daniel, but it appears that the testing in the back room continues to happen at a blazing pace. I just placed an order for another 40 controllers to ship in the next few weeks for final testing.
The designs for the SLB controller case have now been finalized and in production. We expect samples from production to be ready in the next 3 weeks, and parts to arrive in the new year. One of the main differences for the new controller is that it is designed to mount directly to the Y rail on the LongMill, which allows it to take a bit less space on the workbench. However, users will still be able to mount their controller using the screw holes as well.
Design for SLB case
We are also wrapping up the design for the new E-stop buttons and macro buttons as well now and starting production for it this week.
Pre-orders are slated to come in December 4, so make sure to keep your eyes peeled for that! For more info about the pre-order, please check the Blog post here.
AltMill
As we were alluding to in the previous updates, we’ve started working on the AltMill. Kelsey and I are currently working on the shipping of the first batch of parts for the AltMill.
For the latest update, please see our blog article.
Thank you to everyone who filled out the survey. It looks like we have quite a bit of interest in the AltMill. We’ll continue to post updates here and prepare for pre-order availability as we move forward with production on the first batch. At the time of writing about 5 days after the survey went out, we have over 50 respondants, half of which are ready to put down money to get the new AltMill.
Initially I was expecting sales for the AltMill to start out pretty slowly, maybe 15 machines per month, however I feel pretty confident that sales will be much stronger especially given the lack of information we have out for the AltMill at the current time.
Sienci Router
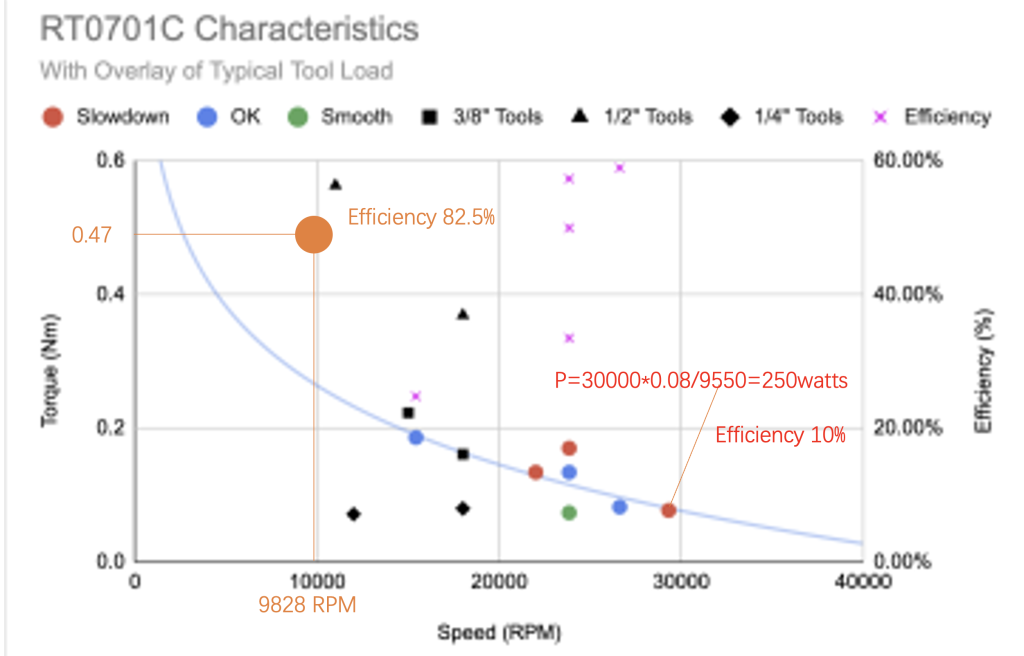
Continued development on the Sienci Router has been fascinating, especially as Johann and I have been looking beyond AC universal motors found in most power tools like the Makita RT0701.
One of the main important things we’ve been looking at has been the efficiency and actual power output of the Makita router. Based on loading and testing the router, we see that the true power output of the router is much lower than the 1.25HP rating in some scenarios.
In theory, this means that a more efficient motor could use less power, but get the same cutting performance as a Makita RT0701.
This is where we’ve been exploring brushless DC motors (BLDC motors).
One of the main advantages of BLDC motors is that they are much more efficient than a universal AC motor. Based on the suggestions from the company we are working with on developing the motor, it may be possible to use a 400 watt BLDC motor in place of a 1200-watt AC motor.
Additional advantages of using a BLDC motor include:
Higher efficiency and lower power consumption means less heat, which also means a smaller fan that creates noise
A wider speed range, allowing the router to be used more effectively at slower speeds
No need for replacing brushes, which also lowers noise caused from the brushes rubbing
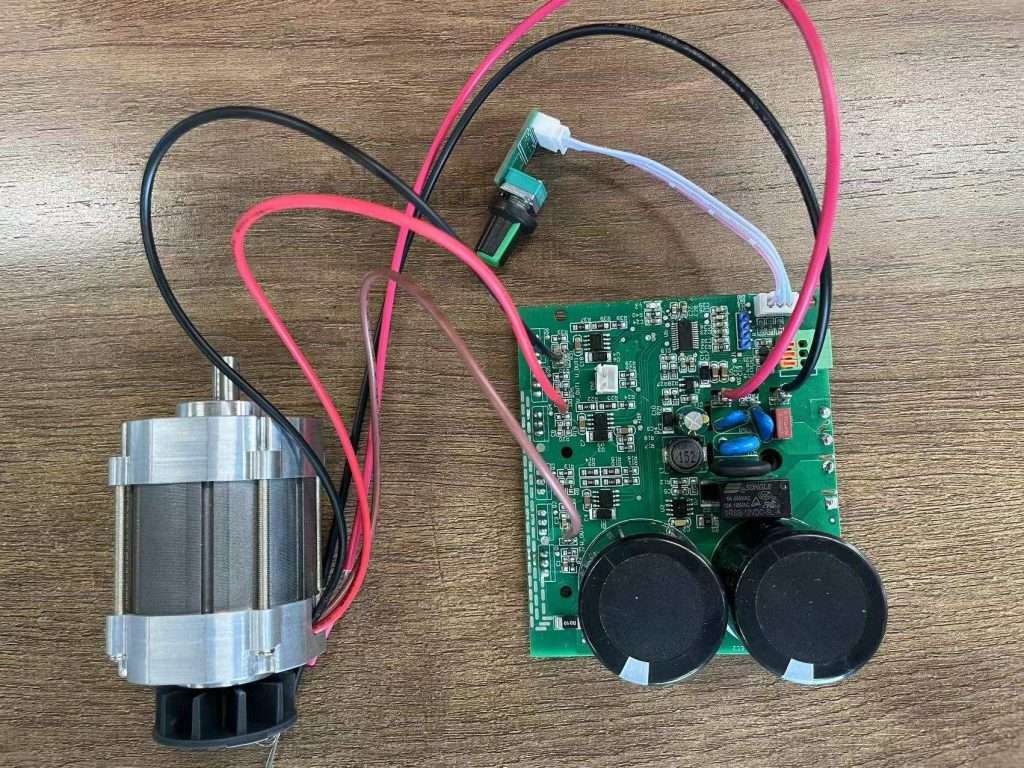
Sample motor with BLDC
BLDC does have a few disadvantages. The first is the price. We expect a production-ready motor to cost 3-4 times more than a universal AC motor. Second is figuring out the additional complexity in understanding the motor control systems and feedback loops we can implement to ensure that we have steady and accurate speed control.
That being said we believe it is possible to keep the overall BOM cost overall low to keep the router affordable and we’ll be able to use some off-the-shelf designs and external expertise to optimize the speed control for the router.
We expect to receive some motor samples in the next week or two, and we’ll start conducting testing to determine if BLDC offers an effective option for the Sienci Router.
CO2 Laser
I just talked to Ikenna to get an update about the CO2 laser development. The CO2 laser development team just finished filming an update video today and plan to release it in the next few weeks. There will also be a survey to help us direct the development for the new product. We expect to start purchasing prototype parts in the next week and expect to have a working prototype at the end of January.
Hey everyone. We’re excited to share that the SLB will be launching on Dec 4, 2023. Chris and our development team have been going full bore in bug fixing, testing, and doing the final prep to get the SLB ready for production.
There are simply too many features and updates to share in one blog post, but we do have lots of different content and information you can check out to find out more about the SLB on the Youtube video, the product page, and our blog article, Next Big SLB Update .
Hey everyone! Big thanks to those who shared their Fall/Thanksgiving LongMill projects this week.
Last Week’s Winners
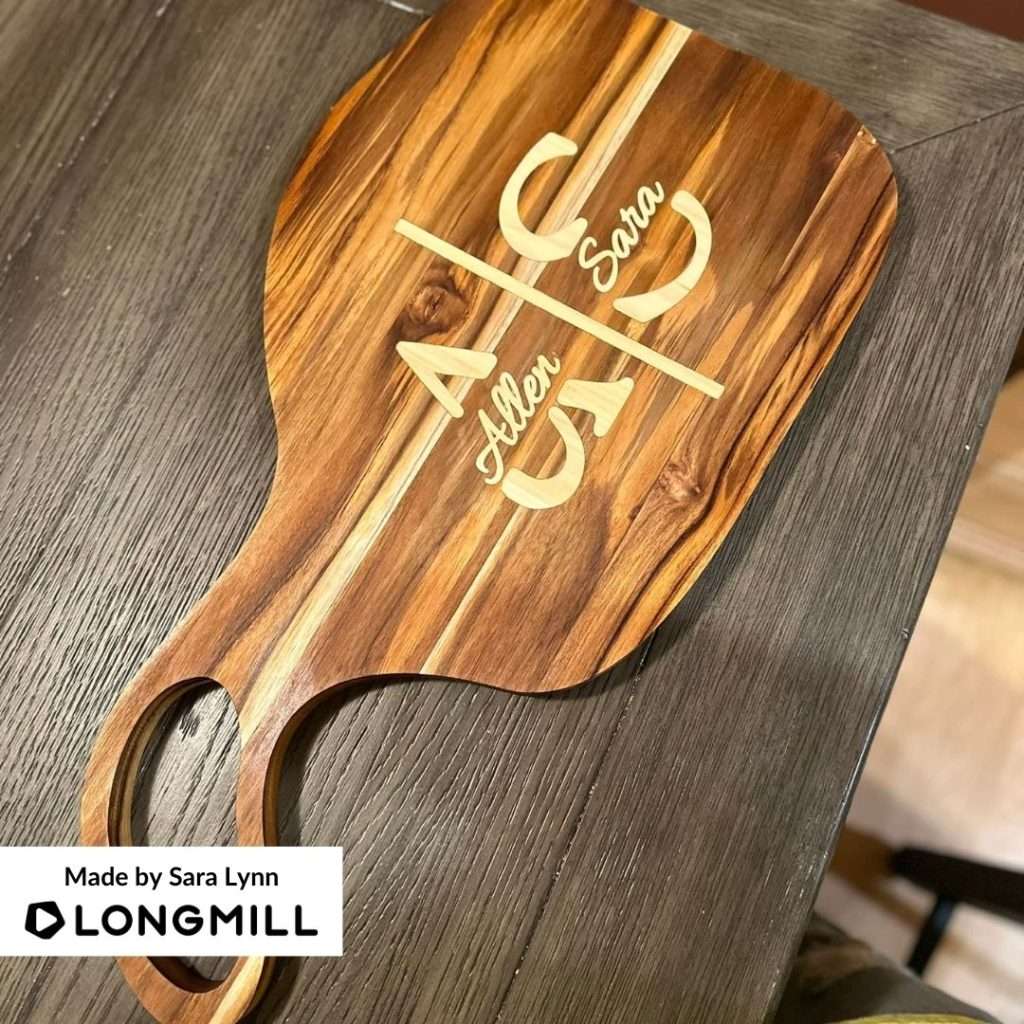
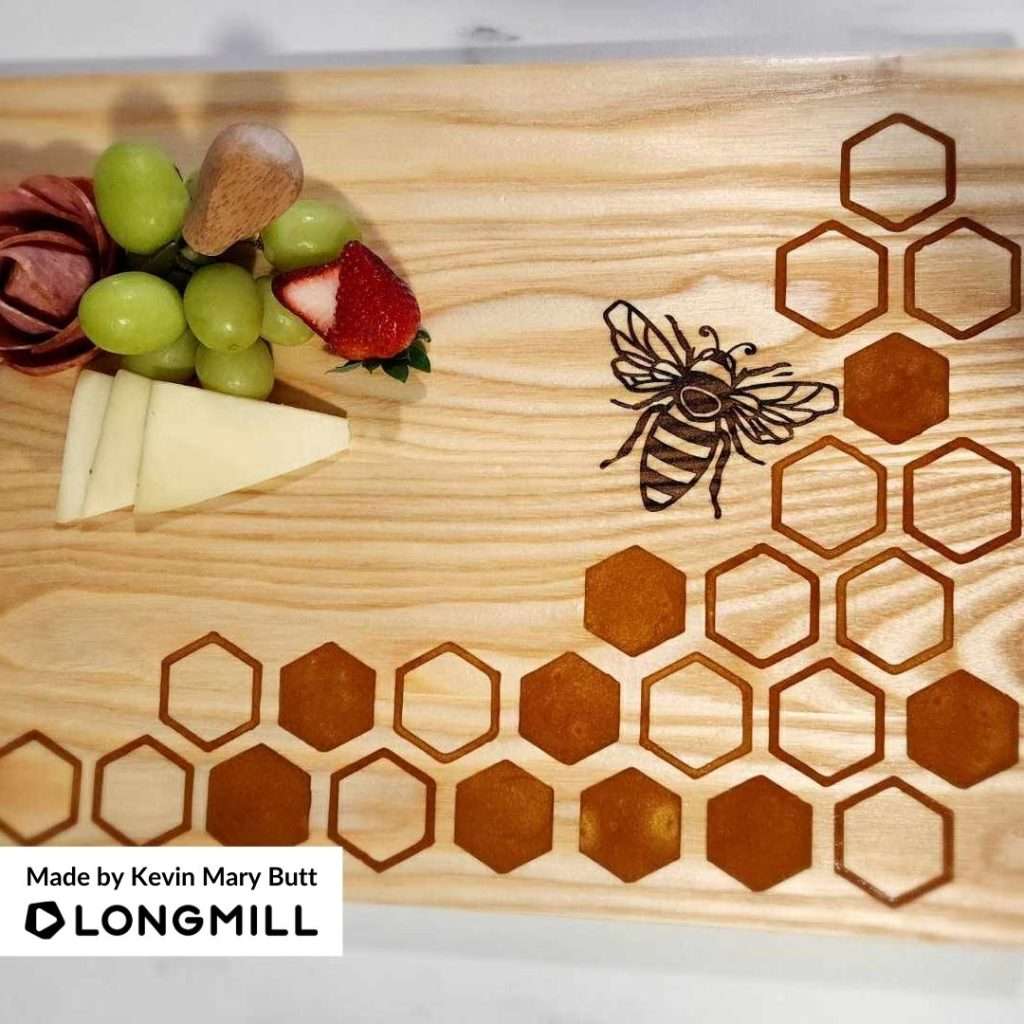
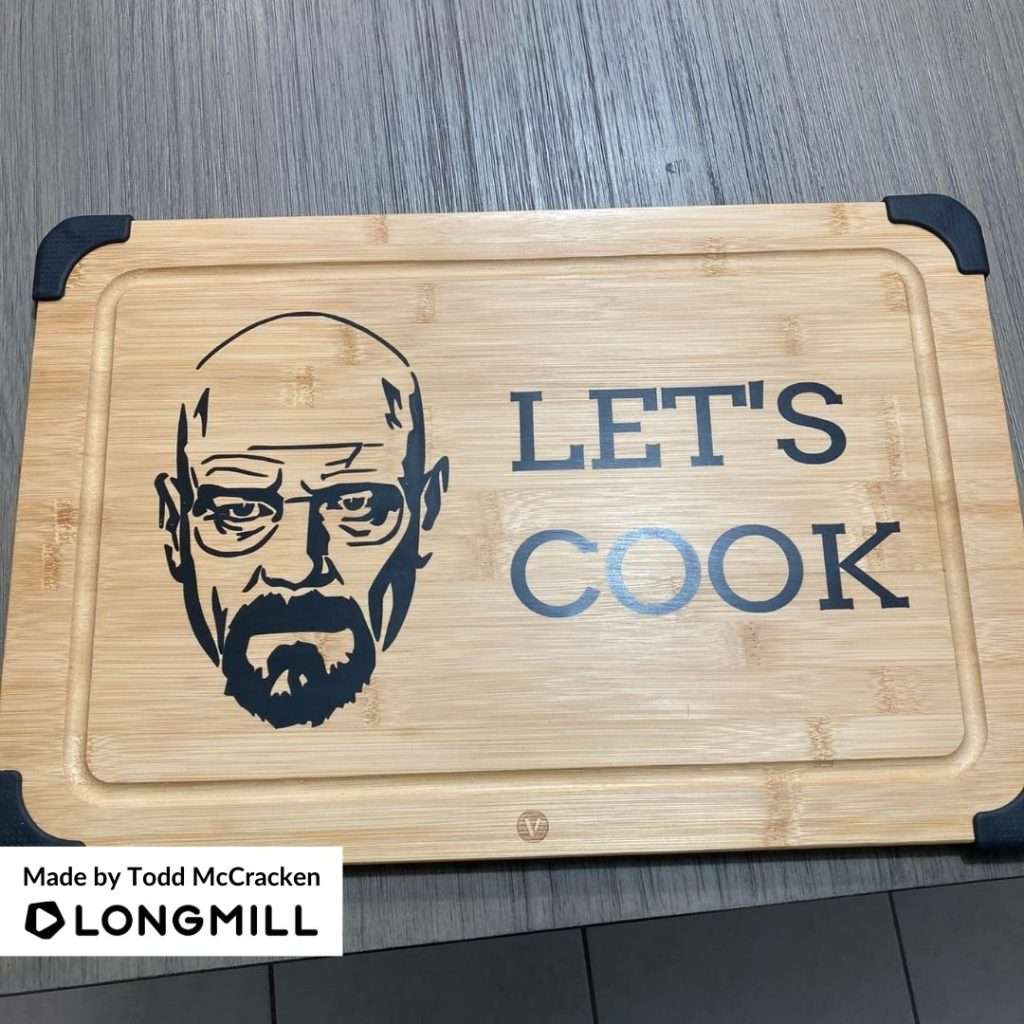
We are happy to announce that Sara Lynn, Kevin Mary Butt, and Todd McCracken are the winners of the Autumn/USA Thanksgiving-themed projects contest. Lookout for a prize!
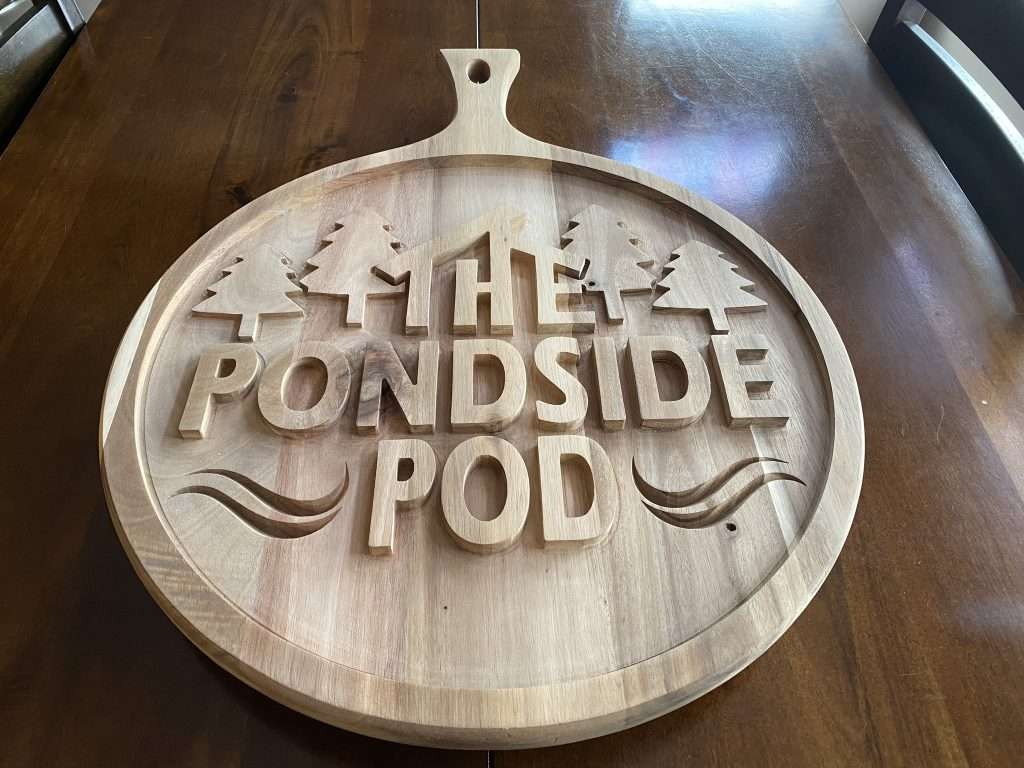
This Week’s Theme: Sign Projects
Share your most creative LongMill sign projects for a chance to win prizes in this week’s “Projects That Are Signs” contest!
Hey everyone. As you guys might have seen in the November update, we are now back working on the AltMill. If you have been following along with us since 2021, you might have heard about the AltMill project.
From 2021 and 2022, there were a couple of reasons and factors that led to us putting the AltMill project on the back burner, which included:
Not having enough space for the development and production of the machine in our current space
Continued need for development and focus on the current LongMill product
A general decision to focus on the lower end/hobby of the market at the time
However, in 2023, we’ve now established a strong process for the LongMill and with the move to the larger building, we feel like it’s a good time to put the AltMill project on the front burner again.
Things are already moving forward with the AltMill, as we currently have 50 machines in production for our first batch. We expect parts to start arriving for assembly in the next 2 months.
What is the AltMill?
#image_title
The AltMill is a CNC router that uses ball screws and linear guides and has a 4ft x 4ft working area. This addresses the two big “asks” we get from the LongMill community for a new machine, which is to:
Having a larger working area
Getting rid of v-wheels
The AltMill focuses on the same core ideas as the LongMill, which is:
Be simple, affordable, and easy to maintain
Come with excellent support
Be beginner friendly
The AltMill is aimed towards:
LongMill users who want to upgrade to a faster, larger, and more powerful machine
Hobbyist, prosumer, and small business owners who want to use for small scale production work
The AltMill is a completely new machine, with basically no parts shared between the LongMill, but users will find the process of running the machine to be almost identical.
Specifications
10,000mm/min rapids with closed-loop stepper motors
Higher rigidity with HG15 linear guides on all axis
Higher precision with 16mm ball screws on the X and Y, and 12mm ball screw on the Z axis
A working area of approximately 50″ x 50″ on the X and Y, and Z travel of approximately 6.5″ (with 4-5″ Z-clearance under gantry)
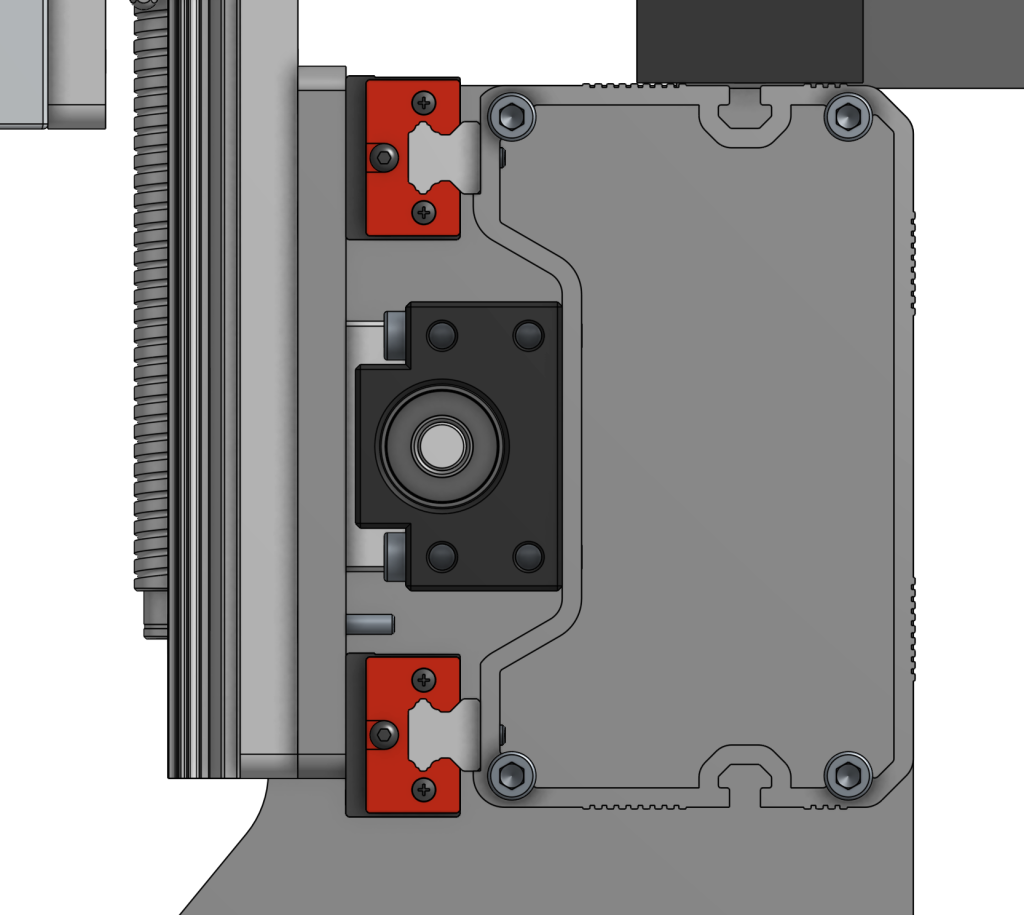
The original design used SBR16-type linear guides, which had a few advantages, with the primary one being that the height that the linear guide blocks sat met up with the exact same height as the ball screw nut, making it possible to mount everyone on the same plane like shown in the picture below. In this design, we mounted everything to machined plates.
We initially avoided using “square rail” guides because of their cost and need for more careful assembly, but with our new experience working with different manufacturing techniques and other factors such as finding a well-priced supplier for the components, using rails such as the HG15 family of parts became viable.
HGH15 components
One of the main manufacturing techniques we’ve come to understand better and use is extrusions. We’ve used this technique for making the LongMill rails, LaserBeam heatsinks, and the t-track clamping system, so we now have a better understanding of the tolerances we can achieve, and because extrusion allows us to space the components as we want to, we’re able to make more rigid structures while keeping the whole machine lighter. Additionally, we can add extra features to the rail and position components where we want.
Adding features like t-slot and locations on the ends to tap holes, we are able to reduce the number of parts needed and provide more freedom in mounting different things to the machine.
We use three main extrusions in the X, Y, and crossbracing of the table that keep the machine rigid while reducing the number of parts needed to put it together.
#image_title
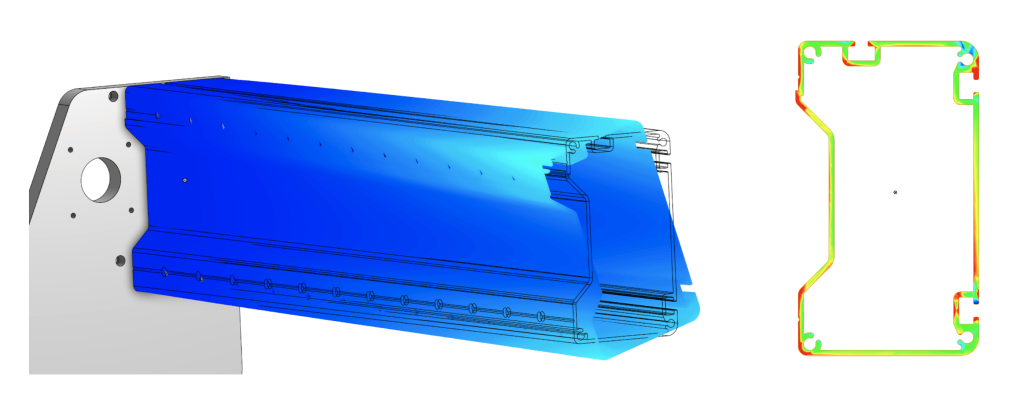
Switching to an extrusion-based design also helps drastically to increase machine rigidity, without increasing weight. In the LongMill MK2, we were able to increase the rigidity of the X-axis beam while simultaneously decreasing moving mass by switching from a solid ‘open channel’ angle aluminum profile to a ‘closed channel’ extrusion. This makes for a significant strength-to-weight ratio improvement, which has been the case of the AltMill’s latest design revision as well.
This is especially relevant for the case of the X-axis beam in most CNC routers, since tend to deal with very high torsion loads; twisting the beam. Closed channels (tube structures) are the most optimal shape for dealing with these loads, the closer a profile gets to becoming a perfectly round tube structure, the better it is at handling this load, and the better our machine will perform.
Simulation of an X-axis extrusion profile iteration, stress concentrations shown on right
The new AltMill’s X-axis extrusion has also been sized to be much more robust than the LongMill’s X-axis extrusion. With better linear motion components, faster cutting speeds, and more utilization of higher-powered spindles it’s important to rebalance different components of the machine to ensure there are no weak points.
The rigidity coefficients of the AltMill’s X-axis extrusion at various wall thicknesses, compared to some other extrusions
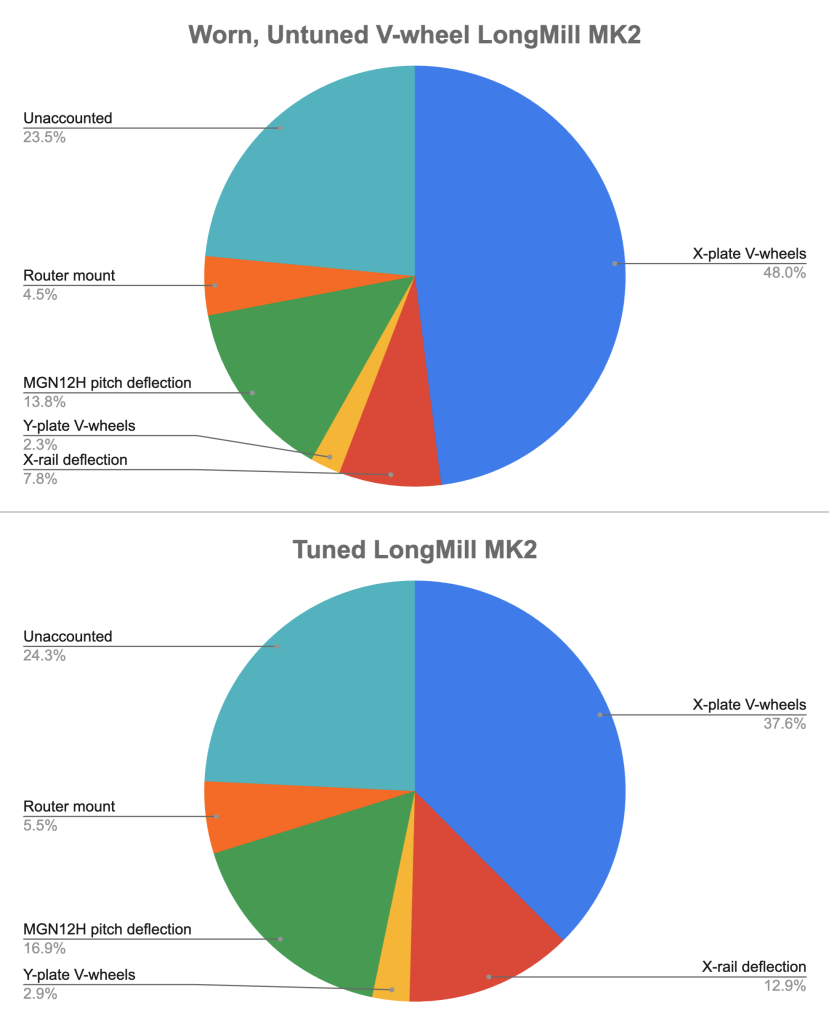
In a CNC router, you generally want to balance any deflection across all components evenly. Having a very rigid machine with a single weak component that causes it to perform poorly usually doesn’t make sense from an engineering or practical standpoint. Looking at a breakdown of various sources of deflection on the LongMill, we can see that with the exception of the V-wheels, the LongMill does a pretty good job of balancing this across major parts and sub-systems.
Since we’re now removing V-wheels from the equation in the AltMill, we now look towards some of the largest areas of deflection, since these will make up the bulk of deflection. Some of the more trivial areas such as the router mount, and deflection from the Z-axis linear bearings (MGN12 pitch deflection) can be addressed by better component selection, but the X-rail deflection stands out as an area where improvement will be needed at the design side.
Another, unrelated takeaway from looking at these charts is the variance of how much deflection the V-wheels on the X-axis contribute depending on their tuning and wear state. This can be problematic when you’ve set up your cutting parameters to fully utilize the rigidity of the LongMill (or any V-wheel machine), only to have them wear or fall out of tuning causing your rigidity to decrease and affect the quality of your project.
This isn’t to say that V-wheels aren’t more than adequate for the purposes of a hobby CNC router, but this matter becomes more of a concern when dealing with much more strenuous, repetitive projects where consistency over a long period of time is needed.
LongMill MK2 deflection breakdown by component/system
Another change not specific to the new design of the AltMill is the decision to pursue a closed-loop stepper motor system.
With regular stepper motors, the motor driver will instruct the motor to move some amount, and the controller will assume the motor has moved by that amount. If there’s nothing wrong with your machine, and you’re not running into anything that’s stopping your motor from moving, this almost always works fine.
When your motor driver instructs your motor to move some amount and it fails to move, or does not move the exact amount as requested, things get out of sync. This scenario is generally referred to as ‘losing steps’ since your stepper motor has skipped moving a few steps/increments and is not where it should be, or where the controller thinks it is. This is bad for a couple reasons such as:
The next toolpath your machine makes won’t be where it should be, typically meaning your cutting paths will appear ‘shifted’ in some direction
On a ‘moving gantry’ machine with two Y-axis motors, if one motor skips/loses steps, your X-axis will no longer be square with the Y-axis, and in serious cases you may damage parts or induce excess wear running it like this.
If the motors are unpowered (such as between jobs), bumping into the machine, or pulling one the router/spindle may move the motors causing them to lose position and create ‘shifts’ in your project the next time you run it.
Unlike a regular stepper motor, a closed-loop stepper motor will keep track of it’s position using a sensor known as an encoder. The sensor typically relays this position information back to the motor driver (ergo, closing the loop), to let it know if everything is in sync and motor is where it’s expected to be, or if something has gone wrong.
If something is off, the motor driver will correct for the difference, and move the motor’s position to wherever it should be. If it’s unable to, such as in the case of running into one of the travel limits, the motor driver will send an alarm signal to the controller to let it know that something has gone wrong, in order to salvage the project and prevent any sort of serious machine damage.
Closed-loop stepper motors also have some other neat benefits such as:
The ability to run at high speeds with reliability
More efficient operation (and resultantly with less heat)
In some cases, quieter operation
There have been a number of advances to hobby CNC technology and industrial technology in general that have made closed-loop steppers more affordable and easier to use. We’re excited to bring some of the new hardware into our designs.
Pricing
We expect the base price for the AltMill to start at $3600CAD/$2650USD, which comes with the mechanics, hardware, and electronics. This price does not include a spindle or router, but we anticipate that we’ll have something available at the time of shipping that would be suitable for the AltMill, such as a spindle package or our Sienci Router that is currently in development for around ($250 to 800CAD).
Because the AltMill uses a frame structure to ensure the whole machine is level and square, we are planning to have specially-made table legs that can be added to the machine to allow the AltMill to be its own standalone bench, eliminating the need for users to need to build a bench like the LongMill. We expect this addition to come as a kit for around $150-300.
Other accessories (and necessities) such as T-tracks and dust shoes will be available specific to the AltMill near the time of launch as well. Most accessories that currently exist for the LongMill system of CNC routers will be compatible – this includes things like the LaserBeam, Vortex Rotary Axis, and any of the future add-ons that pair with the upcoming SuperLongBoard controller.
Users will need to provide a wasteboard (3/4″ MDF) to be mounted on top of the machine.
Production
The AltMill is already in production and we expect the first batch of parts to arrive at the end of December. We expect to have our first working machine in February. We are ordering enough parts to build 55 AltMills and expect to yield a minimum of 50 units in this batch. We expect to have units start shipping in March or April.
50 units is a pretty small batch to start with at our scale, but since we’re not sure how much demand we’ll see for the product, we’ve decided to keep the number pretty low. I think even if we only sold 50 machines, since they are fairly simple and use a lot of off-the-shelf parts, we can keep them supported on a small scale as well. My expectation in the long run however is to be able to ship and sell around 1000-2000 AltMills per year.
Ordering
We expect to start pre-orders sooner or later based on the demand for this machine. Basically…
If people want to give us their money right away and pre-order now, we will set things up so that can happen. This would be the ideal situation since it would be less risky to invest in this new product for us financially, but be the most uncertain for the customer on when they would be getting their machines.
We launch the pre-order when we have a fully working machine so that people can see what it looks like and have more confidence in a specific launch date.
We start to sell and ship once we get all of the parts in and the design is complete. There would be a short wait time as we build and pack machines.
Let us know what you think. If you’re interested in ordering an AltMill now, please fill out the survey below.
FAQ
Technically not an FAQ, but more of an anticipated FAQ…
Will the AltMill be compatible with a spindle?
Yes, we actually believe most customers will want to default to a spindle to take advantage of the AltMill’s higher speed and rigidity. We will be working on a spindle or higher-powered router option at the time of shipping that will be able to be used with the AltMill.
Can I upgrade my LongMill to an AltMill?
No. Because this is a completely redesigned machine, there will be little to no parts shared between the two platforms.
I want to pre-order an AltMill right away. Do I need to put down a deposit?
At the current time, we are planning to ask customers to pay the full price of the machine upfront once we decide to open up pre-orders. You may change or cancel your order at any time before your machine ships.
Do I need to assemble the AltMill?
The major parts of the AltMill such as the X-axis rail and Y-axis rails will come pre-assembled, but will have some basic assembly to help keep shipping costs low. We expect set up for an AltMill to take around 2-4 hours with a basic set of tools.
Will there be a 4×8 AltMill?
At this time, and for the near future we will only be offering a 4×4 AltMill. It’s possible we may look into creating a 4×8 variant of the AltMill much later on.
Will there be an ATC (auto tool change) spindle/system for the AltMill?
It’s not in our immediate plans to offer an ATC system for the AltMill, however, this is something that could be possible much later on as we continue development on the Sienci Router project. In the short term, it will likely be possible to integrate such a system on your own since the AltMill’s controller will run grblHAL firmware which supports more advanced tool-changing features needed for these systems to function.
Will I need to connect a computer to control the AltMill?
The short answer is, yes. The AltMill will need to be tethered to a computer at the time of launch. That being said, some of the development to move the computer onto the board or for us to provide a separate computer module applies that we’re working on with the SuperLongBoard for the LongMill, so we expect at some point, we’ll have a more integrated system for the AltMill. Currently the options we are assessing are expected to cost around $200-300.
Happy Friday! Thanks to all who entered this week’s contest, showcasing your LongMill hosting/entertaining projects.
Last Week’s Winners
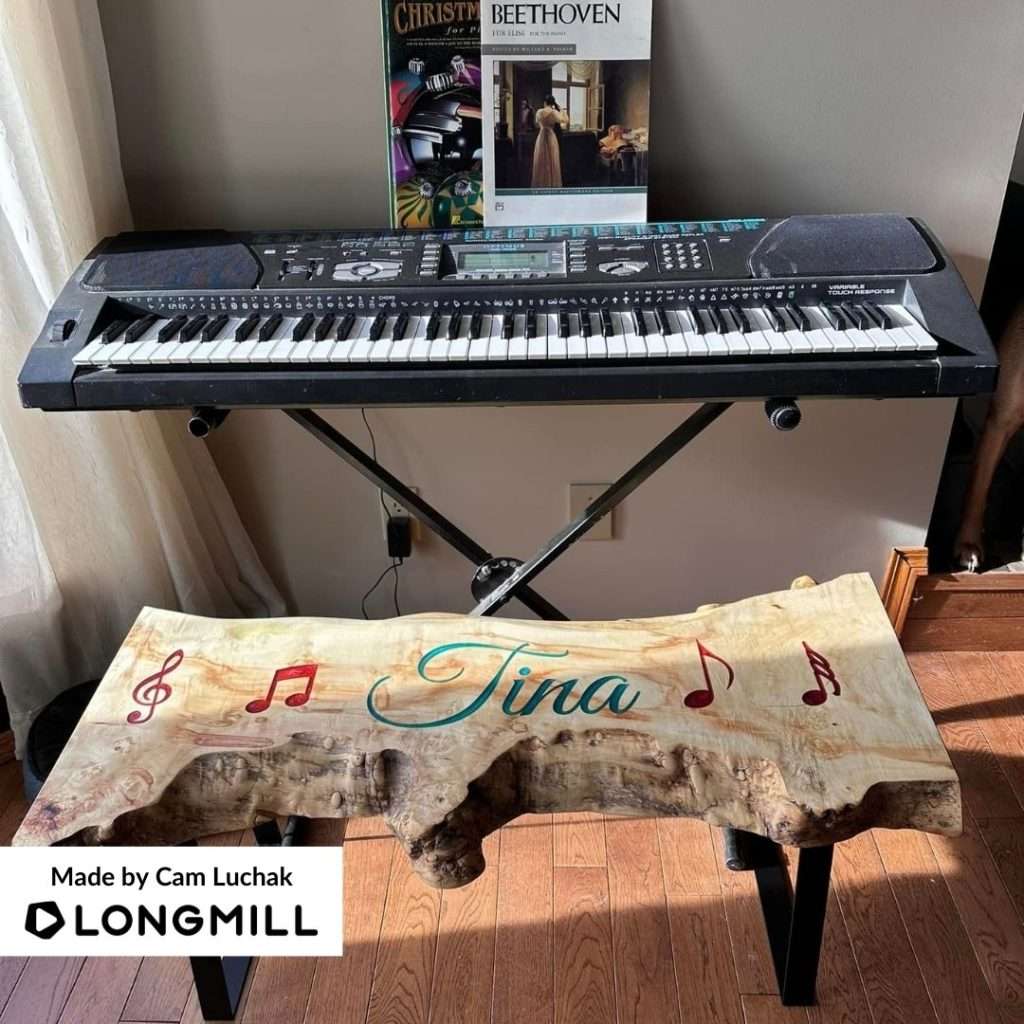
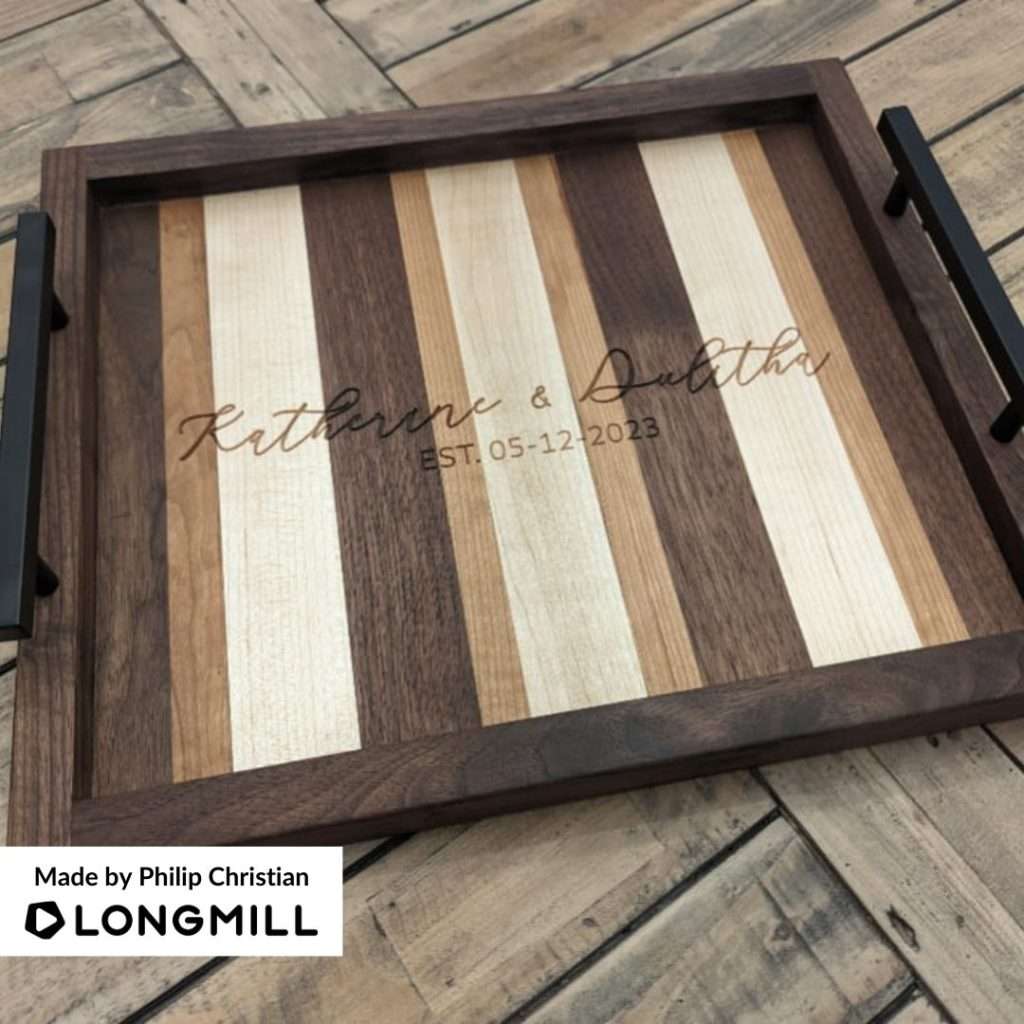
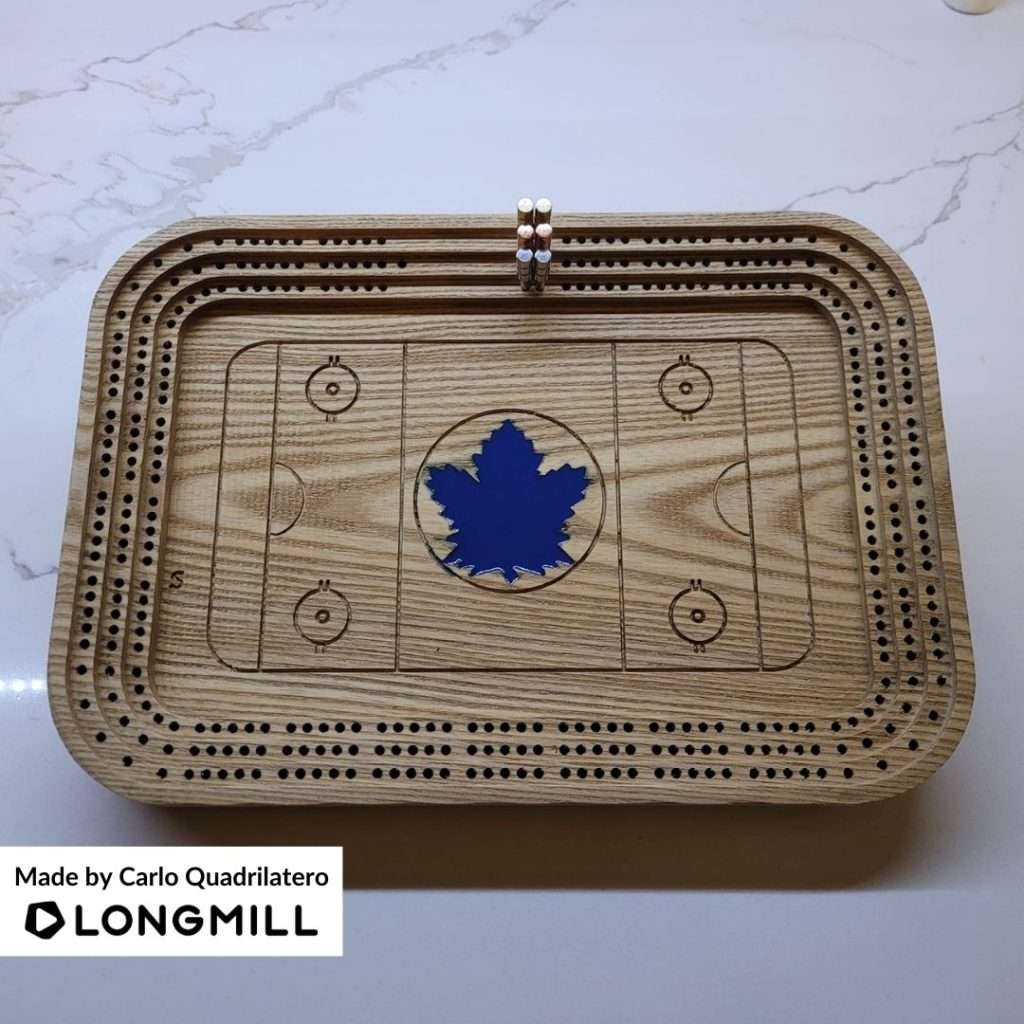
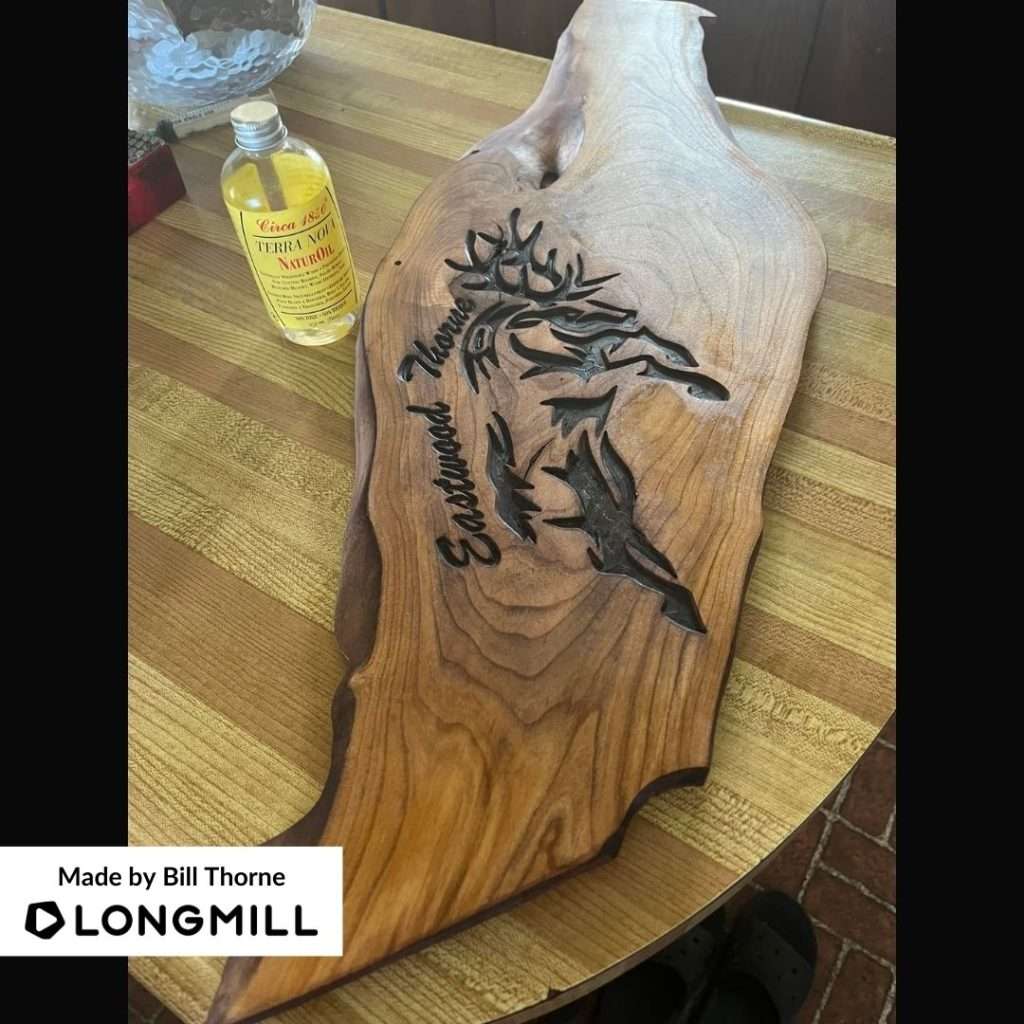
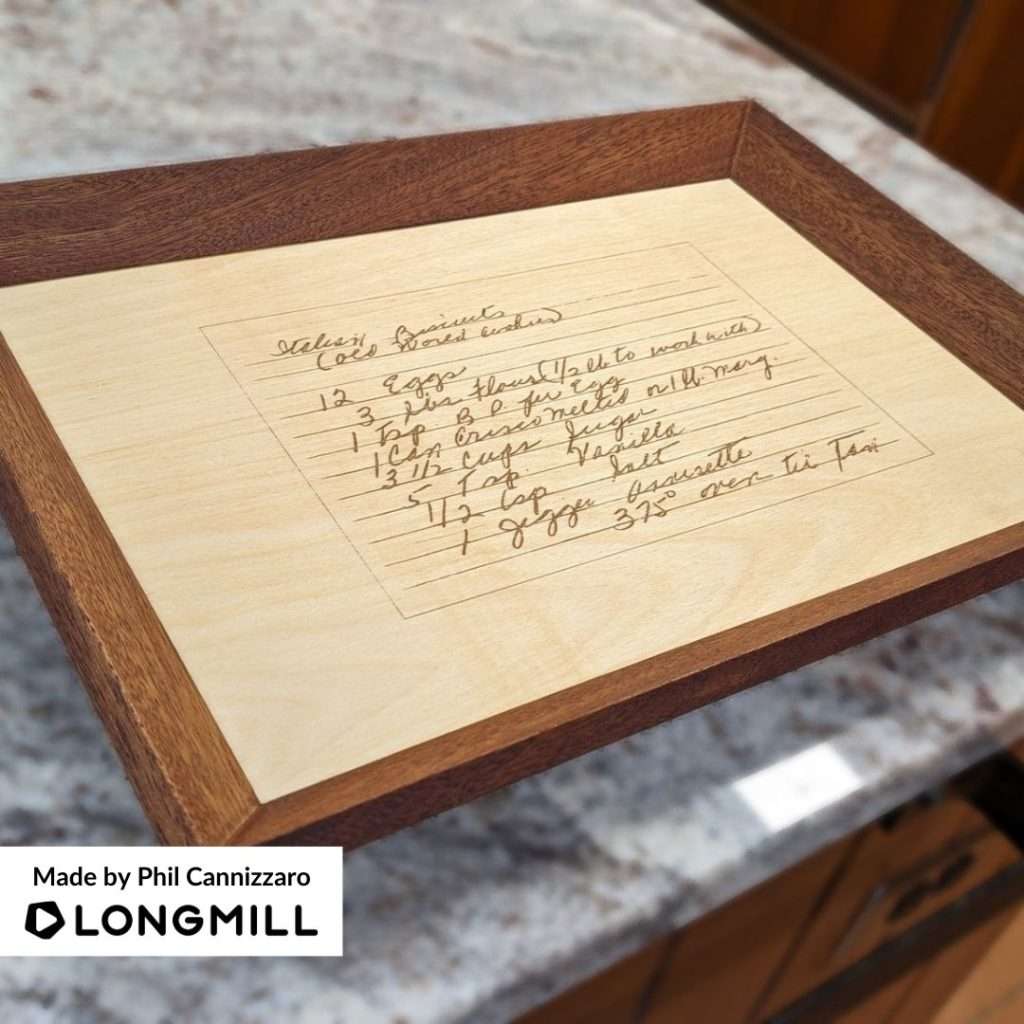
We are happy to announce that Cam Luchak, Brooke Piercy, Philip Christian, Carlo Quadrilatero, Bill Thorne, and Phil Cannizzaro are the winners of the latest projects contest. A prize is on its way!
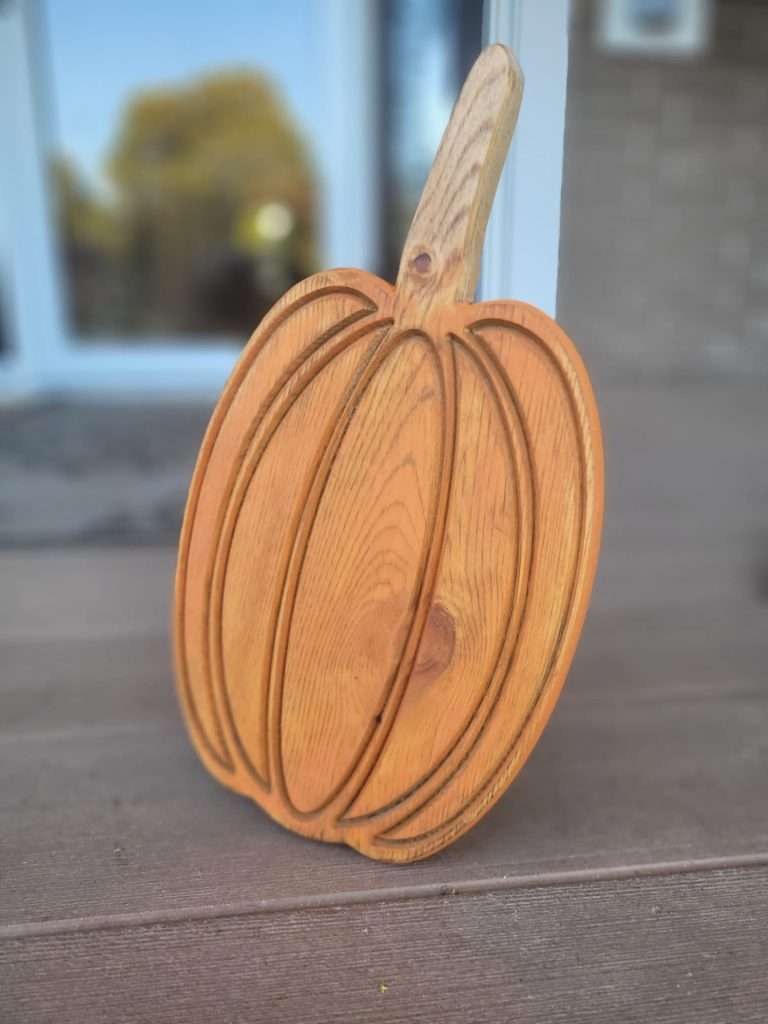
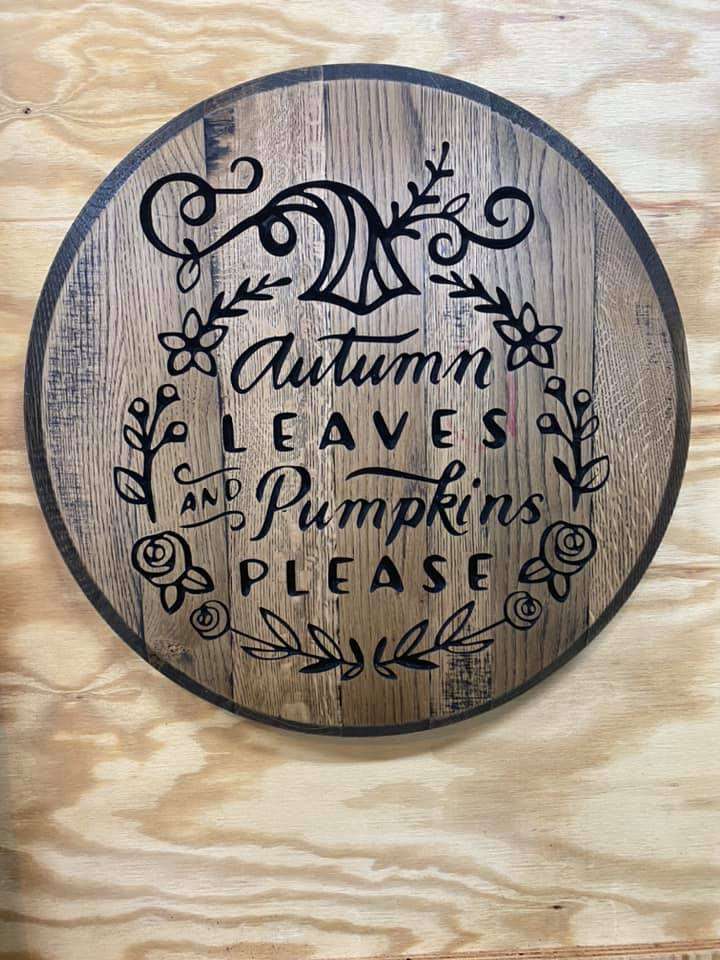
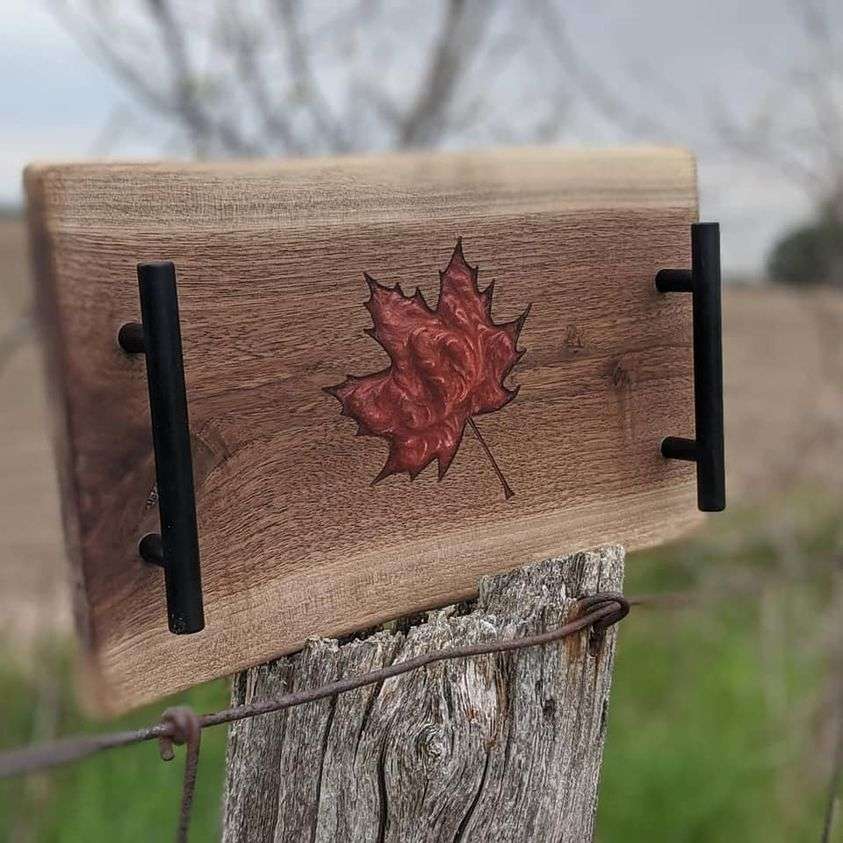
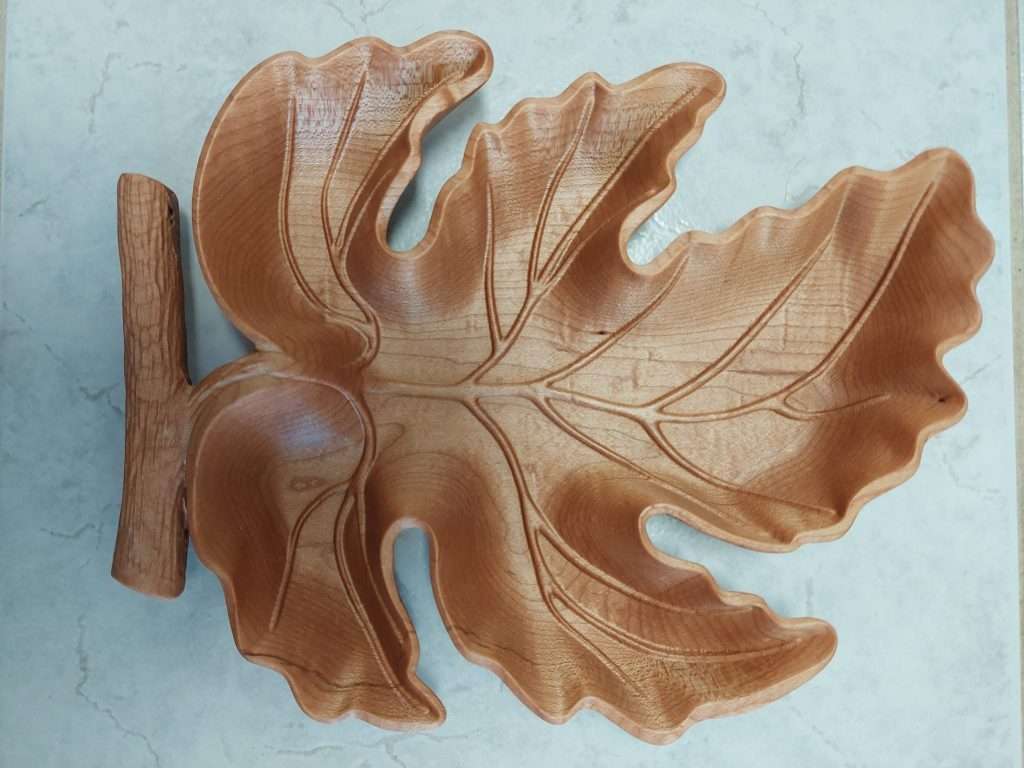
This Week’s Theme: Autumn/USA Thanksgiving Projects
Happy Thanksgiving, neighbors! We’re reviving the Autumn/Thanksgiving theme. Share your fantastic LongMill projects inspired by the season, and we’ll pick our favorites to send some cool stuff your way.
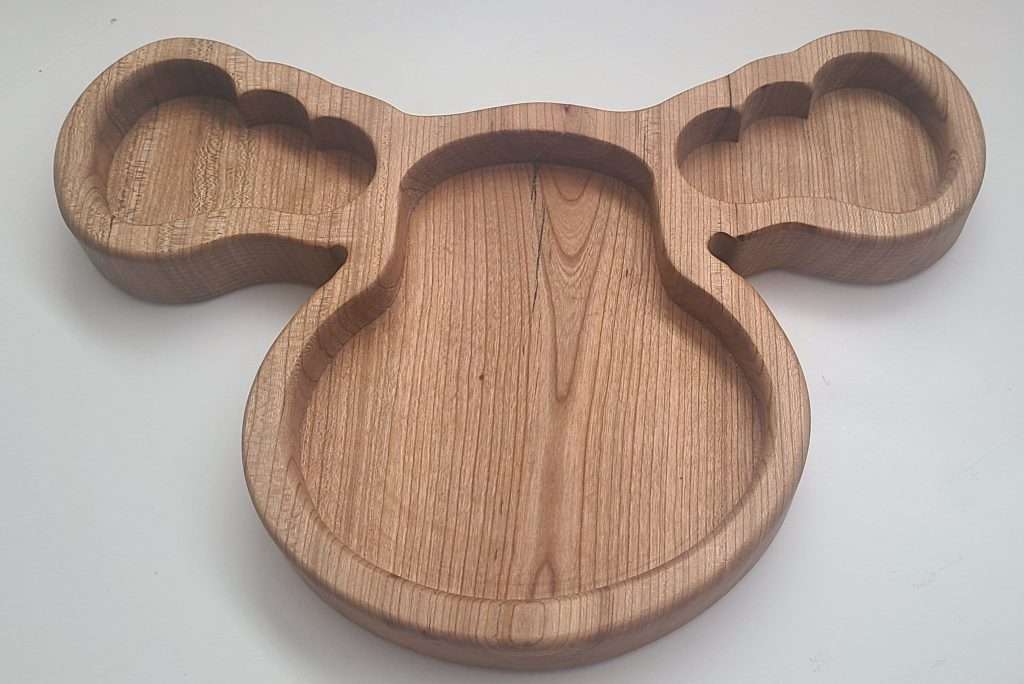
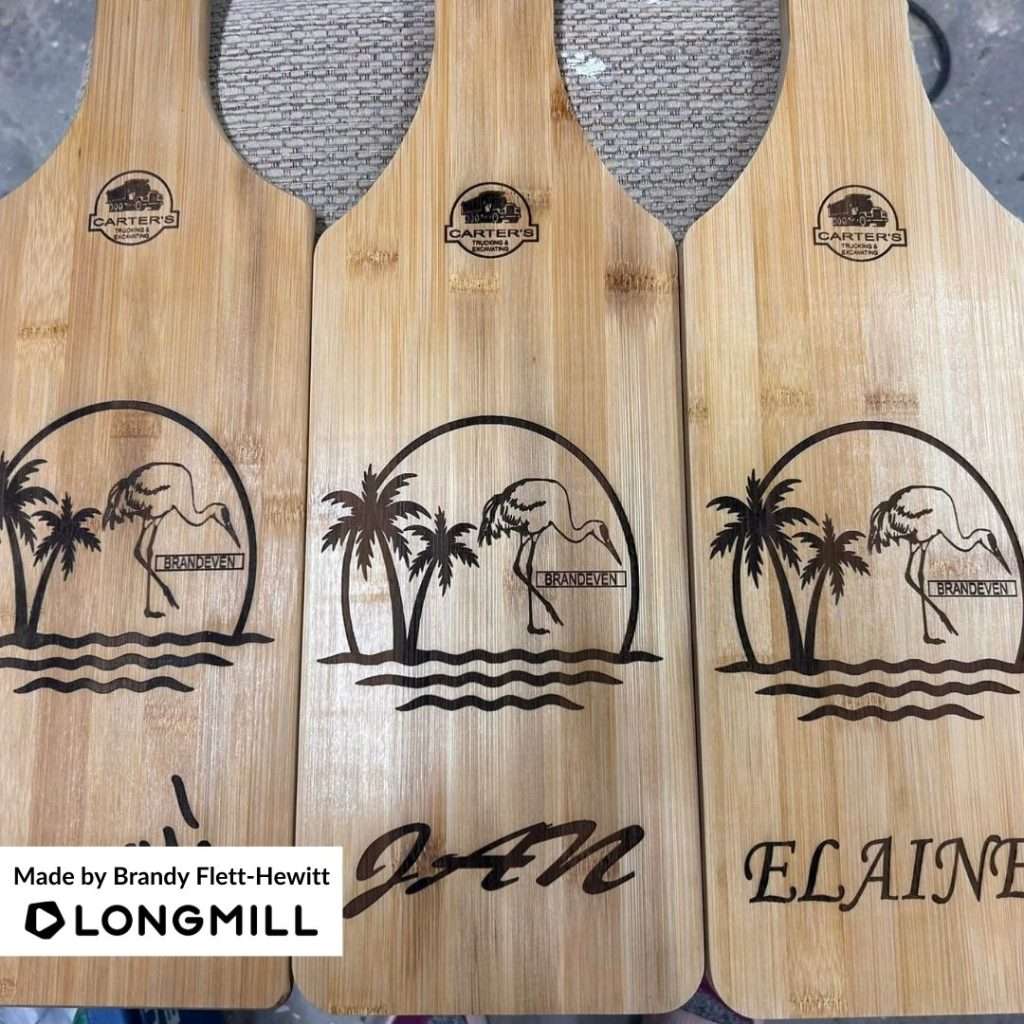
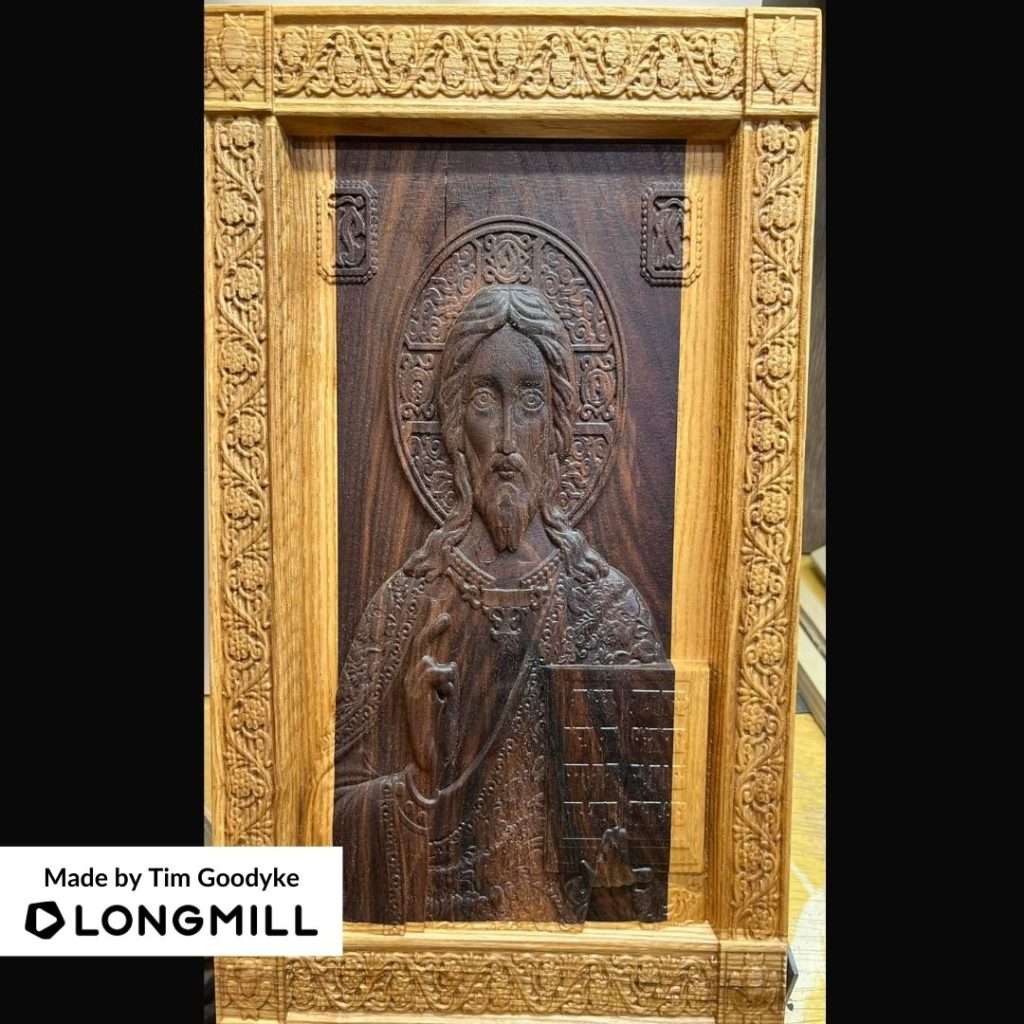
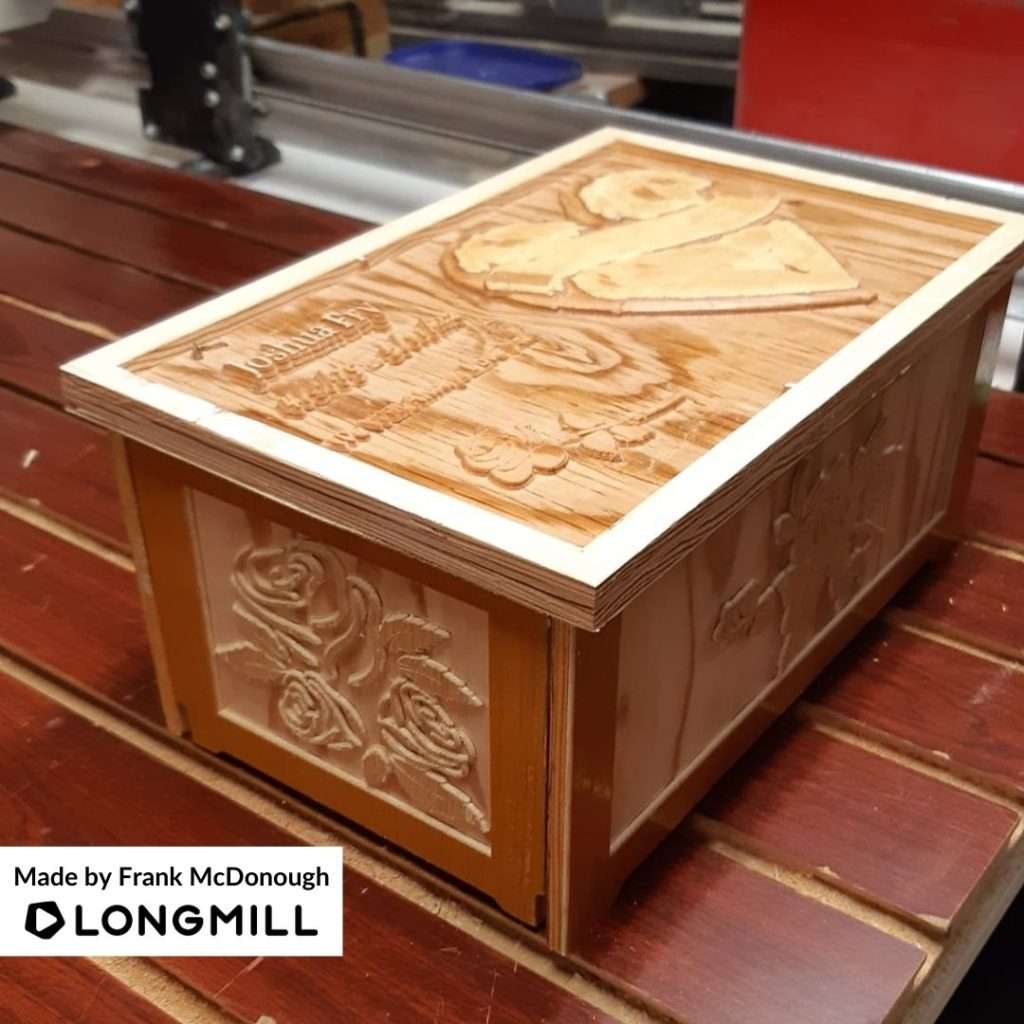
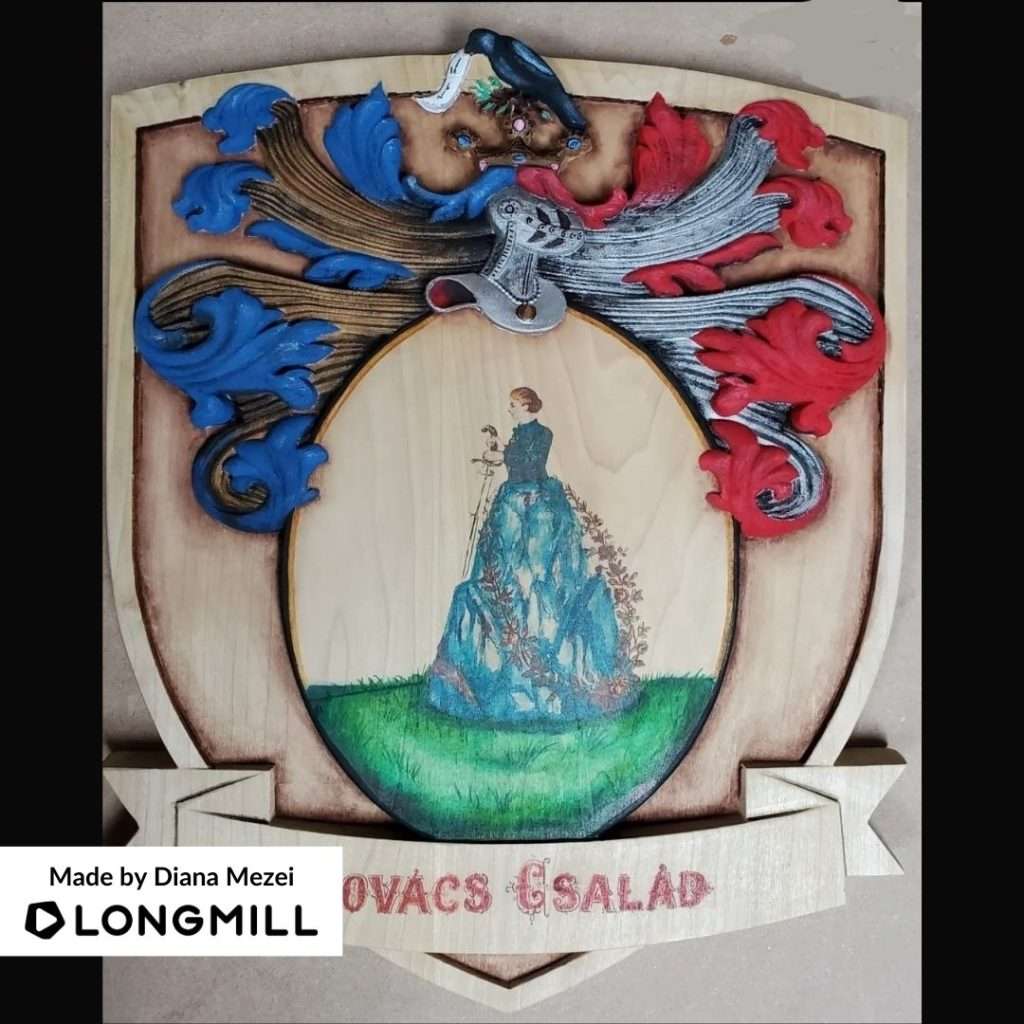
Hey everyone! Big shoutout to those who shared their latest LongMill projects.
Last Week’s Winners
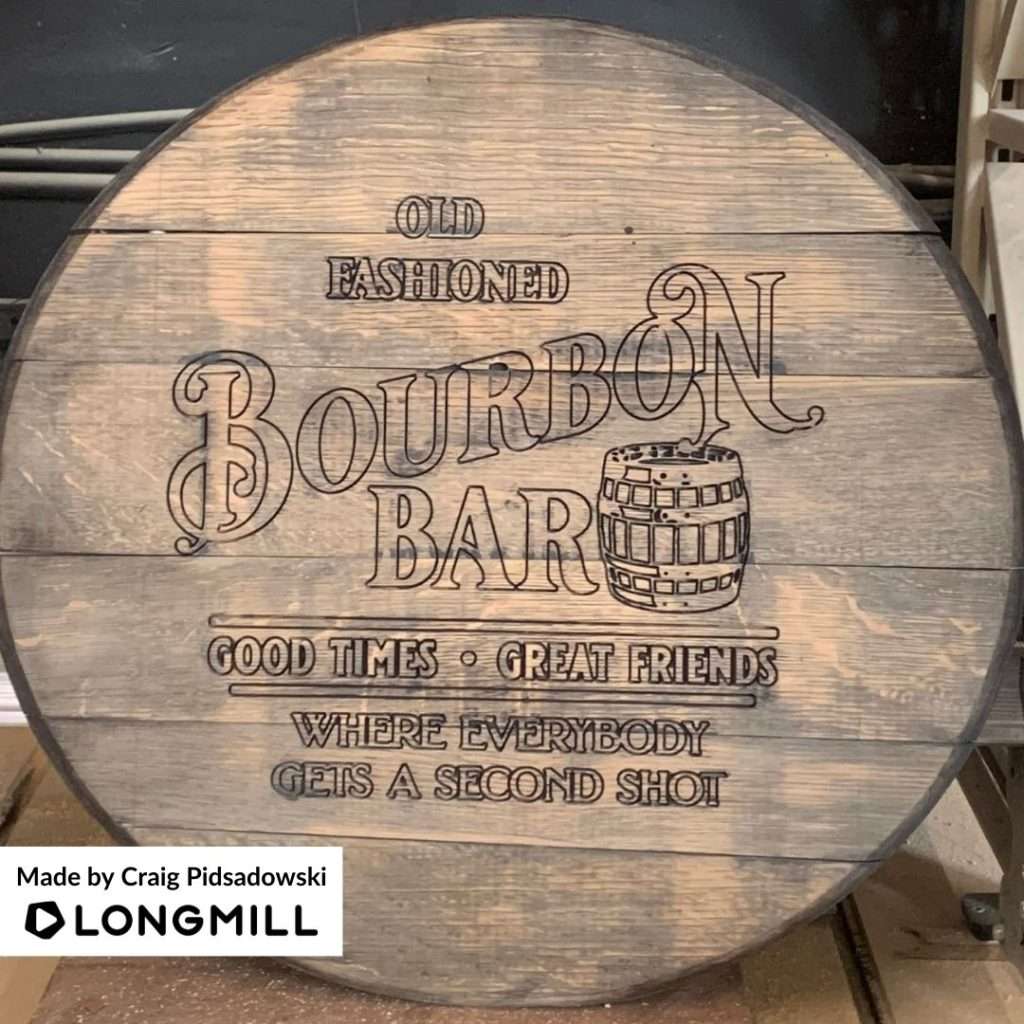
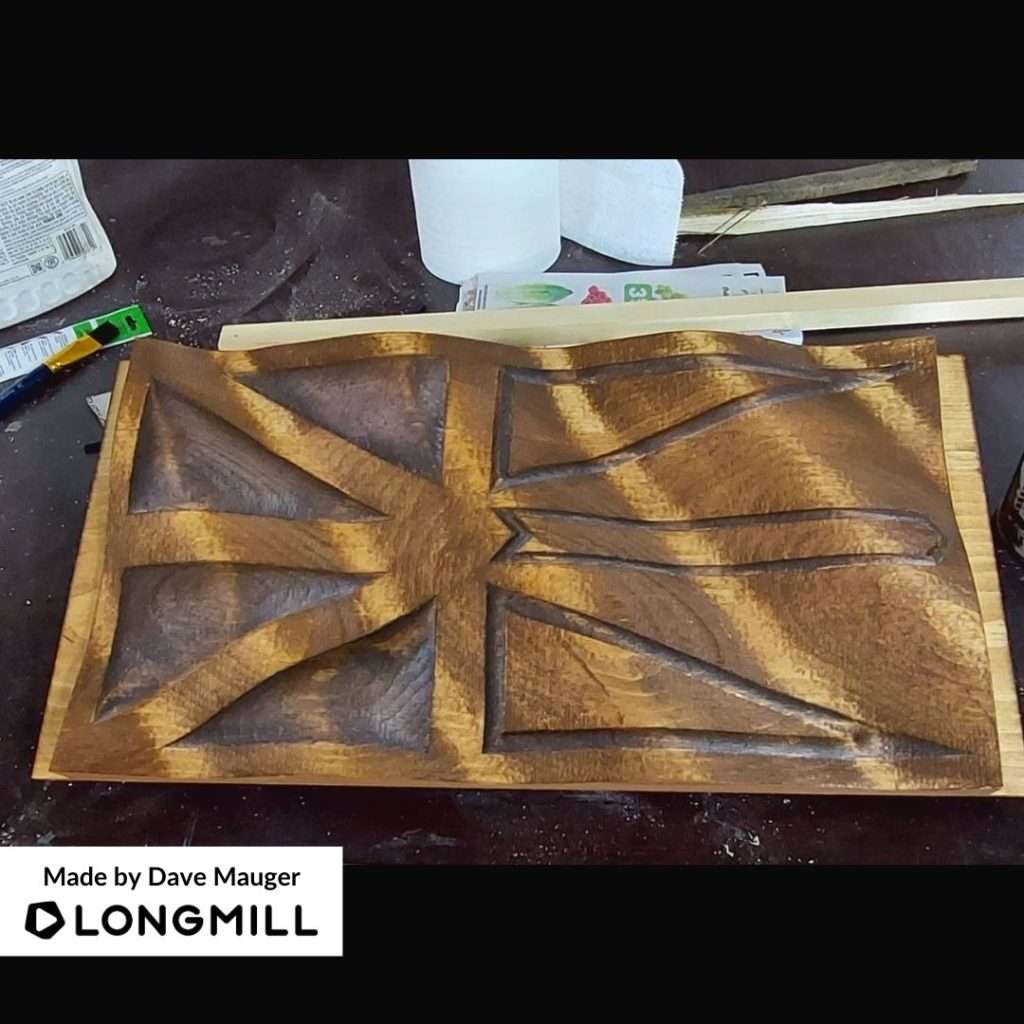
We are happy to announce that Brandy Flett-Hewitt, Tim Goodyke, Frank McDonough, Diana Mezei, Craig Pidsadowski, and Dave Mauger are the winners of the latest projects contest. Look out for a prize!
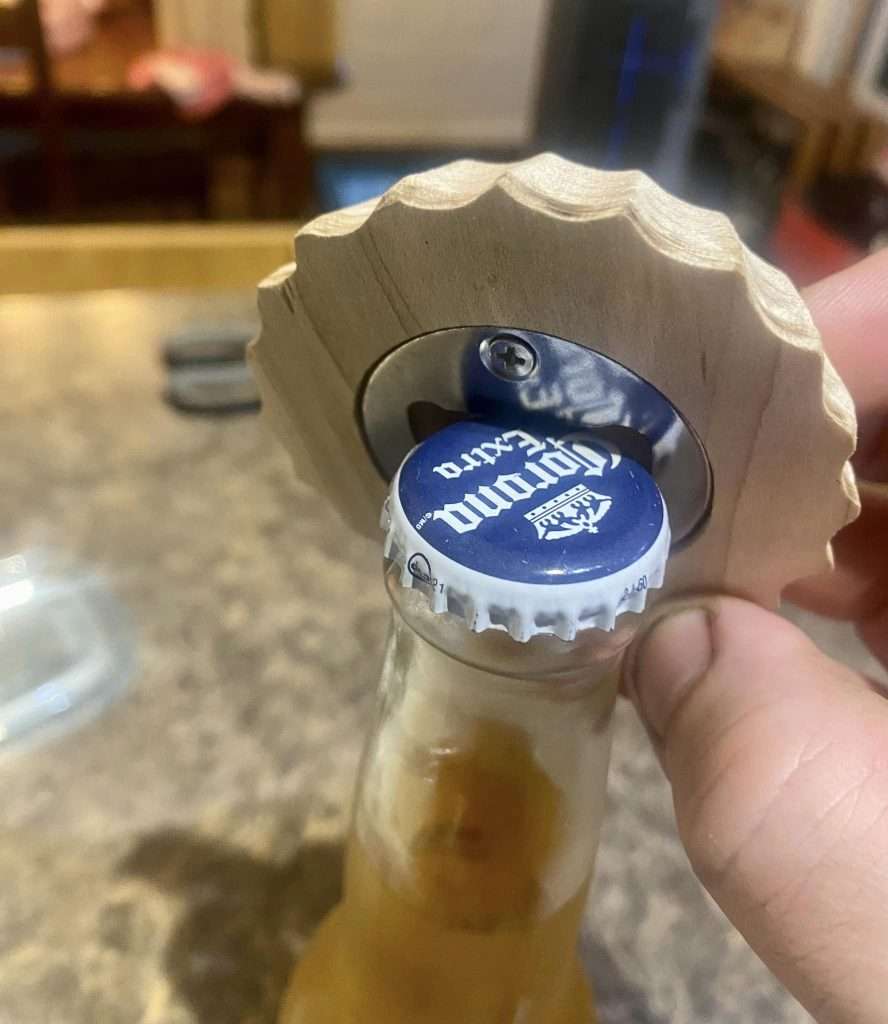
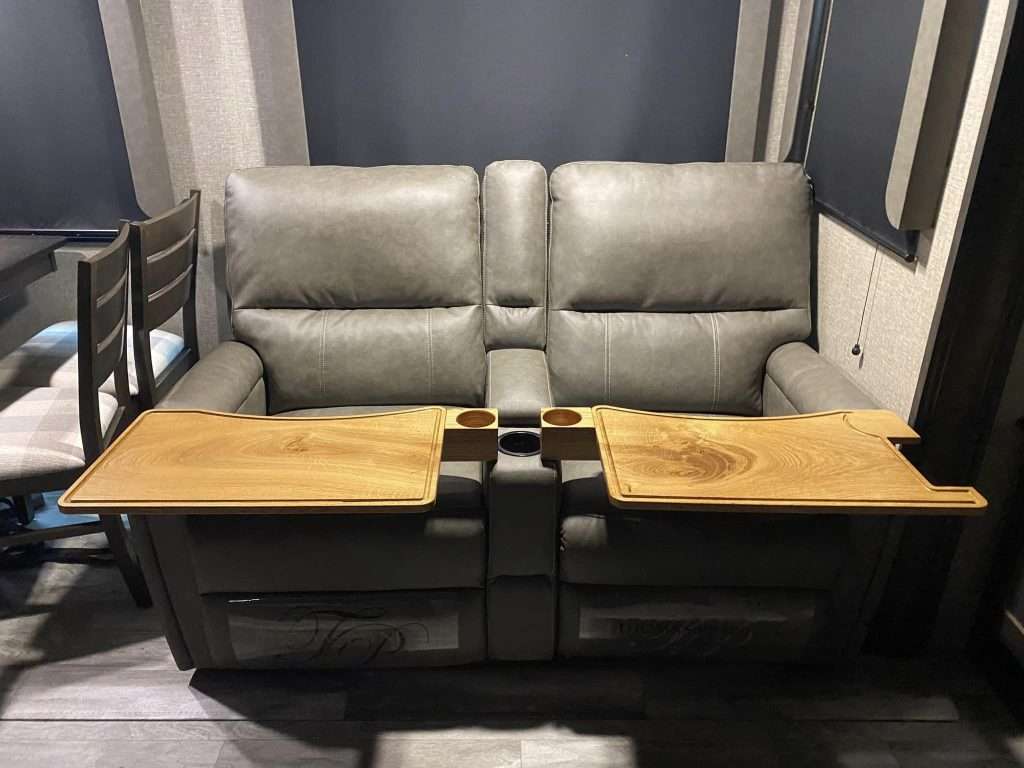
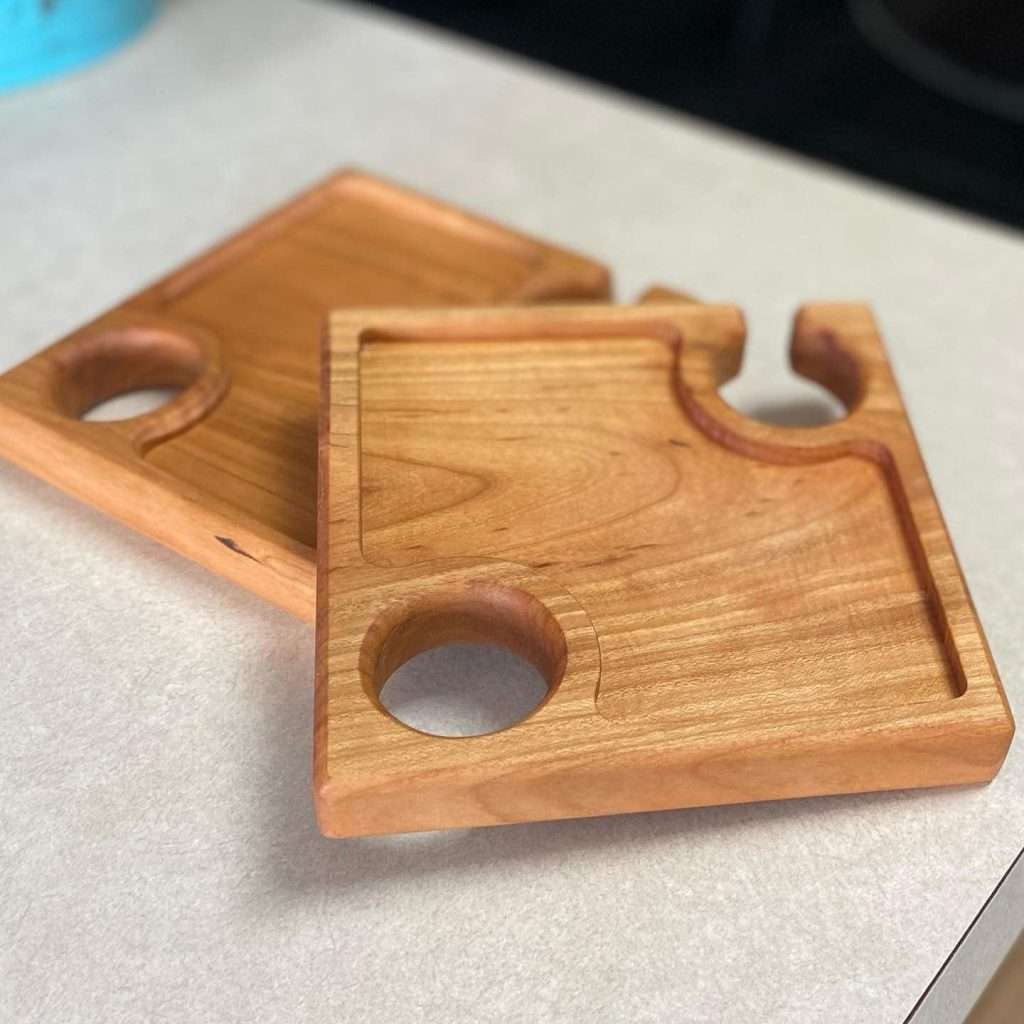
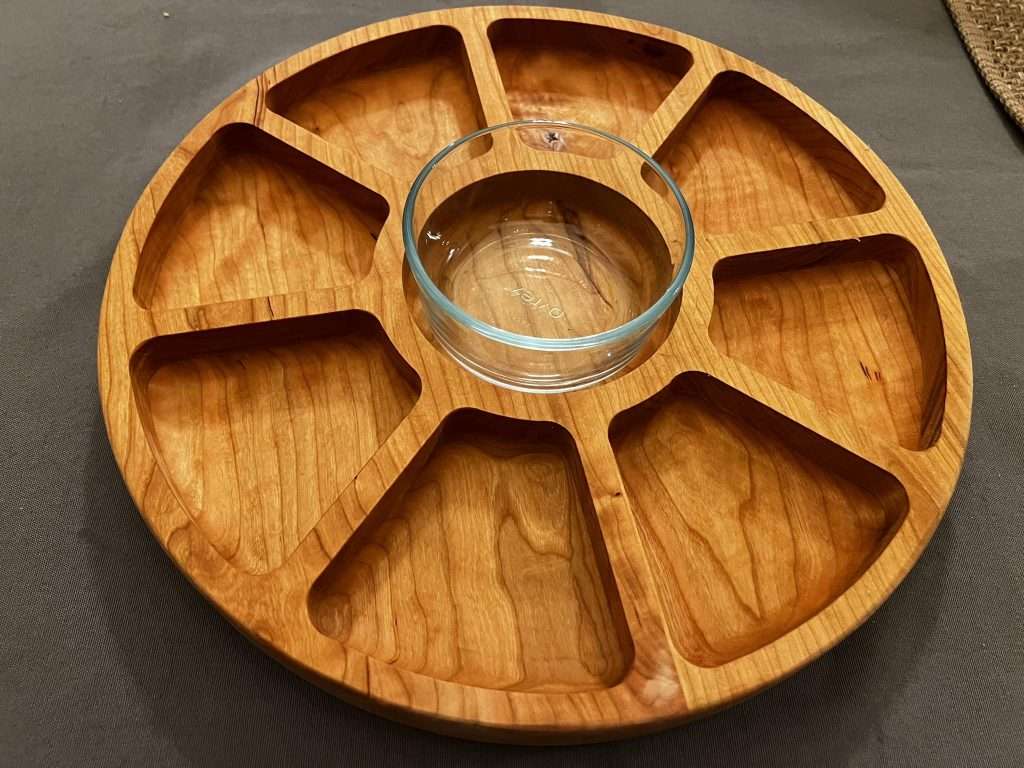
This Week’s Theme: Hosting/Entertaining Projects
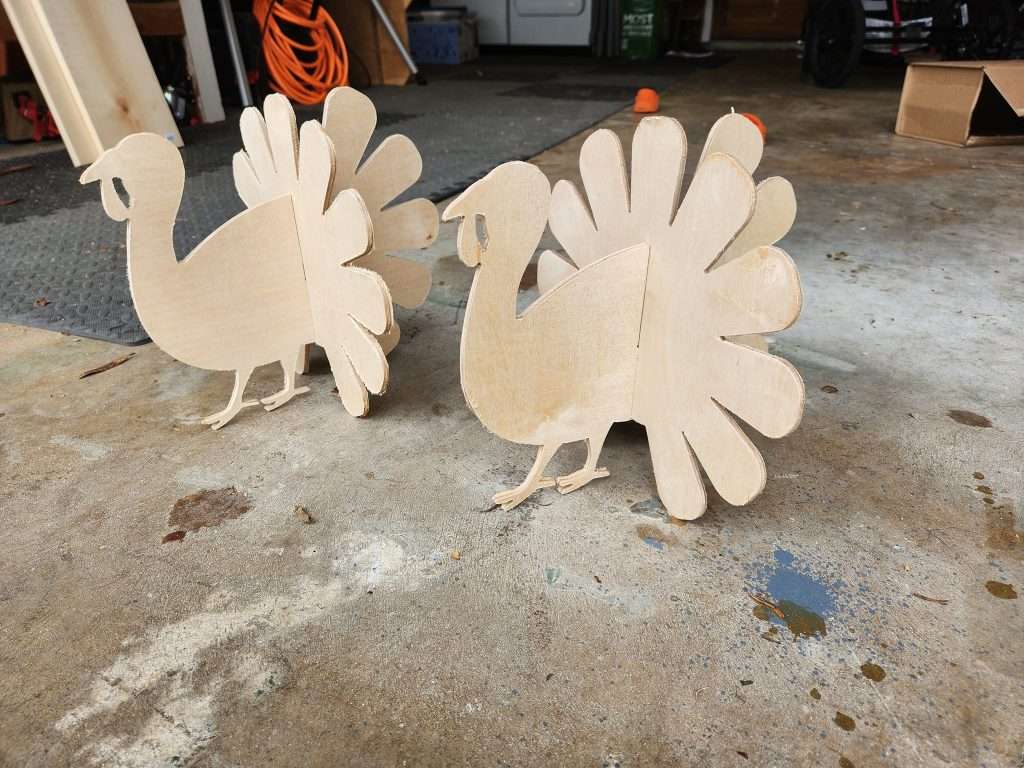
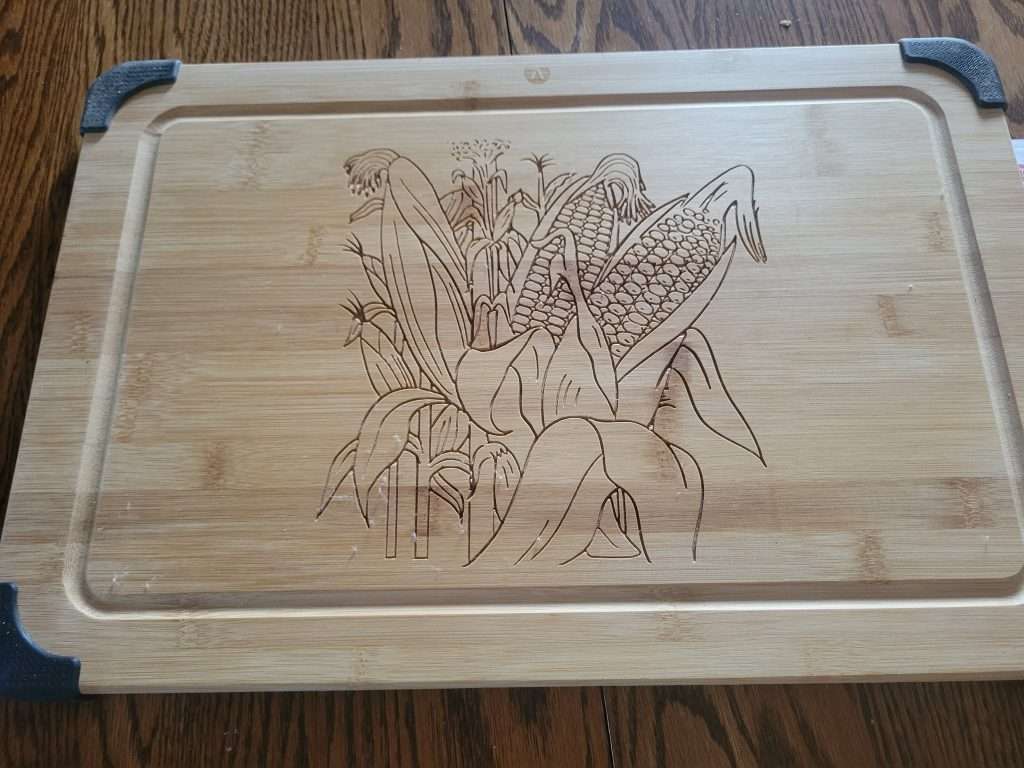
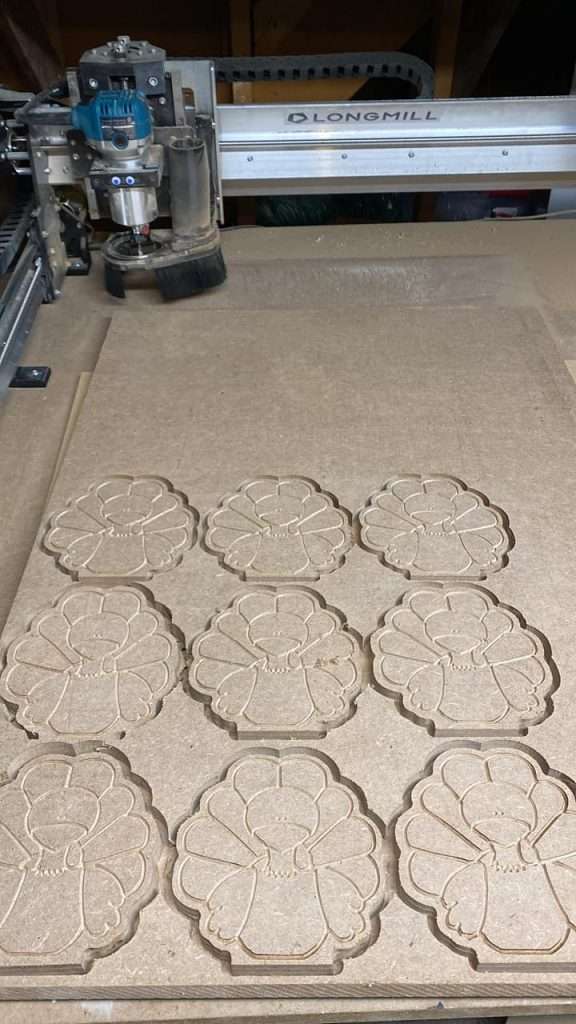
This week’s theme: Hosting/Entertaining projects! Share your LongMill creations—beer stands, coasters, speakers, TV setups, serving trays, charcuterie boards, beer openers, games, and more. Our favorites win free prizes!
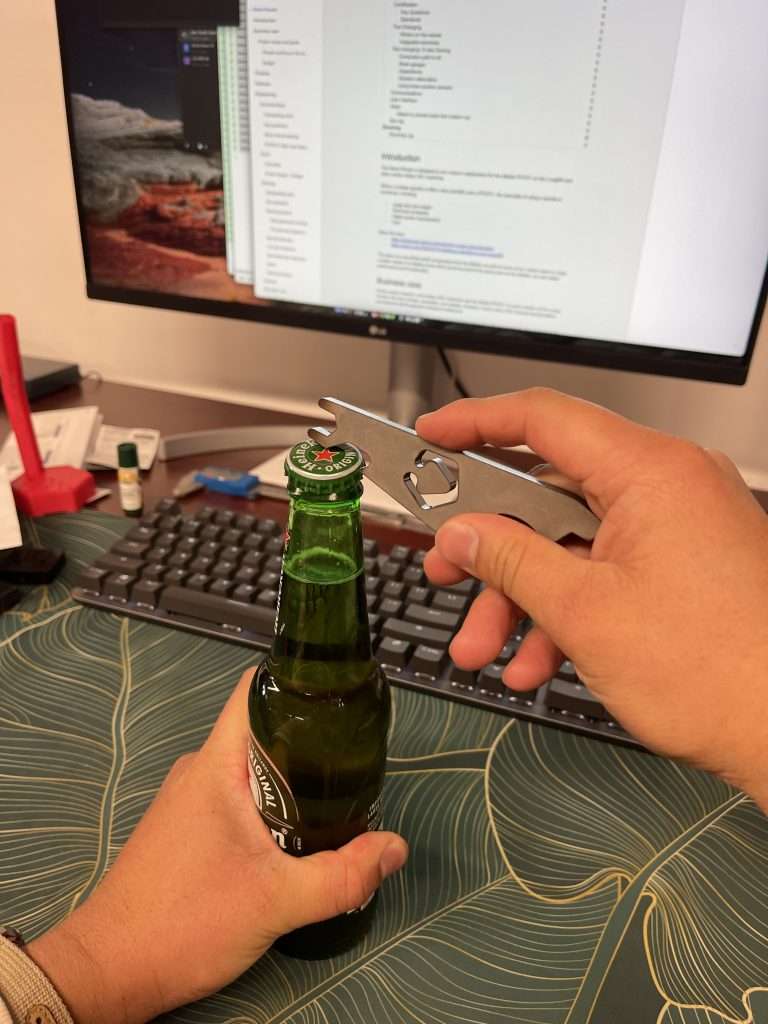
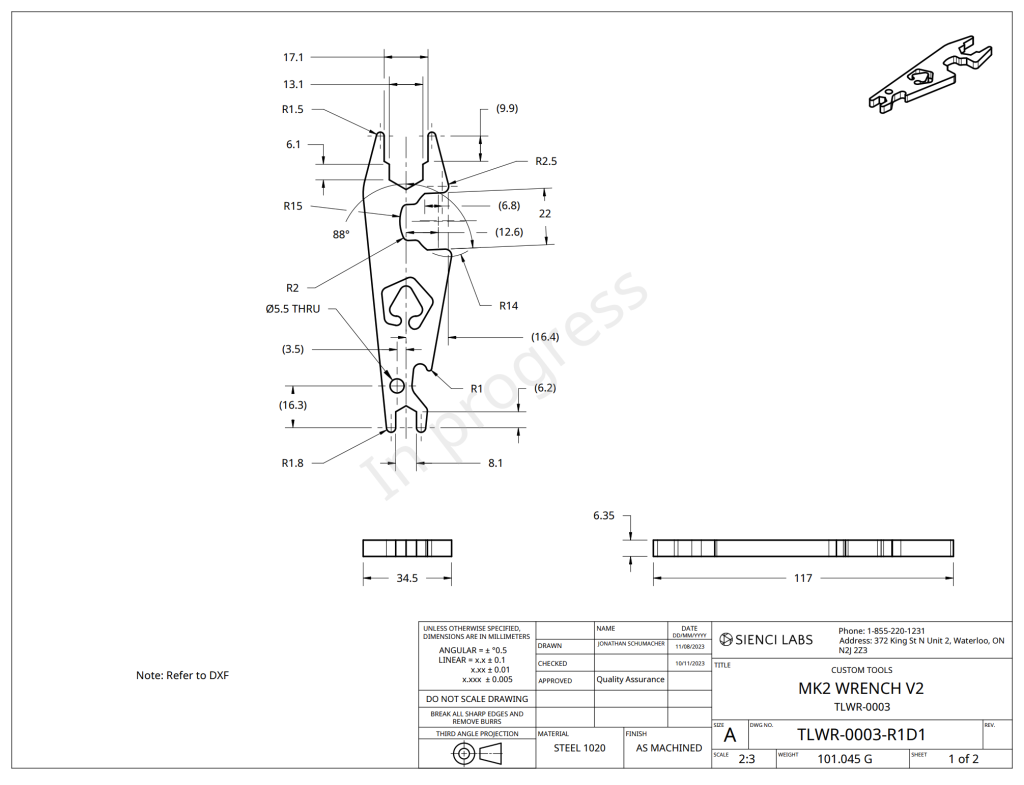
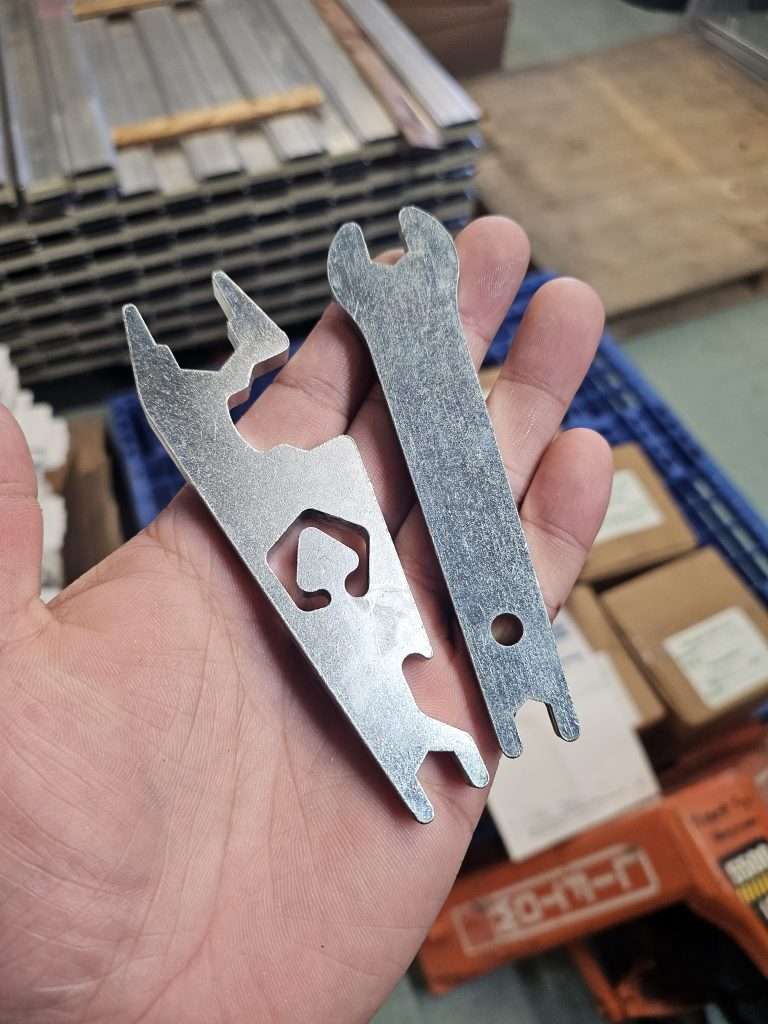
Hey everyone! We have a small change we’ve made to one of the key components to the LongMill that we’ll start shipping for machines going out in the next few weeks.
For the uninitiated, every LongMill comes with a “Maintenence Wrench”. We include this in every LongMill kit as a tool for assembling the machine and adjusting things like the ACME locking nuts and eccentric nuts. Every LongMill comes with a wrench and a set of Allen keys for assembling the machine.
Functionally, the new wrench remains the same but with the biggest difference being:
Adapted to fit new ACME locking nut hardware
More ergonomic shape
And most importantly… a bottle opener!
We hope that small improvements like this make a big difference in your enjoyment of the LongMill.
Also, it looks like the hanging hole got missed…but should still be functional the way it is, but we’ll have to fix that in the next batch.
New wrench on the left, old (V1) one on the right. V2 not shown