Hey everyone. Thanks for following along in the development of our new generation of CNC machines.

As we discussed in our previous blog posts, we’ve been working on making our own custom extrusions for a new generation of LongMills. Just to recap, here are some of the improvements that the new extrusions should bring:
- Improved weight to rigidity, as well as improved rigidity overall
- Lower number of parts and overall ease of assembly
- Ability to extend the working area beyond 30×30 inches
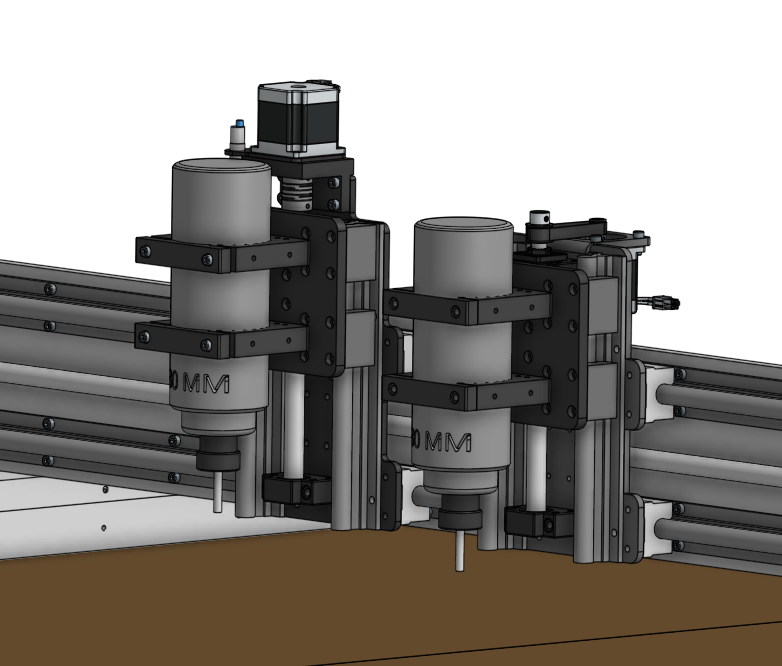
We’re excited to share that we’ve put together our first machine with the new parts and gantries to make a fully working prototype. We’re really happy with the way it’s come together as well as the overall fit and finish of the machine. Now that we’re at this stage, we have a couple more steps towards launching the product.
Beta testing the MK2 30×30
Now that we have parts ready for the 30×30 version of the LongMill MK2, we are looking for beta testers to test the machine between November 2021 and Jan 2022. We are looking to get beta testers set up with machines as soon as possible. If you want to sign up as a beta tester (only for the 30×30 model, you can fill out the form here:
What does “beta testing” mean?
Beta testing involves the process of testing and using a product in a real-world environment before mass production or general release. In our case, the LongMill MK2 platform is a new product that has been active in development. While we are confident in the performance of the new machines, we feel that it is important to get it into the hands of real users to obtain feedback and information about how well the machine performs, how it works, and potential issues that may happen in manufacturing and production of the final product. We also want to identify users and use cases for the product to help us target our machines to the right people based on what you do during the beta testing period.
As a beta tester, your responsibilities are:
- Put your beta machine through the paces
- Report back to us with feedback on a regular basis
- Let us observe and test your machine
- Share your learnings and testing with the community
As the company providing the beta machine, our responsibilities are:
- Provide you with one-on-one technical support for your machine
- Help you set up your machine (either in person or virtually)
- Provide you with updated parts to ensure your machine aligns closely with the final production version
There are several differences that you may see between the beta testing machines and production machines.
- Some parts will be uncoated, such as the gantry plates and aluminum parts
- Machines will either be partially assembled or come in non-production ready packaging
- Some parts may be off the shelf components not from our regular manufacturers
Once beta testing is complete and we begin production for completed units, we will provide you with updated parts to bring you to spec with production machines.
Pricing
We charge for our beta testing machines. We believe that is the best way in vetting between folks that are purely looking for a discounted or free machine and folks who truly need or want a machine. It is our top priority to work with beta testers that will find true value from owning a CNC machine and using it long-term. We ask beta testers to ask themselves “if this was a product I could buy now, would it bring enough value to me to warrant the amount I would pay?”.
If you’d like to hear some interviews from our former beta testers, please check out our channel here:
The LongMill MK2 30×30 serves as the successor to the original LongMill that we started shipping in late 2019. This version of the machine offers simpler, but more rigid construction, and is a great entry into the world of hobby CNCing.
Pricing:
The pricing for the beta LongMill MK2 30×30 will be $1500CAD, plus applicable taxes.
The production price will be $1800CAD at the time of release.
What you get:
- A full, LongMill MK2 machine with a working area of 30×30 inches
- Our one-on-one technical support and set up assistance
- Parts to upgrade your machine to production level spec at release
Talking about the now (and the later)…
I’d like to talk about customer perception and management of the release of a new product. The elephant in the (my) room, is the fact that while the LongMill in its current state is awesome, the new one is going to be even more awesome. If you are an older customer, I’m hoping that you’ve been enjoying using your machine and feel that you’ve gotten the value out of your machine. For new customers, I suspect that some folks are either possibly feeling that 1) maybe they should have waited to get the new version 2) worried about losing support on the current version.
To address the first concern, the reality is that as time goes on, our machines are going to get better. Even between the first generation of machines, we’ve made a lot of changes to make the machines better. The machines that we ship today have many changes and improvements, and we pride ourselves to build the best machines at reasonable prices. The point is, if you use this logic forever, you’ll also be waiting forever to get a machine. The real question should be, is this the best time for me to get a CNC machine?
We also have to talk about the change in price. The original LongMill 30×30’s base price is $1500CAD. The new one will be $1800CAD. We are increasing the price of the machine for a couple of reasons.
First of all, we need to address increasing costs, inflation, and instability in prices over the last two years. We have not increased the price of the LongMill since 2019. We also have not increased the price on most of our parts, consumables, and other items we sell. Because of our growth, we’ve been able to keep prices for our customers the same while being able to negotiate lower prices with our suppliers due to our economies of scale, we no longer see better cost breakdowns at our scale to significantly make up for lost margin of prices going up. We also continue to increase the pay and benefits of our staff. We believe in providing an excellent workplace environment and reasonable pay, but we also need to account for these costs as well. The $300 difference addresses the increased costs of the materials that go into production and ensure that we have the profits to pay our employees well.
Second, the price difference accounts for the performance difference between the two machines. The MK2 is a more rigid machine, and it costs more to make. At this point, we offer a bit of a choice between the two machines with their respective price points.
And lastly, when customers choose to purchase from us, Sienci Labs, they are also investing in our company and the development of new technologies and products. For example, a bit portion of our profits go towards building and supporting gSender, which now is open for use for free for all hobby CNC users. We also have a bunch of other cool stuff coming down the pipeline that the money goes towards to as well. We want to make sure our pricing is in line where these developments are sustainable in the long term and we can provide our team with the funding needed.
To address the second concern, we’ve made a lot of the two machines inter-compatible and backwards compatible. I go into a lot more detail in the last blog post: https://sienci.com/2021/10/15/altmill-and-longmill-survey-results-and-development-progress/, as I cover more pros and cons of this change. Wear components, such as v-wheels, ACME nuts are the same across both machines, and both machines also share the same electronics, power supplies, bearings, linear guides, motors, locking nuts, couplers, and more. We will have parts and services available for both generations of machines, as well as a stockpile of parts on hand. We can also make 3D printed components as needed, so we don’t expect any issues there either. Since the underlying software and electronics remain the same as well, all of our software will continue to be developed with both machines in mind.
To also note, for some people who might be wondering, making a dedicated kit to swap out rails and gantries to change a current LongMill to a MK2 is not our priority. We don’t think the extra cost doesn’t justify the real-life increase in performance, we don’t want to create a lot of extra waste, and if a machine is already assembled, most of the benefits that come with the faster/easier assembly is never realized (since you have to take apart and reassemble a machine). We will still offer individual parts on our store for customers (as we already do), so folks can make up their own mind. I’d also like to note that there WILL be a kit to use the original LongMill and add a longer X-axis (48×30 in the working area).
So in conclusion, if the LongMill at its current design and price point works for you, and you’re thinking of ordering a machine, this is a great time to do so. If you want a bit more rigidity and have a larger budget, the MK2 may be the better option. But regardless, you’ll still be getting a fantastic machine, and I would recommend making your decision based on your personal timing of when you want to get into CNCing.
Availability
The LongMill MK2 30×30 is expected to launch in mid to late January 2022. Pricing for the 30×30 model will be $1800CAD.
Please stay tuned for when orders will open up, and pricing for other size models.